Jump to content
  • Articles

    Our website articles

    Creating texture with thread cuttings

    By Irina, in Machine embroidery materials and technology, , 1 comment, 3,016 views
    Original text by Marina Belova 
    Once in the Stitch and Print magazine, I saw the photos depicting and interesting way of creating an unusual embroidery surface — thread cuttings are placed on the fabric and then covered with Tatami fill of a very low density, to hold them in place, and after than a design is embroidered over it. Now I've got to try it, at last. Unfortunately, there was no guide in the magazine. Therefore, I decided to reinvent the wheel on my own. 
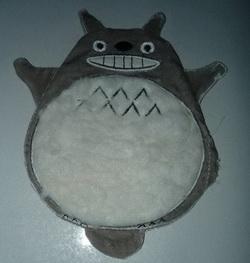
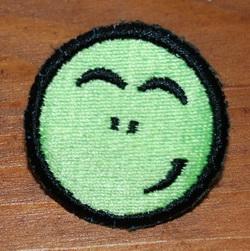
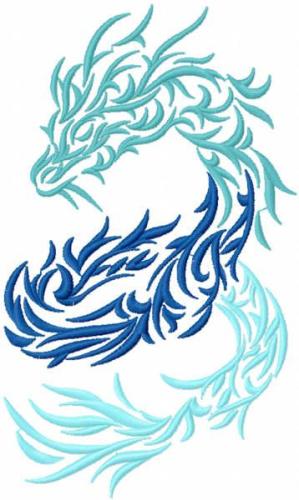
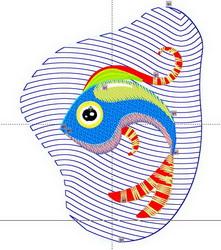
    Here is what I got as the result: 

    This technique can be used for imitating water, sky or grass. You never know. Only I doubt that you can decorate clothes in such a way, for it is unlikely that this technique can endure repeated washing. 
    In order to create this fish I digitized the design: the blue stain behind the fish is where the thread cuttings were to be attached to the fabric: 

    The fill was nothing unusual — density value was 3 mm and stitch length was 3.5 mm. 
    Then I wound old threads on a piece of cardboard, thought it would be more convenient to use knitting threads, but I didn't have any in my cottage, therefore, a piece of cardboard would do. I used 2 colors because it seemed to me that it would be better that way: 

    Then I cut the threads on one side: 

    And got this beautiful tufty heap: 

    Then I started embroidery: I hooped the fabric and the stabilizer and loaded the design. The outline was embroidered first, showing me where to put the threads: 

    Now I could create my background. At first, I just laid the threads onto it: 

    But short after I began the embroidery, I understood that it wouldn't do: the foot shifted the threads, they pushed through the hole in it and got tangled. So it was downright pandemonium and not the embroidery: 

    So I had to spray the thread cuttings with the temporary spray adhesive and also put a water-soluble film on top; after that everything became much better: 

    Here it is with the fill securing the threads already embroidered: 

    Then I embroidered the rest of the design: 

    I solved the water-soluble film and ironed the ready item. 
    It is as easy as it looks. And what's most important, this method can be used with any design if you wish to do so. One last thing: you can use knitting threads instead of embroidery ones, or several threads of varying thickness, color, shine, and texture, then the resulting effect will look more interesting. 
    P.S. Only now a thought popped into my head: if you embroider fractal or stipple fill instead of Tatami and use multicolored threads, the effect will be even better. 

    Embroidering an Easter egg holder

    By Irina, in Machine embroidery materials and technology, , 0 comments, 2,600 views
    Original text by Marina Belova 
    I've been long been using Criswell catalogs as the source of ideas for machine embroidery. Criswell is a rather well-known website, where you can buy ready machine embroidery designs, mostly the FSL ones. Or, if not buy, then, at least, look at them to adopt new techniques. 
    So, in these catalogs, there are wonderful holders for Easter eggs and Christmas balls. There is too late now for Christmas balls, perhaps — we'll leave it for the future. But it's about time for Easter. To cut a long story short, I decided to make something similar, not in the FSL technique so as not to spend a lot of time, but something simpler on organza, which is a lot easier in terms of design creation. 
    What I got as a result was this egg suspender, which can be used as a present: 

    The design is based on simple rules of geometry and is completely unpretentious. At first, I thought that I would need a particular pattern for the holder that involved development drawing of an egg, but then I tried to do without it. After all, the areas between the sections are sufficiently large for the embroidery to mold to the shape of a three-dimensional object. The size, of course, was changed in accordance with the size of my egg. Here is my sketch drawing for the future design: 

    I created a design for it: 

    The rest was easy — I hooped only the organza and made sure it was drum tight. 

    After that, I embroidered the entire design: 

    We've how come to the most boring step — trimming the organza along the perimeter of the embroidery. If I was embroidering lace on water soluble stabilizer (as in the original pattern), it would have fallen off of its own accord. But with a little patience I managed to do it: 

    Then I cut the holes at the ends of columns so as to insert ribbons in them, singed the organza fibers with a lighter and sewed up the resulting ribbon manually in two places. This, literally, took several stitches. Then I cut away 2 small pieces of ribbon and passed them through the eyelets, top and bottom. I tied the bottom ribbon in a bow. 

    After the it has been tied I put an egg into the holder and tie the upper ribbon as well. You can use a bow again and get something like this: 

    Or do without bows at all, if you like: You can hang them on a now popular Easter tree, making an ordinary loop out of the upper ribbon. You can additionally decorate your embroidery with beads or other things. The result will look rather interesting. 
    As usual, everything is very simple. A number of sections with eyelets may be increased (I have 5, but it is enough for me). But the most important thing that I noticed while choosing the image and creating the design was an understanding that the design should be very simple because of the small embroidery area. 

    In-the-hoop: Towel topper

    By Irina, in Machine embroidery materials and technology, , 0 comments, 4,151 views
    Original text by Marina Belova 
    Yesterday I suddenly arrived at the idea that it was impossible to make the eyelets for all the towels in the house. Yet I'd like my towels to hang, even on the hooks that are poorly adapted for use, and don't drop down. So I searched the Embroidery Library and found this method. The idea is so simple that it is ingenious — to embroider a towel topper specifically for the purpose: it is the thing that can hold your towels. 
    My first sample, a test piece, turned out to be not so good-looking, but a functional one: 

    For I decided not to overcomplicate things and not to pay extra attention to the design, as I now have little time for embroidery. The design, as usual, is a series of stops and color changes, for it is a double-faced applique, so it looks like that: 

    Now it is time to embroider. I hoop the tear-away stabilizer: 

    Insert the hoop into my machine and stitch the outline for positioning of the fabric: 

    I put the fabric next, having sprayed it with temporary spray adhesive prior to that: 

    I start the machine and embroider the second stitch — a zig-zag one, which I'll later use as a guideline for trimming of the applique on the right side of the embroidery: 

    After that I can take the hoop off the machine and trim all of the extra fabric:
     
    You can also embroider everything you want on the right side and cut the fabric later, before attending to the wrong side of the embroidery: in that way you'll have less work to do. This is extremely important as I cannot get used to the way the hoop is attached to my home embroidery machine. 
    After that I embroider a simple design with the pig's snout: 

    Now it's time to take the hoop off again, turn it the wrong side up and attach an eyelet to the top of the pig's head using an adhesive tape. Like that: 

    I made an eyelet out of an ordinary elastic, for I had nothing else. But after having used the result for a while I arrived at the conclusion that a non-stretchy woven ribbon would be better for an eyelet. 
    Then I attached the fabric I'd prepared for the back side of my pig to the wrong side of embroidery: 

    And put the hoop back into the machine. I added one more elastic across the pig's belly with an adhesive tape, having stretched it slightly: 

    I start the machine and sew all these layers with a zig-zag stitch, along which I later trim the elastic on the right side of the embroidery: 

    I also trim the leftover pieces of fabric on the wrong side: 

    All that is left is to embroider the finishing satin stitch border. Before resuming the embroidery, change an ordinary bobbin thread so that it is the same color as the upper thread: 

    Embroider the finishing border: 

    Detach the embroidery from the stabilizer: 


    Then remove jump stitches, singe the fibers of the stabilizer, and everything is ready. You can use it now. I rotated the elastic across the pig's belly so that it was on it's back. Though you could insert towels at the front side, too. 

    The back side: 

    Summary may be as follows: 
    It's better to use non-stretchy materials for eyelets and tower toppers, such as woven ribbons or similar things.  The elastic is better to be located on the wrong side.  In order for the fabric to maintain its shape, it is advisable to secure it with the fusible interfacing used in sewing. Or just pick the thicker stabilizer.  The size of my embroidery was 12,5х13,5 cm. But you can reduce it to 10х10, and it will look better.  You can choose from a huge variety of designs, including the ones with names, which will come quite handy in a large family.  My machine struggled over so many layers of fabric + elastics. As for commercial embroidery machines, I've never noticed any such troubles on them. 

    Embroidery on footwear

    By Irina, in Machine embroidery materials and technology, , 1 comment, 2,746 views
    Original text by Lisa Prass 
    Inspired by reading the websites 
    Footwear manufacture, whether of sport, casual or indoor variety, always has been and always will be a promising business. The customers may deny themselves food but won't go to work barefoot. Because it is hard to imagine the embroidery without connecting it to the item (except for chevrons), footwear manufacturing is a good way of expanding your embroidery services... Buy many questions arise when the embroiderer decides to begin decorating footwear. With what to embroider? On what to embroider? And what designs to choose? And if the answer to the first question lies within the area of knowledge of the equipment and materials used in machine embroidery, the answers to the other two relate more to the business acumen and understanding of the current fashion trends. 

    Embroidery on footwear: Slippers 
    Embroidery on slippers may be considered the easiest. Slippers are always in demand because they are not durable, so an average person buys three pairs a year; and besides, the are designed in such a way that you may hoop them without any trouble. One of the advantages of embroidery on slippers is a small embroidery area, which allows you to quickly complete a big order. 

    Embroidery on footwear: Felt boots (valenki) 
    Recently the demand for felt boots increased due to the cold and snowy winter. Many people wear both the Russian valenki and the European-style felt boots with good-looking soles, modern design, an embroidered top and sometimes a zipper on the side, all of which makes them much more like fashionable high boots than the ethnic footwear and makes one wonder: can I do something like that? One should not forget the high boots. Embroidery on high boots will make them more valuable and special and simultaneously will give the others the opportunity to make some cash. 


    Embroidery on footwear: Hoops 
    Embroidery machines manufacturers, aiming at increasing the demand for their products and make them more significant than the rival analogs, produce various devices that allow making the machine embroidery of the complex items simpler. Shoe Clamp, manufactured by EMS/Hoop Tech for Tajima embroidery machines, may be named as an example. 

    Hoop manufacturers supposed that the embroidery would in most cases be of a small size and would be positioned on the right side of the item.
    Nowadays machine embroidery hoop size for embroidery on footwear is 2.54x6 cm, and the price is a bit too high for a small-scale embroiderer, but maybe sometime in the future... 
    I haven't figured out for what embroidery machines these hoops are intended hope you'll be so kinds as to help me with that. 
    If you don't own any modern commercial embroidery equipment, but I've managed to kindle your interest in embroidery on footwear, I recommend you to get acquainted with professionals. Among my Russian-speaking peers, there is quite a number of experts that embroider on high boots, felt boots and slippers, and I'm sure there is as much among out Western colleagues. If you are interested in how and where to use embroidery on footwear, welcome to our forum. 

    In-the-hoop: making Totoro

    By Irina, in Machine embroidery materials and technology, , 1 comment, 5,719 views
    Original text by Marina Belova 
    I continue my quest of embroidering fluffy toys on my embroidery machine. Last time I wrote about making a simple one piece stuffed teddy-bear. Today I decided to make the task harder and embroider paws and several other details separately. 
    A couple of days ago I came across a pattern in a Chinese magazine called Pomelo Handicraft, and this pattern seemed suitable for making what I wanted — a Japanese animation character Totoro. So I decided to make it. Here's what I got: 

    This toy was created entirely on my embroidery machine, except for one short side seam (about 3 cm), which was made by hand. In order to make my Totoro, I needed to create 2 embroidery design files. 
    One for ears, paws, and tail: 

    And another one for embroidering different parts and sewing them all together: 

    I picked several pieces of gray stretchy velvet as the main fabric for my Totoro's coat. For applique on the belly — the faux fur cuttings, and for the teeth applique — the ordinary calico. 
    My first step was to embroider the flap pieces of the toy. In order to do this I hooped the velvet, folded it in two with the pile surface on the inside: 

    Then I started the machine and stitched the details: 

    My subsequent operations were trimming the details along the perimeter (I had stitched a zig-zag outline) and turn them the right side up. I should mark that it was not easy to do the latter, for these details are very small. And so I decided not to stuff them, but to leave as they were: 

    Now I needed to hoop a tear-away stabilizer: 

    After that I embroidered an outline: 

    Attached the velvet to the stabilizer with its right side up: 

    Then I stitched the velvet along the perimeter to prevent it from peeling off and embroidered the eyes and the outline of the first applique — the mouth: 

    Now I position the fabric for the mouth: 

    I stitch and trim it and enclose it in a satin column border. I will skip these steps as the obvious ones. Immediately after that I stitch the outline for the belly: 

    Place a piece of fur for the belly applique: 

    After having completed this applique comes the most important part — positioning of the flap details. I placed them in accordance with the embroidered marks and tried to secure them with glue, which doesn't usually work well on velvet: 

    Then I stitch these details to the fabric: 

    Now I cover this with another layer of velvet the wrong side up for the back part of the toy: 

    And after that comes the finishing touch: sewing the parts together. I left a small opening on the side through which I would stuff the toy with a filler: 

    That is all; now I may take the hoop off. I trimmed the fabric along the perimeter in accordance with the outline, embroidered at the very beginning: 

    Then I removed the stabilizer and turned the yet two-dimensional Totoro up front: 

    The rest is easy — I stuff the toy and sew up the opening. But you may go without stuffing if you like. I think that I should have made the hind-paws, too, for he looks somewhat strange. But I'll leave it for the next time. 

    In the hoop: decorating a hair tie

    By Irina, in Machine embroidery materials and technology, , 0 comments, 2,915 views
    Original text by Marina Belova 
    Recently I allowed my mind to dwell upon the days of my youth, when hair ties just appeared on the market. So I decided to embroider an ordinary hair tie, particularly as my hair is now long enough to make a ponytail. 
    Frankly speaking, at first I scratched my head over how to do it. And why? Simply because would it be my professional machine, I would join the hair and the embroidery with a few stitches without hesitation, but on home embroidery machine the trick wouldn't pass (I've tried). And then it suddenly dawned upon me. It's very simple — you don't need to stitch the hair tie, but instead the ribbon, to which the tie is attached. 
    Here it is what I got: 

    The back side: 

    The emoticon may look big, but is only 4 cm in diameter. I created the simplest possible design, almost like the one for the chevron, but with an additional stitching that allowed me to cover the back side of the emoticon with the fabric. The overall stitch count was 3200. 

    All I needed for my embroidery was a hair tie, a piece of fabric and a ribbon: 

    I hooped only the tear-away stabilizer: 

    The basting stitch came first, as always. 

    Then I placed my fabric in the hoop and began to embroider the design on the right side:
     
    Here's the emoticon already embroidered: 

    Then I took the hoop off the machine and trimmed all of the extra fabric around my embroidery, then turned it the wrong side up. And that was where the most interesting part began. I sprayed the wrong side of the fabric with a temporary spray adhesive and placed the hair tie with a ribbon that had been run through it, in accordance with the embroidered nose so as to hit the center. I secured the ends of the ribbon with a paper adhesive: 

    I placed a hair tie into the hoop so that it would not shift during the embroidery, and stuck a piece of adhesive tape to it so that it didn't get under the border. All this thing turned out to be quite puffy, so I even doubted that my home machine could cope with it. 
    Then I put my hoop into the machine and encircled the emoticon with a zig-zag border, along which I decided to cut both the hair tie and the ribbon on the wrong side. The machine struggled over it, but succeeded: 

    I take hoop off again and trimmed all the extras. But I didn't remove the adhesive tape: 

    After that, I changed the color of my under thread to black — the color of my border. 

    Then I put the hoop back into the machine and embroidered the border: 

    This is the wrong side: 

    I unstuck the adhesive tape, and the hair tie was uncovered: 

    After that, all I had left was to remove the stabilizer and all the other leftovers (threads, stabilizer fibers, etc.) 

    And this is how it looks from the front: 


    How to make cutwork on your embroidery machine

    By Irina, in Machine embroidery materials and technology, , 1 comment, 4,463 views
    Original text by Nadezhda Agureeva 
    Broidery.ru magazine 
    Machine embroidered cutwork (also called richelieu) is not that different from the free-motion cutwork. The smoothness of the satin column is determined at the stage of the design creation, and it's within your power to preserve the beauty of this particular kind of embroidery with the help of careful hooping and stabilizing. 
    Unlike the free-motion embroidery, the machine embroidery has both advantages and disadvantages. On one hand, there is a vast majority of beautiful ready designs as well as the automation of the embroidery process, and on the other hand, there is a high possibility of encountering a poor quality design. 
    The embroidery process, for our purpose, may be divided into four steps: fabric preparation, basting, cutting out pieces of fabric and then making bridges, nets, and satin columns. 
    Fabric preparation 
    The preparation of the fabric consists of choosing the right type of stabilizer and careful hooping. As the fabric often shrinks after washing, I recommend washing or steaming the fabric in advance so as not to damage the embroidery. Choose your bobbin thread with attention. On some of the home embroidery machines automatic thread tensioner just doesn't work as it should, therefore, the underthread may show on the right side. I recommend using the bobbing thread of the same color as the main one. 
    Basting 
    As a rule, the designs are created with the consideration that the machine should make a stop after stitching the outline so as to give the embroiderer a possibility of cutting out pieces. If you have an embroidery editor, watch the whole process in the embroidery simulator. Pay attention to the number of colors in your design. Home embroidery machines make a stop when a color change is needed; therefore, your design should contain two colors at least. If your design is monochromatic, you will have to follow the embroidery process closely so that to manually stop the machine when it is needed. 
    Making holes 
    Pay attention to cutting out pieces of fabric when you're making your cutwork. Be patient and prepare the sharp scissors. When doing the cutting out take your hoop off the machine, but, in any case do not unhoop the fabric! When making holes, try to avoid shifting of the fabric in the hoop. Because the final step of your embroidery process depends on that. 
    A hole made correctly will guarantee an almost 100% success. 
    Finalizing 
    Having cut out all of the pieces, proceed to the final step — making bridges. This process is automatic, so it won't require your involvement. 
    Before embroidering on your main fabric or item, make a test piece first. And while you're doing it, pay attention to how the thread lies on the fabric, and what steps of your embroidery process cause your difficulties. If you chose a proper stabilizer and hooped the fabric correctly, but the quality of the sample did not satisfy you, you'd probably better choose another design.

    Making cutwork on your embroidery machine: the process 
    We will need the fabric, threads and two kinds of stabilizer (the topping and the backing).  Stick your backing to the wrong side of the fabric. If you wrong side is unlined, I advise you to use a tear-away stabilizer.  Carefully hoop your fabric. Make the fabric drum tight and tighten the screw. 
    Place the hoop into your embroidery machine and start the embroidery.  After having stitched the basting stitch the machine should make a stop. To do this, you need to choose a design that contains at least two colors. Take your hoop off the machine. In any case, do not unhoop the fabric.  Take any sharp instrument and make a small cut in it, in order to cut the holes with scissors later. 
    Make the holes in it using scissors. Try not to distort your fabric and catch the stitches that are already there.  To continue our work, we'll need water soluble topping.  Carefully pin the stabilizer to the fabric. 
    Is is not necessary to use the stabilizer for the entire embroidery area. Just covering the areas you're going to cut out will be sufficient. This will prevent stitches from sinking in places where the fabric is missing.  Insert your hoop back into the machine and proceed with your embroidery.  Remove the jump stitches after the completion. The wrong side should be as neat as the right side! 
    Rinse your ready item with water, in order to remove the topping from the right side of the embroidery and the backing leftovers from the wrong side. 
    Having completed this task, remove the leftovers of the backing from the wrong side of the embroidery and iron the item. 

    This mysterious leather

    By Irina, in Machine embroidery materials and technology, , 0 comments, 2,546 views
    Original text by Marina Belova 
    Leather, faux leather, chamois and vinyl are, in my opinion, the most mysterious fabrics for machine embroidery. There are a lot of materials on the subject on the Web. And these materials are so different that you could be lost in it. The only way left is, as usual, to collect knowledge and practice. 
    All leather-like materials, as well as fabrics, vary in weight, thickness, texture, density, hardness and softness. However, there are several things they have in common: 
    These materials will not tolerate any mistakes — if the needle has penetrated the fabric, the hole stays visible forever.  There may also be hoop burn.  Leather-like materials are perforated along the perimeter (where the needle had penetrated the fabric).  All of these factors pose their own requirements to the various parts of the embroidery process on leather-like materials, such as the choice of needles and stabilizers, ways of hooping etc. 

    I'll name the main ones for you: 
    I haven't seen two needle choice recommendations alike. There is a huge variety of needle points: some people advise to use a light ball point, some — a normal round point, and some — a narrow wedge point or even a round point with triangular tip. There are so many of them that it makes your head spin. I guess, I'll have to figure this out myself, by trial and error, as usual.  As for the choice of a stabilizer, everything seems to be more or less clear: average tear-away, average or dense cut-away or adhesive paper (like Filmoplast), according to the type of fabric. An ordinary fusible interfacing has been suggested for additional leather stabilization.  I've seen the following recommendations on the hooping of the leather-like materials: wrap the hoop in a soft fabric and loosen the hoop screw to a point where the hoop won't be leaving any traces on the fabric, but so that the material will still be pulled tightly. If the fabric cannot be hooped, all that is left is to stick it onto the adhesive paper. An alternative hooping method is to use a special magnetic hoop (for those who own it, of course).  You can use the ordinary (#40) or thicker (#30) threads.  To prevent gaps, the embroidery speed should be lowered. As for cleaning and oiling of the machine, you'll need to do it after every two or three items.  Creating machine embroidery designs for leather and similar materials is believed to be a job for experienced digitizers. But how can you gain experience, if you don't try? Therefore, let's dip into a variety of tips from the Western gurus of machine embroidery design digitizing.  Creating a machine embroidery design for leather is different from creating a design for other fabrics because you have to control the number of needle penetrations that can be done in many ways. That's because the question posed before a digitizer is a very serious one: how to avoid perforation. 
    The main rules of creating a design are: 
    increase the fill stitch length and the underlay stitch length to 4—5 mm.  The width of satin columns should be no less that 3—4 mm.  Lower the density of satin stitches by 30—35%. Some people even recommend lowering the density by 50%.  Lower the fill density by 20—25%. On the use of understitching there is a difference of opinions. Some people say that all of the understitching should be spared, the other ones — that it should stay in place. And even more than that — they recommend increasing their density because the finishing layer of satin stitches, in this case, is lighter. At the same time, you should place the understitching within the outline and away from the finishing layer of stitches. 
    You should avoid: 
    small elements  a large number of fills (you may use an appliqué instead).  This is all, in a nutshell. And now it's time to practice. 

    Saving up on stitch count

    By Irina, in Machine embroidery materials and technology, , 0 comments, 5,995 views
    Original text by Marina Belova 
    Before now, I've never thought about reducing the stitch count in order to cut production costs. But now it's time to begin. In addition to the economic reasons that may be expressed through the formula: lower stitch count = embroidery process acceleration, reducing the stitch count makes the design look better. And it reduces the distortion of the fabric, too. 
    There are many ways of lowering stitch count in the design without sacrificing the quality of the embroidery; for example: 
    Increasing the lengths of the underlay and connector stitches  Increasing the stitch length in the objects that contain split stitches (satin stitches with patterns, fills)  Lowering the density of the satin stitches and fill stitches  Replacing the standard monolithic fill patterns with motif stitches  Making the design simpler: replacing the satin stitch outlines around the Tatami fills and with the running stitch outlines and removing the unnecessary details.  Placing an appliqué in the large surface areas, outlined with zigzag stitches  Using a thicker thread, which allows to substantially decrease the density  Deliberately changing the design so that a part of it will not be embroidered. For example, deleting the background fill so that the fabric will work as a backing.  Reducing the number of trims and color changes  Replacing some pre-digitized fills for the ones digitized manually  All of these methods are based on changing the design manually and not with the help of various options in the software like Outline Processor or Process. 
    Let's look at some of these recommendations more closely: 
    1. Underlay stitches and connector stitches lengths 
    By default the running stitch even in different editors is 2—3 mm long. This is the perfect length for the outlines, but it is too short for the understitching. Without any hesitation, you can make the underlay stitches 4—5 mm long, and that will lower the underlay stitch count by 40—50%. This will not work well with the narrow stitch columns less than 2 mm wide. But in other cases, you should not lose the opportunity to increase stitch length. 
    2. Density 
    It's better not to use the dynamically varying stitch density in order to save up on stitch count, but set the right density value manually, in accordance with the size, color and type of the fabric. But to do that you'll have to work hard, using both your hands and brains because every object containing stitches of varying size needs to be split into several pieces. Each one of these parts will have its individual embroidery parameters. 
    If you have more that one layer of stitches, you'd better not forget to lower the density of every new layer by no less 10%. 
    It's also advisable to increase the fill stitch length by at least 25% as compared to the default value. But you'll need to do a test run after a change like that. 
    3. Trimming and color change 
    One should reduce the number of trims and color changes. All of these operations require time that equals to embroidering 130 and 65 stitches, respectfully. Why so many? Because the machine lowers its speed before every trim, and then has to accelerate again. 
    Besides, every trim calls for the tie-off at the beginning and the end of the objects. And even taking into consideration that a tie-off contains only a few stitches, but, if you have lots of them, it means additional stitches. 
    4. Making the design simpler 
    The easiest you can do is remove the satin stitch outlines or replace them with the running stitch ones. You should be careful doing this: running stitch outlines are considered the most complex of all. It is extremely difficult for them to hit the right spot, without gapping and overlapping. Difficult, but not impossible. 
    The machine embroidery design of your choice may contain a large number of details. You should define the size of these details when assessing the image. For example, it is recommended to embroider details that are less than 1 mm in size with running stitches or remove them altogether. 
    5. Replacing the pre-digitized fills with the ones digitized manually 
    Not so long ago I had a vital necessity of saving the stitches, for we outsourced the embroiderers for a huge project. And the embroiderer, as you know, is paid per thousand stitches. Therefore, we needed to reduce the stitch count to fit the budget. 
    My design had 83000 stitches. So I had to select the elements manually, throwing away everything I could spare. I managed to save the largest number of stitches by manually changing the motif patterns. The pattern was ultimately simple: one layer of running stitch curves. 
    So, I decided to get rid of the already existing pattern, add a new one manually, and digitize it with the running stitch. The resulting cut in the stitch number was about 20-25% for every object. What was especially good was that when you drew the stitches manually on the already existing pattern, you could see in what places you could do without it at all, and lower the stitch count even more. Thanks to these easy manipulations I managed to save about 12000 stitches. 

    So much for you stitch count algorithms. Often your own two hands are better that any automatic device. The only disadvantage of this method is that it takes a bit more of your time. 
    P.S.: I just remembered another method of saving the stitches, which I use. I slightly move the edges of the fills. This option has a different name in different editors. For example, in Stitch Era, there is Exclusion Margin, and in Tajima the similar option is called Critical Zone. With it help you may eliminate about 3% of stitches by simply moving the fill pattern 1 mm from the edge, the alteration being almost invisible to the eye. 

    Together with the aforementioned methods, it will help you to make the design much simpler and lower the production costs. 

    Matching the fabric and the stabilizer

    By Irina, in Machine embroidery materials and technology, , 0 comments, 4,944 views
    Original text by Marina Belova 
    Choosing a right stabilizer for a particular fabric is important for every embroiderer. If you want to know what a stabilizer is, what kinds of stabilizers are there and where they can be used, along with the other stuff, click here. 
    Wrong stabilizer plays has a great impact on the embroidery, for it is one of the reasons for various technical defects, which nobody wants. 
    Below are the recommendations on matching a particular type of fabric with a particular kind of stabilizer, which I found in various sources. You always need to have some kind of guide, if only a short one, which will give you a hint to where you stand and where to go from there. And then, to find a right kind of stabilizer for your type of fabric. 
    Obviously, one should choose a stabilizer according to the fabric qualities, such as: thickness, density, quality, type and so on. The basic rule goes as follows: the more tightly-woven and stable the fabric is, the lighter stabilizer it needs. And vice versa. In case you've found a right match you'll need only 1 layer of stabilizer (this is true in 99,9% of all cases). 
    The fabric
     
    The stabilizer
     
    Acrylic fabric
     
    Cut-away
     
    Acetate fabric
     
    Cut-away
     
    Velvet
     
    Tear-away adhesive stabilizer (Filmoplast) or heat-away stabilizer (Thermogaze)
     
    Corduroy
     
    Tear-away for the thick fabrics and cut-away for the thin ones
     
    Vynil
     
    Tear-away
     
    Felt
     
    Cut-away
     
    Gabardine
     
    Cut-away
     
    Gauzy fabric
     
    Dense water soluble for the backing and thin water soluble for the topping
     
    Jersey
     
    Cut-away
     
    Denim
     
    Tear-away or no stabilizer
     
    Chamois
     
    Cut-away for the thin fabrics and tear-away for thick ones
     
    Fake fur
     
    Tear-away for the backing and water-soluble film for the topping
     
    Damask
     
    Cut-away
     
    Leather
     
    Cut-away for the thin fabrics and tear-away for thick ones
     
    Lycra
     
    Spunbond
     
    Linen
     
    Cut-away with temporary spray adhesive
     
    Terry cloth
     
    Cut-away or tear-away for the backing and water-soluble film for the topping
     
    Muslin
     
    Cut-away with temporary spray adhesive
     
    Nylon
     
    Tear-away adhesive (Filmoplast), heat-away (Thermogaze) or high-quality tear-away stabilizer
     
    Voluminous knitwear
     
    Cut-away with temporary spray adhesive
     
    Organdy
     
    Cut-away adhesive
     
    Organza
     
    Water soluble or high-quality tear-away
     
    Sailcloth
     
    Cut-away for the thin fabrics and tear-away for thick ones
     
    Brocade
     
    Tear-away
     
    Percale
     
    Cut-away
     
    Pique
     
    Cut-away for the backing and water-soluble film for the topping
     
    Velour
     
    Tear-away adhesive (Filmoplast)
     
    Poplin
     
    Tear-away or cut-away, depending on the fabric thickness
     
    Sateen
     
    Cut-away
     
    Sateen
     
    Cut-away with temporary spray adhesive or tear-away adhesive (Filmoplast)
     
    Spandex
     
    Cut-away with temporary spray adhesive or tear-away adhesive (Filmoplast), spunbond
     
    Woolen cloth
     
    Cut-away
     
    Tweed
     
    Cut-away
     
    Knitwear (T-shirts)
     
    Cut-away, tear-away or spunbond, depending on the quality of knitted fabric
     
    Flannel
     
    Cut-away
     
    Fleece
     
    Cut-away
     
    Canvas
     
    Tear-away or no stabilizer
     
    Silk
     
    Tear-away
     
    Chiffon
     
    Tear-away
     

    I want to remind everyone that the aforementioned matches are the basic recommendations and not the rules. 
    What is also interesting is that a stabilizer is often replaced with other, cheaper, materials for cost reasons — the means the manufacturers strictly advise against (naturally). For example, you may see a stabilizer replaced with the printing paper, the embroidery spunbond with the building one, and water-soluble film with polyethylene. There is a lot of information about it on the Web. 
    I decided to check if water soluble film replacement was at all possible. You can read about this experiment here. 

  • Top Downloads

  • Recently Browsing   0 members

    • No registered users viewing this page.
×
×
  • Create New...