Jump to content
  • Articles

    Our website articles

    Embroidering a pocket: Kitteh

    By Irina, in Machine embroidery materials and technology, , 3 comments, 3,448 views
    Embroidering a pocket: Kitteh
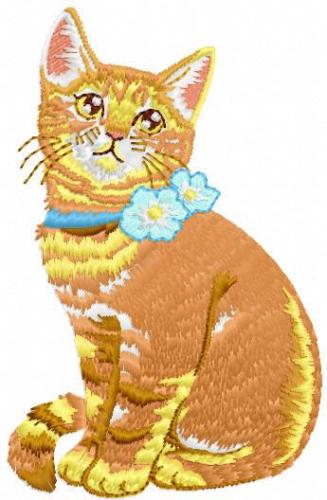
    This adorable and perky kitteh captivated me the moment I’ve seen the design. Lisa Prass, who created it, suggested giving some volume to this cutie. Read on to know what became of it.
    For a long time, I've had a soft spot for felines. When I was a child, I used to bring home kittens in my pockets, and they peeked out just like the one does in the design, which I instantly named KitteH.
    The embroidery took very little of my time. For it, I needed the design rendered in the Photostitch technique, an embroidery machine, a pair of jeans with pockets (a pocket flap, too, fell victim to the Kitteh’s charms and was pitilessly ripped off), embroidery threads, and, of course, the cheerful mood.
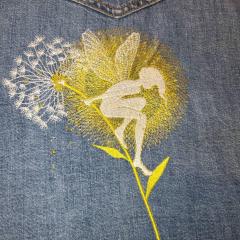
    First of all, I ripped off the pocket flap; in case your jeans come without one, skip this. After that, I undid the seam (the ordinary, not the decorative one). It was the inner seam in my case.

    I conceived my Kitteh puffy, and now was time to think how to add the volume. Having discussed the matter with the creator, I decided to embroider the cute kitten’s paw separately.
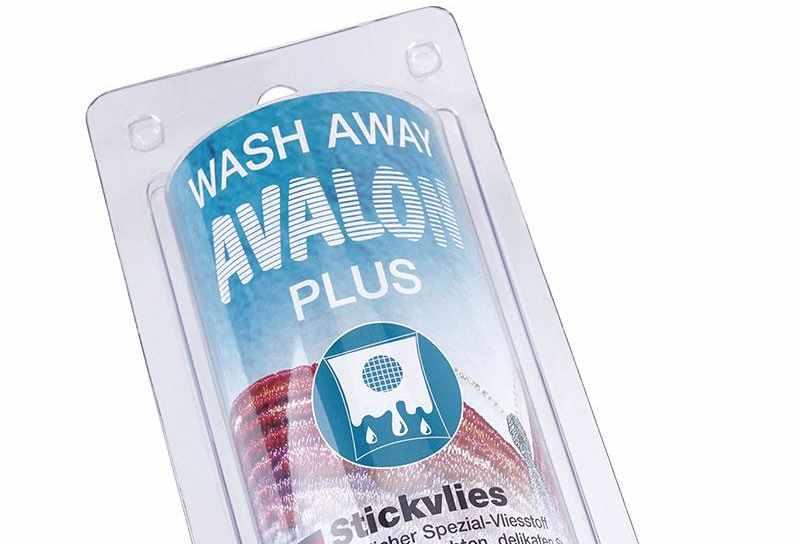
    I embroidered the paw on organza stabilized with the solvent stab and understood that it was too soft.
    Having tried several options, I finally chose the three-layer “sandwich” that consisted of a solvent stabilizer, fine mesh fabric, and organza as my base fabric.


    The embroidery took about 15 minutes. While the machine was going, I had time for a cup of coffee. That’s why I love machine embroidery: the machine is doing the work while I rest :-) 

    Having stitched the paw, I trimmed it close to the stitching, washed out the stabilizer under the tap, and finished the organza edges with a lighter. The paw was ready!
    Now was the time to embroider the rest of my kitteh.
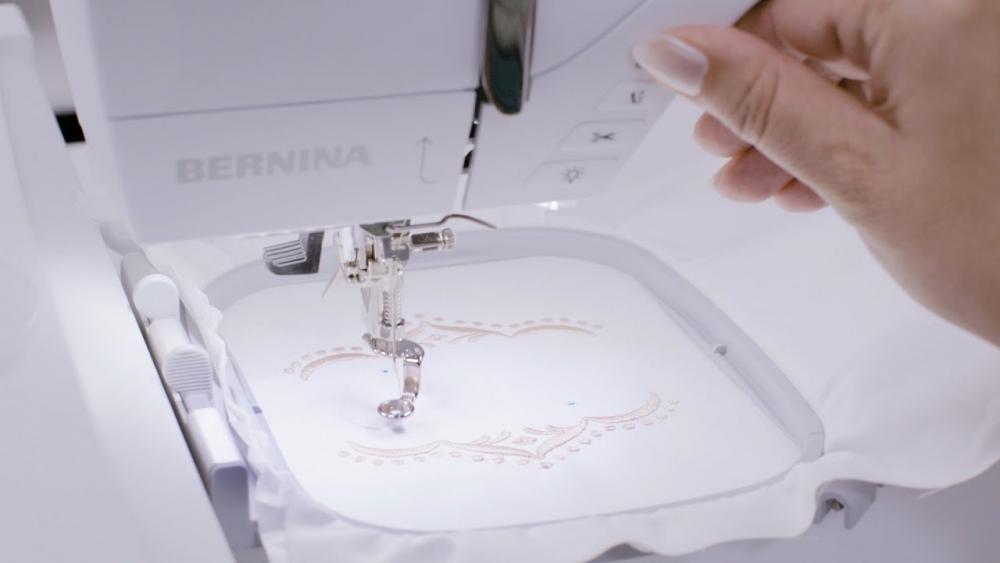
    I hooped the tearaway stabilizer. I should note that denim is quite stable as it is, so I don't reinforce it with adhesive stabilizers as a rule. With a temporary spray adhesive, I glued my denim piece to the stab and pinned it for better security.


    Using a layout grid and the machine’s display, I aligned the design to the pocket entrance. I checked the hooping accuracy with an outline, marking the place where the paw would go.


    Then I changed the thread color and stitched the paw to the main part.


    After that, the kitteh’s body and head were embroidered.


    All done. Some time, a good mood and an embroidery machine were all it took.

    Easy stitching to you all and have a good day!

    Original text by Irina Lisitsa
    Design available here 
     

    Felt bag decorated with machine embroidery

    By Irina, in Machine embroidery materials and technology, , 0 comments, 2,632 views
    Felt bag decorated with machine embroidery
    Felt is a wonderful fabric. You can decorate items with it or use it for sewing bags. I sewed this bag without a ready pattern or complicated calculations, by the eye. My pattern consisted of three rectangular panels and two stripes, cut out of felt. The bag was embellished with machine embroidery and decorative trim. A tip: you can choose any other machine embroidery design from our shop and make your bag look casual or romantic.

    Felt bag decorated with machine embroidery. Materials
    Decorative felt Bright cotton fabric Tearaway nonadhesive stabilizer Water-soluble stabilizer (film) Upper thread Underthread Machine embroidery design Embroidery or sewing and embroidery machine Embroidery machine hoop and template Felt bag decorated with machine embroidery. Embroidery process
    Out of felt, cut a rectangle size 18 x 22 cm. This will make a panel for your future bag. You’ll need three such panels. Two of them will make the bag, and the third will become a flap cover.


    Hoop the cutaway nonadhesive stabilizer, sprinkle it with a temporary spray adhesive and press the felt to it. Cover the felt with a piece of water-soluble film. In the embroidery editor, add a basting stitch outline to the design. 
    Load the design into your embroidery machine and hit the start button.


    I used a common polyester thread; though it is not recommended for machine embroidery as a rule, you can use it in some cases. After you've used cotton or polyester threads, clean the shuttle thoroughly.


    Change the thread colors in accordance with the chart.


    Felt bag decorated with machine embroidery: sewing
    Before joining the panels, remove the water-soluble stabilizer: it will tear easily after the embroidery. Round the corners of the two panels constitute the bag. Round the corners of the panel intended for the flap. Finish the edge with decorative trim.


    Cut out a strip of fabric 4 cm wide to make a strap for your bag. Adorn it with a strip of fabric or decorative trim. Out of the fabric, cut out the lining. Turn in the seam allowance on the edges and baste.


    Attach the two parts of a magnetic clasp to the front side of the bag and the flap. Lay the lining and the flap together with their wrong sides facing each other and tack them down in order to avoid shifting during stitching.


    You may sew from the front or the back. When joining the panels, use a hemmer foot or an omni-purpose foot. Stitch your flap to the back side of the bag.


    Cut out a strip 6 cm wide for the side. Stitch this strip first to the back side of the bag, then to the front. Before sewing the felt panels, baste them first.


    Your felt bag decorated with machine embroidery is ready!


    Original text by Irina Lisitsa

    How to embroider hard-to-reach areas of clothing?

    By Irina, in Machine embroidery materials and technology, , 1 comment, 3,194 views
    How to embroider hard-to-reach areas of clothing?
    If you like one-of-kind jeans or wish to revamp your favorite pair, you can do it with comparative ease, using just an embroidery machine and your imagination. In this article, I’ll tell you how to embroider the pocket of jeans thus turning them into something original.
    Small items of clothing, such as jeans’ pockets, belts, straps, yokes, cuffs are somewhat difficult to embroider, being impossible to hoop. There are, however, some ways of doing it quickly and easily. I’ll be happy to tell you about them!
    For the embroidery, you’ll need:
    Embroidery machine or sewing and embroidery machine, Your favorite pair of jeans, Embroidery stabilizer (Filmoplast adhesive paper by Gunold will do nicely.), Embroidery threads of the necessary color (Madeira Rayon #40 or Gunold Poly #40), Bobbin thread of the same color as the fabric (Amman Belfil C #120), Thick threads for the jeans, same color as the stitchout (Madeira Aerofil #35), Machine embroidery needles of the corresponding thickness, with a reinforced blade (Schmetz Jeans), Embroidery needle (Schmetz Embroidery #90). First, rip off the pocket and iron it, removing the excessive threads. Carefully inspect your pocket to see whether it has any metal eyelets or decorative stitching. A layout grid comes with your embroidery machine. With it, you may position the design on the pocket the way you like. If there eyelets and rivets in that place, they should be removed so as to save your needle from breaking during the embroidery. If you don’t need the decorative stitching as part of your design, rip it off. Press the pocket with an iron once again.

    Prepare the stabilizer and the hoop. Filmoplast is an embroidery stabilizer with an adhesive layer covered with paper.

    Hoop it with the paper layer facing up. Position your pocket on top of it and jot down the placement marks with a marker. If you only embroider one pocket, it’s better to place it in the center of the hoop.

    In order to attach our pocket before the embroidery, you’ll need to remove the upper layer of the stabilizer (the paper one). Gently peel off the paper and press the pocket onto the adhesive area between the marks.

    You’re now done with the preparation. You may proceed to the embroidery. It is crucial to correctly position the design in the hoop because the entire design has to fit in.
    I used my Husqvarna Designer sewing and embroidery machine. Its full-color touch panel display allows you to choose an appropriate hoop (which now circumscribes your pocket) and position the embroidery where you want it. With the help of a layout grid in the hoop and another one on the touch panel display, it will be an easy job.

    You can check whether everything is correct by touching the design positioning button. On the screen, you’ll be able to see whether the design should be shifted a bit or rotated (see the manual that comes with your embroidery machine or ask the seller).
    Your embroidery is ready. Take the hoop off the machine. Carefully tear off your embroidered pocket from the stabilizer. It will be easy to do while still in the hoop because the needle soft of cuts it along the edges of the embroidery.


    You only need to iron the pocket and sew it back on.

    Thus, you have decorated your old jeans.

    With a sleight of hand and no fraud, you are now the owner of a one-of-a-kind pair of jeans! Wear it happily!
    Original text by Irina Yemelyanova

    Making patchwork quilt on the embroidery machine

    By Irina, in Machine embroidery materials and technology, , 8 comments, 2,429 views
    Making patchwork quilt on the embroidery machine
    Level: beginner.
    If you are fond of both quilting and machine embroidery, this tutorial is for you. Do want to make high-quality quilt blocks quickly? Patchwork quilt on the embroidery machine: high quality without painstaking and time-consuming work. Just a few easy steps will enable you to decorate your project with an ornate stitched pattern.
    Patchwork quilt on the embroidery machine: Materials:
    Upper fabric (front) Mid-layer (batting) Lower fabric (back) Upper thread Machine embroidery design (straight stitch) Visit our store to find a suitable embroidery design!
    Patchwork quilt on the embroidery machine: preparations
    Load the design into the embroidery machine or use the one from the memory. Activate the Basting option.

    Hoop the mid-layer only. For the mid-layer, you may use a high-loft polyester batting (150 gsm, two layers), cotton batting or any other kind of wadding for quilt. Choose your batting in accordance with your needs and the desired outer look of the ready item.

    In this tutorial, we’re going to quilt both the front and the back. In order to attain high quality and a beautiful back side, use identical upper and lower threads.

    Secure a piece of the backing fabric on the wrong side of the hoop with the help of a temporary spray adhesive. The wrong side of the fabric should face the batting. The piece of fabric should be approximately 5 cm larger than the ready quilt block on each side. When you make a quilt with the high-loft mid-layer, the covering fabric will get smaller, hence the shrinkage allowance.
    Patchwork quilt on the embroidery machine: machine embroidery
    Having attached the hoop to the machine, cover it with the fabric for the front, with its wrong side facing down. Hit the start button.
    With the Basting option turned on, all layers of the future block are first stitched together with a basting stitch. If your machine doesn’t have this option, create an outline with straight stitches no less than 7 mm long in any embroidery software. You will be able to use this outline for basting in your future projects.

    The outline comes first in the sewing order, before the design.


    After the embroidery is finished, you’ll have a ready quilt block. The front and back will look equally fine due to the identical threads.


    Original text by Irina Lisitsa

    Machine embroidery on T-Shirts: how to ace it

    By diver361, in Machine embroidery materials and technology, , 0 comments, 5,196 views
    T-shirts can be found practically in anyone’s wardrobe. They are soft, unpretentious and comfortable to wear. That is to say, unpretentious if you want them this way. A pretty embroidery design will make the simplest everyday item distinctive. At the same time, this simplest everyday item may prove a real challenge for an embroiderer.
    While this article was originally intended for beginners, it turned out that many seasoned embroiderers are afraid to tackle with T-shirts as well. And why? Because knits can be really tricky. Here are some tips that will help you tame them. 
    Buy a good T-shirt
    T-shirts are predominantly made of cotton, but other kinds of fibers may be used as well—rayon, polyester, Lycra, linen, and various blends. They have slightly different properties, and there are also quality grades. Combed cotton is softer than basic cotton, and Pima cotton, thanks to its extra-long fibers, is considered the finest of all. Not only T-shirts of finer quality wear better but they also pucker less. They also differ in weight. Heavier fabrics are preferable for fibers in them don’t warp as much as in the lighter ones.
    Pre-launder 
    Wash your T-shirt before starting an embroidery project. Cotton shrinks after laundry and your design might get badly distorted.
    Choose a good backing
    T-shirts are washed on a regular basis, therefore, the stab should be stiff enough to keep the embroidery in shape while not making a garment too uncomfortable to wear. Cutaway stabilizer is preferable because it doesn’t deteriorate as quickly as the tearaway one in the course of time. The fusible mesh is, probably, the best option. 
    To hoop a T-shirt, cut a piece of stab larger than your hoop, sprinkle it with a temporary spray adhesive or use a glue stick, press your T-shirt to it and hoop the whole thing. Don’t forget that a stretchy fabric should never be drum-tight in the hoop! If you are afraid of the hoop burn, try to hoop the stab and glue your T-shirt to it. If you don’t have any special devices, the embroidery will require some acrobatics but it is possible. 
    After you’ve finished the embroidery, remove the excess stabilizer by cutting it close to the stitching. If you have sensitive skin, covering the back side with fusible tricot interfacing might help.
    Use a topper 
    Additional stabilization will make the embroidery look neat. Cover the embroidery with a piece of thin water-soluble film and baste it. The extra film will come off easily when rinsed with water. 
    Always do a test-stitch
    Unless you’ve embroidered this design before, on the same equipment and with identical consumables, it’s won’t hurt to try it first. The fabric should be similar to the one you’re going to use for your project. A tip: keep your old T-shirts, they will make a fine testing range.
    Select a lighter design
    Heavy designs with a large stitch count often look and feel like a patch. Thin and delicate knitted fabric cannot support the dense stitching at the edges; there will be wrinkles no amount of ironing will remove. Lighter designs with open structure are better for T-shirts.
    Use the right needles and threads
    You’ll need a ballpoint needle that doesn’t cut through the fibers but gently pushes them to the sides. The smaller the tip, the better. Use 70/10 needle for lightweight fabrics, and 80/12 for heavier ones.
    For T-shirts, one should select a durable thread that will be able to withstand repeated washings without losing its strength, color or luster. Polyester threads meets all these requirements and is, therefore, the best choice.
    Tack before the embroidery
    Basting the whole thing prior to the embroidery will provide yet more stabilization. It keeps the water-soluble topping in place and also prevents the lower stabilizer from shifting.
    Press the embroidery from the back
    Having finished the embroidery, turn the T-shirt out and press it from the back side with an iron. Apply pressure gently, don’t make the iron too hot and use a pressing cloth.

    Tearaway adhesive stabilizer

    By diver361, in Machine embroidery materials and technology, , 2 comments, 3,684 views
    Tearaway adhesive stabilizers are used for the embroidery designs on various fabrics. The main goal of a sticky stabilizer is the prevention of puckering; it is, perhaps, its only goal if you don’t count the ones that rampant imagination can conjure. Adhesive stabilizers vary in weight. The most lightweight stabilizers are intended for delicate fabrics (batiste, sateen, satin). Heavier stabilizers are used when working with such fabrics as drape cloth, linen, denim, etc.
    Tearaway adhesive stabilizer
    You can purchase black and white stabilizers in world As I’ve already said, they vary in weight: the higher the weight, the thicker and stronger the stabilizer. Stabilizers are similar to paper made from pressed fibers, they have one coarse and one smooth side covered with a layer of glue. The only difference between sticky and non-sticky stabilizers is the adhesive layer. It allows gluing fabric to the stabilizer with the help of an iron and nothing else.
    Weight is the main property of a stabilizer. It is measured in grams per m2. The greater the number, the denser the stabilizer. The figure may vary from 25 to 130 g/m2. The lightweight stabilizers are used with thin and delicate fabrics, whereas heavyweight stabilizers – with dense and thick ones.
    Composition: 50-70% cellulose and 25-30% synthetic fibers, also 100% rayon or 100% polyester.
    Stabilizers are often sold without any marking, and newbies get puzzled trying to figure out whether it is good for the fabric they've chosen or not. It is very easy to define stabilizer density by touch. Feel the material and take a cue from that. The stabilizer should not be much denser than your chosen fabric, otherwise, you’ll get a thick patch on the thin fabric.
    When buying an adhesive stabilizer, try and learn who produced it, how it is marked and what fabrics it is intended for. In case it's difficult for you to remember a wide variety of stabilizers, create a supplementary sheet for every one you own, fill in all the relevant information and attach a sample. This will help you to distinguish among the different types of stabilizers.
    Usage embroidery stabilizer.
    Sticky stabilizers are used when there is a high possibility of puckering during the embroidery, and no hooping restrictions apply.
    In order to attach the stabilizer, place the fabric with its wrong side facing up, and put the stabilizer on top of it with its sticky side facing fabric. With a hot iron glue the stabilizer to it. Hoop the “sandwich” with the right side of the fabric facing upward.

    After the embroidery is completed, carefully tear away the stabilizer along the edges. Tearaway adhesive stabilizers are also noted for being easy to remove from the wrong side of the fabric after the work has been completed.

    If the stabilizer does not tear, it is not a tearaway, but a cutaway. A tearaway adhesive stabilizer should tear easily in all directions. When purchasing a stabilizer, give preference to those that tear more easily. They will make your job easier.
    It’s better not to use tearaway adhesive stabilizers when doing Walk Stitch or Run Stitch because they are hard to remove from the wrong side. If, for one reason or another, you had to use a stabilizer, tear it away gently on completion, so as not to damage the stitch lines.
    Storage rules.
    Store the carefully folded stabilizers in a plastic bag where the sun cannot reach them. Bear in mind that the stabilizer’s adhesive layer may deteriorate in the course of time, and therefore, do not buy the three years supply. Keep to the minimum. Try not to crease the stabilizer, because this will damage its adhesive properties.
     

    Making lace on the edge of the napkin using embroidery.

    By diver361, in Machine embroidery materials and technology, , 4 comments, 5,896 views
    Embroidered napkins are the classic decoration of a modern house. They easily fit into the interior of any living room or kitchen. If you have an embroidery machine and free time, you can make it yourself. It is needed sometimes to process the edge of a fabric beautifully.
    There are a lot of creative methods to do this and we will consider one in the master-class: lace making on the edge of a items. One may decorate a dining cotton napkin, a handkerchief or any other items this way. There is a plenty of machine embroidery designs in FSL technique, choose the one you prefer for your items. Such patterns can be easily found in our embroidery design library.
    Materials which you need for work:  
    Water soluble machine embroidery stabilizer (interlining). Our recommendation Avalon. Adhesive spray of a temporary fixation Sulky or GUNOLD KK100 Top thread for machine embroidery (any brand) - we using Robison Anton Lower thread for machine embroidery or bobbins Fabric for the napkin Processing of lace on the edge of a embroidered item:
    Fix the water soluble stabilizer in the hoop. Download the embroidery design to the your machine (or save to USB stick or special memory card). Start the embroidery processing. The first stitching would mark where to layout the edge of the tissue on the stabilizer.


    Apply a layer of the adhesive spray on the stabilizer. Glue the tissue by markup and repeat the stitching of the first thread color, this would fix the tissue on the stabilizer. Then keep on embroidering the lace part of the napkin.


    The embroidery would be on the edge and on the corner, if you combined the machine embroidery design in a special editing software (My Editor, Embird, Brother Pe-DEsign, Wilcom TrueSizer, Buzz Tools and etc.). The processing of the other parts of the napkin would be repeated with connection. Fix the water soluble stabilizer in the hoop again and embroider the first color of the pattern. Fasten the second corner of the napkin on the stabilizer.


    Repeat the process of embroidering the design on the edge round the napkin.


    Cut off the stabilizer close to the edge of the embroidery. Rinse the embroidered napkin with the lace edge in plenty of warm water at the end of work.


    Napkin ready. In the same way you can arrange a tablecloth or a handkerchief.


    Madeira’s Avalon water-soluble stabilizers

    By diver361, in Machine embroidery materials and technology, , 2 comments, 5,198 views
    Hi friends! Today we’ll talk about water-soluble stabilizers by Madeira. I’ll try to show you what they can do and where you may apply them.
    Madeira has a line of water-soluble stabilizers named Avalon. Therefore, it is not correct to apply this name to all water-soluble products. When we say ‘Avalon’, we mean Madeira, and when we say ‘Madeira’, Avalon is implied. Madeira offers 4 items in that department. They have different properties and functions.
    Avalon Film
    A thin semitransparent water-soluble film. To the touch, it is like a plastic bag. This stabilizer can only be used as a topping. It is good for terry cloth, piled fabrics, knits, and fur. You put it on top of your fabric in order to prevent the sinking of the stitches.
    Avalon Ultra
    Dense water-soluble film. It looks very similar to the greenhouse covering material. Machine embroiderers use it as a main fabric when creating thin diaphanous laces, such as Battenberg lace or Vologda lace. You hoop the stabilizer, choose a design of a certain kind, and embroider. The dense film is also used for cutwork and Hardanger, where you cut out the holes and then apply the material.
    Avalon Plus
    A non-woven material that is also used as a main fabric for the embroidery. Works well for felting, cutwork, and Hardanger embroidery. If you’re making lace and want it to maintain its shape in future, Avalon Plus is the right choice. You hoop the stabilizer and embroider. After the embroidery is completed, the stabilizer is washed away.
    If you want my personal opinion, I like Avalon Plus more. To me, it seems more reliable, though while I was writing this article, I asked Irina Lisitza, our technology specialist, and she said that for thin laces, she prefers Avalon Ultra because it washes out better.
    Avalon Fix
    This one is similar in structure to Avalon Plus, but with an adhesive layer and protection paper cover. It is used as backing for embroidery on very thin and diaphanous fabrics, such as batiste, tulle netting, and organza. In other words, in all those cases where the stabilizer is hard to remove or where it makes the embroidery too dense. The making process is simple. You hoop the stabilizer, cut the protective cover, put your fabric on top of it and do the embroidery.
    This is all, in a nutshell. Happy embroidery! 
     

    Filmoplast – an adhesive stabilizer for machine embroidery

    By diver361, in Machine embroidery materials and technology, , 2 comments, 5,742 views
    Filmoplast is a stabilizer for machine embroidery that has an adhesive layer. Its main purpose is to reduce the time spent on hooping, to enable you to embroider small details and to embroider designs on dense unhoopable fabrics. Used as a backing, Filmoplast prevents the fabric from puckering. It is of a tearaway variety, and is removed once the embroidery is completed.
    Filmoplast is a TM of Neschen company. It comes in ribbons for mending books. Gunold, the company that brought it into machine embroidery, issues it in two colors (black an white), in rolls or precut sheets, of one weight (1.6 oz, Filmoplast 140). (Note: it used to be 80, 120 and 140; the first two are no longer in production).
    Filmoplast usage

    Filmoplast is used as a backing whenever it is not possible to hoop the fabric. For example, when the item is too small (a pocket, a collar, a cuff, etc.), or the fabric is too dense that it makes it unhoopable, the garment is of a specific shape (caps, in the absence of the cap frame), cloth caps, hats.
    Or, it not recommended to hoop the fabric in order not to damage it. Velvet, some knits, thin leather can be cited as an example.
    Filmoplast is a perfect substitute for the “tearaway stabilizer + temporary spray adhesive” combo.  It is also used for speeding up the embroidery process when it is necessary to embroider a large number of single-type designs. In cases like that, you hoop Filmoplast, cut the rectangle the size of the design and stick the garments or their parts to it one after the other.
    Storing Filmoplast
    Filmoplast does not require special storage conditions. It simply should not be crinkled. It is better to store it in rolls or in sheets precut for the specified size. Do not leave Filmoplast on the windowsill where the sun can reach it: that may damage the adhesive layer. Do not buy Filmoplast enough to last you through the whole life, because the adhesive layer is not imperishable. It only has 2 years of shelf life.

    Pinpoint: Perfect design placement on Bernina machines

    By diver361, in Machine embroidery materials and technology, , 1 comment, 5,853 views
    Should you ask me 5 or 7 years ago, what are the main points when choosing an embroidery machine, I would undoubtedly say, “The size of the machine frame and your wallet.” Today I will answer, “Look at the what the machine can do!” Contemporary home embroidery machines are reaching their limit as regards the hoop/frame size. You cannot infinitely enlarge the embroidery area and stay affordable for the majority of people. You need to find other ways. One of those is to add to the machine’s functionality. Pinpoint Placement, the perfect alignment of the parts of the embroidery, is exactly what an embroiderer needs. No size limit. Split up – Position – Go!
    Pinpoint: Perfect alignment
    Hi friends!
    Should you ask me 5 or 7 years ago, what are the main points when choosing an embroidery machine, I would undoubtedly say, “The size of the machine frame and your wallet.” Today I will answer, “Look at the what the machine can do!”
    Contemporary home embroidery machines are reaching their limit as regards the hoop/frame size. You cannot infinitely enlarge the embroidery area and stay affordable for the majority of people. You need to find other ways.
    One of those is to add to the machine’s functionality.
    Pinpoint Placement, the perfect alignment of the parts of the embroidery, is exactly what an embroiderer needs. No size limit. Split up – Position – Go!
    This information is meant for those who are planning to buy or have already bought a Bernina sewing and embroidery machine, but hasn’t yet explored all its capabilities. Today we’ll talk about a Pinpoint Placement option that allows you to position the design on a garment with accuracy to one mm, and also to align different parts of the pattern and embroider designs several times larger than your hoop. The most perfect examples are the border designs, replicated again and again.
    Pinpoint Placement is an option available in some Bernina models: Embroidery machines: Bernina 700, Bernina 500; Sewing and embroidery machines: Bernina 590, Bernina 790 Plus, and Bernina 880 Plus. This is how it’s done. You decide where on the garment you’ll place the future embroidery. With chalk or a marker, draw two positioning points. Now hoop the garment not bothering about the exact placement. The main thing is to match the size of your design with the embroidery area. Then the magic starts.
    You pick the necessary design in your machine. Touch the PinPoint button, then activate the Grid and choose two of the nine positioning dots. You will align the needle with the chosen positioning points. To do this, rotate the Multifunction Knobs until the needle will be in the right position, directly above your mark. Fix the position by touching Set.  Now, let’s align the needle with another of our two dots. Choose the other one of our two points and rotate the Multifunction Knobs until the needle will be right above the mark on the garment. Done. Now you can do the embroidery.
    There is also free point positioning. Here you mark a random spot on your garment, touch the right spot on the design, rotate the Multifunction Knobs until the needle is directly above the mark. Then repeat with the second positioning dot.
     

  • Top Downloads

  • Recently Browsing   0 members

    • No registered users viewing this page.
×
×
  • Create New...