Jump to content
  • Articles

    Our website articles

    Removing the hoop burn

    By Irina, in Machine embroidery materials and technology, , 1 comment, 12,230 views
    Original text by: Marina Belova 
    I've already raised the question of hoop marks (hoop burn) on fabric and the ways of avoiding them. Today I will write about removing the ones that are already there. 

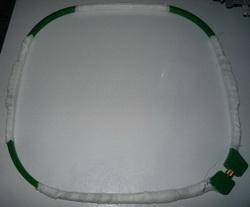
    First let's try to figure out what is the reasons for their appearance. It is believed that the reason for hoop marks is screwing a hoop too tightly so that the rings are fitted too closely. The traces may vary: 
    Simple creases  Shiny rings  Fibers shift  Fibers damage  Some fabrics are more prone to get hoop marks and some are less. For example, pure fabrics will more likely get hoop marks, unlike the blended ones. Fabrics like velvet are often difficult to hoop and require alternative methods of securing, because the hoop tramples down the pile, which is then uneasy to restore to its original condition. 
    Of course, some of these marks are easier to remove than the others; everything depends upon the degree of damage and fabric composition. 
    There are numerous ways of removing the hoop burn. I've seen the following recommendations, which require inexpensive means that are always under our hand: 
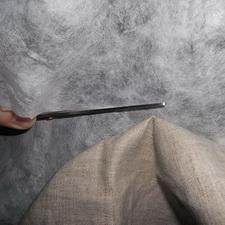
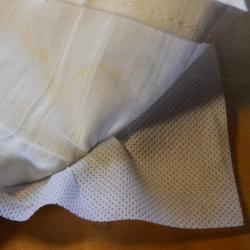
    Always keep a bottle with a sprinkle, filled with plain water. After unhooping, spray the hoop marks with water right away and leave it for 5 or 10 minutes to dry. When fabric is dry, press it with steam.  A sticky roller brush that removes fluff and pile from clothing will help with the hoop burn on dark textiles.  Starch mixed with water will be equally effective. You need to sprinkle it over the hoop marks and dub them with a soft cloth or just by hand. But this is only true for light-colored fabrics.  For the dark-colored fabrics better use an ordinary fabric softener.  Hoop marks will easily come off the knitted fabric if you use steam. I've tried this one myself.  It is recommended to remove shiny hoop burn with vinegar and water cleaning solution, which is sprayed over the damaged place and then dubbed with the piece of the same fabric.  Flattened pile could be brushed.  Creases will most probably disappear after first washing.  Fiber shift is much harder to correct. I remember how I had to restore the fabric simply by moving the fibers back to their original position one by one with the help of a needle. Fiber damage (tear) is, in my opinion, irreparable. Therefore you should very attentive to how tightly you hoop the fabric. 

    Hooping minutiae

    By Irina, in Machine embroidery materials and technology, , 1 comment, 6,070 views
    Original text by: Marina Belova 
    Oh Your Excellency Lord Hooping Device! How much depends on You! 
    But let's be more serious: how can we make hooping of the garments more easy, but yet use an ordinary hoop? I don't suggest using special devices that help positioning an item in the hoop, which every embroiderer dreams of. What I mean is what one can do with an ordinary hoop to make life easier. 
    Not very long ago I was embroidering with the use of the ordinary square hoop, which is a part of any commercial embroidery machine, and no stabilizer. And in case no stabilizer is present, it is very important for the fabric to be very taut in the hoop. What's no less important is preventing the fabric from slipping out of the hoop during the embroidery, as it will inevitably cause the pull. 
    My hoop is made of plastic. And the fabric has a tendency to slipping out of it along the sides because of the gap between the bigger and smaller squares, and also to become slack in the hoop. However, the fabric is firmly secured at the corners. 
    All this happens because the gap between the inner and outer squares varies — it is the smallest at the corners and the biggest at the centers of the sides. Of course, the fact that the tension is spread unevenly may lead to all kinds of embarrassing situations. 
    I didn't have time for intricacies, and therefore, I did this: took a roll of the ordinary adhesive bandage (the one that can be found at the chemist's) and stuck it onto the inner side of the outer square, where it touched the outer side of inner square, like this: 

    This helped to even the tension during the embroidery, and additionally made hooping easier. 
    But having embroidered a couple of items with these 'patches' I've noticed that the ones at the sides were not thick enough, because the fabric loosened there. Therefore, they should be made thicker. So I took an ordinary paper adhesive and wrapped it around each side of the hoop 2 times: 

    The attempts to hoop the fabric with and without a stabilizer were successful — the tension was right, and the fabric almost was not pulled at the corners. 

    I've read somewhere recently that there are special materials that can be stuck to the rings (ovals, squares) of the hoop to prevent the fabric from slipping out, similar to the ones I made of an adhesive bandage. The name slipped from my memory. Soft duct tape for hoop wrapping can also be found on the western markets. 
    Given that I have two sets of hoops of every size, I decided to wrap the straight sides of my second square hoop in a thin fabric. I took a strip of calico about 2 cm wide: 

    Wrapped the outer square in it, not forgetting to make a small bulge at the center of each side. I secured the ends with a few stitches so that the wrap did not unwind. This is what I got: 

    Hooping test showed that wrapping works good as well. 
    Then I decided to see how the wrapping would effect the performance of the round hoop. In my opinion, using the round hoop is easier, because the gap between the rings is the same along the perimeter. Anyway, I wanted to check if there was the difference: 

    I hooped a piece of knitwear together with a stabilizer. The result was splendid. The quality of the hooping was increased because of wrapping of the ring in a fabric. 
    Summary: wrapping of the hoop and evening of the gap with the 'patches' improves the quality of the hooping. 
    But the hoop marks (also known as hoop burn) on knitwear are still present: 

    And why shouldn't they be if the outer ring has not been wrapped. My next step was to test the widely publicized method of removing the hoop burn — putting paper under the outer ring. 
    It is usually advised to use the thin cigarette paper for this purpose. But I don't have any, and the only substitute I could fined was thin tearaway stabilizer. Now I'll try to make a 'sandwich' — stabilizer/knitwear/stabilizer: 

    Because the paper that lies on top is nontransparent, it is very difficult to control the fabric during the hooping. This I didn't like right away. But I've already hooped the fabric and tore the stabilizer off. I will not embroider on stabilizer, will I? 

    The quality of such blind hooping leaves much to be desired. A not at all convenient method, and what's more, everything was in vain, for the burn on knitwear remained visible, though to a lesser degree. 

    But was determined to bring this matter to a conclusion. Therefore I proceeded, and an idea popped into my mind: how about cutting a window in the piece of cloth the size of the future embroidery and trying to hoop it with the fabric and the stabilizer, in order to see if the marks would be visible after that. 
    This time I used the following layers: stabilizer/knitwear/additional fabric with a window in it. 

    The hooping was of a comparatively higher quality than I achieved with paper. Not to mention the fact that hooping is much easier if you can see what you're doing: 

    But I was really interested in hoop marks: would they appear or not? It turned out that the fabric didn't prevent appearance of the hoop burn. 

    I really don't know what say about a trace like this one. What should one do to avoid it? 
    P.S. The idea for this article was suggested to me by Lydia. 
    P.P.S. Various tips on removing the hoop burn can be found here. 

    Multicolored threads for machine embroidery. What to do about them?

    By Irina, in Machine embroidery materials and technology, , 6 comments, 4,622 views
    Original text by: Marina Belova 
    Multicolored threads and to what purposes can they be used, always have been a mystery to me. They seem extremely beautiful on spools, but the result of the embroidery is often discouraging. Where can they be used so that the result would not look odd? 
    Multicolored threads can be called in different ways: some manufacturers say "multicolored" or "multiple colored", the others — "color blend"; you could even see the name "variegated". Usually they are #40 threads that weigh just about the same as the standard ones. The price is slightly higher than for the standard threads of the same composition. The color combinations may be most unusual to the eye. There may be 2 colors that either blend smoothly or contrast each other. There can be a distinctive pattern, or a rather chaotic one.
    Here is an illustrative example of multicolored threads: 

    Or even more illustrative one: 

    There is so little information on these threads that you don't know where to start. Because every time you embroider with them, you inevitably get stripes, both on satins and fills. 
    The only techniques known to me where these threads contribute to an interesting and good-looking result are trapunto (free-motion) and quilting. That is, embroidery with simple stitches. Or decorative motif stitches in extreme cases. All the other types of stitches are offending to the eye. 
    Not long ago I was embroidering a butterfly in the Thread Velvet technique, and got an idea not to change colors, but to use the multicolored thread instead — it was easier with that particular design. The characteristic striped look of the embroidery before trimming is shown on the photo below: 

    It becomes better after you've trimmed and slightly frayed the threads: 

    While observing the embroidery process, I notice an interesting effect. As I mentioned in my blog about the Thread Velvet, this technique stems from employing several layers of satin stitches, superimposed. So, when I was embroidering the layers of satin stitches of low density, the threads in them got intermixed, and that seemed to destroy the striped effect. 
    This gave me the idea of using these threads in the Balboa Stitch technique, which involves embroidering the same objects with layers of satin stitches of low density, superimposed. I decided to experiment a little. I chose the design. There was a gradient fill it in, how very suitable for my purpose: 
    And I created a butterfly test design out of it, which employed a number of various techniques: standard satins, standard fills, layers of satins of a high and low density, and also layers of fills of low density. This is the result that I got: 

    Let's look at the image, moving from left to right: 

    Two columns in the leftmost vertical row — both satin stitches and the fills are made of low density layers. The layers and, subsequently, the colors superimpose chaotically, which results in a curious effect.  Two columns in the next row were made using traditional methods. The shapes here are simple, the embroidery is covered with the stripes of even width.  Then the third vertical row: the butterfly on top is made of ordinary satin stitches, the on the bottom — of standard fills. The shapes here are more complex and the thread is spread in a more random way, but the stripes are visible.  The forth row was made of low density stitch layers. The butterfly, embroidered with satins, in located on top, and the fills are on the bottom. It creates an ambiguous effect.  This is my summary for now: 
    A definite "yes" to the simple stitches done with these threads.  The same can be said about Thread Velvet technique.  A definite "no" to standard fills.  As for using the ordinary satin stitches, the question remains open for the debate, for the result was not so bad. At least, with these threads.  As for the layered technique, it is only good for very simple objects.  There are more questions that there are answers, as usual. 
    Does anyone have an idea, where one may use these enigmatic threads? 

    Trimming jump stitches

    By Irina, in Machine embroidery materials and technology, , 0 comments, 10,917 views
    Original text by: Marina Belova 
    A couple of days ago I was thinking on where it would be better to cut the jump stitches (travel runs between the objects): on the right or the wrong side of the embroidery. As it always happens, the mystery was easily solved — with the very simple yet sound advice from Deborah Jones: 

    If you use topping (water soluble film), don't remove it after embroidery.  Trim the jump stitches on the right side.  Now turn the item the wrong side up and, gently pulling, secure the upper thread end in the fabric so that it is not visible anymore.  Trim the jump stitches that are over 12 mm, created by the bobbin thread on the wrong side. It is necessary in order to prevent the long threads catching the parts that stick out.  Remove the stabilizer both from the right and the wrong side.  To make the embroidery look neat, you'll need to do all the work that any commercial embroidery machines with an automatic trimmer (a knife under the needle plate) does — pull the upper thread tails to the wrong side. There is no way to avoid wearisome manual labor in machine embroidery. 
    Even such a small problem is handled not like I'm used to, as usual. From now on I won't make the jump cuts between the objects. I'll let the machine do the trimming. 
    When I was just beginning my embroidery career, I was most strictly advised to minimize the number of trims in the design not because it was good for the purpose of making the right embroidery sequence leading to embroidery efficiency, but only because it would cause 'damage' to the machine. But later a technician said to me that trimming was not in any way damaging for the machine, and that I should not try to avoid it where it was really needed, because removing the jump cuts would require a lot of manual labor afterward. 
     

    Thread color vs the color of the fabric

    By Irina, in Machine embroidery materials and technology, , 0 comments, 3,267 views
    Original text by: Marina Belova 
    I think that every machine embroidery digitizer has experienced a necessity of changing the design not only because of different size or a different type of fabric, but also to embroider the same design in a different color scheme. 
    Here is an illustrative example. I embroidered the same design on the same type of fabric, but with different colors. The colors of both the fabric and the threads varied. And every time the color of the thread contrasted the color of the embroidery base. 
    This is a branch embroidered with dark threads on the blue knitwear pique: 

    Here all fills and densities are in perfect order. And this is the same branch, but embroidered with light-colored threads on the dark brown pique: 

    As you can judge from the photo, the dark background shows from under the light-colored threads, and to my eye the branch looks thinner and less neat, like it sinks into the fabric. You also get the impression that the lighter threads are thinner than the dark ones. 
    On the photo below is the branch embroidered with the thread that does not contrast the dark fabric. Nothing is offending to the eye here: 

    I also show you the photo of the embroidery made with threads of several different colors, but with the same outline parameters. When you look at it, you instantly see that something is wrong with the white thread — the dark background shows through and tempts you to make corrections. 

    It seems that the light-colored thread requires more attention from the digitizer. That is, higher compensation value and higher stitch density.
    But if you asked me, I would not increase the density of the finishing stitches so that to avoid extra problems. I would increase the density of the understitching instead. 
    And don't forget about the greater attention to the light-colored thread in the design. I've encountered situations when I had to digitize the same image twice, in two color schemes, i.e. I got two different files as the result. One for the light-colored threads and another, a simpler one, for dark colors. 
    As you see, you cannot just take machine embroidery files and simply change everything in them, from the type of thread to the type of fabric, and achieve the result of the same quality. There is no such option. You'll always need to make small corrections. 
    There are no trifling matters in machine embroidery. Though our understanding of the quality may vary. 

    Testing water soluble film replacement materials

    By Irina, in Machine embroidery materials and technology, , 5 comments, 3,539 views
    Original text by: Marina Belova 
    A lot of people on the Web say that you may use plastic food bags instead of water soluble film, which is quite expensive. What's interesting is that not only my fellow compatriots write about it, but our western colleagues as well. Those who do not know how to use the water soluble film, are very welcome to read this article. 
    The question is quite an interesting one, especially if we look at it from the standpoint of an embroiderer who tries to save the consumables.
    Therefore, I decided to test all the potential replacement materials in order to make sure that this method works. 
    So, I'll try to replace thin (10 microns) water soluble film with the following materials: 

    Plastic food wrap (comes in rolls).  Plastic bags used for food freezing. I want to point out that the bad I have here is quite thick.  I created a small monogram for embroidery on terry cloth. And made 3 copies of it right in the editor, without changing the parameters. This was necessary, because I wanted to see the difference between the test pieces. 

    I embroidered the first monogram on the leftovers of the water soluble film: 

    The second monogram was embroidered on a food bag: 

    And the third one — on the food wrap: 

    After having embroidered all 3 test pieces, I decided to embroider just one letter. I changed the design so it looked like this: first came the understitching, then the machine made a stop, and after that all the finishing stitches were embroidered. 
    Why would I need to do it this way? The answer is simple: so that to remove the film after having embroidered the underlay and before the finishing stitches. I've seen this several times. In my opinion, the necessity of creating the design in a highly unusual way it a great disadvantage of this method, for you have to draw the underlay by hand. But I wanted to see if there were differences between the standard way of digitizing and this one. 
    This time instead of water soluble film I used the food bag. I used it only to embroider the underlay: 

    Having stopped the machine, I tore the bag off: 

    After that I embroidered all the finishing satins without any topping: 


    Now all three tests were completed. All that's left was taking them off the machine, and thoroughly remove the film and the bag. I haven't managed to get rid of all the leftovers: 

    The process of removing the film or stabilizer from an item is the dullest and extremely wearisome part of the embroidery on terry cloth for me.
    Especially on terry cloth, where there is always a possibility of catching the loop and pulling it out. And what's the most remarkable, it is always hard to remove all the ones that stick out, though it seems so easy. Besides, the cleaning process is rather long if you do not use some additional means, but just pluck the film from under the embroidery. Those of you who have done that, will understand. 
    Then I did the pressing. I decided not to take a risk of pressing the item it as it was, but used the stabilizer leftovers for protection. Just in case: 

    Now can you can see the results: 

    Water soluble film (the first monogram counting from the top) is good as always. Though the film does not come off after steaming, you can remove it using the wet cloth.  Embroidery on a food bag is just as good. And besides, all the leftover pieces disappeared after the steaming, leaving no trace.  The embroidery on the food wrap is the worst of three — I mean the smoothness of the stitches. The leftovers did not disappear after the steaming. It seems impossible to remove them by hand, because the wrap is extremely stretchy.  Stopping the machine in the middle of the embroidery I now consider an over caution, for it only complicates both digitizing and embroidery processes. 
    Summary: an ordinary plastic food bag can be a perfect water soluble film replacement. At least, with terry cloth, where is works very well. I think that even washing won't change the look of the embroidery. As for embroidery on velvet, the matter is still in question. 
    P.S. I would not recommend using the polythene bag for complex designs with small details, for it would be hard to remove, and steaming will cause it to roll up and to create rather hard 'ribs' along the perimeter. 
     

    Flat knot that goes through needle's eye

    By Irina, in Machine embroidery materials and technology, , 0 comments, 5,577 views
    Original text by: Marina Belova 
    Perhaps, everybody knows how tiresome it is to change thread color on multi-head embroidery machines. As for single needle embroidery machines, inserting the thread into the needle's eye every time when you need to change color is quite a wearisome task, too. Therefore, every embroiderer could use the skill of joining the ends of two threads into a flat self-tightening knot that passes through the needle's eye. It is especially true if you insert a very thick thread (like acrylic) into the needle's eye. 
    I will not go into details of how one can do it, but instead show you the picture, which served as a guide for myself when I was learning to knit amigurumi toys. Even now the ability to tie two threads together makes the job much easier: 

    P.S. Polyester threads, in my opinion, should be tied in a tighter knot than rayon ones, for they have a tendency to slip out of it. In order to avoid it you may also leave the longer thread ends. 
    P.P.S. Imagine my disappointment when the trick didn't work out on my home embroidery machine. 
     

    Removing stabilizer from the wrong side

    By Irina, in Machine embroidery materials and technology, , 0 comments, 3,784 views
    Original text by: Marina Belova 
    Every one of us has encountered a dense tearaway or a cutaway stabilizer, which does not tear easily. But nevertheless we need to remove it from the wrong side, in order for the item to look neat. And no matter how you slice it, it is the part of the machine embroidery routine, so you have to do it anyway. 
    Methods of removing the stabilizer include either simply tearing the it away or trimming it along the perimeter of the embroidery; which way to choose, depends on the type of the stabilizer used. Here are the most common mistakes: 
    Distortion of the ready embroidery, which is the result of pulling the stabilizer too much in order to tear it away as quickly as possible.  Cutting the stabilizer in such a way that it leads to a «small» inconvenience of cutting the fabric with it. I've been there, and I know how disastrous it is. 
    To cut a long story short, even simple actions like that will tolerate no haste or shoddy work. 
    To avoid distortion of the design when tearing away the stabilizer, one should hold the embroidery close to the tearaway line. If you have used several layers of stabilizer, tear them away layer after layer. 
    As for trimming the stabilizer you should just follow these steps: 
    Use scissors with short sharp blades and round edges order not to catch the fabric.  When cutting hold not to the fabric, but to the stabilizer instead, so that the fabric (item) is hanging down from it. 
    Always have the fabric in sight so that you could be sure the scissors are not cutting it.  Remove the stabilizer by gliding the scissors through it, moving them along the perimeter of the embroidery, about 3-5 mm from the edges.  In order for the item not to fall on the floor and get dirty, trim you stabilizer above the table.  That's it all.

    Seeking for stabilizer replacement

    By Irina, in Machine embroidery materials and technology, , 4 comments, 6,859 views
    Original text by: Marina Belova 
    I have long been practicing in searching for a 3D Puff replacement — read here and here. Now I'm in the middle of testing my new embroidery machine, and I decided to find a new kind stabilizer. Moreover, I have a lot of materials at my country house, which at the first glance seem to make a suitable embroidery stabilizer. 
    I chose 4 materials for comparison: 

    I'll name them from left to right: 
    a very dense perforated cutaway stabilizer from Gunold. I don't remember how many g/m2 are in it. It stretches good in one direction, and practically not at all in the other.  some non-woven insulation material used in building; it, too, is perforated, but has lower density compared to the real stabilizer. It is similar to the stabilizer by its characteristics.  covering spunbond (for garden) — a non-woven material, soft, agreeable to the touch, perforated, resembles spunbond used in embroidery. But this material is flexible — it stretches in all directions.  ordinary printing paper. I've read a lot about using it as a stabilizer on the internet. Only now I've decided to give it a try. The paper is very stable and does not stretch at all.  I chose a plain calico fabric. I turned the hoop screw once, and hooped all the stabilizing materials in a similar way — together with the fabric. I had only one design for all materials. The result surprise me a little. 
    The design I'd created contained a large number of stitches (about 21 thousand), and the first material I chose to embroider it on was a real stabilizer: 

    This is what I got: 

    Not bad altogether. The lines on the bushes shifted downward — they didn't hit the grooves intended for them and went beyond the fill area. The rest is quite acceptable. In one place between the dark bear's head and the bush there is a gap. Indeed, not so bad a result for such a big design. 
    Then I proceeded to embroider on the building spunbond: 

    This is what I got this time: 

    The lines on the bushes shifted slightly more down, and there are gaps in the strips on the bear's shirt here and there. The fabric was visibly more pulled, but nothing too critical. 
    I made the third embroidery on the covering spunbond: 

    Here the result was most pulled of all, the lines on the bushes shifted the most, and the gaps on the shirt were the widest: 

    As for the bears' eyes, I haven't even manage to finish them because of the sad occurrence of the 'birds nest'. I used to think that only on commercial embroidery machines it was such of problem to remove a knot like that without consequences. There you can at least get to it from the throat plate side. It turned out that on a home embroidery machine it was practically impossible. Here it is:
     
    To remove it I had to unhoop the fabric and take off the throat plate — there was no other way I could reach it: 

    Then I decided to embroider on 2 layers of printing paper: 

    The embroidery on it was the best of all four, which was not at all what I have expected: 

    What do you know, you win some, lose some. The result was good even despite the fact that the paper was perforated and almost detached from along the perimeter. 
    And the paper is the most accessible stabilizer of all. This means that even in the hardest times we'll have something to work with. 
    It turns out that you have to try everything once, in order to understand what is what. 

    Removing a fresh stain from an embroidered item

    By Irina, in Machine embroidery materials and technology, , 0 comments, 3,862 views
    Original text by: Marina Belova 
    Several days ago I happened to read an article by H.H. Momsen in the Printwear magazine on different ways of removing stains from the embroidered items. My own experience of staining the embroidery instantly jumped to my mind. I shudder every time I remember it. After all, stains are a part of an embroider's life, too. 

    I have probably seen all kinds of stains, from machine oil mixed with dust and grease to blood. Mistakes in marking of the item before embroidery fall into this category, too. Sometimes the marking was hard to remove — there were traces of pencil, soap, chalk, and also air and water erasable markers. Every time I had to struggle to remove them from the fabric, and not always the result was successful. 
    Here are the tips by this knowing lady on the subject of removing the stains and preventing their appearance. I will add a bit from my own experience: 
    After having lubricated your machine, you'd better start with the dark-colored items.  After having lubricated your machine, you should use water soluble topping (film) when embroidering the first item, to protect the item from the drops of oil.  Too bad if the shuttle was oiled too much, because the bobbin thread might get soaked in oil and might splatter item from there. That's why it is better to remove the excessive oil with an ordinary cotton swab. 
    In case the stain has appeared anyway, you can try to remove it using gasoline or a mixture of turpentine and sal ammoniac in the ratio of 1 to 1. Sometimes I've managed to get rid of a fresh oil stain by simply washing the item in a warm water with soap.  Air and water erasable markers leave traces on cotton fabrics. Traces made by a Madeira disappearing marking pen cannot be removed by air or water or even with the special erasing pen, which should simply wipe it off. As for the less expensive Aurora markers, they do not give cause for criticism. You can test all these markers on a piece of fabric first.  Ball pen traces can be treated with glycerin and then with oil solvent.  Blood stain should be washed in warm water and rinsed with cold water after that. Repeat until all the stains will be gone. Now you can try removing the stain with hydrogen peroxide.  Coffee and tea stains can be treated with glycerin, an then oil solvent to get rid of the traces. Or you can dub the stain with a mixture of 1 teaspoon of sal ammoniac and 4 teaspoons of glycerin.  Vaseline removes machine oil stains.  Vegetable oil and animal fat stains might come off any type of fabric if you use gasoline, acetone or turpentine.  You may succeed in getting rid of fresh greasy stains powdering them with chalk, talc or starch and leaving them for a while.  But I've never managed to get rid of the pencil traces as yet. Therefore, I recommend using it only where it couldn't be seen — on the wrong side, for example. 
    These tips aren't, of course, ultimate and you should test every time, not forgetting to remember the type of the fabric that was stained. 
    There are times even in machine embroidery when one should use their gumption and knowledge of housekeeping. And also to keep various stain removers and cleaning substances, solvents, tissues etc. After all, our experience has proven that neither of them is ready to hand when they are needed. 

  • Top Downloads

  • Recently Browsing   0 members

    • No registered users viewing this page.
×
×
  • Create New...