Jump to content
  • Articles

    Our website articles

    Patchwork pillow on embroidery machine

    By Irina, in Machine embroidery materials and technology, , 1 comment, 2,104 views
    Patchwork pillow
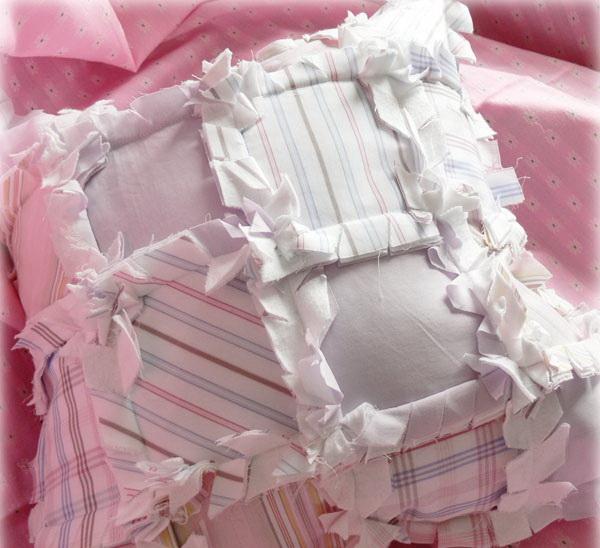
    A soft and fuzzy pillow with frayed edges that one can easily create by utilizing scraps from other embroidery projects. The edges will become more frayed with every time the pillow is used.

    The pattern is basically an ordinary square; the seams will go inside so they won’t need a finish.
    One cannot have too many pillows, but what if you have more ideas than your flat has free space? The solution is a simple one! Sew several pillows and change their “clothing” often. Pillowcases don’t take much space and can be washed, if necessary.
    Pattern
    To create a fluffy pillowcase, take a piece of cardboard and draw a square of side 10 cm plus 2 cm for fraying. Cut out 16 squares from fabrics of various colors.


    Arrange them as you wish, matching them by color and print. Cut 16 more squares out of white baize or white chintz; these fabrics are easily frayed and suitable for creating the chenille effect.


    Install the feed dog on your machine and stitch the cutouts together into horizontal bands. If you're going to join multiple layers (4 in our case) with an ordinary foot, lessen the foot pressure first.
    The details should be joined with their wrong sides facing each other.


    Pin horizontal bands together, in order to mark the places where the seams meet. 


    Stitch the details together, folding the fray allowance from the seam on both sides before they go under the foot. 


    Having finished stitching, you’ll get the outlined squares on the wrong side, and fray allowance on the right side of the fabric. Rip off the stitching where the fray is.


    Fray the allowance at a distance of 0.5 cm to the stitching and fluff it. You may leave the last bit to your washing machine :) Several washing cycles will fray your pillowcase alright.


    The back side of the pillowcase and the button panels:
    The back side of the pillowcase is comprised of two rectangles 48 by 27 cm.
    On one side, where the button panels will be, attach a 3 cm wide strip of the adhesive stabilizer. 


    Finish the edges with overlock or with overhand stitch.
    Fold the edge by 3 cm and stitch with a straight stitch; cut the buttonholes on one of the details.


    Pin the two pieces of the back side of the pillowcase together with their wrong sides facing each other. Mark the starting point at the distance equal to the fray allowance.
    Starting from any corner point, sew the parts of the pillow perimeter-wise, rotating it at the corners. Having finished, trim the edges.


    Cut the fabric reserved for fraying, avoiding the stitching.


    Sew the buttons, cut the buttonholes and put your pillow into your new pillowcase. Done!


    Original text by Olga Ionova

    Machine embroidery on terry cloth: the guidelines

    By Irina, in Machine embroidery materials and technology, , 1 comment, 7,643 views
    Machine embroidery on terry cloth: the guidelines
    Every one of us becomes familiar with terry cloth in early childhood: our favorite bathrobes and bath towels are made of it. Terry cloth is most commonly used to produce items for home. Embroidery on terry cloth is a pleasure, for the fabric is stable and doesn't stretch. The loops are, perhaps, the only disadvantage, but if you are familiar with the correct hooping technique, and know how to choose a stabilizer and a design for the particular fabric, you needn’t concern yourself with them.

    In this article, we’ll cover the main points of the embroidery on terry cloth. One needs to keep in mind that all this information pertains to home embroidery and sewing and embroidery equipment; nevertheless, many of the recommendations will be applicable to commercial embroidery equipment as well.
    Terry cloth: its composition and properties
    Terry cloth is an uncut-pile fabric used in the production of towels, beach robes, bath slippers, bed linen for grown-ups and kids, children’s toys, and even bar furnishings.


    As for its composition, terry cloth is usually made of cotton, linen or, less frequently, bamboo. The fabric absorbs a lot of moisture and doesn’t stretch.  These properties, along with the range of uses, make terry cloth very attractive for the embroiderers, both amateur and professional ones.
    Lately, synthetic fibers are used in the making of the fabric rather often. This lowers its quality a bit, but using it as your main fabric does not affect the result of the embroidery. There are advantages as well. Baby bibs are made of terry cloth that is partly composed of synthetic fibers. They are soft, and the after-effects of breakfast and dinners easily wash off them. 
    Terry cloth differs in weight, thread twist, and loop height. These are the main properties one should pay attention to when mastering the embroidery on terry cloth.

    The higher the loop, the greater the possibility of its sinking into the fabric or showing through the fill. The thicker the fabric, the more likely you’ll have trouble with hooping it, as such fabric will be more difficult to properly secure. It is possible, but not easily attainable, and besides, do you really need it? Let's proceed.
    Choosing machine embroidery needles and threads
    When embroidering on terry cloth, one shouldn’t concern oneself too much with the needles. Ordinary embroidery kind will be just fine.  In case there is trouble, use specialty needles listed below.
    For the embroidery on a loosely spun terry cloth, use ball point needles, such as the ones designed for knitwear. They separate the yarns without cutting them.
    For the embroidery on a dense terry cloth with high uncut pile and containing a great number of synthetic fibers, use a topstitch needle with a sharp tip. Such a needle easily pierces the material, thus preventing the slip stitching.
    If you’re going to use metallic threads, use the needle designed specifically for that purpose; metallics are whimsical: when passing through an eye of a wrongly chosen needle, they tend to fray, which at best costs them their luster, and at worst makes them snap a lot. 

    Any threads may be used for the embroidery on terry cloth—cotton, polyester, wool, etc. The main thing that matters is their durability. Rayon and metallic thread are, perhaps, the less washable: they don't get along well with bleachers and other chemicals used in laundry.
    We’ll probably offer nothing new in the bobbing thread choice department. Use a common bobbin thread (white or black, depending on the design color scheme). Its thickness will depend not so much on the chosen fabric properties as on the whims of your embroidery machine. It has been noted that some machines do not take to a very thin bobbin thread (#200).

    When embroidering a design on a terry towel, try to choose a bobbin thread of a matching color—in that case, the wrong side will look tidier. Keep in mind, though, that it will make the embroidery thicker. 
    Choosing a stabilizer
    For the embroidery on terry cloth, the stabilizers listed below will come in handy.
    When embroidering on terry cloth, the backing is used not only to prevent puckering but also as the main fabric that will be hooped.
    Tearaway nonadhesive stabilizers are preferable. They can be easily removed without scissors.
    On the market, you’ll find this kind of stabilizer in two colors, black and white. The color of stabilizer depends on the color of the fabric. It’s better to use black backing with dark fabrics, and a white one with light-colored fabrics.
    Stabilizers also differ in weight. For the embroidery on terry cloth, use the following stabilizers: 1640, 1650, 1751, 1860.

    Use stabilizers 1751 and 1860 for the dense terry cloth with high uncut pile (bath towels, bathrobes), and stabilizers 1640 and 1650—for the terry cloth with a low uncut pile (face towels).
    In addition to the nonadhesive stab, a temporary spray adhesive will be necessary.
    Filmoplast 
    As a backing, Filmoplast (a tearaway stabilizer with a sticky surface) is the most convenient. It comes in two colors, white and black. You can attach it to the fabric immediately after peeling off the protective paper.
    More on how to work with these materials in the Hooping methods section.
    Adhesive stabilizers may be used as well, but in that case, you’ll have to hoop the fabric, and there is no need to hoop the terry cloth. Besides, hooping terry cloth means to make the whole process more complicated. 
    For a topping, we recommend a water-soluble film that prevents the stitches from sinking into the fabric and can be easily removed without washing.

    Other kinds of topping are of little use for the embroidery on terry cloth. You may use them, but with no avail.
     
    Hooping methods
     
    Hooping terry cloth is easy. There will be no need to get the fabric tight as a drum or keep an eye on it so that there is not a single wrinkle, as you do with knits. After two or three attempts embroidery on terry cloth will become easy to you.
    Methods of hooping depend on the kinds of stabilizers recommended for the terry cloth.
     
    Materials
     
    Nonadhesive stabilizer (backing) Spray adhesive Water-soluble film Hoop the nonadhesive stabilizer. Carefully smooth down the stabilizer and tighten it a bit so that is doesn’t sag.
    Tighten the screw.

    Spray the upper side of the stabilizer with a temporary spray adhesive.
    Place the fabric with its right side facing up on top of the stabilizer.
    Pin the water-soluble film on top of the fabric.

    If you have some trouble locating the embroidery area on your machine, use a template. Any template has an embroidery area marked upon it.
     
    Materials
     
    Filmoplast Water-soluble film Scissors Hoop the Filmoplast. Carefully smooth it down and tighten it a bit so that is doesn’t sag. Tighten the screw.
    With your scissors, make an incision in the stabilizer’s protective layer. Peel off the protective layer.
    On top of the stabilizer, place your fabric with its right side facing up.
    On top of the fabric, place the water-soluble film.
    Pin it to the fabric.

    If you have some trouble locating the embroidery area on your machine, use a template. Any template has an embroidery area marked upon it. 

    Choosing machine embroidery designs
    The vast majority of machine embroidery designs gives one freedom to act. When choosing a design, one should learn to see it from the inside. To understand which fills the creator has used and whether the embroidery will look good on terry cloth. Having tried different embroidery techniques, you’ll come to the conclusion that in the majority of cases a topping should be used for the embroidery on terry cloth. If you’ll stick to this rule, the embroidery on a garment will undoubtedly come out beautifully. In order for you to know your way around the plenitude of machine embroidery designs, we offer the tried-and-true variants with the detailed account of the results.
    We have lots of logos and other designs in our store.
    All of the showpieces were embroidered with the help of the 1751 nonadhesive tearaway stabilizer.
    All stitching designs may be divided into two main kinds: 1) Double run—as a rule, all quilting and Redwork designs are made with simple double running stitches 2) Triple Run—every stitch is repeated three times.


    The record shows that Triple Run designs come out good with or without the water-soluble film on top. After you’ve removed the stabilizer leftovers and gently passed your hand over the surface, the difference is hardly visible.
    As regards Double Run, one may state that it is better not to use it while embroidering designs without topping. The difference is clearly pronounced. The picture below shows the same design embroidered with and without the topping.

    One should not forget that the design embroidered with running stitches on terry cloth may in time sink into the fabric, despite the result being satisfactory right after the embroidery. Therefore, here’s what we propose: embroider stitching designs on thin terry items with low uncut pile (face towels) and refrain from doing that on thick terry items with high uncut pile (bathrobes and bath towels). 
    A highly popular kind of machine embroidery designs are congratulations and inscriptions, and also logos made with satin columns. Monograms are also created with the help of satin columns. This kind of designs is perfect for towels, bathrobes and other items made of terry cloth.
    To provide you with full information on the subject, we have embroidered terry cloth with satin stitches under different circumstances. In the picture below you can see a monogram embroidered with the topping and without.

    We’ve tested the design on the least troublesome fabric with the low uncut pile. 1751 nonadhesive stabilizer was used as the backing. When embroidering monograms that consist of satin columns and fills without topping, thread breakage often occurs. The thread is caught in the loops, and that leads to chaffing. Thread breakage is not linked with the needle type or the kind of thread used (we’ve tried metallic, rayon and polyester embroidery threads of various manufacturers).
    The difficulty was also caused by the fact that the thread didn’t break at once but was chaffed so that the machine continued to embroider for some time after that. When embroidering the same design with the topping, the thread didn’t snap even once, and what’s more, the embroidery ran at a higher speed, with an excellent result.
    The embroidery without the stabilizer ran at 350 spm, with the stabilizer—at 600 spm!
    Tatami is one of the most popular fills. Up to 80% of the designs contain objects filled with it.
    In order to understand how Tatami behaves on terry cloth, we’ve used a simple design with the high-density fill (“Mushrooms”) and a design with the low-density fill (“Flower”). Both designs were embroidered twice, with and without water-soluble stabilizer.
    We’ve got the following results.
    The embroidery of the designs that contain Tatami fill without topping leads to trouble. 
    When stitching the design with high-density fill (“Mushrooms”) without the water-soluble stabilizer, the thread twisted and snapped. Terry cloth showed through.

    When doing this design with the topping, the result was a way better. Though in some places terry cloth is still visible through the fill, you may avoid it by adding an underlay.
    When embroidering a design with a low-density fill (“Flower”) without the stabilizer, terry cloth showed through the fill, and the thread did not twist but snapped at once. That most often happened on very small stitches.

    When embroidering the same design with the water-soluble topping, terry cloth didn’t show through (almost), but in some places, where the fill was the least dense, one could see the color of the main fabric.
    Choosing a design with the Tatami fill, pay attention to whether it has an underlay: it further strengthens the fabric and prevents the terry cloth from showing through during wear. The design we’ve chosen for our test piece didn’t have an underlay and was rather dense. 

    Perfect for terry cloth! The fabric covers the pile that adds some volume to the embroidery.
    We recommend using a water-soluble stabilizer on top—though without it the thread didn’t break, the loops showed through the satin column.

    Cross-stitch looked wonderful on a terry towel embroidered with the help of water-soluble stabilizer. One may turn a blind eye to the slight distortion of the stitches after the removal of the stabilizer if one wants a towel embroidered in this technique.

    We advise against the embroidery without the water-soluble stabilizer because the result is the same as with other embroidery techniques: thread breakage and stitches shifting.
    Of course, the sky is the limit for a really imaginative embroiderer, but the designs rendered in this technique are not good for terry cloth, especially for a dense high-piled one.
    If you're going to do cutwork, use the techniques above. You’ll find the guidelines in the section where we discussed satin columns. When choosing a design, pay attention to the width of the satin column. Do not use designs with columns less than 3 mm wide that are trimmed on the side.
     
    Taking care of an embroidered item
     
    If you want your embroidered item to serve you for many years (OK, months at least), you’ll need to learn how to take care of it. Having finished the embroidery, remove the traces of topping and backing. Gently iron the item in the embroidered area.
    An important note: it’s better not to use hot pressing and steaming with terry cloth. The loops are flattened, the general appearance of the garment suffers, making it look untidy.

    You may circumvent this issue by keeping an iron suspended above the fabric and using the steam boost option. Or, you may use a soft underlay—for example, a blanket, or an old terry towel.
    Items made of terry cloth are highly washable, therefore, if you’ve chosen right threads, no chemicals or high temperatures will do your item any damage. 
     
    Machine maintenance
     
    If you embroider on terry cloth often, especially without any backing, the lint, which is always present, may clutter the shuttle. It is, perhaps, the only problem your embroidery machine may encounter during the embroidery on terry cloth. Keep your shuttle clean and everything will be fine!

    Happy embroidery!
    Original text by Irina Lisitsa, Maria Stratan, Lisa Prass

    Machine embroidery on linen

    By Irina, in Machine embroidery materials and technology, , 1 comment, 3,131 views
    Machine embroidery on linen

    It is getting difficult for newcomers to find the information they seek among the numerous articles and forum discussions. Therefore, I have compiled all the pieces covering embroidery on linen here.
    In masterclasses, and also on sewing and embroidery forums, you often see phrases like “sew linen”, “embroidery on linen”, “linen napkins”. No wonder, as linen is a very easy-to-sew fabric.
    There are heavyweight linen fabrics (grayish brown in color), semi-white, white and dyed. Linens are valued for their durability and wear resistance, and also for their ability to absorb moisture while allowing for good heat and air penetration. Linen fabric varies greatly in appearance, from smooth with a matte finish to heavyweight with a coarse structure.
    Linen fabric is perfect for tablecloths, table napkins, curtains or bed linen decorated with embroidery. This fabric allows for the natural thermoregulation of the human body, which makes it a perfect material for summer clothes.
    Types of linen fabric, their uses, and appeal for the embroiderers, will be covered in the future articles. Here I’m talking about how embroidery on linen should be done.
    Newbie seamstresses and embroiderers should remember that natural (i.e. not containing any synthetic fibers) linen fabric shrinks a lot after washing. One must keep this in mind before cutting out and a pattern and embroidering. In order for the embroidered item to keep its neat look after the first laundering, you need to sanforize the fabric, i.e. to wash it or moisten it with hot steam. After washing, the fabric should be smoothed down while still damp, to save yourself the trouble with ironing out the creases.


    The rules of embroidery on linen
    Linen is a very easy fabric to embroider and the least troublesome for embroiderers. Nevertheless, there are several pieces of advice that may come handy for the first-time embroiderers on this highly manageable material.

    Hooping
    Linen is hooped in a standard way. The fabric should be smoothed down before being placed in the hoop, with a matching stabilizer glued to its wrong side. Only after that the fabric together with the stabilizer is placed onto the smaller hoop and is covered with a bigger one. Tighten the screw until the fabric is taut to prevent shifting during the embroidery.

    If the fabric is very thin and you’re afraid to damage it, you may hoop a tearaway stabilizer, and glue the fabric on top.

    Needles
    There are no special requirements when choosing needles for embroidery on linen. An ordinary embroidery needle with a sharp tip will be fine.

    Threads
    You can use any kind of embroidery threads: polyester, rayon, cotton ones; though it is not advisable to use metallics, there are no rules. If your design calls for metallic threads, try it out.
    Cotton thread is most often used for the embroidery on linen because its dull surface goes will together with the linen surface. Acrylic threads look interesting: they resemble woolen yarns in appearance.


    Stabilizer
    Choosing the right kind of stabilizer for linen depends on the fabric type and the design properties. The density of the stabilizer depends on the density of the design and the fabric weight. If the linen is thin, and the design is dense, you’ll need a tearaway stabilizer with adhesive or an ordinary tearaway. If the linen is dense and plain weave, and the design is a “light” one that only contains simple stitches, you may spare the stabilizer altogether.
    Too dense designs look bad on thin fabrics, spoiling the effect by reminding one of coarse patches. Soft, if dense, designs should be embroidered on soft, flowing fabrics. If embroidering a dense design on a thin linen fabric cannot be avoided, use a thin bobbin thread: it will make the embroidery a bit lighter.
    As textured linen is often loosely woven, it is necessary to use a thin water-soluble film on top of it.

    Embroidery designs
    In case you digitize your own designs, you’ll need to maintain a certain ratio between the density of the design and the weight of linen on which the design or inscription will be embroidered.
    If you’re going to embroider on loosely woven linen, it’s better to secure it with an outline prior to the embroidery.
    If you haven't learned to digitize yet, you are welcome to choose something from our large collection of free embroidery designs.
    Follow these rules, and the embroidery on linen will be a piece of pie to you. Linen towels, napkins, tablecloths, curtains, bedcovers, and pillowcases will decorate your home. Linen clothes, comfortable to wear, will look beautiful as well, thanks to the machine embroidery.


    ]

    Original text by Yelena Kraftwork

    A textile etui with cross stitch embroidery (Bargello imitation)

    By Irina, in Machine embroidery materials and technology, , 3 comments, 3,462 views
    A textile etui with cross stitch embroidery (Bargello imitation)
    Where do you keep your bijou jewelry, beads, memory sticks, buttons, and other knickknacks? Boxes and tins aren’t good–the heart yearns for the beautiful. These cross stitch designs imitate the famous Florentine embroidery known as Bargello.

    Below I explain how to actually sew and embroider an etui.

    A textile etui with cross stitch embroidery. Materials
    Printed cotton fabric Sole-colored cotton fabric Tearaway adhesive stabilizer Upper thread Underthread Scissors Machine embroidery design The sewing order (the image below)
    A textile etui with cross stitch embroidery. The making process
    You can buy the design or create it yourself. For those who don't know how, there will be tutorials in future.
    Prepare the design and working materials. I like doing it before the work starts, thus eliminating the possibility of missing something in the crucial moment.
    We’ll be using a sole-colored fabric. Attach the adhesive stabilizer to the wrong side. Hoop the fabric together with the stabilizer. Tighten the screw. After that, do the upper and lower threading and attach the hoop.


    Hit the start button. The embroidery consists of three parts, two rectangular and one square. You need to embroider two rectangular parts and one square part, which will make the basis for your etui.
    I recommend following the color chart that comes with the design so that to avoid gaudiness. 


    If you’ve decided to create your etui out of felt, you may forego the lining. In the course of embroidery, even cotton fabric becomes thicker, but I decided to leave the stabilizer and to add lining. In order to do that, embroider only the outer stitch on a sole-colored or printed fabric. As it comes last in the embroidery order, you need go to the editing menu of the design and skip the steps you don’t want to embroider.


    Having embroidered one square and two sides for both inner and outer sides of the etui, cut out the details, leaving 0.5–1 cm for seam allowance. Remove the stabilizer from the seam allowance, it will be superfluous there. Sew first the outer sides, and then inner sides together (see the scheme). Insert the lining into the etui and stitch the two sides together. I sewed by hand, catching the back stitches.
    You can additionally decorate the item with beads, ribbons, tassels or charms, whichever suits your taste best.

    In the end, you’ll get a nice textile etui where you can put your sundry. Such an etui may also be used as a box for a small present. Happy embroidery!
    P.S. Explore other embroidery techniques here!
    Original text by Mary Stratan
    Free machine embroidery designs made in this technique can be found here.

    Cross Stitch embroidery with alignment

    Cross Stitch embroidery with alignment
    There is a time in the life of any owner of an embroidery/sewing and embroidery machine when they come across a design too big to fit the hoop. Such a design should be split and embroidered by piecemeal in such a way that its separate fragments combine into a whole. This tutorial will show you how to align and embroider counted cross stitch patterns with the help of the alignment stitch.

    Design alignment. Materials
    Fabric Upper thread Underthread Tearaway adhesive stabilizer Cross stitch machine embroidery design from our store Pins Nota bene. Unfortunately, we do not have this particular design. But you can buy other ones from our store. You may use the "cross stitch" tag as a guide.
    Design alignment. The working process
    Prepare your fabric for the embroidery by gluing the tearaway adhesive stabilizer to the wrong side. Hoop the fabric and add the alignment marks with the help of the template. Add vertical and horizontal lines.


    You’ll also need to draw the alignment line. Use the design printout as your guide. Or, look at the image on the screen and use the plastic template.


    If you want to embroider your own cross stitch design but aren’t familiar with the embroidery software, please read these articles.
    Embroider the first part of the design and change color in accordance with the color chart. 
    Please remember that cross stitch embroidery takes a long time so you’ll need to be patient.


    This design was cut along a straight line. If you’ve decided to cut your design in your own fashion, put the biggest part in the first place in the sewing order and make the others a few cm smaller than the hoop. This will give you the room for alignment.


    The alignment stitch should be of the same color as the last color in your chart. Or, you can use the color that blends with the fabric–in that way you won’t need to rip the stitch out.


    Having embroidered the first part of the design, unhoop the fabric. What you need to do is to iron out the hoop burn.


    Do not slide the iron but press and lift it instead. Otherwise, the fabric will get warped and it will be impossible to make an alignment.
    Hoop the fabric along a straight line. Use the alignment stitch as your guide.


    The second alignment stitch is not obligatory. Use the option of moving by stitches. When aligning the cross stitch pattern it is crucial that its parts should match together with the utmost precision.
    The alignment should be accurate to the stitch!
    If the alignment lines do not match together, you’ll need to rehoop and do it all over again.


    Having correctly aligned the parts, embroider the rest of the design. As a result, the two parts of your design will correspond to the cross.


    Remove the jump stitches every time you change the thread color. Otherwise, they will be covered by the stitches that come next, and that will make them difficult to remove.


    When the embroidery is finished, iron it on something soft. Do not iron the front side of the embroidery and do not use the steam boost. Especially if you've used rayon threads!


    Design alignment is ready!

    Original text by Irina Lisitsa

    How to embroider on knitwear?

    By Irina, in Machine embroidery materials and technology, , 2 comments, 1,479 views
    How to embroider on knitwear?
    To create a high-quality and good-looking embroidery on knitwear we’ll need:
    Knitwear fabric of any composition. I have cut a new knitwear jacket and will do the embroidery on it. Embroidery stabilizer. I recommend a tearaway STIFFY stabilizer (by Gunold) or COTTON SOFT (by Madeira). If you going to use a non-sticky stabilizer, add a layer KK 100, a temporary adhesive (by Gunold). In order to embroider on knitted fabric, it’s better to use an adhesive stabilizer named FILMOPLAST (a stabilizer is hooped, and the fabric is glued to it). AVALON FILM, a water-soluble stabilizer by Madeira. Embroidery threads of the necessary color made of 100% rayon, in order for the embroidery to be soft (Madeira RAYON #40). Bobbin thread for machine embroidery, same color as the fabric (AMMAN BELFIL-C #120). Needles for knitwear (SCHMETZ Stretch), their number depending on the thickness of your fabric and threads.
    Cut out a pattern, choose where to place the embroidery, and mark the place.

    If you use a sticky stabilizer, glue it to the wrong side of the detail with an iron. If you use a non-sticky stabilizer, spray it with a temporary spray adhesive and attach it to the knitwear detail. A piece of stabilizer should be 3-5 cm bigger then the hoop you're going to use, so as to secure the fabric and the stabilizer.
    In order to get a high-quality embroidery, cover the right side of the fabric with a piece of water-soluble material and secure it in the hoop.
    Start your machine and run the embroidery.

    After it has finished stitching, carefully remove the excess stabilizer: both water-soluble and tearaway. Holding the embroidery with one hand, remove the Avalon. Turn it to the other side, and tear away the other stabilizer. Stabilizers come off easily as a rule because the needle cuts them along the edges.

    What’s left under the stitches will be washed out during the first laundry.
    See how easily you’ve made a one-of-kind T-shirt!

    Original text by Irina Yemelyanova

    Creating an Easter decoration with the help of ScanNCut

    By Irina, in Machine embroidery materials and technology, , 0 comments, 1,839 views
    Creating an Easter decoration with the help of ScanNCut
    Create an Easter decoration with the help of the ScanNCut machine. It’s fun and quick, and the result will look nice. The children will duly appreciate the magic world that pops up on your windowsill. You can cut the original decoration out of scrapbook paper. Read the following tutorial to learn how to use the machine, to cut the details, and to arrange them. You can download the designs, too.
    For this job, you’ll need:
    ScanNCut, an electronic cutting machine Standard cutting mat Scrapbook paper Files for cutting Creating an Easter decoration with the help of ScanNCut: the bunnies
    Load the designs onto USB and open them on the cutting machine. Customize the blade length and depth according to the manual. Apply your paper to the mat and do the test run. Cut.

    Each bunny consists of 2 parts. Join the parts together.


    The carved egg
    Load the designs and open them on the machine. Change the size if you want. Cut out the details, join them, pass the ribbon through, and tie the ends in a bow.


    The fence
    Load the designs and open them on the machine. Change the size if necessary.


    Cut. Glue the rails and fold along the dotted lines.


    Your holiday decoration is ready! Put it on the windowsill. Happy Easter!


    Original text by Olga Milovanova

    Decorative pillow: machine embroidery with alignment

    By Irina, in Machine embroidery materials and technology, , 4 comments, 2,908 views
    Decorative pillow: machine embroidery with alignment
    Not only is a present for a loved one, created with your own hands and in accordance with his or her tastes and preferences, a value-in-itself, but the attention you show in that way makes it even more valuable. Which item is simplest to create, even for a person who doesn't engage in handicraft? A decorative pillow, of course. There is a great variety of them, from a simple sole-colored pillow made of linen or cotton to the ones decorated with appliqué, embroidery or a pattern formed by beads or sequins. In this tutorial, I’ll show you how to do machine embroidery with alignment.
    You’ll need:
    Fabric Upper thread Underthread Stabilizer Tailor's chalk or water-soluble marker Stick the tearaway adhesive stabilizer to the wrong side of the fabric. With a water-soluble marker or chalk, mark the center and the horizontal and vertical axes on the fabric (blue lines in the picture).

    Trace the patterns in the corners of the future pillow. Hoop the fabric and embroider the first part of your design (the upper left corner).


    During the embroidery, I recommend doing your patterns in the following order: upper left corner, then upper right, lower right and lower left. Every time you rotate your design by 90 degrees clockwise.
    Having embroidered the first part of the design, use the plastic template that comes with your machine to hoop the next parts.
    Thanks to the “Display fabric while aligning the embroidery position” option in Brother Innov-is 1E, you can check the positioning accuracy without the alignment stitches/crosses.


    Cutting out and assembling the pattern
    For the front side of your pillow, cut out a square size 36 x 36 cm (that includes seam allowance) out of the embroidered fabric. After that, cut out two rectangles size 36 x 19 cm for the back side.
    Inserting a zipper under the placket
    Pin or baste the zipper tape to the longer sides of the rectangles, install a zipper foot and stitch.


    Add piping along the perimeter of the front or the back panel of the pillowcase. Start and end at the bottom of the future pillow, matching the edges of the fabric and the piping with approximately 2 cm overlap.
    Cover the panel with the piping with the panel without, their right sides facing each other, and stitch perimeter-wise; add a few back stitches in the places where you zipper is. Finish the edges with overlock.


    Press the pillowcase and turn it the right sight out. Put your pillow into it.

    The new pillow is ready!
    Original text by Irina Lisitsa

    Pinpoint: Perfect design placement on Bernina machines

    By Irina, in Machine embroidery materials and technology, , 2 comments, 2,983 views
    Pinpoint: Perfect design placement on Bernina machines
    Hi friends!
    Should you ask me 5 or 7 years ago, what are the main points when choosing an embroidery machine, I would undoubtedly say, “The size of the machine frame and your wallet.” Today I will answer, “Look at the what the machine can do!”
    Contemporary home embroidery machines are reaching their limit as regards the hoop/frame size. You cannot infinitely enlarge the embroidery area and stay affordable for the majority of people. You need to find other ways.
    One of those is to add to the machine’s functionality.
    Pinpoint Placement, the perfect alignment of the parts of the embroidery, is exactly what an embroiderer needs. No size limit. Split up – Position – Go!

    This information is meant for those who are planning to buy or have already bought a Bernina sewing and embroidery machine, but hasn’t yet explored all its capabilities. Today we’ll talk about a Pinpoint Placement option that allows you to position the design on a garment with accuracy to one mm, and also to align different parts of the design and embroider designs several times larger than your hoop. The most perfect examples are the border designs, replicated again and again.
    Pinpoint Placement is an option available in some Bernina models: Embroidery machines: Bernina 700, Bernina 500; Sewing and embroidery machines: Bernina 590, Bernina 790Plus, and Bernina 880Plus. This is how it’s done. You decide where on the garment you’ll place the future embroidery. With chalk or a marker, draw two positioning points. Now hoop the garment not bothering about the exact placement. The main thing is to match the size of your design with the embroidery area. Then the magic starts.
    You pick the necessary design in your machine. Touch the PinPoint button, then activate the Grid and choose two of the nine positioning dots. You will align the needle with the chosen positioning points. To do this, rotate the Multifunction Knobs until the needle will be in the right position, directly above your mark. Fix the position by touching Set.
    t.  Now, let’s align the needle with another of our two dots. Choose the other one of our two points and rotate the Multifunction Knobs until the needle will be right above the mark on the garment. Done. Now you can do the embroidery. There is also free point positioning. Here you mark a random spot on your garment, touch the right spot on the design, rotate the Multifunction Knobs until the needle is directly above the mark. Then repeat with the second positioning dot.
    Original text by Lisa Prass

    Embroidery techniques: Sewing a pumpkin-shaped pincushion

    By Irina, in Machine embroidery materials and technology, , 7 comments, 3,186 views
    Embroidery techniques: Sewing a pumpkin-shaped pincushion
    Internet has an endless supply of ideas. For a long time I’ve been creating round pincushions, simple and artless. And then I suddenly read that by tying it up with a cord, you can turn a round pincushion into a sort of pumpkin. And so cute it seemed to me that I’ve only been using the pumpkin pincushion in my work ever since. Besides, people now only ask pumpkin-shaped pincushions for presents.


    Sewing a pumpkin-shaped pincushion. Materials
    Sole-colored cotton Tearaway adhesive stabilizer Upper thread Underthread Scissors Decorative button or bead Cord or mouline threads Batting (wool, polyester, quilting cotton) Machine embroidery design
    Sewing a pumpkin-shaped pincushion. The making process
    If you have bought a design in the store or created it by yourself, hoop the fabric and hit the start button. I secured cotton with a tearaway adhesive stabilizer (it is my favorite–so easy to work with).

    You’ll need to stitch the design twice. You can make the sides identical or use two different color schemes. You can also spare the flowers and only embroider the circle on the lower side. The bottom half can do without the embroidery.

    When the embroidery is finished, remove the stabilizer and cut the upper and lower panels along the stitching, leaving seam allowance. Sew them together by hand, like biscornu, catching the back stitches with your needle. When only a small gap is left, stuff your pincushion through it.

    You can cover the stitching between the two halves of the pincushion with a cord, carefully sewing it along.
    Near the end, insert a cord or several mouline strands into the eye of a needle and wrap it around the pincushion. I usually divide mine pincushions into 8 parts. You can do less or more, whichever suits you best. Having done that, pass your needle through the center of the pincushion and fix the thread on both sides. To disguise the knot, cover it with a decorative button.

    Done! The actual making and assembling takes much less time than you may think from the description. Try it! You’ll definitely make it.


    Original text by Mary Stratan

  • Top Downloads

  • Recently Browsing   0 members

    • No registered users viewing this page.
×
×
  • Create New...