
Search the Community
Showing results for tags 'netting'.
Found 1 result
-

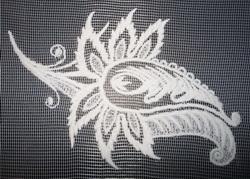 Today I decided to check whether the high-quality lace embroidery designs on netting without using a stabilizer is possible. What kind of stabilizer do you need for the netting? Either water soluble film or other water soluble stabilizer. This means an extra cost, and not a small one; besides, you'll need to wash the embroidery afterward, which also complicates the matters. I also checked whether it was possible to embroider on such a delicate material as netting using any type of needle. I do not have SUK ball point needles, which do not cut through the yarn, only the standard R and SES ones. I created a machine embroidery design: Set the most ordinary density, 0.4mm. Put 2 edge runs of understitching under the satin columns. In my opinion, an underlay like this one allows for the satin columns to maintain their shape and work as a backbone, because the stitch has nothing to rely on within the particle, and it therefore creates the ugly ragged edges. The reason for ragged edges is the large particle mesh size, so that some of the stitches fall first into one particle, then the other, and so on. And because the mesh particles are on different levels, the edges become ragged. I saw this method in the Italian embroidery design when I was just beginning to embroider on netting. I hooped the netting without the stabilizer. It was the ordinary netting — knit and quite stretchy. There are no difficulties in hooping the netting. I just place it on the inner ring of the hoop and cover it with the outer one, without tugging it in the hoop and other intricacies. The pressure caused by the outer ring is enough to pull it tight. The crucial thing is not to overstretch the netting, in order not to damage the mesh even before starting the embroidery. Otherwise, it will break during the embroidery under the pressure of the stitches pulling it, and very ugly-looking holes will appear along the perimeter. I chose a standard rayon #40 thread right away. Polyester, in my opinion, is not good for netting. I may be wrong, though. Below is the result of my first attempt, still in the hoop: Numerous perforations along the perimeter and in the corners are visible right away, as well as the underlay showing in several places: Below is the photo of the netting already unhooped but not yet pressed. The pull is not critical and can be corrected by pressing: After the pressing: In my opinion, there exists a number of reasons for perforations: High density No stabilizer Wrong type of needlepoint As I cannot change the type of needlepoint, I decided to lower the density by 20% (it allowed me to save about 2000 stitches), and in order for the fill to look dense enough, I changed the embroidery thread from #40 to #30. Now I'll try to embroider again. The holes along the perimeter and in the corners are still present. Maybe not so many. The pull is not so bad: After pressing the item some of the holes become less visible, but don't disappear completely: But if you try, you try. Then I decided to embroider on the netting with large square mesh. I hooped it without a stabilizer as well: But my attempt to embroider on the netting with a large mesh particle size (on nothing, as one may say) didn't work out. Thread kept breaking, and the embroidery became distorted: That's why I decided to put a piece of thick water soluble stabilizer (80 microns) on top. Using thin stabilizer for this purpose is like flogging a dead horse. I instantly realized that I cannot spare the stabilizer this time. This is what I got — like it had been embroidered on the ordinary fabric: Almost no puckering: See the photo of this embroidery after washing and pressing below. An excellent sample. I thought it would look much worse: Then I decided to try to embroider on the ordinary netting (like in the first 2 tests), but with the use of the thin water soluble film. But instead of placing it on top for cost reasons, I hooped it together with the netting, as required: In this case, the advantages of using stabilizer are apparent — the result looks much better than the one without it: neat and tidy, without the underlay showing. I cannot say anything about perforations until I wash off the film: Below is the photo of the already washed embroidery: The pull is visible, of course, but I'll try to iron it out. The ironing goes smooth and without effort. And the most remarkable thing is the absence of the perforations along the perimeter. It means that the needlepoint and high stitch density are not so much the reasons for perforations as using only one layer of thin water soluble stabilizer. Stabilizer is a great invention. Though too high a density is not good for embroidery. To put in a nutshell, my experience convinced me of the futility of not following the standard procedure, even for cost reasons. Here you can read my article about embroidery
- 3 comments
-
- 3
-

-

-

-
- netting
- stabilizer
- (and 1 more)