Clean Patch Cutting Techniques for Embroidery

By diver361 in Embroidery Patches
· 2,848 views
Cutting Patches Cleanly: Real Advice From the Front Lines of Machine Embroidery
By a frustrated patch maker turned community crowdsource convert
I’ve been making and selling embroidered patches for over three years—and despite my experience, cleanly cutting patches still drives me crazy. I’ve tried Badge Master, tear-away, cut-away, heat tools, lighters, and even a Brother ScanNCut. Some methods work… sometimes. But most leave me with frustration, fraying threads, or wobbly borders.
So I turned to the embroidery community—and what I found was a goldmine of methods, hacks, and wisdom from fellow stitchers. Here’s what I’ve learned from real conversations that might just save your sanity too.
🧵 What's the Problem?
Loose borders with Badge Master
Fibrous mess from tear-away
Scissors anxiety with cut-away
Melted messes from lighters and hot knives
Unpredictable results from digital cutters
Every patch maker hits this wall: How do you get clean, professional edges without a commercial merrow machine?
🔄 Tried-and-True Methods (and What Actually Works)
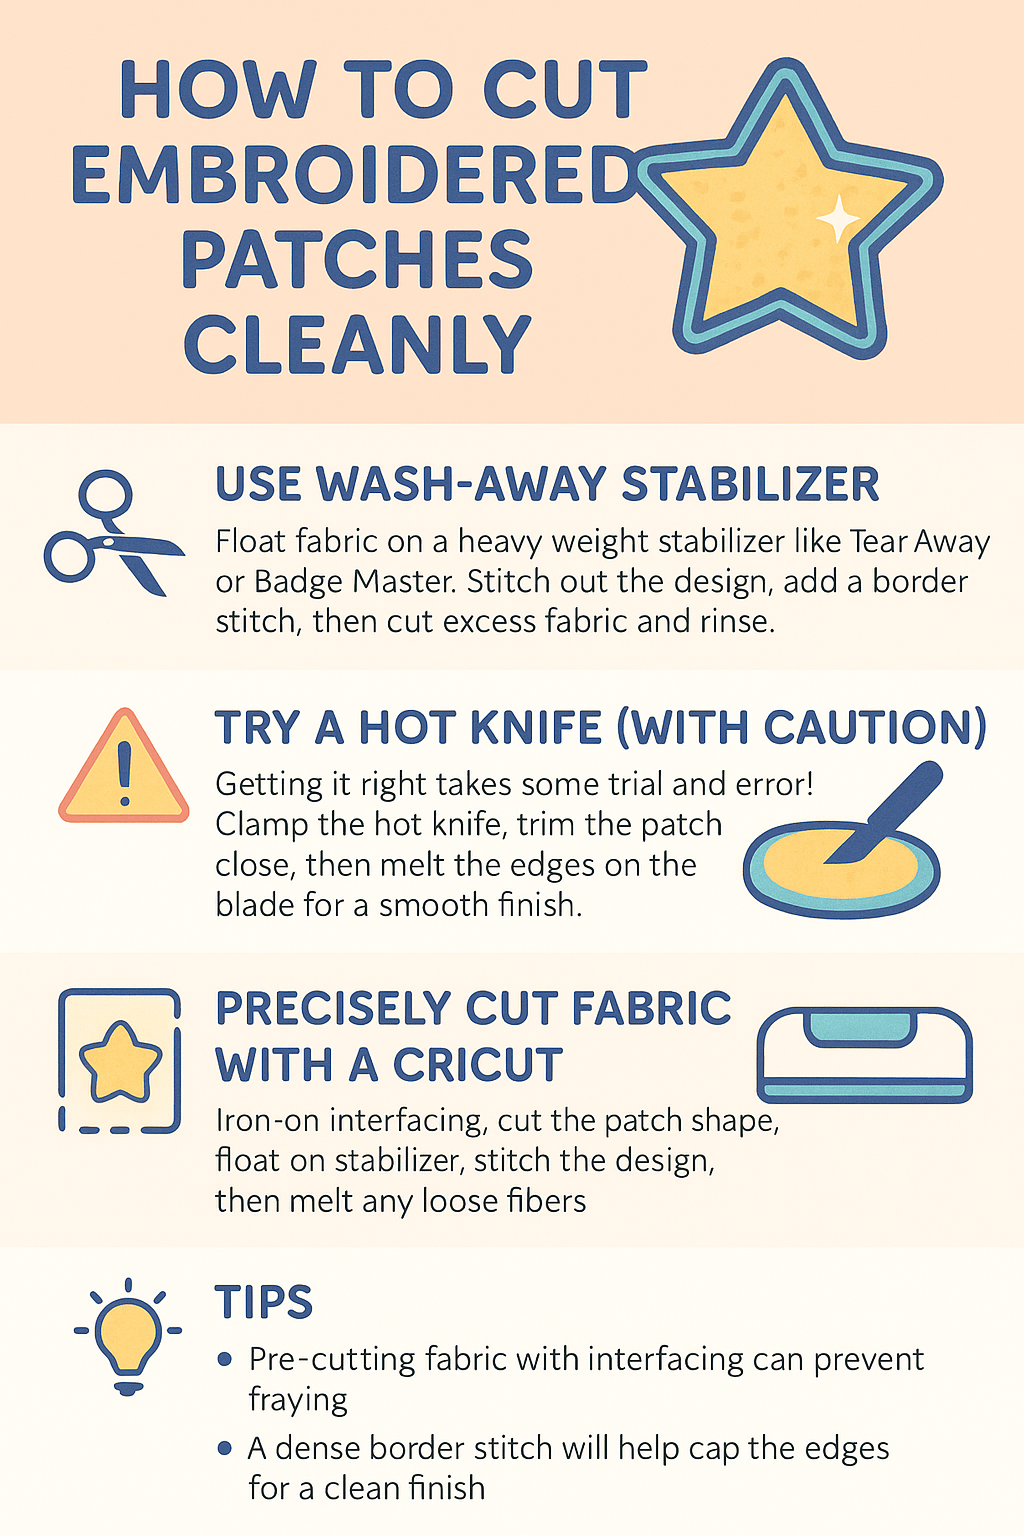
1. The Wash-Away Stabilizer & Faux Merrow Combo
This method came up again and again—and with good reason.
✅ Float your fabric (felt, twill, or cotton with cut-away fused to the back)
✅ Stitch your design
✅ Run a placement running stitch for the patch outline
✂️ Pause and cut the excess fabric close to that stitch
🪡 Finish with a dense border satin stitch
🚿 Rinse under the tap to dissolve the stabilizer
“All the raw edges are capped, and there’s no stabilizer mess to clean up.”
2. Hot Knife Finish (But… Carefully)
A hot knife can be your best friend—or worst enemy.
🔥 Use a woodburning tool with adjustable heat
🪚 Clamp it down and glide the patch edge across like sanding wood
🧵 Use cotton thread in the border so it doesn’t melt
“Don’t try to cut everything with the hot knife—trim close with scissors first, then finish with heat.”
3. Precut Fabric + In-the-Hoop Appliqué
Start your patch the clean way by prepping before you hoop.
🧵 Cut your patch fabric (with interfacing and foam backing) on a Cricut or ScanNCut
🪡 Place it on top of your stabilizer or foam (like OSED Fiber Form)
✅ Stitch your design—no messy threads inside the hoop
🌟 Finish with a dense border
“Using the Cricut to precut fabric with interfacing gave me the cleanest edges ever—even on Swiss dot!”
4. Plastic Sheeting & Tear-Out Magic
A few experienced users swear by 2mil painter’s plastic.
🧵 Stitch directly onto the plastic
✂️ Tear the back and sides out after stitching
🔥 Use a lighter or hot knife to clean up frays
“They pop right out without having to trim anything. Simple.”
🧠 Pro Tips From the Thread
Use poly twill + poly iron-on backing for sturdy patches
If using tear-away, get a crisp high-quality version (try Madeira USA’s)
Don’t forget: place the running stitch after the design, before the border to avoid distortion
Always test your hot knife temp—you want to melt, not burn
Use the acrylic flatbed table on your PR1055X to prevent hoop bounce
Consider freestanding patches—no fabric, just thread and stabilizer!
✨ Final Thoughts
There’s no single “perfect” way to cut patches—but with a mix of creativity, prep, and the right tools, you can find what works for you. Whether you’re team hot knife, wash-away wizard, or Cricut master, just know: you’re not alone in this frustrating, oddly satisfying process.
Got a favorite method of your own? Share it in the comments—we’re all learning together.
Recommended Comments