

🧵 How to Sew a Plush Whale Toy
Using Two Fabrics – Simple Softie Project
✂️ What You’ll Need:
Two types of fabric:
Main fabric (e.g., printed cotton or fleece for body)
Contrast fabric (e.g., stripes or solids for the belly and fins)
Toy stuffing (polyfill)
Matching thread
Sewing machine or hand needle
Pins or clips
Scissors
Printed pattern pieces at 1:1 scale
📐 Pattern Overview:
Part No. | Name | Cut Instruction |
|---|---|---|
1 | Body (top) | Cut 1 from main fabric |
2 | Side fin (small) | Cut 1 from main fabric + 1 from contrast |
3 | Tail fin | Cut 1 from main fabric + 1 from contrast |
4 | Side panels | Cut 1 from main fabric + 1 from contrast |
5 | Belly (bottom) | Cut 1 from contrast fabric |
Each piece marked "cut 2" means you'll cut one from each fabric type.
🪡 Sewing Instructions:
1. Prepare All Pieces
Cut the pattern pieces at 1:1 scale.
Make sure mirrored pieces are cut where necessary (for fins and sides).
Keep right sides of the fabrics facing inward when pinning.
2. Assemble the Fins (Parts 2 & 3)
Place each pair of fins right sides together (main + contrast fabric).
Sew around the edge, leaving the base open.
Turn them right side out and press flat.
Optional: topstitch around the edge for a neat look.
3. Attach the Side Panels (Part 4)
Sew each side panel (one from main, one from contrast fabric) to each side of the top body piece (Part 1).
Align the straight edge of the side panel to the body’s side curves.
You should now have a three-piece top with two fins sticking out from the sides.
4. Insert the Tail Fin
Place the tail fin (Part 3) between the two side panels at the rear.
Pin it in place between the layers.
Sew across the back to secure.
5. Sew the Belly to the Body
Pin the belly (Part 5) to the assembled top body part, aligning the curves.
Leave a small opening at the underside for turning and stuffing.
Insert the side fins (Part 2) into the seam, pinning securely before sewing.
Sew around the entire body, leaving the gap open.
6. Turn & Stuff
Carefully turn the whale right side out through the opening.
Stuff firmly with polyfill, shaping the body as you go.
7. Close the Opening
Hand-stitch the opening with a ladder (invisible) stitch.
Shape and press gently.
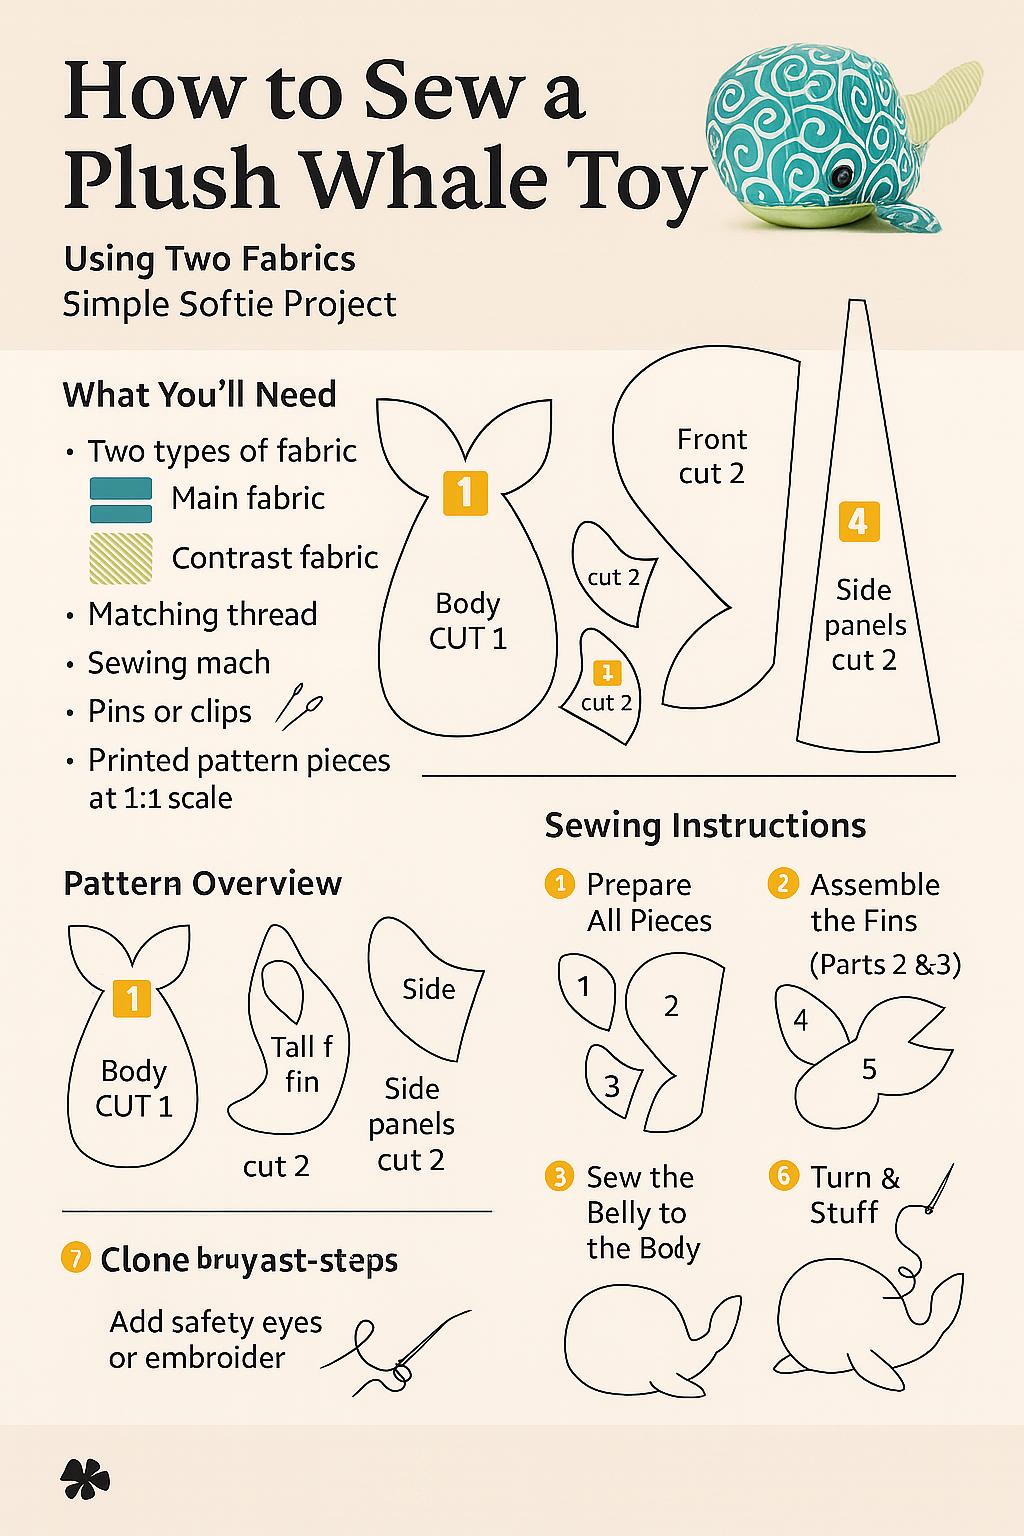
🐳 Optional Final Touches:
Add safety eyes or embroider the eyes with black thread.
Topstitch around belly seam if desired.
-
 1
1
Join the conversation
You can post now and register later. If you have an account, sign in now to post with your account.