
Embroidered Sleeves on Denim Jackets: Step-by-Step Guide

By diver361
- 17 views
- View diver361's images
Embroidered Denim Jacket Sleeves: Bold Flair Meets Personal Style 🧥🪶
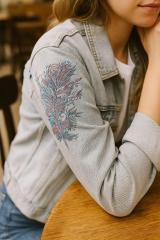
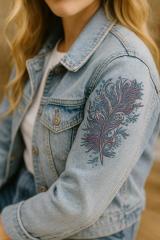
Sleeve embroidery transforms a denim jacket from ordinary to unforgettable. Whether you choose an elegant Firebird's feather embroidery design or a geometric motif, the sleeve is perfect for showcasing creativity. Here's how to prep, stitch, and style your sleeve for a standout, personalized look.
Step-by-Step Sleeve Preparation & Embroidery Callouts
1. Seam Access: Seam-rip or Flat Sleeve
Best practice: Carefully seam‑rip the sleeve cuff or side seam to flatten the fabric for hooping.
“We often seam‑rip the sleeve open and then reassemble it!” — Reddit user “jibbidibbi”
Alternative: If you can’t rip seams, use a "float" method—hoop stabilizer only and lay the sleeve on top with temporary adhesive.
2. Marking Placement Accurately
Print or sketch your design and place it on the sleeve.
Mark the center and boundaries using fabric-safe chalk or washable markers. Align carefully with seams or sleeve folds .
3. Stabilizer Setup: Cut-Away with Support
Use a 2.5 oz (≈70 g/m²) cut‑away stabilizer as a base—ideal for denim’s thickness and stitch density .
Optional: Add a sticky tear-away topper or adhesive spray to help the sleeve stay flat during embroidery.
4. Hooping Techniques for Sleeves
For curved areas, use the floating method: hoop stabilizer only, then affix the sleeve with temporary spray or basting.
Magnetic hoops are especially useful on denim—they grip securely and reduce slippage.
5. Needle, Thread, and Tension Setup
Needle: Sharp embroidery needle, size 75/11 works well; 90/14 may be necessary for heavy denim or multiple fabric layers .
Thread: Choose quality polyester embroidery thread for durability—ideal for frequent wear and washing .
Tension: Reduce machine speed slightly and test on scrap fabric to avoid puckering.
6. Embroidery & Finishing
Begin stitching, keeping a close eye on jumping stitches and movement.
After completion, trim stabilizer closely with applique scissors, reassemble the sleeve seams if needed, and press gently on the inside for a crisp finish .
Expert Quotes on Denim Embroidery
“Medium-weight denim (around 300 g/m²) is ideal—it’s sturdy yet stitch-friendly.” — Elena Petrova, Fashion Technologist
“The sleeve is a dynamic canvas. Designs like feathers add flowing elegance to denim.” — Sophie Kim, Style Consultant
“An embroidered sleeve elevates a jacket—it becomes wearable art.” — Mark Johnson, Embroidery Digitizer
Why Sleeve Embroidery Makes a Statement
Fashion edge: Embroidered sleeves elevate casual denim to expressive wearables.
Flexible placement: Unlike back panels, sleeves avoid bulky seams and give the garment mobility.
Longevity: High-quality embroidery withstands wear better than prints.
Distinctive flair: Designs like the Firebird’s Feather instantly personalize any outfit.
Visual Summary: Remember
Step | Action |
|---|---|
1 | Seam-rip or float sleeve flat |
2 | Mark design placement accurately |
3 | Use heavy cut-away + optional topper |
4 | Hoop stabilizer; float sleeve if needed |
5 | Use 75/11 or 90/14 needle, poly thread |
6 | Stitch carefully, trim, reassemble, press |
Machine embroidery on denim sleeves combines fashion, craftsmanship, and personal expression. With the right prep and design like the Firebird’s Feather, you’re not just wearing a jacket—you’re wearing your creativity.
Recommended Comments
Join the conversation
You can post now and register later. If you have an account, sign in now to post with your account.