

Embroidered Knife Holders: A Creative Blend of Utility
- canvas knife roll embroidery
- chef knife cover handmade
- crafting embroidered knife sleeves
- custom knife storage ideas
- durable fabric knife holder
- embroidered kitchen accessories
- embroidered knife cover
- handmade kitchen storage
- kitchen knife sleeve sewing
- kitchen textile organization
- knife holder embroidery
- knife lion embroidery design
- knife organizer embroidery design
- machine embroidery kitchen projects

By diver361
- 393 views
- View diver361's images
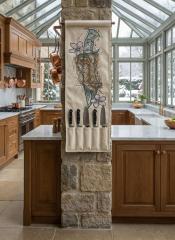
🔪✨ When Function Meets Art: Creating Embroidered Knife Holders for a Stylish Kitchen
A kitchen is more than a place to cook—it’s a creative space, a family hub, a stage for daily rituals.
And nothing elevates that atmosphere like beautiful handmade textile accessories, especially when they combine practicality with character.
One of the most unexpected—and visually striking—items you can embroider is a fabric knife holder.
Hanging on a wall or cabinet, with a dramatic embroidered design, it becomes both a functional organizer and a piece of kitchen art.
Just look at the Knife Lion embroidery design on the example above:
a bold, sketch-style lion head with soft pink florals — fierce yet artistic, perfectly transforming an ordinary textile into a statement piece.
Let’s explore how to make your own embroidered knife holder, what challenges to expect, and how to ensure your design fits perfectly.
🧵✨ Why Embroidered Knife Holders Are Trending
Across sewing and machine-embroidery forums, users love:
vertical textile organizers
rustic canvas or cotton hanging storage
oversized, expressive embroidery on utilitarian objects
décor that blends seamlessly with the kitchen
Creators note how embroidery instantly turns a simple roll-up holder into something much more personal and decorative.
It becomes a conversation piece — and a great gift idea.
📐 How Emroidery Size Relates to the Knife Holder Dimensions
The proportion between the design and the base matters more here than in many other projects.
✔ Ideal Design Height
50–70% of the textile panel’s height
→ visually balanced and still leaves space for pockets.
✔ Ideal Design Width
30–40% of the panel width
→ narrow vertical motifs look elegant and do not overpower the structure.
✔ Vertical Designs Work Best
Sketches, line art, animals, florals, and geometric motifs that grow upward lead the viewer’s eye through the entire organizer.
The Knife Lion design is a perfect example:
tall, narrow, dramatic, with details concentrated in the center.
🪡 Step-by-Step Guide: How to Make an Embroidered Knife Holder
1️⃣ Choose the Right Fabric
Use mid-weight textiles:
cotton canvas
linen-cotton blends
denim
light upholstery fabric
Avoid stretchy materials.
2️⃣ Measure and Plan
Most knife holders are:
Width: 22–30 cm
Height: 50–80 cm
Decide how many knife pockets you need and add 5–7 cm seam allowance.
3️⃣ Hoop and Embroider the Panel
Before sewing:
hoop the flat fabric
add tear-away or cut-away stabilizer
embroider your design at the top THIRD of the future panel
This ensures the embroidery will sit above the knives, clearly visible.
4️⃣ Create Knife Pockets
Cut a wide strip of the same fabric:
height 15–20 cm
width equal to the main panel
Fold, press, and stitch vertical channels for each knife.
5️⃣ Assemble the Organizer
Sew the pocket panel onto the embroidered base, right sides together.
Topstitch for durability.
Add:
eyelets
loops
a wooden dowel
or a metal bar
so the holder can hang neatly.
6️⃣ Finishing Touches
Optional but beautiful:
contrast binding
leather loops
metal rivets
decorative topstitching
🧠📚 Common Difficulties (and How to Avoid Them)
❗ Problem: fabric sagging under the embroidery
→ Use medium-weight stabilizer and interface the entire backing.
❗ Problem: knives too heavy for the panel
→ Add a second layer of fabric or lightweight fusible foam.
❗ Problem: wrong embroidery placement
→ Chalk-mark the exact top pocket line and embroider ABOVE it.
❗ Problem: embroidery puckers after sewing
→ Pre-wash fabrics and stabilize generously.
🎨🌿 What Designs Work Best?
For long-term use, choose embroidery that is:
✔ Vertical
Tree silhouettes, florals, animals, sketch-art.
✔ Low to medium density
Less thread → less stiff fabric.
✔ Neutral or artistic
Pieces that suit kitchens year-round.
✔ Works in a single color or limited palette
Easier to coordinate with changing kitchen décor.
The Knife Lion embroidery design is a strong example — modern, textured, expressive.
🧵🎄 Designer & Maker Tip Boxes (light gray background)
🔷 Tip from Clara Jensen — Textile Designer
Use natural fabrics like cotton canvas. They hold heavy embroidery beautifully and won't warp when knives are stored.
🔶 Insight from Marco Devlin — Kitchen Décor Specialist
Place embroidery high on the panel to balance the visual weight of the knives below. It looks cleaner and more elegant.
🔷 Advice from Elena Ruiz — Machine Embroidery Expert
Avoid dense fills. Vertical line-art designs create movement and keep the holder flexible.
🔶 Note from Sarah Holten — Product Crafter
Make knife pockets slightly wider than the blade. Tight pockets wear out quicker and stress the fabric.
🔷 Observation from Hana Kim — Sewing Educator
Pre-test your embroidery on a scrap. Canvas reacts differently to stitches depending on humidity and needle type.
✨ Final Thoughts: Functional Art for the Heart of the Home
An embroidered knife holder is more than storage.
It’s personality.
It’s craft.
It’s a daily reminder that beauty and function belong together — especially in the kitchen.
With the right design, fabric, stabilizer, and a little creativity, you can transform a simple utility item into a dramatic, expressive centerpiece.
And if you want a design that truly speaks — the
Knife Lion embroidery design
is the perfect inspiration.
Strong, artistic, unforgettable.
Just like the kitchen you’re about to create. 🍽️🧵✨
Recommended Comments
Join the conversation
You can post now and register later. If you have an account, sign in now to post with your account.