

.jpg.4b719b852b8d4f39eb8a14aa603a1e11.jpg)
From Fabric to Message: Designing Embroidered Greeting Cards

By diver361
- 594 views
- View diver361's images
Embroidered Greeting Cards: Turning Stitches Into Meaningful Holiday Messages 🎄✉️🧵
In a world of digital messages and instant notifications, a handmade embroidered card feels deeply personal. It’s not just a greeting — it’s a keepsake, something that can be touched, displayed, and remembered long after the holiday season ends.
Embroidered cards combine textile art with the intimacy of a handwritten message. They are especially popular for Christmas, when warmth, care, and time invested matter more than ever.
In this article, we’ll explore:
How to make an embroidered card step by step
What materials work best
The correct production order
What extra elements can elevate the design
What similar products look like online
Practical advice from sellers and designers
As an example, we’ll reference a delicate, elegant design suitable for embroidered cards:
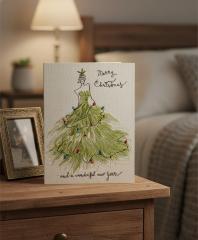
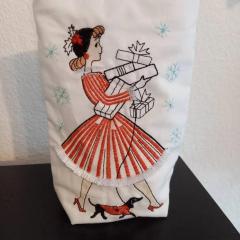
✨ Christmas tree lady embroidery design
1. Why Embroidered Cards Are Special 💛✨
Unlike printed cards, embroidered cards:
Feel handmade and intentional
Are often displayed as décor
Can be framed or kept for years
Carry emotional weight through texture and thread
Online research shows embroidered cards are often described as:
“too beautiful to throw away”
“a piece of textile art”
“a gift on its own”
They sit perfectly between craft, design, and emotion.
2. Materials Needed to Create an Embroidered Card 🧵📦
Base Materials
Fabric (linen, cotton, canvas — light to medium weight)
Embroidery threads (cotton, rayon, or silk)
Stabilizer (light cut-away or tear-away)
Card Structure
Heavy cardstock or kraft paper
Blank greeting card base or handmade folded card
Double-sided tape or archival glue
Tools
Embroidery hoop (small to medium)
Embroidery machine or hand embroidery tools
Fabric scissors
Iron & pressing cloth
Optional Decorative Elements
Metallic thread accents
Beads or French knots
Handwritten calligraphy
Ribbon or wax seal
<div style="background:#f0f0f0; padding:14px; border-radius:8px;"> <strong>DESIGNER TIP:</strong><br> Choose fabric colors that contrast gently with the card base. Soft neutrals photograph beautifully and feel elegant. </div>
3. Correct Order of Making an Embroidered Card 🪡📐
Step 1: Choose the Design
Select a design that:
Is not overly dense
Reads well at small sizes
Has a strong silhouette
Sketch-style designs, fashion illustrations, and minimal Christmas scenes work best.
Step 2: Embroider on Fabric First
Always embroider on a flat fabric piece before assembling the card.
Important points:
Use proper stabilizer to avoid puckering
Avoid embroidery too close to the edges
Press gently from the back after stitching
<div style="background:#f0f0f0; padding:14px; border-radius:8px;"> <strong>CRITICAL NOTE:</strong><br> Never embroider directly onto paper. Paper tears, warps, and cannot handle stitch tension. Fabric is essential. </div>
Step 3: Trim & Prepare the Embroidered Panel
Cut the embroidered fabric to size:
Leave equal margins on all sides
Square edges give a professional look
Optional: back the fabric with thin cardstock for stiffness.
Step 4: Mount the Fabric Onto the Card
Attach the embroidered panel to the card base using:
Double-sided archival tape
Glue dots
Minimal fabric glue
Make sure the card can still open easily.
4. What Else Can Be Added to an Embroidered Card? ✨🎨
To elevate the design, makers often add:
Handwritten holiday wishes
Calligraphy-style stitched text
Metallic accents (gold or silver thread)
Minimal watercolor splashes
Small beads as Christmas lights
Inner message printed on vellum
The key is balance — embroidery should remain the focal point.
<div style="background:#f0f0f0; padding:14px; border-radius:8px;"> <strong>DESIGNER TIP:</strong><br> Leave negative space. An embroidered card feels luxurious when it can “breathe.” Don’t overcrowd it with decorations. </div>
5. What Similar Embroidered Cards Look Like Online 🔍
Researching handmade platforms shows several trends:
Popular Themes
Christmas trees (especially stylized or fashion-inspired)
Angels and silhouettes
Minimalist winter scenes
Fashion illustrations turned festive
Elegant female figures shaped like trees or gowns
Common Characteristics
Small embroidery size (10–14 cm)
Neutral backgrounds
Handwritten or stitched greetings
Cards displayed on shelves, not envelopes
These cards are often sold as:
Premium Christmas cards
Limited-edition holiday stationery
Framed mini artworks
<div style="background:#f0f0f0; padding:14px; border-radius:8px;"> <strong>SELLER TIP:</strong><br> Many customers buy embroidered cards to frame them. Offering a “frame-ready” size increases perceived value. </div>
6. Difficulty Level & Time Investment ⏳🧠
Difficulty: Medium (5/10)
Not technically hard, but precision matters.
Why:
Small scale embroidery requires accuracy
Clean mounting is essential
Any mistake is visible
Time Estimate
Embroidery: 20–45 minutes
Assembly: 10–15 minutes
Perfect for:
Handmade gifts
Limited seasonal collections
Craft fairs
Boutique stationery
Final Thoughts: A Card That Becomes a Keepsake 💫💌
An embroidered card is more than a message — it’s a moment of care stitched into fabric. It stands still in time, carries warmth, and often becomes part of someone’s holiday décor or memory box.
In a season filled with noise, an embroidered card whispers:
“I made this for you.”
And that’s where its true magic lies. ✨
Recommended Comments
Join the conversation
You can post now and register later. If you have an account, sign in now to post with your account.