
Custom wedding invitation
I began preparing for my wedding with the making of the wedding invitations. The wedding is a pretty important occasion in the life of a woman, so I took the matter seriously.
Naturally, I wanted my invitations to be hand-made and original. In this, I succeeded.
Tools and materials
- 2 sheets of scrapbooking paper, size 30.5*30.5 cm (I used Fleur Design Romantic Vintage and Romantic Patterns) A satin ribbon 1.2 cm wide
- A heat gun
- Embossing powder
- Alphabet stamp (Russian letters “В” and “Д” in my case)
- An embossing ink pad
- An acrylic stamping block
- Talcum powder and sponge (for degreasing)
- A cutting mat
- Sticky foam pads
- Glue
- Double-sided adhesive tape (narrow)
- Scissors, ruler, pencil, design knife, a pair of tweezers
- A creasing tool
- A corner hole punch for the insertion of the photograph
First, I created files for cutting in the Canvas Workspace and transferred the designs to the cutting machine via USB flash drive. I used the slightly sticky cutting mat and a standard knife. Before the work started, I adjusted the knife (the paper density is very important here) and did several test cuts. Only after that, I proceeded to the scanning and positioning.

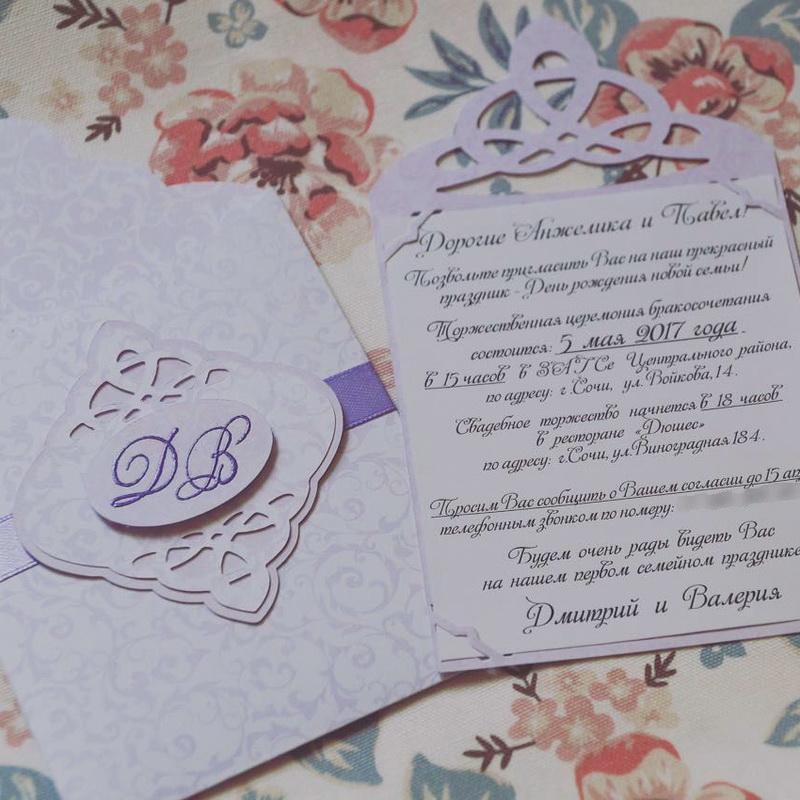
I cut the following details: an envelope, an insert piece, and some decorative elements for the front part of my invitation (a carrier with two openings, a carved edge decoration, and an oval thing).

If the cutting machine has left something uncut, don't panic. You can easily remedy it with a design knife.


To get the neat-looking, I smoothed them out on all sides with a creasing tool and also made some folding creases on the envelope (center part and sides — let’s call them “wings”).


I stuck small strips of adhesive tape on both “wings” and glued the parts of the envelope together.

This resulted in a lot of workpieces.

Using my hole punch, I made several openings the insert piece so that I could put in the text sheet later (you may glue it or use Canvas Workspace instead).

I also decided to emboss the bride and bridegroom’s initials (you may just stamp them with ink or glue the word “Invitation” or something).
For embossing, you’ll need:
- A heat gun
- Embossing powder
- An embossing ink pad
- “В” and “Д” stamps
- An acrylic stamping block
- Talcum powder and sponge (for degreasing)

First, I prepared the surface, using talcum powder and sponge (so that the small particles of the embossing powder only stuck to the parts I had applied my stamp to).

Then I used the pad to create the inscription, sprinkled the embossing powder, shook off the excess and heated the inscription. As the heat gun gets really hot, I recommend holding your paper with tweezers.


All is ready for the assembling of the invitation:

- An envelope blank
- An insert piece
- Three decorative elements: The carrier with two openings, the decoration with carved edges and the oval thing with embossing
- A satin ribbon 1.2 mm wide
- Sticky foam pads
- Glue
- A ruler and scissors
I held the ribbon to the envelope, measured the required length (it should be sufficient to go around the envelope), and cut. I could have singed the edge with a lighter, so as to prevent it from unraveling, but decided not to, for the ends were to be glued.

Then I passed the ribbon through the carrier and glued one end of it almost at the center (use any glue you like).


Then I pulled the ribbon tight, overlapped, and glued the second edge. I shifted the carrier toward the center so that it covered that spot.

I used glue to attach the decoration with the carved edges, but you may replace it with double-sided adhesive tape. Then, I stuck the oval thing with embossing (my inscription) to the sticky foam pads.
Our wedding invitation is ready.

All that’s left to do is to print the text with the vital details about the wedding and to attach it.

Original text by Valeria Balashova
-
 1
1
There are no reviews to display.