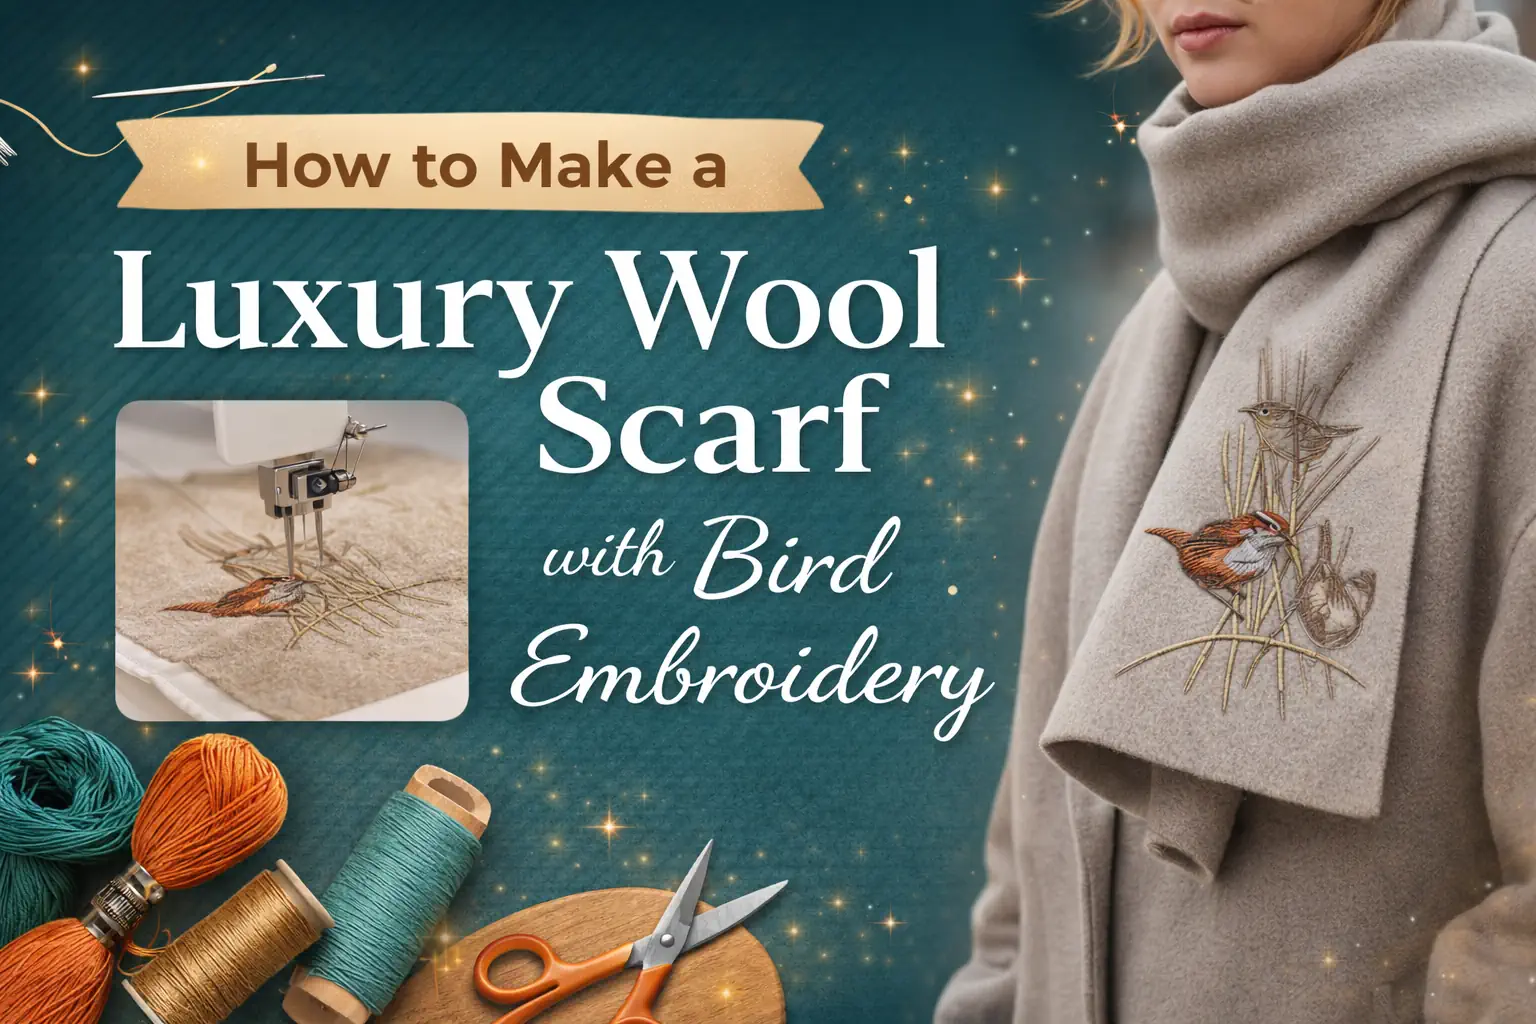
🧣 How to Make a Luxury Wool Scarf with Bird Embroidery

By diver361 in Master classes and instructions
· 169 views
🧣 How to Create an Elegant Embroidered Wool Scarf
Featuring the Kinglets Embroidery Design
A minimalist wool scarf with delicate bird embroidery is the perfect blend of elegance and craftsmanship. In this guide, I’ll walk you through materials, sizing, embroidery placement, edge finishing, and professional tips to help you create a luxury handmade accessory.

✨ Project Overview
This scarf features refined machine embroidery placed asymmetrically near the lower edge — ideal for coats, wool jackets, and autumn/winter styling.
We’ll use the beautiful Kinglets Embroidery Design for this project.
🔗 Design Reference (Widget Table)
Use this table format for your website widget:
Kinglets Embroidery Design | |
|---|---|
|

📏 Recommended Scarf Dimensions
For a look similar to the example:
✔ Classic Long Scarf
Length: 170–190 cm (67–75 in)
Width: 25–35 cm (10–14 in)
✔ Wide Statement Scarf
Length: 180 cm (70 in)
Width: 35–45 cm (14–18 in)
📌 Tip: Embroidery looks most elegant when placed 12–18 cm (5–7 in) from the bottom edge.
🧵 Materials You’ll Need
🧶 Fabric
Wool blend
Cashmere blend
Soft boiled wool
High-quality fleece (budget alternative)
Weight: Medium (250–350 gsm)
Color: Neutral tones (beige, camel, grey) enhance embroidery detail.
🧵 Stabilizer
Medium tear-away (for stable wool)
Light cut-away (for soft or stretchy fabric)
🪡 Threads
Polyester embroidery thread (durable)
Rayon (luxury sheen)
Matte cotton for minimalist look
🪡 Step-by-Step Instructions
1️⃣ Cut the Fabric
✔ Cut your scarf rectangle according to chosen size.
✔ Add 1–2 cm seam allowance if finishing with folded hem.
Press lightly with steam.
2️⃣ Mark Embroidery Placement
📍 Measure 12–18 cm from one short edge.
📍 Center design horizontally or shift slightly toward one side for a modern asymmetrical look.
💡 Pro Tip: Slight asymmetry creates a premium fashion feel.
3️⃣ Hoop & Stabilize
✔ Place stabilizer underneath.
✔ Hoop fabric carefully — avoid stretching wool.
✔ Use spray adhesive if necessary.
⚠ Do not over-tighten hoop — wool can distort.
4️⃣ Stitch the Embroidery
Load the Kinglets Embroidery Design into your machine.
Recommended:
Needle: 75/11 embroidery needle
Speed: Medium
Top thread tension: Slightly reduced for wool
🧵 Monitor first color changes to ensure clean stitch formation.
5️⃣ Remove Stabilizer
Tear away gently (if tear-away).
Trim excess cut-away carefully.
Use steam from the back to relax fibers.
✂ Edge Finishing Options
✔ Minimal Folded Hem
Fold 1 cm twice
Stitch with matching thread
Clean, classic look.
✔ Invisible Hand Finish
Use blind hem stitch
Ideal for luxury scarves
✔ Raw Edge + Fray (Fashion Style)
Leave raw
Trim evenly
Gently brush edges for soft fringe
Modern and stylish.
✔ Rolled Edge (Professional Finish)
Best for lighter wool
Requires narrow hem foot or serger
🧥 Placement Styling Ideas
✨ Near lower corner
✨ On both ends (mirrored)
✨ Large single statement embroidery
✨ Subtle tone-on-tone design
🎯 Professional Tips
💎 Use slightly darker thread than fabric for subtle elegance.
💎 Avoid very dense designs on soft wool.
💎 Test on scrap fabric first.
💎 Steam from reverse side only.
💎 If fabric is very soft, fuse lightweight interfacing in embroidery area before stitching.
🧼 Care Instructions
✔ Hand wash cold
✔ Lay flat to dry
✔ Steam gently
✔ Avoid aggressive rubbing on embroidery area
💡 Optional Upgrade
Add:
Small leather brand tag
Matching coat embroidery
Gift packaging with care card
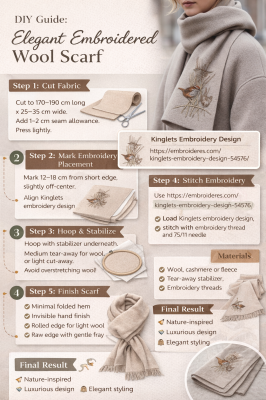
🧣 Final Result
You’ll create a timeless accessory that combines:
🕊 Nature-inspired elegance
🧵 Professional machine embroidery
🧥 Luxury fashion styling
Perfect for boutique collections, Etsy shops, or handmade gifts.
Recommended Comments