.jpg.6e4bc268e52291c45f7477ddd376cc96.jpg "Stitched With Warmth: Creating Cozy Christmas Treat Baskets")


.jpg.4819e96c14fc36a6d45204d944c82e8f.jpg)

Stitched With Warmth: Creating Cozy Christmas Treat Baskets
- christmas candy basket diy
- christmas embroidered basket
- christmas embroidery design ideas
- christmas sewing crafts
- christmas treat basket sewing
- embroidered fabric basket tutorial
- embroidered holiday gift basket
- fabric basket pattern christmas
- festive home decor embroidery
- happy fawn embroidery design
- holiday embroidery projects
- machine embroidery christmas projects
- quilted basket with embroidery
- sewing tutorial fabric basket
- soft textile basket diy

By diver361
- 538 views
- View diver361's images
🎄🧵 Sweet Holidays in Every Stitch: Embroidered Soft Baskets for Christmas Treats
Christmas is a season of warmth, sweetness, and little handmade moments. And nothing captures that feeling quite like a soft textile basket decorated with a charming embroidered holiday design. Imagine it: a cozy basket filled with pies, cookies, candies, gingerbread… and on the front — a smiling embroidered reindeer bringing joy and gifts. ✨🦌💝
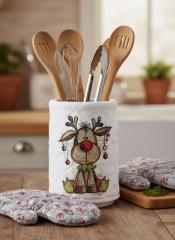
One perfect example is the Happy Fawn with Christmas Gift embroidery design, stitched beautifully onto a quilted cream-colored basket. This tiny embroidered scene instantly transforms a simple fabric container into a centerpiece of comfort and holiday cheer.
But how do you actually create a basket like this?
Let’s dive into the magic — from planning and cutting to embroidery and assembly.
🎁 Why Soft Fabric Baskets Are Perfect for Christmas
Soft baskets bring a special kind of charm:
They feel warm and handmade
They are lightweight and safe, especially for kids
They can hold pastries, cookies, ornaments, candies, napkins, and small gifts
They are reusable, washable, and eco-friendly
And most important — they’re beautifully embroidered ✨💫
A Christmas fawn, Santa, gingerbread men, snowmen, or even a minimalistic geometric tree — every design becomes a story.
🧵 How to Design a Soft Basket With Embroidery
Before cutting your fabric, you need a solid plan.
Here’s what to consider:
1️⃣ Choose the Right Fabric
The best materials are:
quilted cotton
canvas
thick linen
felt
cotton with fusible stabilizer
Quilted fabric gives the basket structure and that cozy winter vibe 🎄🧵.
2️⃣ Pick Your Christmas Embroidery Design
Cute characters work perfectly:
🦌 Happy Fawn
🎁 Gift boxes
❄️ Snowflakes
🎅 Santa hats
🍪 Gingerbread motifs
For soft baskets, embroidery with clean lines and moderate density is ideal to avoid stiffness.
3️⃣ Determine the Size of the Basket
Standard sizes:
Small: 18 × 18 × 18 cm
Medium: 22 × 22 × 25 cm
Large: 28 × 28 × 30 cm
Choose based on what you want to store — cookies? ornaments? bread rolls?
4️⃣ Decide Where the Embroidery Will Go
Typically the embroidery is placed on:
the front panel
or on two opposite sides for a 360° festive look 🎄
✂️ Step-by-Step: Cutting & Sewing a Christmas Textile Basket
Here is a simple, reliable method for creating a structured soft basket.
Step 1 — Cut the Panels
You will need:
2 outer panels (front & back)
2 side panels
1 bottom square/rectangle
5 lining pieces in the same size
Optional: 2 handle strips
Make your pattern rectangular or square depending on the desired height.
Step 2 — Prepare the Front Panel for Embroidery
Mark the center of where the design will sit.
Attach cut-away stabilizer (or fusible woven) to the back.
Hoop the panel with stabilizer only — do NOT hoop quilt batting; it stretches.
Embroider your design (example: Happy Fawn with Christmas Gift).
✨ Tip: Use light-density fill so the panel stays soft and flexible.
Step 3 — Trim Threads & Press
Gently press the fabric panel from the back using a pressing cloth.
Avoid ironing the embroidery directly.
Step 4 — Assemble the Outer Basket
Sew each side to the front panel.
Add the back panel.
Attach the bottom piece last.
Press seams outward for sharp edges.
Step 5 — Add Handles (Optional)
Fold long strips, stitch, turn inside out, attach to basket with X-box reinforcement.
Step 6 — Sew the Lining
Repeat the same construction without embroidery.
✨ For a sturdy basket, use:
fusible interfacing
quilt batting
foam stabilizer (if you want a firm, upright shape)
Step 7 — Connect Lining & Outer Shell
Insert lining inside out into the outer shell (right sides together).
Stitch around the top edge.
Turn through a gap in the lining.
Topstitch the upper edge for a clean finish.
🎉 Your basket is ready!
⚠️ Pitfalls to Watch Out For (and How to Avoid Them)
❌ Basket collapses or looks too soft
✔ Use thicker batting, fusible foam, or double layers.
❌ Embroidery puckers
✔ Use quality cut-away stabilizer.
✔ Use a higher stitch density only where necessary.
❌ Sides become distorted after assembly
✔ Trim threads and stabilize edges before sewing.
✔ Press seams carefully.
❌ Lining pulls the basket inward
✔ Make lining slightly (3–4 mm) smaller.
❌ Embroidery placed too low
✔ Always mark the front panel AFTER deciding bottom seam allowance.
🧺 Can a Christmas Basket Be Fully Textile With Embroidery and Lining?
Absolutely — yes!
And it’s even recommended:
✨ Lining hides stabilizer
✨ Makes the basket washable
✨ Adds structure
✨ Protects embroidery from crumbs and sweets
✨ Feels premium and gift-worthy
You can even add a removable plaid cloth inside for extra charm, as in your example. 🥧❤️
🎉 Final Thoughts: A Basket Full of Magic
Embroidery turns even the simplest fabric basket into a Christmas treasure.
It becomes a warm, handmade, heartfelt container for the sweetest holiday memories — pies, cookies, candies, or little gifts.
The Happy Fawn with Christmas Gift design is a perfect example of how embroidery brings personality and charm to home décor. 🦌✨
Whether for your home, a Christmas party, or a unique handmade present — such a basket will always bring smiles, warmth, and festive joy.
Recommended Comments
Join the conversation
You can post now and register later. If you have an account, sign in now to post with your account.