


.jpg.4b719b852b8d4f39eb8a14aa603a1e11.jpg)
How to Create a Christmas Wreath With Embroidery design ✨

By diver361
- 421 views
- View diver361's images
Handmade Christmas Wreaths With Embroidery: A Magical Holiday Trend ✨🌲
Christmas wreaths have always symbolized joy, warmth, and the spirit of welcoming guests into a festive home. But today, crafters around the world are re-imagining this classic décor element: adding a piece of embroidery in the center to create something personal, artistic, and irresistibly magical.
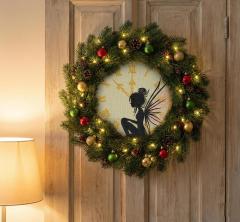
One of the most inspiring examples is a wreath featuring a glowing fairy silhouette on a soft fabric “clock”—a design that feels like a doorway into a winter fairy tale.
In this article, we’ll explore how to create such a wreath yourself, how to choose the right embroidery size, and what professional designers recommend to achieve a perfect result.
Why Embroidery Belongs in a Christmas Wreath 💫
Adding embroidery inside a wreath creates:
A focal point — the eye naturally lands on the stitched artwork
A sense of handcrafted warmth
A unique decorative style: fairy tales, vintage, winter stories, animals, monograms—anything you love
A reusable piece (you can change the greenery seasonally!)
On Pinterest and embroidery communities, similar projects show stitched snowflakes, Christmas clocks, angels, woodland silhouettes, and Victorian scenes placed inside wreaths. These projects are gaining popularity because they blend sewing artistry with holiday décor.
How to Make a Christmas Wreath With an Embroidered Center
1. Choose the Right Embroidery Design 🧵⭐
Select a design with a clear silhouette or strong Christmas symbolism, because it will be viewed from a distance.
Perfect examples include:
Fairies and magical creatures
Vintage Christmas clocks
Angels and silhouettes
Snowy forest mini-scenes
Christmas typography (“Joy”, “Noël”, “Believe”)
✨ Try this gorgeous example: Fairy Christmas clock embroidery design
2. Understanding Size: Wreath Diameter vs. Embroidery Diameter 🎯
One of the most important steps is matching your embroidery size to the wreath size. A common proportion system used by decorators is:
Ideal Proportion: Embroidery = 40–55% of the inner wreath diameter
For example:
Wreath Diameter | Recommended Embroidery Size |
|---|---|
35–40 cm (14–16") | 14–18 cm (5.5–7") |
45–50 cm (18–20") | 18–24 cm (7–9.5") |
60 cm (24") | 24–30 cm (9.5–12") |
Too small → the embroidery disappears.
Too large → there’s no visual breathing room.
Think of the wreath as a frame — the embroidery must sit comfortably inside without touching the greenery.
<div style="background:#f0f0f0; padding:14px; border-radius:8px;"><strong>DESIGNER TIP:</strong> Choose a design with a circular composition (a clock, a moon, a wreath, a mandala, or any round frame). These shapes blend naturally with the round greenery and look perfectly balanced.</div>
3. Preparing the Embroidered Center 🪡🎄
You will need:
A piece of stable cotton, linen, or canvas
Stabilizer (medium cut-away for dense stitches)
Wooden or plastic inner hoop (to stretch and hold the embroidery)
Backing fabric or felt to finish the reverse side
Optional: LED micro-lights sewn behind the hoop for soft backglow
Steps:
Embroider the design using high-contrast thread (black silhouette looks fantastic).
Press the fabric from the back with steam.
Stretch it tightly in a hoop or mount it onto a thin wooden circle.
Finish the back with felt or fabric––this prevents shadows when lights shine through.
<div style="background:#f0f0f0; padding:14px; border-radius:8px;"><strong>DESIGNER TIP:</strong> If your wreath includes LED lights, choose threads with a soft matte finish (cotton, rayon). Metallic threads reflect light unpredictably and can create glare in evening lighting.</div>
4. Creating the Greenery Wreath 🌿✨
You can use:
Real pine branches
Artificial pine garlands
Prefabricated wreath bases
Pinecones, berries, ornaments
Assembly:
Wrap the wreath base with greenery.
Add ornaments (gold, green, red work best for classic Christmas style).
Weave LED micro-lights around the greenery.
Leave an opening in the center wide enough for your embroidery hoop.
5. Attaching the Embroidery to the Wreath
There are two main methods:
Method A: Zip-ties or floral wire (strong & stable)
Connect the embroidery hoop to the wreath frame from behind. This works best for heavier stitch designs.
Method B: Ribbon suspension (decorative & soft)
Use a wide ribbon to hang the embroidery like a “pendant” inside the wreath. Creates a romantic, floating effect.
<div style="background:#f0f0f0; padding:14px; border-radius:8px;"><strong>DESIGNER TIP:</strong> Place the wreath at eye level and step back 2–3 meters. If the embroidery is the first thing you notice — the scale is perfect. If not, adjust the angle or increase central contrast.</div>
6. Inspiration From Online Craft Communities 🔍💡
Crafters share many creative variations:
A snowman embroidery framed inside a fluffy, snowy wreath
Blue-and-silver wreaths with embroidered winter birds
Vintage angel silhouettes inside candle-lit wreaths
Nordic minimalist wreaths featuring whitework embroidery
Victorian-style wreaths with embroidered Christmas clocks (similar to your fairy clock)
These examples show how versatile embroidery can be in holiday décor — from modern minimalism to fairytale fantasy.
Final Thoughts: Bring Holiday Magic to Your Door ✨🚪
A Christmas wreath with embroidery at its center is more than decoration — it’s a personal artistic statement. It blends tradition with craftsmanship, light with texture, and nature with imagination.
Whether you choose a fairy silhouette, a winter clock, or a snowy animal, your wreath will become a meaningful piece that guests instantly notice and remember.
Let the holiday season begin with creativity, warm lights, and a touch of embroidery magic. 🌟💖
Recommended Comments
Join the conversation
You can post now and register later. If you have an account, sign in now to post with your account.