


Embroidering on a Lampshade

By diver361
- 147 views
- View diver361's images
Lampshades are one of the most underrated embroidery canvases — and once you try it, you'll wonder why you didn't start sooner. ✨
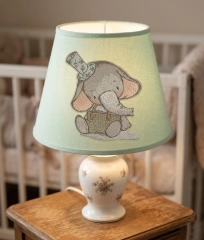
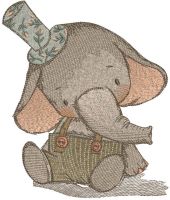
Whether it's a nursery nightlight or a living room statement piece, an embroidered lampshade brings warmth — literally and aesthetically. The design glows from within when the lamp is on, creating a stained-glass-like effect that no other textile can replicate. And with the right design, like our Vintage Elephant, even a beginner can achieve something truly stunning. 🐘
In this guide, we'll walk through everything — fabric prep, stabilization, hoop tricks, machine setup, and finishing — so your lampshade comes out looking like it belongs in a boutique nursery or a Parisian antique shop. Let's dive in! 🏪
💡 Why Embroider on a Lampshade?
Lampshades made from natural fabrics — linen, cotton, dupioni silk — are perfect for machine embroidery. The fabric is taut, the surface is stable, and when the light shines through, even simple designs look breathtaking.
"Light transforms embroidery. The thread shadows create depth that you simply cannot see in daylight — a lampshade is one of the few projects where your work looks even better in the evening than it does on the worktable."
The key is choosing a fabric shade, not a plastic or vinyl one. Many modern lampshades come with a simple cotton or polyester covering stretched over a wire frame — and these are your canvas. 🎨
🧺 What You'll Need
🧵 Choosing the Right Fabric Shade
Never embroider on a shade while it's on the frame! Always remove the fabric covering first, embroider it flat, then reattach. Trying to hoop around the frame is a recipe for broken needles and misaligned designs.
📋 Step-by-Step: Machine Embroidery on a Lampshade
Remove & prep the fabric 🧼
Carefully detach the fabric from the lampshade frame. Wash lightly if needed and press with a warm iron. Mark the center with your fabric marker.
Choose your design placement 📐
Print a template of the design at actual size. Position it on the shade fabric — usually center-front, slightly below the middle of the shade's height.
Stabilize correctly 📦
Spray KK2000 lightly on medium-weight tear-away stabilizer. Smooth your fabric on top. This floating method is ideal when the fabric is too small to hoop directly.
Hoop & load the design 🖨️
Use the largest hoop your machine supports. Load the Elephant Vintage design file. Set machine speed to 90% for delicate fabrics.
Embroider! 🪡
Watch the first color stop carefully. The vintage sketch style means many short stitches — this is normal. Let the machine run at its own pace.
Remove stabilizer & press 🌡️
Tear away the stabilizer carefully. Place a pressing cloth over the design and press from the reverse side with a warm iron to settle the stitches.
Reattach to frame ✂️
Re-stretch the embroidered fabric onto the lampshade frame. Use fabric glue or the original attachment method. Let dry completely before installing the lamp.
Run a test stitch on a scrap piece of the same fabric first — especially with sketch-style designs. Density settings may need a slight reduction (try 85%) on loose-weave linens to prevent puckering.
🎨 Thread Color Palette for the Elephant Design
The vintage elephant design uses a carefully curated muted palette that mimics the look of aged illustrations:
Elephant body — Warm gray
Use a medium warm gray (avoid cool blue-grays). Madeira 1845 or Sulky 1219 work perfectly.
Ears — Dusty rose
A muted blush pink adds warmth without being babyish. Think antique rose, not bubblegum. Robison-Anton 2340 is ideal.
Dungarees — Sage green
On mint shades, try olive-sage. On cream shades, a brighter sage pops beautifully.
Top hat — Muted teal
This is the accent color — the floral-print hat detail in teal ties the whole design together. Don't skip it!
"With sketch-style designs, the outline thread does most of the visual work. Invest in a high-quality 40wt rayon for outlines — the sheen catches the light beautifully when the lamp is lit, adding a magical quality that polyester thread simply can't match."
🏆 Expert Tips for a Perfect Result
Reduce your top thread tension by half a point when stitching on lampshade fabric. Standard tension can pull and cause tiny puckers along the seamlines of filled areas.
Always use LED bulbs in embroidered lampshades — never incandescent or halogen. Thread is flammable, and a cool LED bulb keeps your beautiful work safe for years to come.
For drum shades, consider repeating the design three times around the circumference, rotated 120°, for a seamless all-around effect. Use your machine's repeat function to ensure exact spacing.
🪄 The Magic of Lit Embroidery
Here's what surprises most first-timers: the design looks one way in daylight, and transforms entirely when lit from within. Sketch-style designs like the Vintage Elephant are especially magical — the fine lines create delicate shadow patterns on the surrounding walls, almost like a projection. 🌟
Heavier thread (30wt) blocks more light and creates bold shadows; finer thread (50wt or 60wt) for fill areas lets more light through, giving an almost watercolor effect. The elephant's body fill at 40wt strikes exactly the right balance. 🎭
Place your finished lamp near a wall and turn it on at dusk. The elephant and his little floral hat will cast their shadow softly across the room — and that, right there, is the moment you'll fall completely in love with lampshade embroidery. 🐘✨
Happy stitching! 🧵 Share your finished lampshade with us.
Recommended Comments
Join the conversation
You can post now and register later. If you have an account, sign in now to post with your account.