
How to Embroider Women's Pants: Tips That Actually Work

By diver361
- 25 views
- View diver361's images
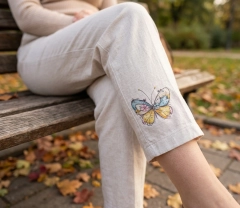
A butterfly on the hem of linen trousers. A floral motif near the knee. Delicate sketch embroidery on denim. These projects look effortless in photos — and brutally honest in the hoop. 🤭
Pants are one of the trickiest garments to embroider on. Unlike a flat pillowcase or a jacket back, trouser fabric curves, stretches, seams appear at the worst moments, and the leg tube doesn't fit neatly into any standard hoop. But the result — a butterfly catching light on cream linen while you sit in an autumn park — is absolutely worth mastering the technique.
Let's go through every real challenge, one by one, with the solutions that actually work. 💪
Challenge #1: The Leg Tube Won't Fit the Hoop
This is the first wall every embroiderer hits with pants. The leg is a closed tube — you can't simply lay it flat and hoop it like a pillowcase. Force it and you'll stitch the front leg to the back leg, which is both embarrassing and irreversible.
Use the free-arm hooping method: slide only one layer of the leg over your hoop's inner ring, tucking the back leg inside and out of the way. Secure with pins or clips. Many embroidery machines have a free-arm attachment specifically for sleeves and legs — use it.
For narrow legs (skinny jeans, fitted trousers), use a sticky stabilizer in the hoop and adhere the fabric to it rather than hooping the fabric directly. This prevents distortion on tight tubes.
Challenge #2: Curved Surfaces & Design Distortion
The side of a trouser leg isn't flat — it curves. When you hoop curved fabric flat, it stretches in the hoop, and once released, the design puckers or pulls off-center. A butterfly stitched straight ends up looking like it's mid-flight in the wrong direction. 😬
Never pull the fabric tight to make it "more flat" in the hoop. This stretches the grain, and the design will distort once the garment is worn and the fabric relaxes back to its natural shape.
Hoop the fabric relaxed and natural — just as it lies. Use a cut-away stabilizer instead of tear-away for stretch-prone fabrics. For linen trousers like in our photo, a medium-weight cut-away gives just enough body to prevent drift without stiffening the drape.
Challenge #3: Seams in the Way
Side seams, inseams, hem seams — they all create ridge lines that the needle hates. Stitching across a seam allowance changes the needle's path, can cause skipped stitches, bent needles, and visible puckering right through the design.
Plan placement first
Before hooping, mark all seam locations with tape. Position your design so it falls entirely between seams, not across them.
Press seams flat
Iron seam allowances open before hooping. A flatter seam = fewer problems. Use a tailor's ham for curved seams.
Slow down at seams
If crossing is unavoidable, reduce machine speed to 60–70% over the ridge. Use a titanium needle — it flexes less than standard.
Bridge with stabilizer
Place a strip of tear-away stabilizer under the seam allowance to level the surface before hooping.
Challenge #4: Choosing the Right Stabilizer for Stretch
Linen stretches on the bias. Ponte knit stretches in both directions. Even "non-stretch" cotton twill has some give when pulled. Wrong stabilizer choice = a design that waves at you from across the room. 👋
Challenge #5: Getting Placement Right Every Time
On pants, placement is everything. 2cm too high looks deliberate. 2cm to the left looks like a mistake. And unlike a flat piece where you can pin a template and check easily, a trouser leg is three-dimensional.
Print the design at 100% actual size. Cut it out, put the pants on (or stuff the leg with tissue paper), and tape the template where you want it. Step back. Look from arm's length. Only then mark the center point with a water-soluble pen and transfer to the hoop.
For symmetric designs (like a centered butterfly), always find the crease line of the trouser leg — that's your true center, not the seam. Seams on modern trousers are often off-center by design.
Challenge #6: Puckering After Washing
You finished it, it looks perfect. You wash it — and the butterfly now lives inside a little wrinkled island of gathered fabric. This is the saddest moment in embroidery. 😢 It happens when thread density is too high for the fabric weight, or when stabilizer shrinks differently from the fabric.
Before you stitch the real garment:
① Pre-wash both the pants AND the stabilizer cut-outs before use
② Do a test stitch on matching fabric scrap, then wash the test
③ For sketch designs, reduce density to 75–85% of default
④ Use a bobbin thread that matches the garment fabric weight
⑤ Steam-press (don't iron flat) the finished design before first wash
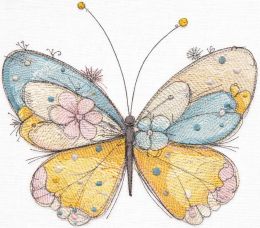
🦋 Why This Design Works So Well on Pants
Not every embroidery design is a good candidate for trouser legs. Dense filled designs are rigid and crack with movement over time. The Butterfly Crayons sketch design works beautifully on pants for specific reasons:
