
Search the Community
Showing results for tags 'embroidery troubleshooting'.
Found 8 results
-

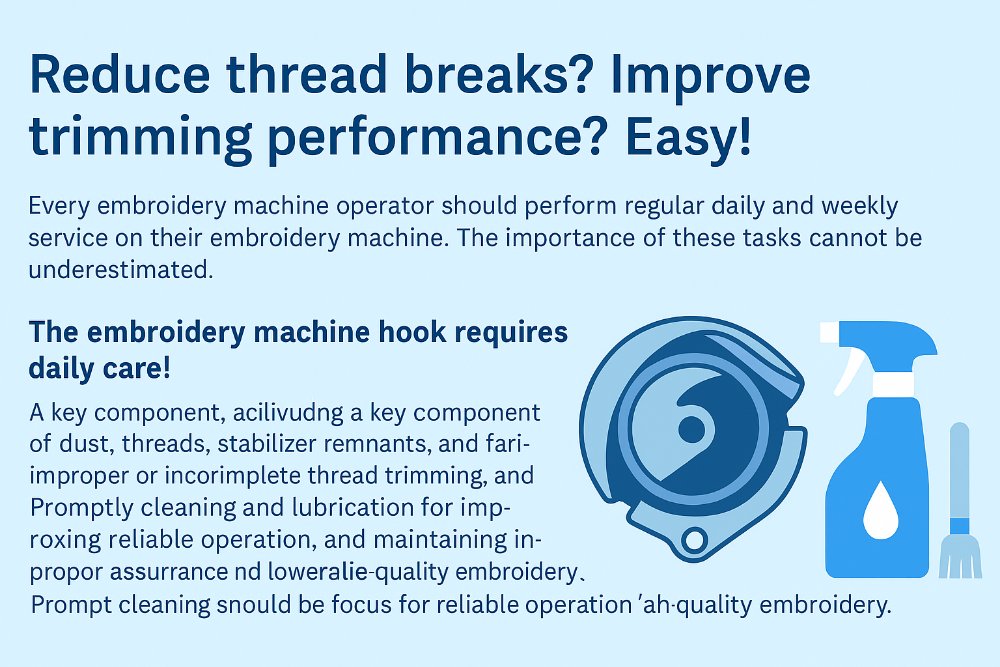 Want Fewer Thread Breaks and a Smoother Thread Trimmer? It’s Easier Than You Think! Every embroidery machine operator should follow a regular maintenance schedule—both daily and weekly. And when it comes to performance, this is not just a recommendation—it's a necessity. The Hook Assembly Needs Daily Attention The hook assembly is one of the most critical parts of your embroidery machine. It plays a direct role in stitch quality and overall machine operation. Keeping it clean and properly oiled can help you avoid many common embroidery issues. What Happens Without Maintenance? Dust, stray threads, stabilizer residue, and fabric lint accumulate quickly in the hook area. This buildup: Reduces stitch accuracy Causes frequent thread breaks Absorbs oil, reducing lubrication Increases resistance and wear on moving parts This not only affects your embroidery results—it can shorten the machine’s life. Insufficient Oil = Expensive Repairs Without proper oiling, parts wear out faster. This can lead to breakdowns, costly repairs, and downtime. Oiling ensures smooth motion, reduces friction, and helps prevent overheating. What About the Thread Trimmer? Inconsistent trimming is often caused by dust and thread bits lodged in the hook assembly. When debris blocks the trimmer’s blades, they can’t cut the thread cleanly—leading to missed trims or thread nests in your work. Quick Takeaway: Clean and Oil = Reliable Embroidery Daily cleaning and oiling of the hook area ensure: Fewer thread breaks Smoother trimming Higher stitch quality Longer machine life Fewer surprises during production Just a few minutes of maintenance can save you hours of frustration. Treat your machine well—it’ll return the favor with flawless stitching.
-
- 1
-

-
- embroidery hook oiling
- hook cleaning
- (and 4 more)
-
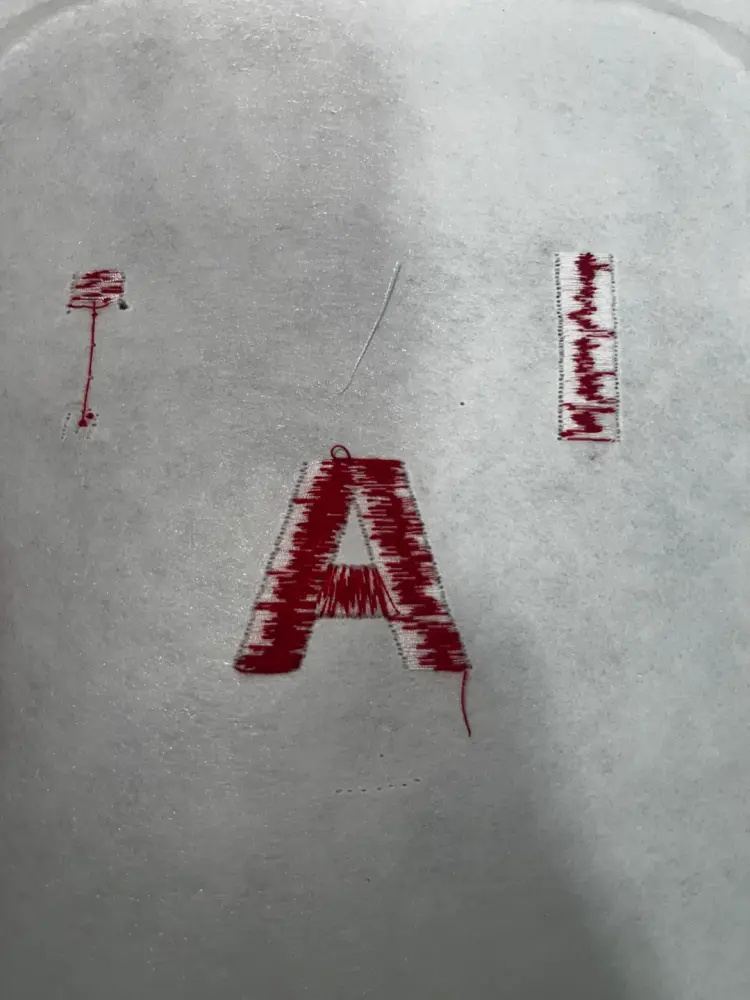
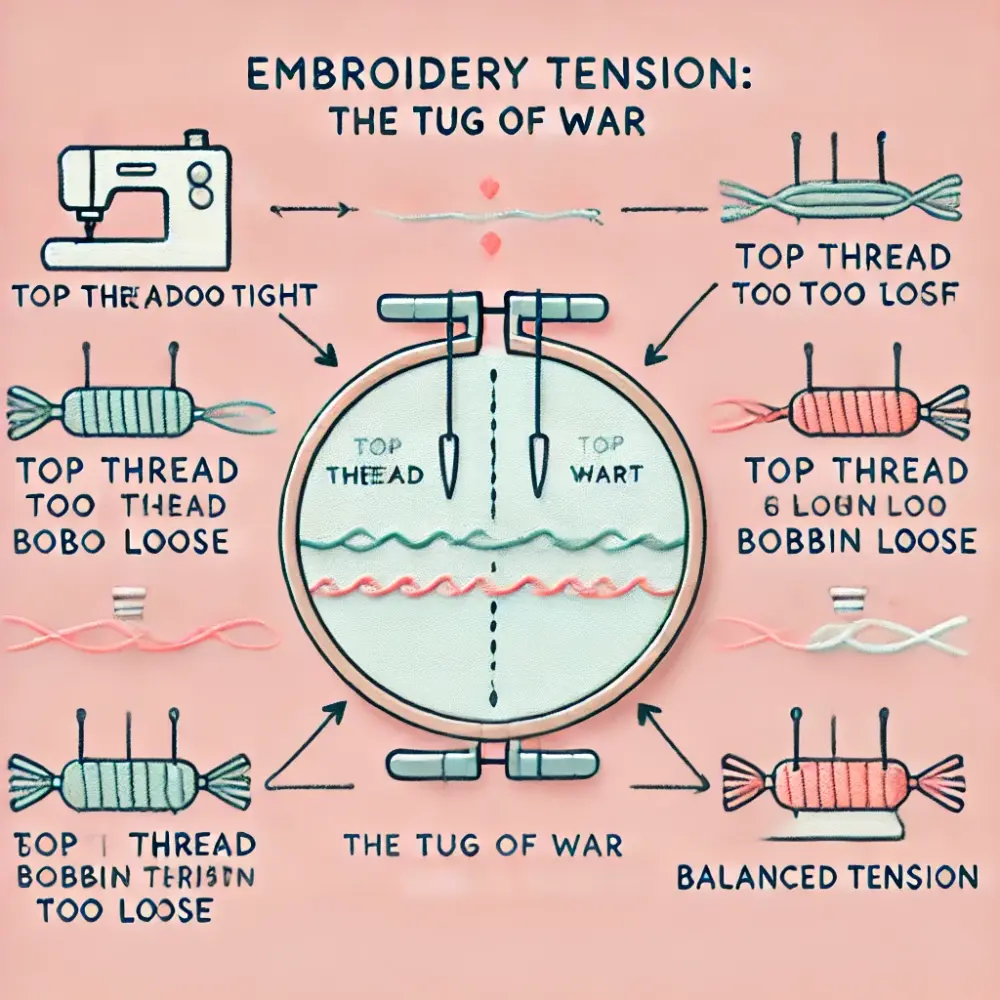 When Totoro Goes Wrong: Thread Tension Troubles in Machine Embroidery A Stitch Too Far: The Cursed Totoro Incident If you've ever looked down at your embroidery mid-stitch and gasped at the unholy creature being born beneath your needle — you’re not alone. One user recently shared their struggle with a “cursed Totoro,” complete with red bobbin thread showing through where it definitely didn’t belong. While their choice of bobbin color made the issue vividly clear, the real culprit turned out to be a classic embroidery challenge: thread tension imbalance. Tug of War: Top Thread vs. Bobbin Thread Think of embroidery tension as a tug-of-war. Your bobbin thread and top thread are constantly fighting for control — ideally meeting somewhere in the middle of your fabric. But when that balance is off, it shows. Literally. If your bobbin thread is showing on top, two things could be going wrong: Your top thread tension is too tight (it’s winning the tug too easily). Your bobbin tension is too loose (it’s not pulling its weight — pun intended). In our Totoro tragedy, the bright red bobbin thread overpowering the white top thread was a telltale sign of tension trouble. Diagnosing Tension Issues: Rule of Thumb? Here’s what experienced stitchers recommend: Try adjusting one thing at a time. Start with the top tension. Loosen it slightly and stitch a single letter (like an “I” or “H”) as a mini test. If that doesn’t help, check your bobbin tension. Many bobbin cases have a tiny screw — a quarter turn tighter may be all you need. Always make sure your bobbin is threaded and inserted correctly. It should pull the thread in a lowercase "p" shape — “p” for put it in! Secret Weapon: The Tension Gauge Not sure how much is too much tension? Enter the tension gauge — a handy tool that lets you measure the tension on both your bobbin and top thread. These come in both analog and digital versions and are surprisingly affordable. Madeira’s website offers a range of options, but you can also find similar tools on Amazon and other online embroidery suppliers. For beginners, a cheaper analog gauge does the trick just fine. Bonus Tip: Thread Weight Matters! Another often-overlooked culprit in tension chaos? Mismatched thread weight. In this case, the red bobbin thread appeared to be heavier than the top thread, which made it more dominant and harder to keep hidden. Make sure to: Match thread weight where possible. Check the labels — most threads have their weight printed on the spool. If unsure, eyeball the thickness and avoid big mismatches unless you're experienced. One Last Word on Color… Yes, the red bobbin thread was used on purpose to make the issue easier to spot — but it’s worth noting that matching thread colors (or at least coordinating them) makes a big difference in how forgiving your stitch-outs will look. And hey — winding bobbins might be annoying now, but it gets easier with time. Promise. Conclusion: Don’t Curse Your Totoro Just Yet Embroidery is a beautiful mix of art and precision, and every “cursed Totoro” is just another learning step on the journey. With a little patience, a few tension tweaks, and maybe a tension gauge or two, you’ll be on your way to creating embroidery magic — not mayhem.
 -
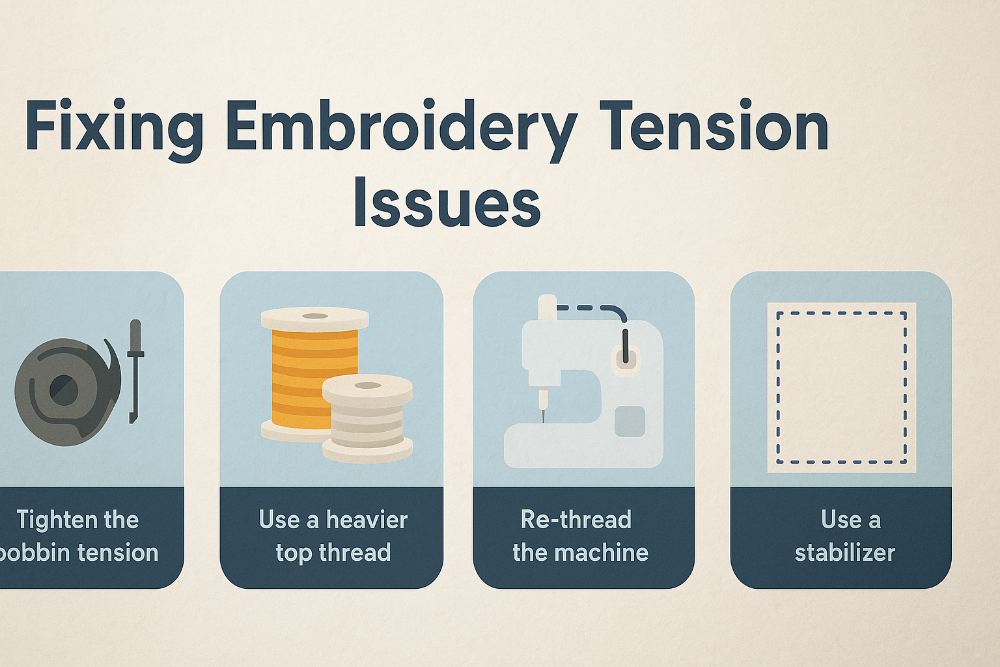 My First Embroidery Machine Project: Why the Front Looked Terrible (But the Back Looked Great!) Hi there! I'm brand new to the embroidery world, and I recently gave my very first machine embroidery a try using my Brother SE700. I was super excited, but... let’s just say, things didn’t go exactly as planned. I used: Simthread 40wt embroidery thread on top Simthread 60wt embroidery bobbin thread Sulky Cut Away Plus Midweight stabilizer The result? The front looked awful—loose, gappy, and uneven—while the back looked amazing… as if it was meant to be the front! Totally confusing, right? Take a look: My Embroidery Looked Backwards?! I tried adjusting the top tension (each “B” in my test has a different setting), but nothing fixed it. The middle bar of the “B” even looked like it wasn't attached to the vertical stroke. I had no idea what was going wrong. I started wondering things like: Did I hoop my fabric upside down? Could the design file be corrupted? Was the machine trying to stitch from the wrong side?! The online community (thank you amazing folks!) chimed in with some solid tips, hilarious theories, and reassuring support. Here's a breakdown of what I learned. Top Lessons I Learned (So You Don’t Have to Go Crazy Like I Did) 1. Tension Matters... A LOT Several people pointed out that my bobbin tension was likely too loose. That would explain why all the bobbin thread was being pulled up and dominating the front. Fix: Tighten your bobbin tension in tiny increments. A quarter turn clockwise on the tension screw is a safe place to start. Pro Tip: If you're nervous about messing with it, just get a second bobbin case to play with. They're cheap! 2. Thread Weight Differences Count Using a 60wt bobbin thread and a 40wt top thread is totally normal—but it means your tension has to be dialed in perfectly. The thicker 40wt should dominate on top, but if the bobbin tension is too loose, the thinner thread will get yanked to the surface. 3. Threading Must Be Perfect Yep—rethread the machine from scratch. Make sure your presser foot is raised when threading so the thread goes through the tension disks properly. A lot of machines won’t apply correct top tension if this step is skipped! 4. Double Check Your Bobbin Direction Several people mentioned that a backwards bobbin can cause major chaos. So if you’re seeing weird results, reinsert it carefully and make sure it’s turning the correct way in the case. 5. Stabilizer Is Your Best Friend Turns out, I got drastically different results depending on whether I used stabilizer or not. When I skipped it? Disaster. When I used it? Much better! Always use stabilizer (especially as a beginner!) and consider topping it with a wash-away if you’re working on stretchy or textured fabric. The Verdict? It was a mix of things: bobbin tension, thread weight difference, and possibly threading mistakes. But now I know, and I hope this helps you avoid the same frustrations. Most importantly, if your embroidery looks better on the back, don’t panic—you’re not crazy. You’re just learning, and we’ve all been there. Thanks to everyone who helped troubleshoot—I genuinely would’ve gone nuts without you Have you ever had a similar embroidery fail? Share it in the comments—I’d love to hear your story (and feel a little less alone ). Happy stitching, A New Embroidery Addict
 -
 Recently, I was asked to recreate an embroidery design for a client who used to outsource their patches but now wants to support local makers. It sounded simple enough—just reproduce an existing 2.25-inch patch. I’ve done similar work before, so I figured I’d digitize it myself and get stitching. Cue: frustration. No matter how many adjustments I made to the file or tweaks I tried on the machine, I couldn’t get it to look as clean and professional as the original version. The fill stitches looked okay, and tension wasn’t the issue (I double-checked needle gauges and everything), but the lettering—especially at the bottom—just wouldn’t cooperate. So... Is It Me? Or Is It My Machine? At a certain point, I started to wonder if the real issue was my Ricoma machine. It seems like it's just not built for super fine lettering, especially when it gets down to those 2-inch patch sizes. I know machines have their quirks, but when your file looks great on screen and stitches out like a mess, it’s enough to drive you up the wall. The Community Weighs In: Actual Life-Saving Tips Thankfully, I wasn’t alone in this. I reached out and got some solid advice from folks who've been in the same boat: 1. Design Size vs. Font Size Even though the patch is 2.25 inches (which matched the original), that still doesn’t leave a lot of space for clean, crisp lettering. Fonts get tricky fast when they drop below a certain size, especially if you're using standard 40wt thread and a 75/11 needle. 2. Stitch Strategy Tweaks For the yellow outline around “Penn”, instead of outlining it literally, try making a wider fill base and letting the white letters overlap slightly. Add or adjust pull compensation: set it between .010 and .012 for better coverage. Don’t skip underlay, even for thin elements like ribbon lines. A single run underlay can stabilize the stitches and reduce distortion. Bump density to .014 for words like "Construction" or "Comprehensive Design" that sit on curves or small spaces. 3. Small Fonts Need Special Tools For really fine lettering: Use 60wt thread (Gunold is a favorite for this). Switch to a 65/9 needle for better control and less distortion. Increase density slightly (around .011) to help with clarity. 4. Removing Underlay Isn’t Always the Fix I was removing underlay from thinner text elements because it was getting messy, but without it, things didn’t look much better either. Sometimes, the messiness is a sign the design just needs more support—not less. On the Topic of Outsourcing: A Learning Perspective I got a few suggestions to outsource the digitizing entirely—just pay the $25 and be done with it. And honestly, I get that. Sometimes, it is the smartest path. But here’s where I stand: I already spent a year having my designs digitized professionally. I’ve studied every stitch from those files, reverse-engineered how they’re built, and have been digitizing my own work for over a year and a half now. Most of the time, the results are solid. But these patch-style designs really push the limits, and that’s exactly why I want to do this myself. I have the time. I have the drive. And this project gives me a chance to truly figure it out—not just imitate the look, but understand the logic behind it. A Reminder to Fellow Creators If you're in the same boat—frustrated with inconsistent results and tempted to throw in the towel—you're not alone. Sometimes, the hardest projects are the ones that push your skills to the next level. Take the feedback that helps, ignore the noise that doesn't, and give yourself space to improve. At the end of the day, I’m not just trying to make this patch. I’m trying to master the craft. Have you wrestled with small fonts, tricky underlays, or machine limitations? Drop your thoughts below or send me your go-to fixes. Let’s keep learning together, one stitch at a time.
 -
 Help! My Embroidery Machine Keeps Jamming – What I Learned and What to Do If you’ve ever sat down to embroider and ended up nearly in tears over thread nests, jamming, or tension issues—welcome to the club. I’ve had my embroidery machine for about a year and a half now, and lately, it’s been giving me a serious headache. No matter how much I adjust the tension, it just keeps jamming. At first, I blamed the file digitization, but even an old design I’ve used before jammed. That’s when I realized: it might be time for a deeper look. Here’s a rundown of what happened, what I tried, and what I learned from the embroidery community (and a few kind souls who clearly know their stuff). The Mystery of the Constant Jams It started subtly—occasional issues here and there—but quickly escalated to full-blown chaos. The top thread would bunch up underneath the fabric, right in the needle hole, forming what many call a “bird’s nest” or more technically, thread nesting. I changed the needle. Then I changed it again. And again. (Twice in one hour ) I fiddled with the upper tension, bobbin tension, rethreaded everything, but nothing worked. Diagnosing the Problem Here’s what I learned through trial, error, and talking with others: 1. It’s Called Nesting – And It’s Not Always About Tension Nesting happens when the top thread gets caught or doesn’t pull through properly. Despite what many assume, it’s not always a tension issue. If the thread isn’t breaking but is bunching, it’s likely something else. 2. Time to Clean and Oil One of the best tips I received was to take off the throat plate, use pressurized air to clean out the lint, and shine a flashlight down there to check for stray threads. Oil every recommended spot on your machine, especially if it’s been a while. 3. Inspect for Damage If you’ve had a bad jam, you might have a needle strike that damaged the underside of the needle plate, the bobbin case, or the rotary hook. These tiny dings can catch the top thread and start the whole nesting nightmare again. Use a cotton ball to run across all those surfaces. If it catches anywhere, you may have a rough spot causing the jam. How Often Should You Service Your Machine? This was one of my biggest questions, especially since I’m getting ready to launch a small business selling custom shirts and sweatshirts. Here’s the consensus: Once a year is the standard for routine servicing, assuming no problems. If you’re running your machine frequently (say, over 5–10 million stitches a year), you may need to service it more often. Just like a car, preventative maintenance—cleaning, oiling, replacing worn parts—protects your investment. Final Thoughts: Know Your Machine I’m using a single-needle Brother dual embroidery and sewing machine, and while I’m no expert, I’ve learned this: take the time to really get to know your machine. Clean it regularly. Oil it when needed. Keep a stash of fresh embroidery needles. And when things start acting up? Don’t ignore it—investigate. Sometimes it’s a quick fix, sometimes it needs professional servicing. Either way, keeping your machine in top shape is crucial—especially if you’re stitching for business. Got your own jamming horror story or fix-it tip? Drop it in the comments—I’d love to hear what’s worked for you!
 -
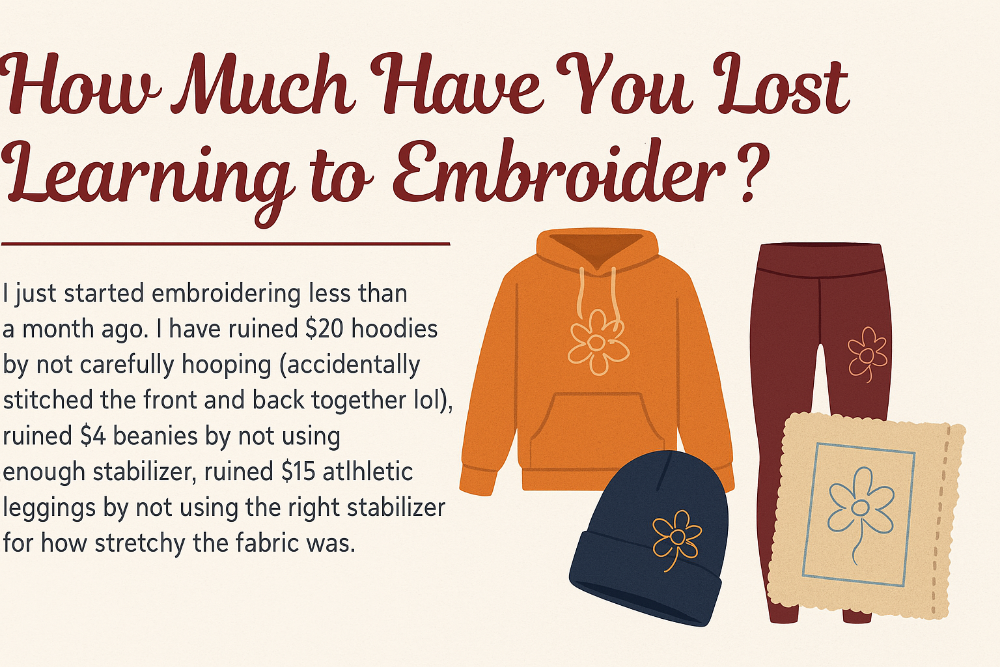 If you're new to embroidery and already watching your wallet take a hit, you're not alone. Behind every beautifully stitched design is a trail of broken needles, stretched-out fabric, and a few (okay, a lot) of ruined garments. But let’s get one thing straight: every mistake is a lesson. And some of the best embroidery wisdom comes from the biggest fails. "$70 in and I’ve already stitched the front and back of a hoodie together..." One beginner, only a month into their embroidery journey, shared how they’ve already racked up about $70 worth of mistakes, including: A $20 hoodie stitched closed because of careless hooping (we've all done it) $4 beanies ruined from not using enough stabilizer $15 leggings distorted by the wrong stabilizer for stretchy fabric A fluffy blanket embroidered without a knockdown stitch (RIP design) The golden rule they learned the hard way? ALWAYS DO A TEST RUN. “I digitized and stitched a 24-hoop masterpiece… 3 times.” One brave embroiderer took on a massive challenge: The Golden Tapestry from Anita Goodesign. Instead of quilting, they turned the 24-part project into a multi-hooping marathon on a single 48"x36" piece of fabric in metallic gold thread. It took hundreds of hours and three full attempts before it finally worked. But now? Hoop alignments don’t scare them one bit. Lesson learned: Do the impossible once, and you'll fear it less the next time. “Snag Nab-It saved our $160 bookbags.” When you can't get perfect tension and end up with thread loops galore, Snag Nab-It is the hero tool you didn’t know you needed. A few slow-downs on the machine speed and that tiny gadget made a world of difference. The Common Thread: Mistakes Happen to Everyone From newbies slicing through shirts with scissors, to seasoned pros who’ve messed up $150 jackets, the takeaway is clear: mistakes are part of the game. Whether you're digitizing for hats, tackling slippery fabrics, or navigating a multi-needle machine, something will go wrong. Even experienced stitchers admit to having a whole box of "oopsies"—ruined items they now use for test runs. It's not waste; it's material for growth “Every mistake is a lesson. Every mess-up is a tuition fee.” Many embroiderers don’t even calculate the dollar value of their learning curve. Why? Because they see it like paying for a class. Every needle break, every misaligned hoop, every wasted spool of thread—it’s all part of the education. And yes, it can get expensive. But the reward? That magical moment when a design turns out exactly how you imagined. Tips from the Community Trace before you stitch. Seriously. One user even taped a bright red reminder to their machine: “DON’T FORGET TO TRACE!” Use scrap fabric or old ruined items to test new designs. Invest in muslin for cheap, bulk test runs. Slow down your machine speed to avoid looping. Upgrade when you're ready. A machine with a scanning bed helped one embroiderer align complex designs with confidence. So... How Much Have You Spent Learning? Whether it’s $70 or thousands, everyone has their “oops” story. But each one brings you a little closer to mastery. Share your biggest embroidery fail. Got a photo of a disaster (or a hard-earned success)? Post it! Let’s celebrate progress—one stitch (and mistake) at a time.
 -
 When I first got my Brother PE535, I was excited—like project-planning-at-2AM excited. But that excitement quickly turned into frustration. I hadn’t been able to finish a single project, and at one point, I truly considered selling the machine altogether. She was cute, but she had me ready to give up. After dealing with bird nests on the back of nearly every design and countless needle breaks, I realized something had to change. Here's the journey that took me from ready-to-sell to finally stitching clean designs—and what I wish I knew from the start. The Culprit: Bobbin Tension (and a Bit of Thread Drama) The first thing I learned? If your project is turning into a thread spaghetti nightmare, tension issues are often to blame. I started by replacing the bobbin case—mine was damaged from all the needle breaks (still don’t know why that happened, but it was clearly a problem). I also tried switching to Brothread 40wt, but I noticed it unwound really fast and the machine pulled way too much thread. Still, even after replacing the case and rethreading the machine like I was prepping for surgery, the embroidery looked off. The bobbin thread was showing on top like it was trying to steal the spotlight. That’s when the community came to the rescue. Understanding Tension: Top vs. Bobbin Turns out, the tension settings are everything. If bobbin thread is pulling through to the top, it’s usually one of two things: Your top thread tension is too tight Your bobbin thread tension is too loose In my case? It was definitely the bobbin. A kind soul in a forum explained that adjusting bobbin tension means turning the tiny screw on the bobbin case (yes, that one!). At first, I was terrified—everyone says “don’t mess with the bobbin case!” But honestly? A small clockwise turn made a world of difference. After cleaning the bobbin case and tightening that tiny screw just a bit… magic. My stitches started behaving. No more bird nests. No more upper thread looking like it was barely hanging on. Just clean, even embroidery. What I Learned Along the Way Here’s what I wish I’d known before nearly giving up on my Brother PE535: Don’t be afraid to adjust tension—start with the upper dial and go from there. Check your bobbin case regularly—needle breaks can damage it, and buildup happens fast. Not all thread is created equal—while Brothread works for some, I’ve had better luck with brands like Madeira or Sulky. Clean your machine more than you think you should. Lint and loose bits can mess with the entire system. Use test designs to dial in your settings before committing to a big project. If your bobbin thread is showing on top, try loosening your top tension or tightening the bobbin tension (or both, slightly). Don’t feel bad about the learning curve. Embroidery is an art and a science—and no one’s born knowing how to master it. Final Thoughts: You Got This Embroidery can be frustrating, especially when you're new or things just aren't going right. But once you learn the quirks of your machine (and adjust that pesky bobbin tension!), things really start to fall into place. To anyone else out there feeling defeated—don’t give up. Ask questions, watch YouTube videos, scroll the subreddits, and remember: every seasoned embroiderer started out confused and overwhelmed too. I’m finally finishing projects now. And I’m proud to say… I didn’t sell the machine. She stays Have you had a tension battle with your embroidery machine? What finally worked for you? Drop your thoughts and tips below!
-
- 2
-
-
- brother embroidery help
- embroidery bird nests
- (and 8 more)
-
 Mastering 3D Cap Embroidery: Techniques, Tips, and Troubleshooting 3D cap embroidery is a fascinating art form that adds depth and texture to embroidered designs. If you've ever wondered what makes embroidery "3D" in the first place, the answer lies in the use of foam. By applying a thick foam layer before stitching, the embroidery thread lifts off the fabric, creating a three-dimensional effect. How Does the 3D Effect Work? Unlike traditional embroidery, 3D embroidery involves placing a foam layer beneath the stitching. The thousands of needle punctures naturally cut through the foam, making it easy to remove the excess afterward. However, ensuring a clean final product requires applying heat to eliminate leftover foam remnants. Digitizing for 3D Embroidery Proper digitization plays a crucial role in achieving a professional 3D embroidery effect. Many experienced embroiderers start with software like Tajima Maestro but eventually transition to more advanced programs such as Wilcom. Digitizing is an essential skill, as it determines the quality, stitch density, and overall aesthetics of the embroidered design. Satin Stitch Width Guidelines When designing for puff embroidery, satin stitches should generally be: Minimum width: 2 - 2.5mm Maximum width: Up to 20mm or more (depending on the design) For thinner raised sections in a design, using a smaller needle can improve results. Additionally, employing a simple single-line underlay stitch (or no underlay at all for curved designs) ensures that the final stitches appear clean without unwanted overlaps. Techniques to Improve 3D Embroidery Results Heat Gun Treatment: Pre-treating the foam and cap with a heat gun helps achieve a smoother finish, reduces thread breakage, and enhances the quality of the raised embroidery. Foam Color Matching: To minimize visible foam remnants, match the foam color as closely as possible to the embroidery thread. If only white and black foam are available, white is often the best choice. Foam Removal Tips: When removing excess foam, pulling it downward instead of upward helps prevent dimples. Additionally, pressing down any noticeable dimples post-embroidery can improve the final appearance. Needle and Density Adjustments: A 75/11 needle is commonly used, but an 80/12 can sometimes yield better results. Adjusting stitch density slightly lower for 2-2.5mm 3D satin stitches can help achieve a better finish. Pricing 3D Cap Embroidery When pricing embroidered caps, consider factors such as: Quantity: 10 caps per customer Stitch count: 5,000 - 10,000 stitches With/without foam: 3D embroidery generally takes longer and requires additional materials, so it should be priced higher than standard flat embroidery. A good pricing strategy accounts for labor, materials, and machine time, ensuring a fair profit margin while staying competitive. Best Embroidery Machines for 3D Puff Embroidery If you’re considering purchasing an embroidery machine, the Janome MB7 is a popular choice but may not be the best for high-quality puff embroidery. Industrial-grade machines like: Tajima Barudan Ricoma Brother PR Series are better suited for professional 3D embroidery work. If your goal is to embroider custom sneakers, investing in a machine with a flatbed attachment and high stitch precision is essential. Conclusion Mastering 3D cap embroidery takes time, but with the right digitizing skills, machine settings, and finishing techniques, you can achieve stunning results. Have you experienced any challenges or successes with 3D embroidery? Feel free to reach out and share your journey—I’d be happy to offer my insights!