Berez
Members
-
Joined
-
Last visited
-
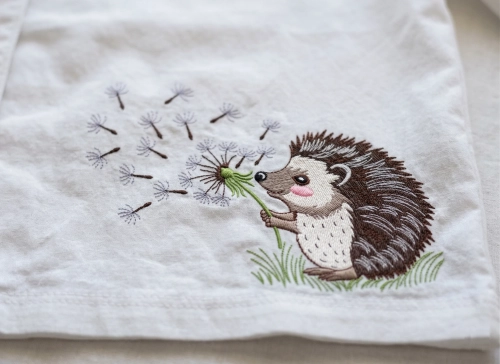 Size 1: 4 x 2.83' Size 2: 5 x 3.54' Size 3: 6 x 4.25' Size 4: 7 x 4.95' Size 5: 8 x 5.66' Hedgehog with dandelion free embroidery design captures a sweet woodland moment with delicate seed details and soft natural tones. Ideal for baby clothes, towels, nursery decor, pillows, and handmade gifts. The balanced stitch density ensures smooth embroidery on cotton and linen fabrics. A charming nature-inspired design perfect for spring and woodland-themed projects.
 -
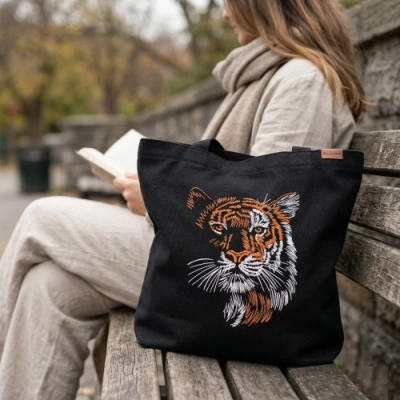
 size 1: 3.63 x 4.52' size 2: 4.44 x 5.52' size 3: 5.25 x 6.52' size 4: 6.05 x 7.52' Tiger Black Background free embroidery design showcases a striking tiger portrait created with dynamic sketch-style stitching and bold contrast threads. Designed specifically to stand out on dark fabrics, this wildlife embroidery file is perfect for tote bags, hoodies, jackets, and decorative projects. Balanced stitch density ensures smooth embroidery while delivering dramatic visual impact and modern artistic style.
 -
Tiger black background free embroidery design size 1: 3.63 x 4.52' size 2: 4.44 x 5.52' size 3: 5.25 x 6.52' size 4: 6.05 x 7.52' Tiger Black Background free embroidery design showcases a striking tiger portrait created with dynamic sketch-style stitching and bold contrast threads. Designed specifically to stand out on dark fabrics, this wildlife embroidery file is perfect for tote bags, hoodies, jackets, and decorative projects. Balanced stitch density ensures smooth embroidery while delivering dramatic visual impact and modern artistic style. File Information Submitter Berez Submitted 03/28/2026 Category Animals View File
-
 Size 1: 3.2 x 3.51' Size 1: 4.12 x 4.51' Size 1: 5.03 x 5.51' Size 1: 5.94 x 6.51' Size 1: 6.86 x 7.51' Dog with Easter Egg Sketch embroidery design combines playful spring charm with a modern hand-drawn stitch effect. This adorable puppy design holding a festive Easter egg is perfect for kidswear, baby blankets, tote bags, decorative pillows, and seasonal gifts. The light sketch-style stitching creates artistic texture while keeping stitch density balanced for smooth embroidery on different fabrics.
 -
Flower bush free embroidery design Size 1: 3.2 x 3.51' Size 1: 4.12 x 4.51' Size 1: 5.03 x 5.51' Size 1: 5.94 x 6.51' Size 1: 6.86 x 7.51' Dog with Easter Egg Sketch embroidery design combines playful spring charm with a modern hand-drawn stitch effect. This adorable puppy design holding a festive Easter egg is perfect for kidswear, baby blankets, tote bags, decorative pillows, and seasonal gifts. The light sketch-style stitching creates artistic texture while keeping stitch density balanced for smooth embroidery on different fabrics. File Information Submitter Berez Submitted 03/22/2026 Category Flowers View File
-
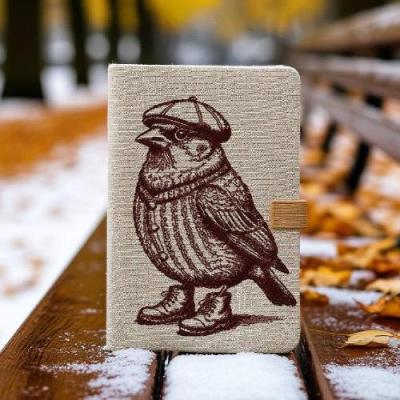
 Size: 3.72 x 5.45' Author: Embroidered Beauty Sparrow Gentleman Free Embroidery DesignVintage Charm with Modern Elegance 🪶✨Step into timeless style with this Sparrow Gentleman free embroidery design — a classy bird dressed in a cozy sweater, cap, and boots. Perfect for decorating notebook covers, tote bags, or home décor, it brings a sophisticated twist to traditional stitch art. The fine sketch lines create a detailed, vintage-inspired look that stitches beautifully on linen, canvas, or denim. 🪡 Perfect for: Notebook & journal covers 📓 Eco bags & accessories 👜 Rustic kitchen or study décor 🪶 Autumn & woodland collections 🍂 Includes all major embroidery formats (PES, DST, JEF, EXP, VP3, HUS, XXX) for instant download.
 -
Sparrow Gentleman free embroidery design Size: 3.72 x 5.45' Author: Embroidered Beauty Sparrow Gentleman Free Embroidery DesignVintage Charm with Modern Elegance 🪶✨Step into timeless style with this Sparrow Gentleman free embroidery design — a classy bird dressed in a cozy sweater, cap, and boots. Perfect for decorating notebook covers, tote bags, or home décor, it brings a sophisticated twist to traditional stitch art. The fine sketch lines create a detailed, vintage-inspired look that stitches beautifully on linen, canvas, or denim. 🪡 Perfect for: Notebook & journal covers 📓 Eco bags & accessories 👜 Rustic kitchen or study décor 🪶 Autumn & woodland collections 🍂 Includes all major embroidery formats (PES, DST, JEF, EXP, VP3, HUS, XXX) for instant download. File Information Submitter Berez Submitted 11/10/2025 Category Birds View File
-
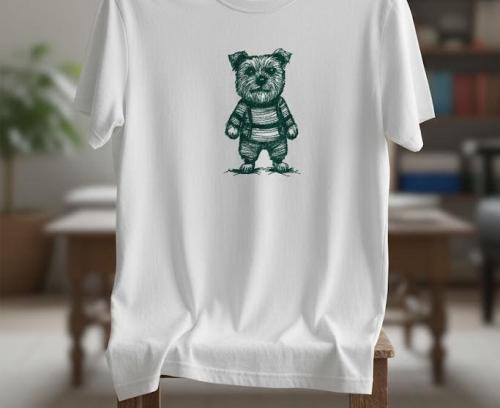 size 1: 2.29 x 5.35' size 2: 4.11 x 6.69'' Author: Vishitaya Krasota Cute Dog in Pants and T-Shirt Free Embroidery DesignAdorable Canine Style for Every Project 🐾💚This Cute Dog in Pants and T-Shirt embroidery design brings a touch of humor and warmth to your creations. The detailed sketch-style stitches make the puppy look fluffy and full of personality — perfect for T-shirts, tote bags, kids’ clothes, or even decorative pillows. The minimalist linework ensures a modern, stylish result that stitches beautifully on any fabric. 🪡 Perfect for: Pet-themed apparel and gifts 🎁 Children’s wear and accessories 👕 Decorative pillows and fabric art 🏡 Minimalist embroidery projects 🧶 Includes all major machine embroidery formats (PES, DST, JEF, EXP, HUS, VP3, XXX) — ready for instant download.
 -
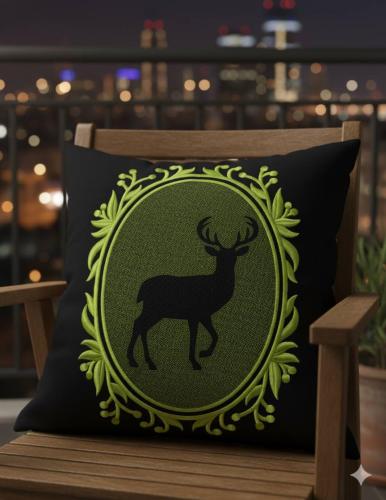 Size 1: 6.87 x 9,42' Size 2: 5.69 x 7.8' Framed Deer Free Embroidery DesignClassic Forest-Inspired Elegance for Home Décor 🌿Bring rustic sophistication to your home with this Framed Deer embroidery design. Featuring a majestic deer silhouette surrounded by an ornate frame, this pattern is perfect for pillows, wall art, table runners, and gift projects. The bold contrast of frame and background adds depth, making it ideal for both minimalist and country-style interiors. 🪡 Perfect for: Cushion covers 🛋️ Cabin or lodge décor 🏕️ Gift embroidery for nature lovers 🎁 Rustic wall hangings 🌲 This design is compatible with all major embroidery machines (PES, DST, EXP, JEF, VP3, HUS, XXX) and stitches smoothly with satin and fill effects.
 -
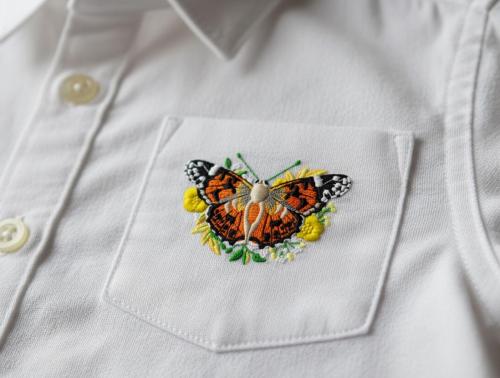 Size: 3.34 x 2.26' 🦋 Aglais Urticae Free Embroidery DesignCapture the elegance of nature with this Aglais urticae free embroidery design, featuring delicate wings in orange, black, and white, resting over soft floral accents. Perfect for jackets, bags, table linens, or decorative home textiles. Details & UsabilityThis design highlights the vibrant beauty of the butterfly, stitched with rich color contrasts and detailed wing patterns. Ideal for spring and summer projects, it adds a lively and artistic touch to both casual and elegant fabrics. Use it on fashion items, accessories, or home décor for a natural, timeless look.
 -
Aglais urticae free embroidery design Size: 3.34 x 2.26' 🦋 Aglais Urticae Free Embroidery DesignCapture the elegance of nature with this Aglais urticae free embroidery design, featuring delicate wings in orange, black, and white, resting over soft floral accents. Perfect for jackets, bags, table linens, or decorative home textiles. Details & UsabilityThis design highlights the vibrant beauty of the butterfly, stitched with rich color contrasts and detailed wing patterns. Ideal for spring and summer projects, it adds a lively and artistic touch to both casual and elegant fabrics. Use it on fashion items, accessories, or home décor for a natural, timeless look. File Information Submitter diver361 Submitted 09/24/2025 Category Insects View File

-
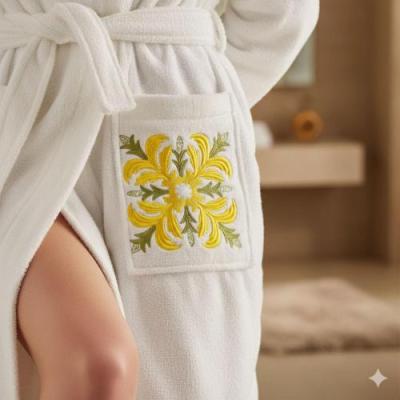
Square vintage decor free embroidery design Size: 4.76 x 4.76' ✨ Timeless Floral Motif for Elegant Projects🧵 Free Download in Popular Machine FormatsBring charm to your creations with this square vintage decor embroidery design 🌼🪡. Featuring delicate floral swirls, it’s perfect for quilts, pillows, table linens, or apparel. Free to download and easy to stitch, this design works with all popular machine formats. Add vintage elegance to every project! 💛 File Information Submitter Berez Submitted 09/17/2025 Category Decoration View File
-
 Size: 4.76 x 4.76' ✨ Timeless Floral Motif for Elegant Projects🧵 Free Download in Popular Machine FormatsBring charm to your creations with this square vintage decor embroidery design 🌼🪡. Featuring delicate floral swirls, it’s perfect for quilts, pillows, table linens, or apparel. Free to download and easy to stitch, this design works with all popular machine formats. Add vintage elegance to every project! 💛
 -
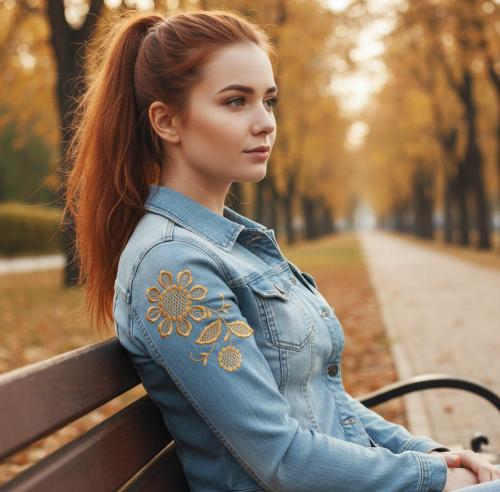 Size: 6.39 x 7.23' Elegant Minimalist Embroidery for Any ProjectDownload Free & Easy-to-Stitch Design in Popular FormatsBring Nordic simplicity to your embroidery projects with this Scandinavian one colored flower free design 🌼✨. Minimalist yet elegant, it’s perfect for denim jackets, napkins, tote bags, and home textiles. Easy to stitch in any popular machine format, this floral design adds timeless charm to fashion and decor.
 -
Scandinavian one colored flower free embroidery design Size: 6.39 x 7.23' Elegant Minimalist Embroidery for Any ProjectDownload Free & Easy-to-Stitch Design in Popular FormatsBring Nordic simplicity to your embroidery projects with this Scandinavian one colored flower free design 🌼✨. Minimalist yet elegant, it’s perfect for denim jackets, napkins, tote bags, and home textiles. Easy to stitch in any popular machine format, this floral design adds timeless charm to fashion and decor. File Information Submitter Berez Submitted 09/15/2025 Category Flowers View File