
Original text by Marina Belova
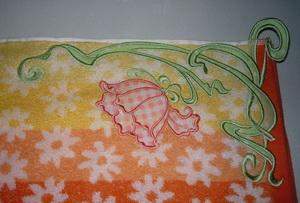
Let me switch off from the chevrons and show you how to make an eyelet for a terry towel (or any other towel, for that matter) with an ordinary patched appliqué. Here is a result of my efforts: a vibrant towel. It's a perfect time for it as the spring that keeps failing to come:

This time, a well-known Smart Needle website inspired me to do the embroidery, so I decided to try. But I wanted something more delicate for a design.
In search for a suitable one, I sifted through a bazillion of variants and settled at last on an Art Nouveau flower to which I added one more whorl for my eyelet. I got this:

So I created a pattern. I decided against a double-sided appliqué, which it's commonly used for eyelets. My design is far too complex for that:

I chose the fabrics for the flower: thin cotton pieces, something akin to muslin.

After that, I proceeded to the most difficult part of the project – to the embroidery.
As I was going to embroider at the very corner of a towel – an appliqué, of all things, going beyond its edge, – I wouldn't be able to hoop it. I'd need to glue it to a stabilizer. For that reason, I hooped 2 layers of a thin tear-away stabilizer with long fibers:

Loaded the design into the machine and started the embroidery. First, I stitched the guideline in the corner. This is a very useful reference point for the precise positioning of a towel in the hoop:

I sprinkled the stabilizer with a temporary spray adhesive and carefully tried to align the corner of my towel with the embroidered line:

After that, I started the machine again and stitched a guideline for the appliqué fabrics. This very stitch would also serve for additional stabilization because one cannot rely on the temporary spray adhesive when dealing with terry cloth:

I put a piece of fabric prepared for the leaves and stalks:

And secured it with a small zig-zag, as it is my custom:

Now we've come to the interesting part – trimming the extra fabric along the perimeter:

Terry cloth is not very easy to cut. No matter how good are the scissors: with the duckbill or the rounded ends – there still is a possibility of slashing the loops. Wouldn't it be great if...
Having done the trimming, I replaced an ordinary bobbin thread with a green one, the same color I would embroider the stalks:

After that, I switched on the machine and embroidered the borders around the stalks and leaves:

As I embroidered at the corner of the towel and the hemline was rather thick there, I expected the needle breakage. But there was no such thing. I think that on a home machine this trick will not work, with all these layers.
Because of the loops being small and sparse, I decided against a water-soluble film or a plastic bag in order to avoid loops showing through the stitches. It turned out to be a bad decision: the loops still showed through in places where there was no appliqué fabric under the satins.
Under the appliqué border everything was perfect, but under the embroidery, the things weren't quite so good. It's not exactly a tragedy, but a number of loops managed to come through, especially between the split satins.
After that, the machine stopped and I put the next piece of fabric for my flower:

I also changed the green bobbin thread for a pink one:

I hit the start button and stitched the pink fabric along the perimeter of the flower:

Now I trimmed the extra pink fabric:

Started the machine again and embroidered the rest of the design:

Took it off the machine. The wrong side looks quite decent, the only thing I need to do is to remove the stabilizer:

Here, I tore the most part of it away: The only place where I chose not to tear it was on the eyelet. But inside the eyelet there was a small digitizing mistake:

If the stitches ran perpendicular to the edge and not along it, they wouldn't have frayed after I removed the stabilizer. But his can be repaired – all I have to do is to gather the threads and to sew them back on. Let nothing be wasted.

Now I need to see how the embroidery will behave after many washings. I'm curious.
-
 2
2
There are no reviews to display.