
Original text by Marina Belova
I'll repeat what I said before. Patched applique involves attaching details consisting of one or several layers onto the fabric with the help of various types of stitches and supplementary materials. This type of applique creates the raised effect.
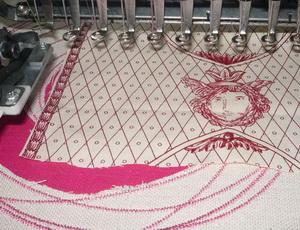
Technically the process of creating applique is simple and includes 3 steps:
- Embroidering an outline that will show where to place the applique fabric. Then the machine makes a stop and the hoop comes out for positioning of the fabric sprayed with temporary spray adhesive.
- Applique fabric is usually stitched with running stitches or zig-zags to hold it in place. After that, the machine makes another stop and the hoop comes out for cutting the fabric directly in it.
- Embroider the finishing border to cover the edges.
There are borders to suit any taste.
- Satin
- Fill
- Low-density zig-zag stitch that is used by everyone in the industry, because it firmly secures the fabric whilst having low density
- Running stitch for raw edge appliques or for the fabrics that do no fray (jersey, felt)
- E-stitch
- Motif stitch
- Various combinations of the stitches mentioned above
There are different methods of digitizing an applique:
- Automatic digitizing in an editor. The range of options depends on the embroidery software used. I will overlook this question for now.
- Digitizing by hand. If a digitizer chooses this method, he'll manually draw every outline.
Digitizing by hand
- Create an outline that will show where to place the fabric. It is usually digitized with a running stitch.
- Insert a stop so that the hoop will come out for fabric positioning. Every type of machines has its own way of adding commands.
- Create an outline that stitches the applique fabric to the base one.
- Insert a stop so that the hoop will come out for trimming. Every type of machines has its own way of adding commands.
- Create the finishing satin columns.
- The width of the satin border should be at least than 3–4 mm. You can try a satin border 2 mm wide, but the embroidery will hardly be a high-quality one. Short stitches cannot firmly secure fabric in place. Besides, it is rather difficult to trim extra fabric in such a way that the remaining pieces will not show from under the thin outline.
- Zig-zag stitch and E-stitch usually have very low density. On the average, a finishing zig-zag should overlap an applique by 70% and the base fabric by 30%.
Zig-zag, E-stitch, and motif finishing borders are frequently used for sportswear: lettering, numbers and other big elements.
100% polyester twill can be stitched with opened stitches because of its wear-resistance. It's better to use twill with a patched interfacing like a web on the wrong side. This will allow lowering the density of the finishing zig-zag even more because the fabric edge is stabilized with the web.
When using zig-zag for finishing of the edge of an applique, you save about 75% of stitches. E-stitch and motif stitches are often used for non-woven applique materials like felt or non-fraying polyester fleece.
Master-classes on simple and reverse applique coming soon. Stay with us!
-
 1
1
There are no reviews to display.