
Original text by Marina Belova
Nearly every machine embroidery software that proudly calls itself "Professional" has a very interesting option that allows users to dynamically change satin stitch density, depending on the stitch length. When the option is enabled, the software lowers the density (makes the space between the stitches wider) for the short stitches and increases it (makes the space between the stitches narrower) for the long stitches. This is necessary for sufficient covering of the fabric without distortion due to the excessive density and gaps due to the deficient density.
This option in machine embroidery editors is called differently. I'll name just several.
- Auto-Spacing (Wilcom)
- Variable Pitch (WingsXp)
- Ramping (EPC win)
I'll only examine the first two.
This thing is extremely handy. No trouble with dividing the objects into separate contours, in order to find suitable density for every one of them in accordance with the stitch length. This is not against any recommendations on how to choose a proper density. More in my article on density.
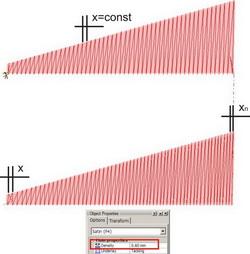
I'll show you how changing the stitch density looks using this example:
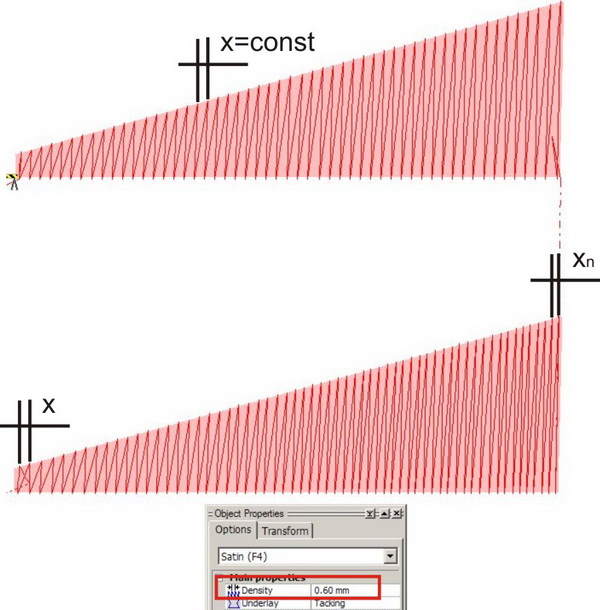
The upper satin column with uniform density throughout the length of the object, which is equal to 0.6 mm.
In the lower satin column short stitches are sparse, but when moving to the right edge they become longer and more fit together more closely.
This is despite the fact that the basic density value is set at 0.6 mm for both objects. And the stitch count in these two object is different as the result. In the upper contour, where the density is consistent, there are 118 stitches, and in the lower one, where the density changes dynamically 132.
What's interesting is the way the editors allow their users to influence the density dynamic pattern. Customarily, you can set the percentage change value, beginning at 0. But, frankly speaking, it does not offer much help in my case. What does it mean, 50 or 70 or 150? I don't get it.
What does it mean, more stitches if <100% and less if >100%? Any why the best result can be achieved at 75%, as it is stated in Wilcom manual?
The whole algorithm is not clear to me.
Wilcom went even further and suggested the users to adjust the parameters to change the density, depending on the stitch length. You can insert your own density, stitch length and thread thickness values on the Auto Spacing panel, pictured below.
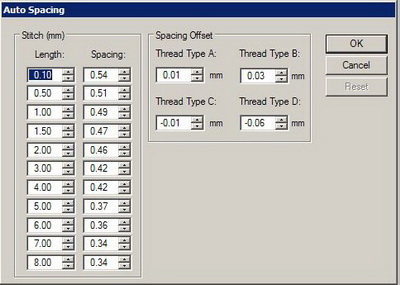
At the same time, the crafty manufacturers did not provide any coherent recommendations on which values are right and which are wrong. Either that or I've missed it. In any case, users have to choose from the number of pre-defined parameters that can be found in the table sheet here. The basic density value here is 0.4 mm. And if I need to increase or reduce it, I cannot use this option. What am I to do in such cases?
WingsXP does not allow the users to alter the algorithm by themselves. But the manufacturers don't make a mystery of how the density changes depending on the basic density value, which is set by the user when digitizing a design.
The density dynamic change table sheet is taken out from the WingsXP manual and looks like this:
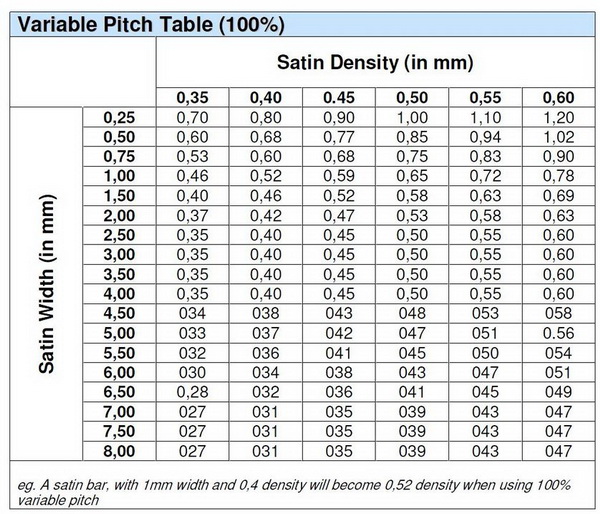
What I like very much about WingsXP is that it is possible to calculate the density not only in accordance with the default 0.4 mm. And also the fact that I don't have to exert myself. You can use this table sheet to set density values manually in case you cannot use the automatic option.
WingsXP generates stitches rather good, and can be trusted.
An undoubtedly useful option, in general, but, unfortunately, not every editor has it.
-
 1
1
-
 1
1
There are no reviews to display.