
How to use a Ruffler foot
Today, we’ll be working with a presser foot designed for the creation of the pleats, frills and ruffles. A little while ago I promised to show you what the Ruffler foot is capable of. At the first glance, the contraption seems a bit complicated. Several adjusters and guides allow you to gather fabric and simultaneously attach ruffles to the garment. Let’s see how it works.

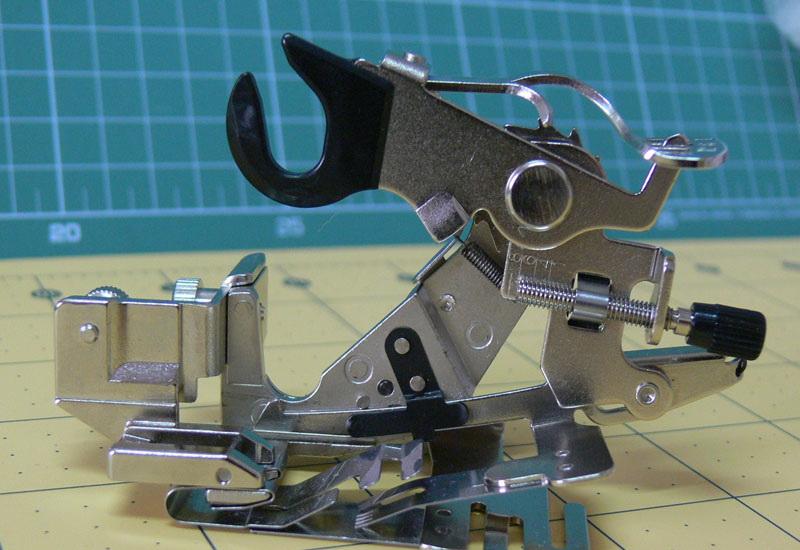
The Ruffler foot structure:
- A bifurcated arm (4) serves to synchronize the attachment with the needle bar.
- The clamp (5) is for quick attachment of the foot to the machine.
- Two screws and the adapter at the rear enable the foot to move up and down, and to the left and to the right of the needle bar.
Adjusters:
- The depth screw (1) determines the amount of fabric pushed into the foot every time it tucks: from 1 to 8 mm.
- With the ruffle regulator (2), you determine how often a ruffle will appear: every 1, 6 or 12 stitches.
- Once set it to *, the attachment will create no ruffles at all.
Fabric guide lines:
- Green line — for the main fabric, no ruffles.
- Red line — the ruffling blade.
- Lilac line — the fabric feed plate (also for braids, ribbons).


You may place your fabric along any of the three guide lines, but only using the red one will give you ruffles.
Stitch at a low or medium speed!
Types of ruffles and pleats:
- Single or double pleat.
To create one or the other, place one (or two, in the latter case) pieces of fabric to be ruffled, along the red guide line. Set the depth screw at 4 or higher. Set the Ruffle regulator to 6 or 12.

How to ruffle fabric and attach it to the main fabric simultaneously
Set the regulators to make single or double pleats. Insert the main fabric into the guide along the green guide line.

You can create a twisted pleat, using a capronic or a satin band, or a specially prepared piece of fabric up to 7 cm wide. Set the stitch length at 2.5 mm. Set the depth screw at 1–3, and the ruffle regulator at 1.

It’s also possible to ruffle fabric and simultaneously attach it to two flat fabrics, on the top and bottom. In order to do this, insert the main fabric with its right side facing up, into the foot along the green guide line, and the fabric to be pleated along the red line, with its right side also facing up. Along the lilac line, place the second piece of fabric, with its wrong side facing up.
Use the prongs on the foot for the width of the seam allowance to be consistent.


How to attach a pleat, folded in half, to the hem of the garment
Finish your seam allowance with an overlocker.
Mark the width of the seam allowance on the right side with a fabric marker. Place the main fabric along the green guide line, and the fabric to be ruffled along the red one.
Adjust the regulators.
Stitch to create the ruffles.
Press down seam allowance to the wrong side and stitch along the edge.

Joining the satin ribbon to the pleat
Place the main fabric along the green guide line, and the fabric to be ruffled along the red one.
Insert a narrow (up to 5 mm) satin ribbon into the foot, using the prong. Stitch.


These are just the highlights of what the Ruffler is capable of. Play around with it, creating your own variants.
Read what you can do with the Ruffler foot:
Original text by Yelena Kraftwork
Edited by Irina
-
 2
2
-
 1
1
-
 1
1
There are no reviews to display.