Should you ask me 5 or 7 years ago, what are the main points when choosing an embroidery machine, I would undoubtedly say, “The size of the machine frame and your wallet.” Today I will answer, “Look at the what the machine can do!” Contemporary home embroidery machines are reaching their limit as regards the hoop/frame size. You cannot infinitely enlarge the embroidery area and stay affordable for the majority of people. You need to find other ways. One of those is to add to the machine’s functionality. Pinpoint Placement, the perfect alignment of the parts of the embroidery, is exactly what an embroiderer needs. No size limit. Split up – Position – Go!
Pinpoint: Perfect alignment
Hi friends!
Should you ask me 5 or 7 years ago, what are the main points when choosing an embroidery machine, I would undoubtedly say, “The size of the machine frame and your wallet.” Today I will answer, “Look at the what the machine can do!”
Contemporary home embroidery machines are reaching their limit as regards the hoop/frame size. You cannot infinitely enlarge the embroidery area and stay affordable for the majority of people. You need to find other ways.
One of those is to add to the machine’s functionality.
Pinpoint Placement, the perfect alignment of the parts of the embroidery, is exactly what an embroiderer needs. No size limit. Split up – Position – Go!
This information is meant for those who are planning to buy or have already bought a Bernina sewing and embroidery machine, but hasn’t yet explored all its capabilities. Today we’ll talk about a Pinpoint Placement option that allows you to position the design on a garment with accuracy to one mm, and also to align different parts of the pattern and embroider designs several times larger than your hoop. The most perfect examples are the border designs, replicated again and again.
- Pinpoint Placement is an option available in some Bernina models:
- Embroidery machines: Bernina 700, Bernina 500;
- Sewing and embroidery machines: Bernina 590, Bernina 790 Plus, and Bernina 880 Plus.
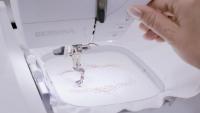
This is how it’s done. You decide where on the garment you’ll place the future embroidery. With chalk or a marker, draw two positioning points. Now hoop the garment not bothering about the exact placement. The main thing is to match the size of your design with the embroidery area. Then the magic starts.
You pick the necessary design in your machine. Touch the PinPoint button, then activate the Grid and choose two of the nine positioning dots. You will align the needle with the chosen positioning points. To do this, rotate the Multifunction Knobs until the needle will be in the right position, directly above your mark. Fix the position by touching Set. Now, let’s align the needle with another of our two dots. Choose the other one of our two points and rotate the Multifunction Knobs until the needle will be right above the mark on the garment. Done. Now you can do the embroidery.
There is also free point positioning. Here you mark a random spot on your garment, touch the right spot on the design, rotate the Multifunction Knobs until the needle is directly above the mark. Then repeat with the second positioning dot.
Edited by diver361
-
 1
1
-
 1
1