

Original text by Marina Belova
I've long wanted to raise a question of push compensation in theory and in practice but didn't get around to it until today. And last week I faced it head-on in connection with 3D Puff embroidery on baseball caps, so it would be utterly wrong to linger even more.
Well, about a week ago I received an order for a cap with puffy. Sounds like nothing unusual. It's only the 3D Puff, I've embroidered designs with 3D Puff before. But now it turned out that all the knowledge I have about adding volume to the embroidery is good for the flat surfaces, and not for the rounded and flexible one like a baseball cap.
I think it is common knowledge that the open ends of 3D Puff should, too, be penetrated by the needle (along the direction of the stitch). For this, you need to draw special "caps". Like the lavender ones in the photo below:

Also, stitches in the upper layer, according to several push compensation theories, should be shortened by a certain number of mm or stitches.
See the example below (marked in the photo):
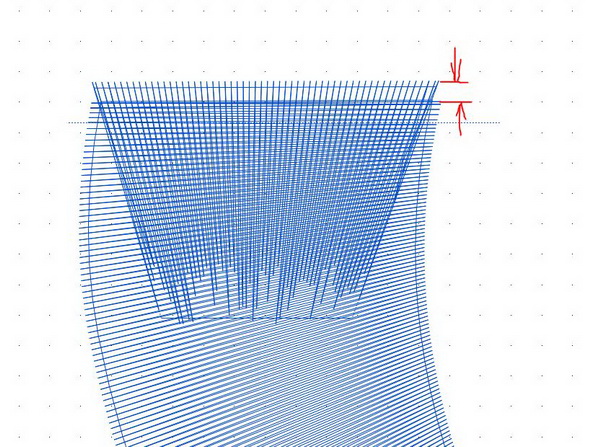
In this case, I removed the commonly suggested 5–9 stitches (~1mm).
I've always been confused by the fact that by using this technique we consciously create a non-penetrated segment on the open end, through which the puffy will undoubtedly peek:

Reality shows that 3D Puff does indeed stick out, and there is nothing you can do about it:

All this brings me to the upsetting conclusion: information that can be bought or read for free about digitizing for 3D Puff is not always correct and lacks many details for the fear of competition.
Oh well, any theory is good enough so long as you are able to analyze it and expand on the subject after digitizing.
In my opinion, according to the simplest laws of geometry, the aforementioned "caps" should have not one but at least three sides with lines of needle penetrations through 3D Puff, just in case.
But to me, the question of shape is not the main one related to the 3D embroidery on caps. I'm much more concerned by what remains unsaid about pull compensation.
Here's the example. In the photo below you can see one of the 3D elements with the canonical caps and shortening on the open edges in order to prevent the stitches from slipping off the edge and onto the cap surface. I painted the upper layer green so that to make it visible that I'd done everything according to the theory. That is, a capped corner + 1 mm off both edges:
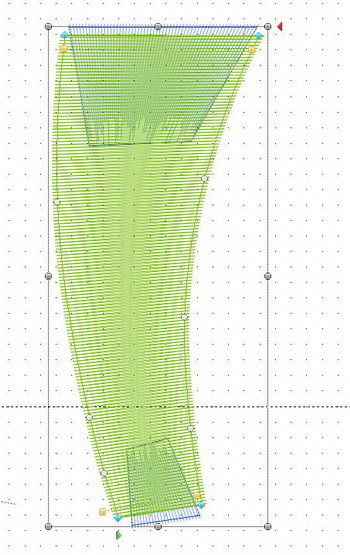
What should look perfect really looks like this:

In the upper end the cap is insufficiently covered by the specified number of stitches, and at the lower end, they slip off the edge and onto the fabric. Starting and end points are to blame for that. In this case, I arranged them as follows: the starting point (green triangle) below and the end point (red triangle) above.

That means that the stitches always slip at the beginning of the embroidery and stay in place at the end of it. And this repeats every time I embroider something. Even if it is something of an ordinary density. Though in the latter case it is less pronounced, because there is less push in the direction opposite to the one in which the embroidery goes.
This contradicts all established theories on the push compensation, where an equal number of stitches should be spared on both ends.
I even counted the stitches that had slipped off the caps at the beginning of the upper satin layer – there was always 10–15 of them. This means that I should lop off additional 1–1.5 mm from the upper layer's starting point. And on the contrary, to add some at the opposite end so that the cap didn't look so bare. This is how the upper layer should be constructed in order for the embroidery to look neat and clean:

And not like this:

At the same time, if I remove 2–2.5 mm from the cap inside, it will enlarge the are where there are no needle penetrations. This will cause the cap, in its conventional form, to stop working completely.
The reality doesn't always conform to theoretical rules, at least my experience says so.
Here is the list of possible reasons:
- I use the wrong settings while digitizing – density, for example – and, consequently, create faulty designs.
- I don't stabilize properly.
- My machine doesn't work quite the way the others do.
P.S. All 3D Puff embroidery theories work fine on a flat surface, at least this is my case. I consciously omit the method with the use of the parallel underlay, loved by many embroiderers, which makes design creation much easier, as it is not compatible with all fonts. It visibly distorts straight elements so that the letters begin to stretch diagonally and extend over the baseline.
-
 1
1
-
 1
1
There are no reviews to display.