Three D of machine embroidery digitizing

By diver361 in Embroidery digitizing
· 2,935 views
In digitizing designs its important to understand the machine embroidery design characteristics, this helps if you have taken some time of art courses as it can prepare you to look at the design different. It also depends on the size, and quality of artwork you have to work with. In this blog we are going to look at the three "D" of digitizing, Depth Density and Dynamics. Whether a design comes from a line drawing, clipart or a photograph, you need to understand how to get the software to be able to recreate the density, depth and dynamics of the design. This is not an easy task as you really need to know some settings in your software. Lets take a look at a design and how it was made.
Original image and design information

This deer embroidery design has depth with the trees fence and grass all in the back ground. it has various densities to create the illusion of blends, and the dynamic of texturs.
We will take you through each layer of the design and show you how they made this design.
Stitch count 41192
Design trims 44
Color changes 14 colors
height 5.99 in design width 4.60 in
Note: 14 of the 44 trims are from a color change, so technically there are only 30 trims in the whole design.. So you need to break it down and separate sections to get the design proportions correct.
Layer 1 background
Background of the embroidery design

Because this is a background layer the density of the design is a bit less than it would be if it was on top of another color. ( 36.3 spi using a random fill pattern.

Notice that the selections are all connected so there are no trims in this section this speeds up the sewout and reduces the amount of simulated thread breaks.
Layer 2 high light of trees

Note: The fence post sits over will make the design over top of this, this detail stand out and be correct to the image.

The detail or dynamic of this layer is to add some detail to the trees, this needs to be behind the deer. To ge the blending effect you should use a fill, Random pattern density of 30 to 38 spi and it should all be connected by run stitches.
Layer 3 detail of trees

This layer will give you a dynamic look and feel to the background as it will have some texture to it, it also covers up and blends the background of the first layer.

Layer 4 and 5 grass and fence

This layer goes slightly over top of parts of the back ground but slightly behind the deer. To ge the blend effect
you need to layer a few density of the complex fill is between 35-44 spi using a random pattern.
Layer 5 detail of grass and poles.

This layer is composed of satin and run stitches to simulate the detail, the shade is slightly different than the grass aboe.
Layer 6 chest background

The fence wires need to go over the grass so they do not disappear in the stitches.

This is the background layer of the deer body its a std complex fill density of 63.5 with a random fill pattern.

Layer 7 and 8 depth and dynamic of the chest.

Layer 7
This layer is made up of light fills, and a run stitches playing with the density and random pattern. no trims in the design.

Layer 8
This layer has a complex fill at 50 spi and in the middle a run stitch to add detail to the previous fill.

Layer 9 and 10 chest highlights and antlers

Layer 9
This layer adds some contrast and depth to fills giving it some blending effect.

The antlers sit on top of the back ground making them stand out, they are made using a satin stitch with a density of 52 spi. Not to scale. The fill is made using the random pattern, with a density of 50 spi no its all connected by travelling stitches.

Layer 11 high light of antlers.

The white layer is made up of satin and run stitches the satin density layers the grey shown last image, creating detail , density is 31 spi.

Layer 12 detail of antlers.

This layer is made up of runs and satin stitches and some stitches and the density varies and stitch type also e-stitch was used as a pattern to create an effect.

Layer 13 high lights in deer head
This last layer ads the final detail of the eyes and nose and hears to high light portiosn.

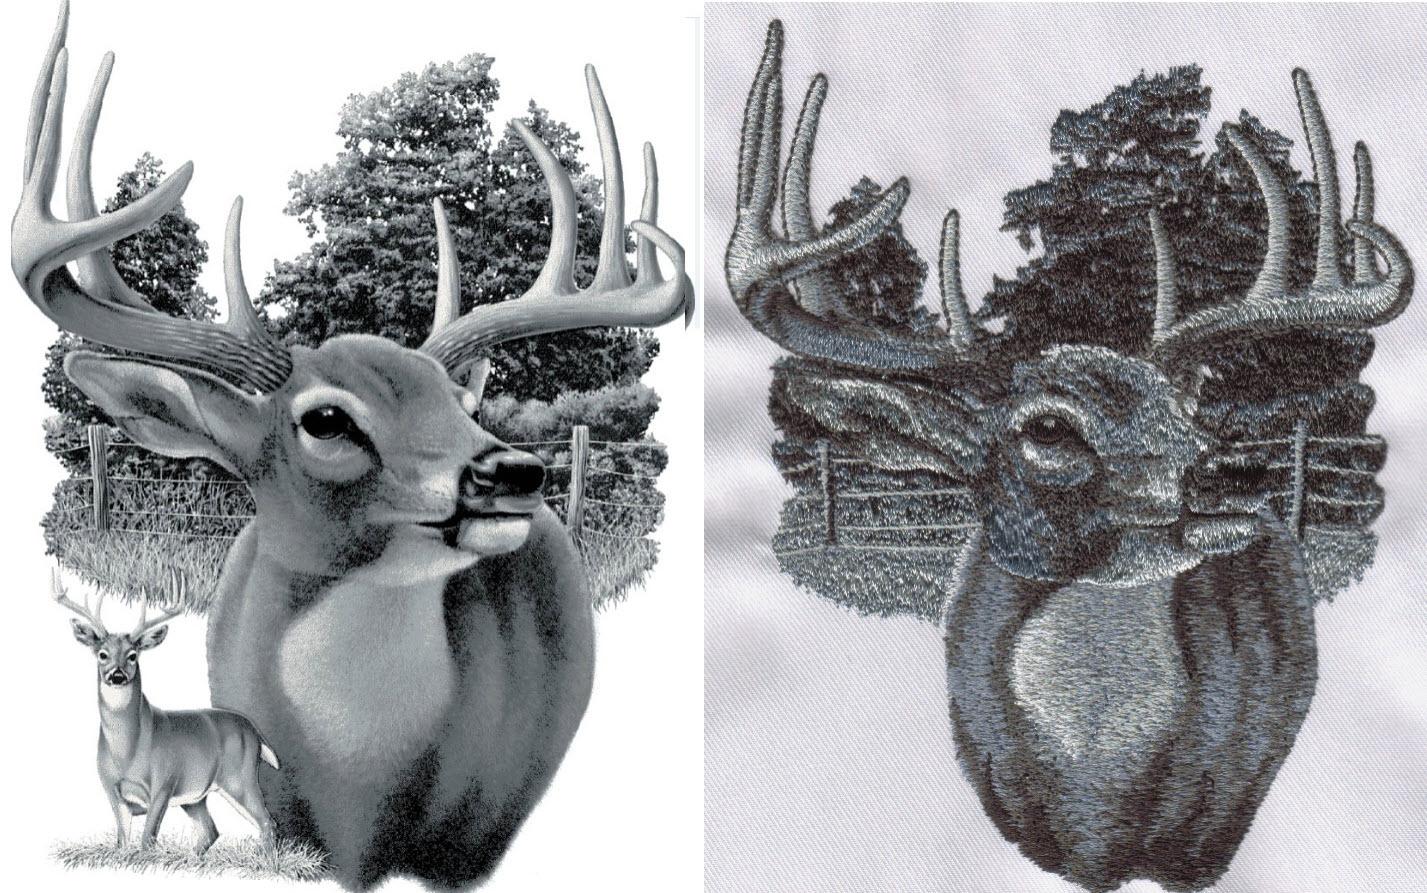
Comparison from the original image to the sew out of the design.
The image on the left is the original image supplied and on the right the sew out.

-
 1
1
Recommended Comments