Cross stitch designs
Cross stitch designs
(creates in special Cross stitch software) into one of the common embroidery file formats for stitch-out on a embroidery machine.
No files in this category yet.
Submit the first fileFiles from subcategories
-
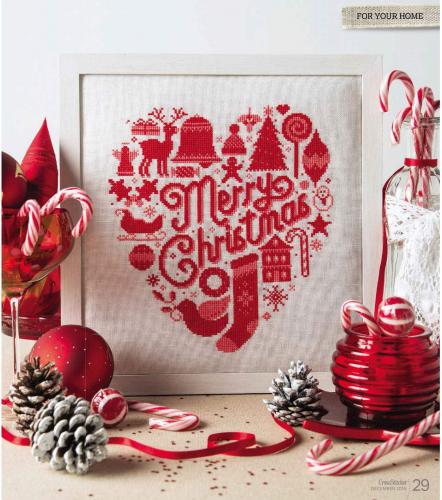
Size: 5.22 x 5.06'
Important: This is not machine embroidery design. Cross stitch design in XSD format. For view, edit or convert to machine embroidery design (special add on) this file need have Pattern Maker for Cross stitch. Download here For view and print need Pattern Maker Viewer free cross stitch embroidery software. Download here.
- 657 Craft & Embroidery Downloads
Newest free embroidery designs
-
- 1,449 Craft & Embroidery Downloads
- 0 Comments
-
- 2,582 Craft & Embroidery Downloads
- 0 Comments
-
- 1,754 Craft & Embroidery Downloads
- 0 Comments
-
- 1,974 Craft & Embroidery Downloads
- 0 Comments
-
- 1,400 Craft & Embroidery Downloads
- 2 Comments
-
- 3,095 Craft & Embroidery Downloads
- 5 Comments


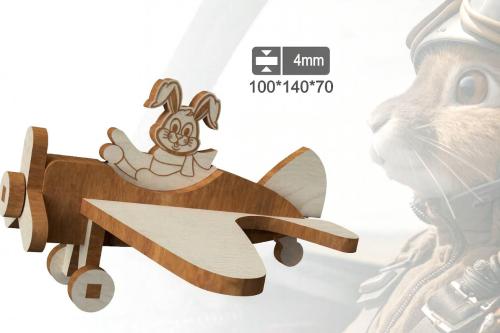
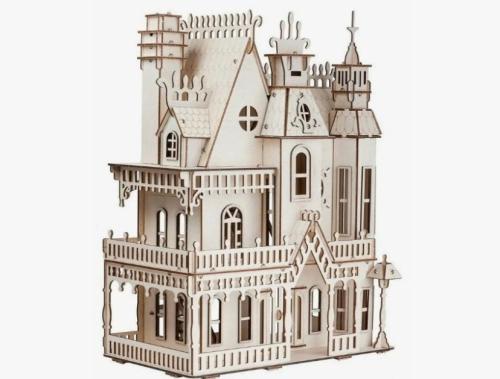
Laser cut Free Files
-
- 34 Craft & Embroidery Downloads
- 0 Comments
-
- 33 Craft & Embroidery Downloads
- 0 Comments
-
- 49 Craft & Embroidery Downloads
- 0 Comments
-
- 41 Craft & Embroidery Downloads
- 0 Comments
-
- 134 Craft & Embroidery Downloads
- 0 Comments
-
- 120 Craft & Embroidery Downloads
- 0 Comments

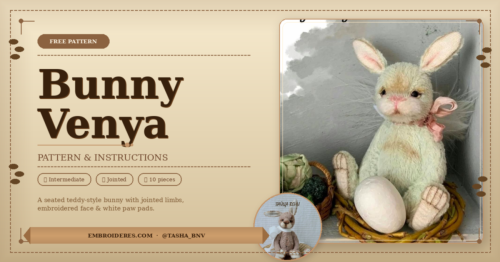
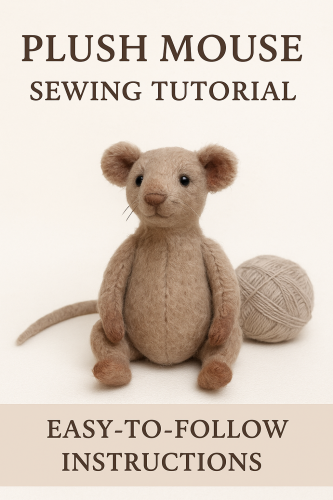
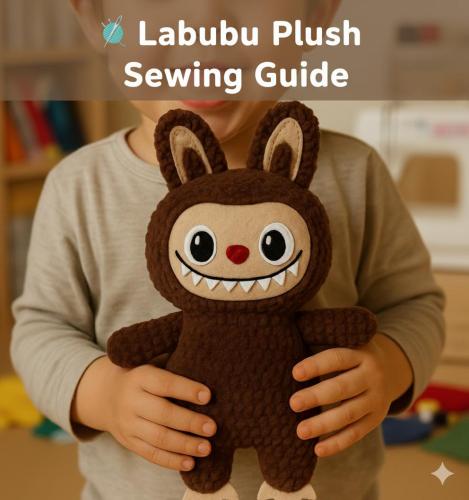
Free Plush Patterns
-
- 77 Craft & Embroidery Downloads
- 0 Comments
-
- 1,437 Craft & Embroidery Downloads
- 0 Comments
-
- 793 Craft & Embroidery Downloads
- 0 Comments
-
- 115 Craft & Embroidery Downloads
- 0 Comments
-
- 146 Craft & Embroidery Downloads
- 0 Comments
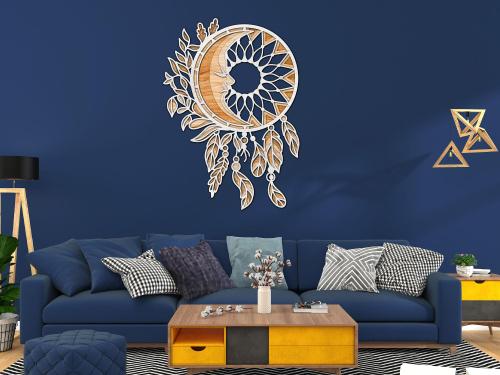
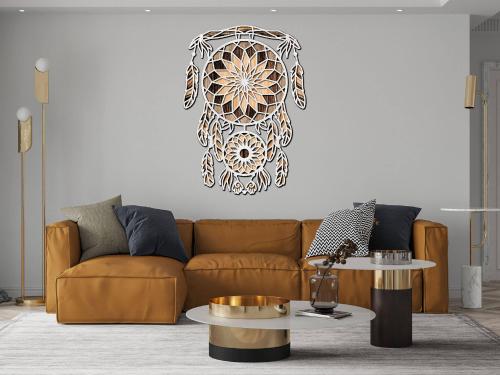
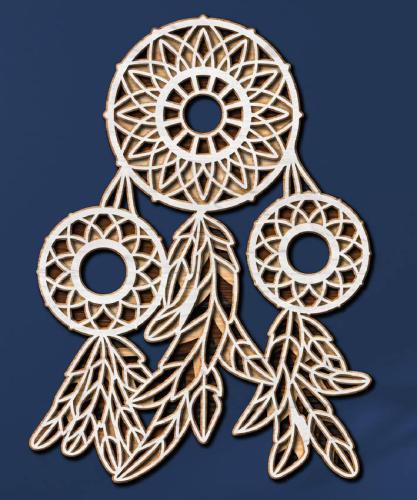
3D mandala cut files
-
- 60 Craft & Embroidery Downloads
- 0 Comments
-
- 42 Craft & Embroidery Downloads
- 0 Comments
-
- 51 Craft & Embroidery Downloads
- 0 Comments
-
- 25 Craft & Embroidery Downloads
- 0 Comments
-
- 9 Craft & Embroidery Downloads
- 0 Comments
-
- 20 Craft & Embroidery Downloads
- 0 Comments

Photos with embroidered items
-
Embroidery on Skirts: the style that conquers everyone
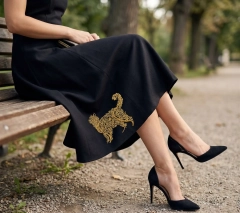
There is a category of embroidery that doesn't decorate clothing — it becomes the clothing. Skirt embroidery is exactly that. 🐈⬛
A skirt is the largest, most visible canvas on a woman's body. It moves. It catches light. It draws the eye downward — and holds it there. When embroidery lives on a skirt hem, every step becomes part of the design. Every sit, every turn reveals it differently.
This guide is about understanding why skirt embroidery works so powerfully — and exactly how to execute it without the three mistakes that ruin it.
✨ Why is this a WOW moment?
Look at the photo. The dress is completely plain — no pattern, no detail, no embellishment anywhere except one spot: the lower hem, slightly off-center. And that single element does something extraordinary.
👁It directs the eye
A single motif at the hem pulls the gaze down and holds it — the viewer's eye travels the full length of the dress to find it. The effect is elongating and dramatic.
🌟It moves with you
Skirt fabric swings. The embroidery catches light from every angle — gold thread on black is never the same twice. Walking is part of the design.
💎It replaces accessories
When the skirt is embroidered, you need nothing else. No belt, no statement necklace, no bag with hardware. The design IS the accessory.
🎭It reveals itself slowly
Sitting, standing, crossing legs — the motif appears and disappears. It creates a sense of discovery. People lean in to look. That's the magic of placement.
✦ ✦ ✦🔍 Let's look at this photo
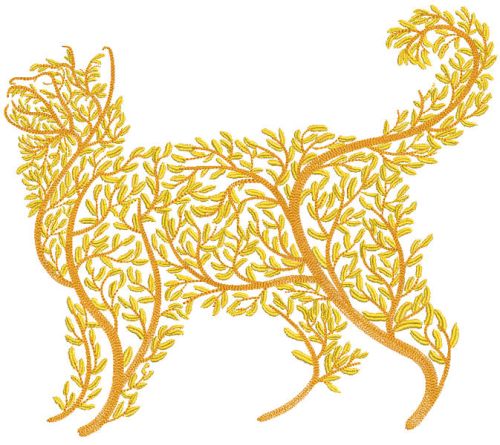
✦ Placement decisionThe cat sits at the lower hem, slightly left of center — not centered, not at the seam. This asymmetric placement is intentional. A centered motif feels formal and static. An offset motif feels alive, like it wandered there on its own.
✦ Color strategyOne color only — warm gold on deep black. This restraint is everything. Two colors would compete. Gold alone on black is a pairing that has worked for centuries — from medieval manuscripts to haute couture. It doesn't need help.
✦ Design scaleThe cat is substantial — roughly 15–18 cm at this placement. On a full skirt this size reads perfectly from a normal conversation distance. Too small and it disappears into the fabric. Too large and it dominates. This proportion is exactly right.
✦ Why a cat?The arched-back cat silhouette has inherent movement — it mirrors the curve of a hem, it mirrors a woman's posture, it feels animated even when still. Not every motif works on a skirt. A static, symmetrical shape would fight the garment. This one belongs.
📋 How to embroider a skirt — step by step
1Choose your fabric carefully 🧶
Wool crepe, ponte, heavy cotton, thick linen — all excellent. Avoid chiffon, georgette or any sheer fabric for your first skirt project. You need substance behind the needle.
2Plan placement before touching the hoop 📐
Put the skirt on (or stuff it with tissue paper to approximate drape). Hold a printed template of the design at the proposed location. Step back 2 metres. Look. Adjust. Mark with water-soluble pen only when certain.
3Stabilize — don't skip this 📦
Cut-away stabilizer for all skirt fabrics — non-negotiable. A skirt hem is under constant stress when worn. Tear-away crumbles with movement. Cut-away stays. For wool specifically, use medium-weight woven cut-away.
4Hoop with the floating method 🪡
Never hoop the skirt directly — the fabric is too precious and the hem structure too complex. Hoop the stabilizer, spray KK2000, and adhere the skirt panel flat to it. The design stays registered, the fabric stays undistorted.
5Stitch, trim, press 🌡️
After embroidery, trim the cut-away stabilizer close to the stitching (leave 5mm). Place a pressing cloth between iron and embroidery, press from the reverse side only. Never iron directly on gold thread — it dulls the sheen permanently.
🏆 Expert tips
💡 Gold thread — use rayon, not polyesterGold rayon has a warm, liquid sheen that catches light the way real gold does. Polyester gold looks flat and slightly synthetic under direct light. On a black garment this difference is unmistakable. Madeira Rayon 1122 or Sulky 1024 are the go-to choices.
⚠️ The hem is a construction zoneBefore hooping, check: does your design area cross any seam allowances or the hem fold itself? Even a well-pressed hem creates a ridge that shifts needle tension. Place the design above the hem fold — a minimum 2 cm clearance from the fabric edge.
✨ One motif ruleResist the urge to add more. One well-placed, well-sized motif on a skirt is haute couture. Three motifs scattered around is craft market. The restraint IS the sophistication. If you're unsure — do one, wear it for a week, then decide if you need more. You won't.
✔️ Best motifs for skirtsAnimals with movement (cats, foxes, birds in flight) · botanical silhouettes · single large flowers · abstract swirling forms. Avoid: rigid geometric shapes, text, anything perfectly symmetrical. A skirt moves — the motif should suggest movement too.
💡 Test on a panel firstBefore touching your finished garment, stitch the full design on a scrap of identical fabric and stabilizer. Wash and wear-test the scrap for a day. Only when you're satisfied with the result should you touch the real skirt. There are no second chances with a finished dress.
🧶 Which skirt fabrics work best
Show us your embroidered skirt — we'd love to see it! 🐈⬛✨
#SkirtEmbroidery #EmbroideredFashion #GoldEmbroidery #MachineEmbroidery #CatEmbroidery #WearableEmbroidery #BlackDressStyle -
How to Embroider Women's Pants: Tips That Actually Work
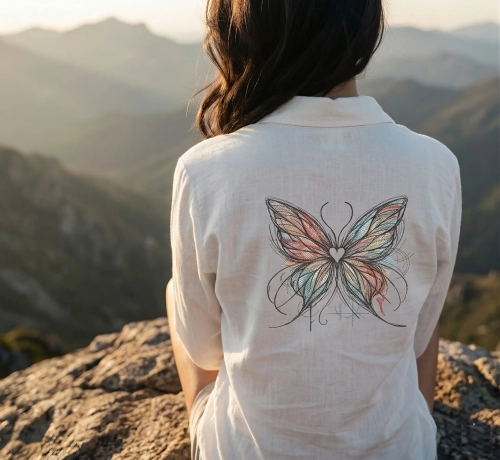
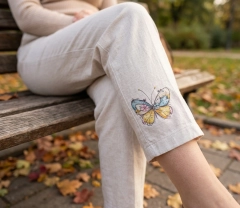
A butterfly on the hem of linen trousers. A floral motif near the knee. Delicate sketch embroidery on denim. These projects look effortless in photos — and brutally honest in the hoop. 🤭
Pants are one of the trickiest garments to embroider on. Unlike a flat pillowcase or a jacket back, trouser fabric curves, stretches, seams appear at the worst moments, and the leg tube doesn't fit neatly into any standard hoop. But the result — a butterfly catching light on cream linen while you sit in an autumn park — is absolutely worth mastering the technique.
Let's go through every real challenge, one by one, with the solutions that actually work. 💪
✦ ✦ ✦😤Challenge #1: The Leg Tube Won't Fit the Hoop
This is the first wall every embroiderer hits with pants. The leg is a closed tube — you can't simply lay it flat and hoop it like a pillowcase. Force it and you'll stitch the front leg to the back leg, which is both embarrassing and irreversible.
✅ SolutionUse the free-arm hooping method: slide only one layer of the leg over your hoop's inner ring, tucking the back leg inside and out of the way. Secure with pins or clips. Many embroidery machines have a free-arm attachment specifically for sleeves and legs — use it.
✨ Pro TipFor narrow legs (skinny jeans, fitted trousers), use a sticky stabilizer in the hoop and adhere the fabric to it rather than hooping the fabric directly. This prevents distortion on tight tubes.
📐Challenge #2: Curved Surfaces & Design Distortion
The side of a trouser leg isn't flat — it curves. When you hoop curved fabric flat, it stretches in the hoop, and once released, the design puckers or pulls off-center. A butterfly stitched straight ends up looking like it's mid-flight in the wrong direction. 😬
⚠️ Common MistakeNever pull the fabric tight to make it "more flat" in the hoop. This stretches the grain, and the design will distort once the garment is worn and the fabric relaxes back to its natural shape.
✅ SolutionHoop the fabric relaxed and natural — just as it lies. Use a cut-away stabilizer instead of tear-away for stretch-prone fabrics. For linen trousers like in our photo, a medium-weight cut-away gives just enough body to prevent drift without stiffening the drape.
✂️Challenge #3: Seams in the Way
Side seams, inseams, hem seams — they all create ridge lines that the needle hates. Stitching across a seam allowance changes the needle's path, can cause skipped stitches, bent needles, and visible puckering right through the design.
📍Plan placement first
Before hooping, mark all seam locations with tape. Position your design so it falls entirely between seams, not across them.
🪡Press seams flat
Iron seam allowances open before hooping. A flatter seam = fewer problems. Use a tailor's ham for curved seams.
🪢Slow down at seams
If crossing is unavoidable, reduce machine speed to 60–70% over the ridge. Use a titanium needle — it flexes less than standard.
🧲Bridge with stabilizer
Place a strip of tear-away stabilizer under the seam allowance to level the surface before hooping.
🧵Challenge #4: Choosing the Right Stabilizer for Stretch
Linen stretches on the bias. Ponte knit stretches in both directions. Even "non-stretch" cotton twill has some give when pulled. Wrong stabilizer choice = a design that waves at you from across the room. 👋
🎯Challenge #5: Getting Placement Right Every Time
On pants, placement is everything. 2cm too high looks deliberate. 2cm to the left looks like a mistake. And unlike a flat piece where you can pin a template and check easily, a trouser leg is three-dimensional.
✅ The Template MethodPrint the design at 100% actual size. Cut it out, put the pants on (or stuff the leg with tissue paper), and tape the template where you want it. Step back. Look from arm's length. Only then mark the center point with a water-soluble pen and transfer to the hoop.
✨ Pro TipFor symmetric designs (like a centered butterfly), always find the crease line of the trouser leg — that's your true center, not the seam. Seams on modern trousers are often off-center by design.
🌊Challenge #6: Puckering After Washing
You finished it, it looks perfect. You wash it — and the butterfly now lives inside a little wrinkled island of gathered fabric. This is the saddest moment in embroidery. 😢 It happens when thread density is too high for the fabric weight, or when stabilizer shrinks differently from the fabric.
⚠️ Prevention ChecklistBefore you stitch the real garment:
① Pre-wash both the pants AND the stabilizer cut-outs before use
② Do a test stitch on matching fabric scrap, then wash the test
③ For sketch designs, reduce density to 75–85% of default
④ Use a bobbin thread that matches the garment fabric weight
⑤ Steam-press (don't iron flat) the finished design before first wash🦋 Why This Design Works So Well on Pants
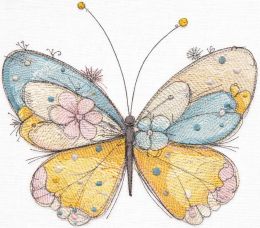
Not every embroidery design is a good candidate for trouser legs. Dense filled designs are rigid and crack with movement over time. The Butterfly Crayons sketch design works beautifully on pants for specific reasons:
1Low stitch density — sketch style means open areas, fewer stitches per cm². The fabric breathes and moves naturally after embroidery.2Compact size — the design fits comfortably within the flat panel of a trouser leg, away from seams and curves.3Neutral palette — the soft teal, yellow and blush tones work on cream, white, grey and light denim — practically any neutral trouser fabric.4Asymmetric shape — a butterfly placed slightly off-center on the leg looks intentional and editorial, not like a placement mistake.Embroidering on a Lampshade
✦ ✦ ✦Lampshades are one of the most underrated embroidery canvases — and once you try it, you'll wonder why you didn't start sooner. ✨
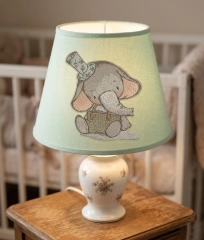
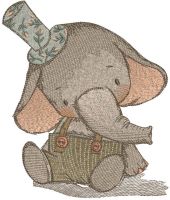
Whether it's a nursery nightlight or a living room statement piece, an embroidered lampshade brings warmth — literally and aesthetically. The design glows from within when the lamp is on, creating a stained-glass-like effect that no other textile can replicate. And with the right design, like our Vintage Elephant, even a beginner can achieve something truly stunning. 🐘
In this guide, we'll walk through everything — fabric prep, stabilization, hoop tricks, machine setup, and finishing — so your lampshade comes out looking like it belongs in a boutique nursery or a Parisian antique shop. Let's dive in! 🏪
💡 Why Embroider on a Lampshade?
Lampshades made from natural fabrics — linen, cotton, dupioni silk — are perfect for machine embroidery. The fabric is taut, the surface is stable, and when the light shines through, even simple designs look breathtaking.
💡 Expert Insight"Light transforms embroidery. The thread shadows create depth that you simply cannot see in daylight — a lampshade is one of the few projects where your work looks even better in the evening than it does on the worktable."
The key is choosing a fabric shade, not a plastic or vinyl one. Many modern lampshades come with a simple cotton or polyester covering stretched over a wire frame — and these are your canvas. 🎨
🧺 What You'll Need
🪡 Machine embroidery thread (40wt)💡 Fabric lampshade (linen or cotton)📦 Tear-away stabilizer (medium weight)🖨️ Embroidery machine with hoop✂️ Small sharp scissors📌 Water-soluble fabric marker🧲 Adhesive spray (KK2000 or similar)🌡️ Iron & pressing cloth🧵 Choosing the Right Fabric Shade
⚠️ Important WarningNever embroider on a shade while it's on the frame! Always remove the fabric covering first, embroider it flat, then reattach. Trying to hoop around the frame is a recipe for broken needles and misaligned designs.
📋 Step-by-Step: Machine Embroidery on a Lampshade
1Remove & prep the fabric 🧼
Carefully detach the fabric from the lampshade frame. Wash lightly if needed and press with a warm iron. Mark the center with your fabric marker.
2Choose your design placement 📐
Print a template of the design at actual size. Position it on the shade fabric — usually center-front, slightly below the middle of the shade's height.
3Stabilize correctly 📦
Spray KK2000 lightly on medium-weight tear-away stabilizer. Smooth your fabric on top. This floating method is ideal when the fabric is too small to hoop directly.
4Hoop & load the design 🖨️
Use the largest hoop your machine supports. Load the Elephant Vintage design file. Set machine speed to 90% for delicate fabrics.
5Embroider! 🪡
Watch the first color stop carefully. The vintage sketch style means many short stitches — this is normal. Let the machine run at its own pace.
6Remove stabilizer & press 🌡️
Tear away the stabilizer carefully. Place a pressing cloth over the design and press from the reverse side with a warm iron to settle the stitches.
7Reattach to frame ✂️
Re-stretch the embroidered fabric onto the lampshade frame. Use fabric glue or the original attachment method. Let dry completely before installing the lamp.
✨ Pro TipRun a test stitch on a scrap piece of the same fabric first — especially with sketch-style designs. Density settings may need a slight reduction (try 85%) on loose-weave linens to prevent puckering.
🎨 Thread Color Palette for the Elephant Design
The vintage elephant design uses a carefully curated muted palette that mimics the look of aged illustrations:
🐘Elephant body — Warm gray
Use a medium warm gray (avoid cool blue-grays). Madeira 1845 or Sulky 1219 work perfectly.
👂Ears — Dusty rose
A muted blush pink adds warmth without being babyish. Think antique rose, not bubblegum. Robison-Anton 2340 is ideal.
👖Dungarees — Sage green
On mint shades, try olive-sage. On cream shades, a brighter sage pops beautifully.
🎩Top hat — Muted teal
This is the accent color — the floral-print hat detail in teal ties the whole design together. Don't skip it!
💡 Expert Insight"With sketch-style designs, the outline thread does most of the visual work. Invest in a high-quality 40wt rayon for outlines — the sheen catches the light beautifully when the lamp is lit, adding a magical quality that polyester thread simply can't match."
🏆 Expert Tips for a Perfect Result
💡 Tension TipReduce your top thread tension by half a point when stitching on lampshade fabric. Standard tension can pull and cause tiny puckers along the seamlines of filled areas.
⚠️ Safety FirstAlways use LED bulbs in embroidered lampshades — never incandescent or halogen. Thread is flammable, and a cool LED bulb keeps your beautiful work safe for years to come.
✨ Style TipFor drum shades, consider repeating the design three times around the circumference, rotated 120°, for a seamless all-around effect. Use your machine's repeat function to ensure exact spacing.
🪄 The Magic of Lit Embroidery
Here's what surprises most first-timers: the design looks one way in daylight, and transforms entirely when lit from within. Sketch-style designs like the Vintage Elephant are especially magical — the fine lines create delicate shadow patterns on the surrounding walls, almost like a projection. 🌟
Heavier thread (30wt) blocks more light and creates bold shadows; finer thread (50wt or 60wt) for fill areas lets more light through, giving an almost watercolor effect. The elephant's body fill at 40wt strikes exactly the right balance. 🎭
Place your finished lamp near a wall and turn it on at dusk. The elephant and his little floral hat will cast their shadow softly across the room — and that, right there, is the moment you'll fall completely in love with lampshade embroidery. 🐘✨
Happy stitching! 🧵 Share your finished lampshade with us.
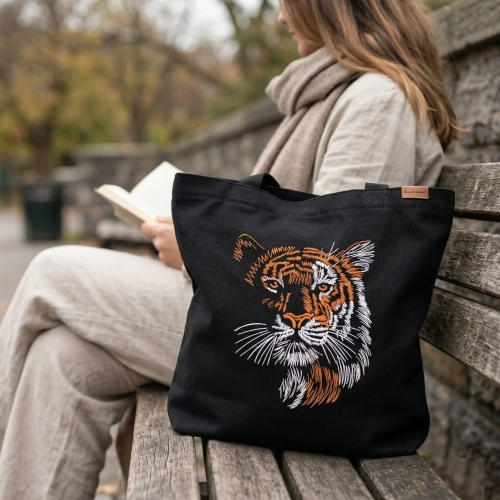
#LampshadeEmbroidery #MachineEmbroidery #VintageEmbroidery #NurseryDecor #ElephantDesign #StitchAndGlowEmbroidered Tote Bags: Practical Style You Create Yourself
There’s something special about a simple tote bag — until you add embroidery.
Then it stops being just a bag and becomes part of your style.Embroidered shoppers are not about trends. They’re about personality. About carrying something that feels yours — not mass-produced, not random, but intentional.
Why embroidered tote bags are actually practical
Let’s be honest — tote bags are everywhere.
But embroidery changes how you use them.You don’t just grab it for groceries.
You take it to the city, to a café, to a walk in the evening.✔ Strong fabric = durable for everyday use
✔ Large size = fits everything (laptop, books, daily essentials)
✔ Washable = easy to maintain
✔ And embroidery? It hides wear and adds character over time💡 A good embroidered tote doesn’t age — it evolves.
It’s not just a bag — it’s your style
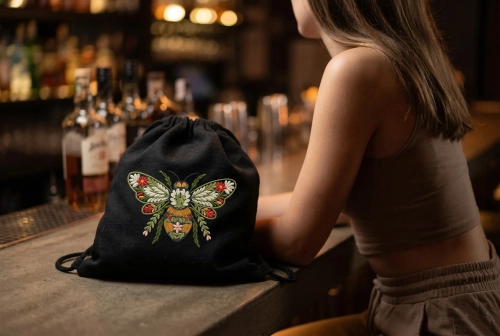
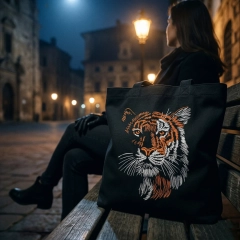
Look at a plain black tote. Clean, minimal… but forgettable.
Now imagine it with embroidery — like a tiger, floral pattern, or something abstract.
Suddenly it becomes a statement.— Minimal design → calm, modern
— Bold embroidery → expressive, artistic
— Contrast stitching → premium, fashion-forward👉 The key is balance:
the fabric stays simple, the embroidery tells the story.Handmade = different energy
There’s a reason handmade things feel different.
When you create your own embroidered tote:
You choose the fabric
You choose the design
You decide the placementNothing is случайно — everything is intentional.
And people notice it. Not because it’s loud, but because it feels real.
How people actually use embroidered totes
This is where it gets interesting.
These bags are not just “DIY projects” — they become part of everyday life:
— City bag for daily essentials
— Travel companion (light but вместительный)
— Creative accessory for photos and content
— Gift that doesn’t feel generic💡 One well-made tote can replace 3–4 random bags.
Small details that change everything
From experience, the difference between “nice” and “wow” is always in details:
— Slightly off-center embroidery looks more дизайнерски
— Matte natural fabric feels more premium
— Visible stitch texture adds depth
— Dark background + light threads = strong contrastAnd most importantly:
👉 Don’t overload the design
Let it breatheWhy this is worth making yourself
You can buy a tote anywhere.
But making one changes how you relate to it.It becomes:
✔ More valuable
✔ More personal
✔ More wearableAnd honestly — it just feels better carrying something you made.
Final thought
In a world full of identical вещей, embroidered tote bags give you something rare — individuality without effort.
Simple base.
Strong detail.
Personal touch.That’s the formula.
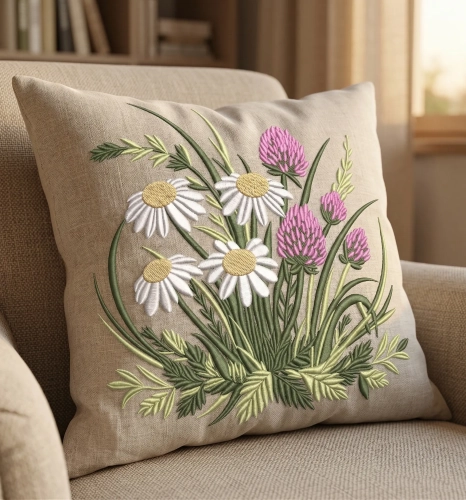
🧵 Cozy Interiors Elevated: The Magic of Embroidered Pillows
🌿 Why Embroidered Pillows Work So Well
Unlike printed decor, embroidery has texture you can see and feel. The raised stitches, thread shine, and handmade look create a premium, cozy atmosphere.
💡 Bouquet for you embroidery design advantage:
Adds depth to flat interiors
Creates a focal point without overwhelming the space
Works in both modern and vintage styles
🛋️ Where to Use Them
✨ Living Room
Layer 2–3 embroidered pillows on a neutral sofa — they instantly make the space feel curated, not generic.✨ Bedroom
Place them in front of standard pillows to create a soft, romantic composition.✨ Accent Chair / Reading Corner
One embroidered cushion is enough to turn a simple chair into a cozy retreat 📖🎨 Expert Tips for Styling Embroidered Pillows
🧠 1. Balance Colors, Don’t Overload
Use embroidery as a highlight, not competition.
👉 If your pillow has colorful stitching (like flowers or characters), keep the rest of the decor calm.🧵 2. Play With Textures
Combine embroidery with:
linen
cotton
knit blankets
👉 This creates a layered, дизайнерский look instead of a flat setup.
📏 3. Mind the Size of the Design
Embroidery should feel proportional:
Small motifs → elegant & minimal
Medium (10–20 cm) → perfect for everyday decor
Large → statement piece (use carefully)
🌼 4. Choose Emotional Designs
People connect with meaning, not just visuals.
💛 Popular choices:
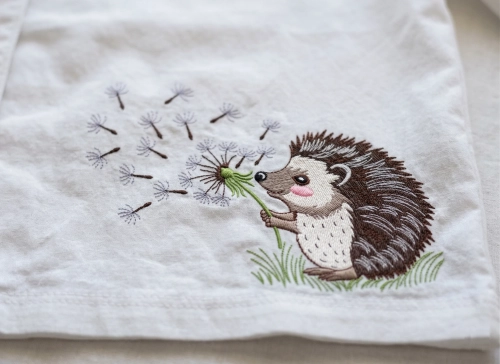
Cute animals (like teddy bears 🧸)
Floral compositions 🌸
Personalized names or messages
These details make pillows perfect for gifts and personal spaces.
🏡 5. Match the Interior Style
Style
Best Embroidery Type
Scandinavian
Minimal, soft tones
Rustic / Cottage
Floral, vintage patterns 🌿
Modern
Simple line embroidery
Kids / Nursery
Cute characters & bright colors 🐻
✨ Pro Insight from Designers
👉 “Embroidery brings handcrafted emotion into mass-produced interiors. Even one piece can change the entire mood of a room.”
👉 “The key is contrast — smooth fabric + textured stitching = visual richness.”
💡 Styling Idea You Can Try Today
Place 2 neutral pillows + 1 embroidered pillow in the center
→ This creates a balanced, catalog-style композиция (just like premium home brands use)🧵 Final Thoughts
Embroidered pillows are a simple way to transform your space without renovation or big expenses. They bring warmth, individuality, and a touch of handmade luxury into everyday life.
✨ Sometimes, one small stitched detail is enough to make a room feel like home.
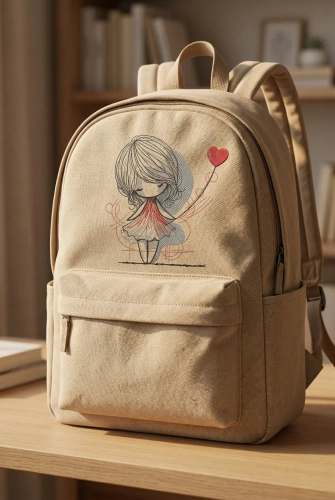
How to Sew a Simple Embroidered Phone Pouch
Sometimes the simplest things turn out the most beautiful. A small fabric phone pouch with embroidery is one of those projects — quick to make, practical, and surprisingly stylish when done right.
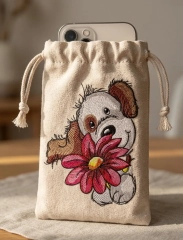
In this guide, we’ll create a soft drawstring pouch using this design:
👉 Cute puppy with big flower embroidery design
https://embroideres.com/cute-puppy-big-flower-embroidery-design-74611/Start with the fabric
Choose a natural fabric like linen or sturdy cotton. It gives structure and makes the embroidery look richer and more textured.
Cut two identical rectangles
Cut two identical rectangles, slightly larger than your phone.
Add about 1.5–2 cm seam allowance and a bit of extra height for the drawstring top.Embroidery comes first
Always embroider before sewing.
Place the design on the front piece only. Don’t aim for perfect center — slightly lower than the middle looks more natural and premium.
Keep the size balanced. A good rule: the design should take about 30–40% of the pouch width.
Sew the pouch
Put both pieces right sides together and stitch the sides and bottom.
Leave the top open.Turn it inside out — now it already starts to feel like a real product.
Make the drawstring channel
Fold the top edge twice and sew around to create a tunnel for the cord.
Leave small openings on both sides.Add the cord
Use a safety pin to guide the cord through.
One cord works fine.
Two cords (from opposite sides) instantly make it look more polished.A few simple tips that make a big difference
— Light fabrics help the embroidery stand out
— Visible stitch texture always looks better than flat fills
— Slight imperfections feel more “handmade” and warm
— Soft natural lighting is best for photosCommon mistakes to avoid
— Design too large → looks heavy and cheap
— Fabric too thin → no structure
— Perfectly centered placement → feels generic
— Flat lighting → no depth in stitchesWhy people love this kind of project
It’s simple, but it feels personal.
It’s practical, but still decorative.
And most importantly — it looks like something from a small boutique, not mass production.You can make one in an evening, but it has real value — both for yourself or for selling.


Who's Online (See full list)
Download Statistics
- 4,114 Files
- 8,927 Comments
- 7,859 Reviews
-