


How to Mount Embroidery Without Sewing

By diver361
- 15 views
- View diver361's images
How to Mount Embroidery
Without Sewing
Simple, beautiful & reliable — turn your embroidery into wall decor, a key holder or a gift panel without touching a needle and thread.
Not every embroidery project needs a needle and thread to finish. Sometimes the most beautiful result comes from mounting — and the best part is, anyone can do it.
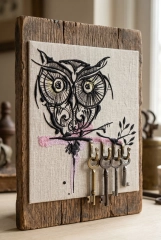
This key holder was made with a single linen panel, an oak frame, copper screws — and no sewing at all. The embroidered owl is mounted with double-sided adhesive tape, stretched smooth, secured from the back. Clean, professional, permanent.
In this masterclass you'll learn three methods for mounting embroidery without sewing — when to use each, what materials to buy, and how to avoid the most common mistakes.
Can you glue embroidery?
Yes — and it works beautifully for decorative pieces. Gluing is perfect for wall panels, key holders, photo frames and gift items. It is not recommended for wearables or anything that will be washed repeatedly.
For home decor
Wall panels, framed hoops, decorative boards — anything that hangs on a wall and stays dry.
For functional items
Key holders, organizers, pinboards, bookmarks — items that are used daily but not laundered.
For gifts
Mounted embroidery makes a far more impressive gift than a loose hoop. A linen panel on an oak board with copper screws looks like a gallery piece.
3 methods — from quick to professional
PVA Glue
Apply a thin, even layer of PVA glue to the base (wood or cardboard). Place the embroidery, smooth from center to edges removing air bubbles. Let dry completely — at least 24 hours. Done.
Stitchery Tape or Acid-Free Double-Sided Tape
Special double-sided tape designed for textiles. Apply to the base, place the embroidery, press firmly. Does not damage fabric, leaves no marks, does not yellow over time.
Stretch on a Base + Secure from the Back
Stretch the embroidery over a wooden frame or board, pulling it taut and even. Secure by folding the edges to the back and stapling, pinning or lacing with thread. No glue touches the fabric at all.
How to use PVA glue — step by step
Use a clean brush. Cover the full surface but keep it thin — thick glue soaks through. A minimal amount applied evenly is always better than more.
Start from the center and work outward. Align the design before it touches the glue — repositioning is difficult once placed.
Use a flat card or your palm. Bubbles under the fabric will show once dry. Take your time here.
Do not move the piece while drying. Place a light weight on top if the fabric tends to lift at the edges. PVA dries clear.
Add hardware (hooks, screws, hanging wire) once fully dry. The mounted piece is ready to display or gift.
What the pros remember
MDF and plywood hold PVA glue and tape extremely well. Raw wood is porous — seal it lightly with diluted PVA first. Cardboard works for lightweight decorative pieces but not for functional items.
Always trim cut-away stabilizer to within 5mm of the design before mounting. Excess stabilizer creates bulk and uneven surfaces that show under tension. Tear-away should be completely removed.
PVA is great for decorative pieces with a 5–10 year lifespan. For something you want to last 20+ years — use acid-free double-sided tape or the stretch-and-lace method. These don't yellow, don't crack, and don't damage the fabric.
Key holders, wall panels, organizers, kids' projects, gifts and handmade items. Any project where the embroidery becomes part of an object rather than a garment.
PVA is a great solution for decorative and interior pieces. If you want maximum longevity — choose archival materials or stretch the embroidery and secure it from the back.
— Create with joyDesign used in this project
Used in this project
|
Sketch · Detailed · Home decor
Strange Owl No.12
Embroidery Design The exact design used in this key holder masterclass. Bold sketch-style owl — perfect for linen panels, wall art and functional decor items.
PES
DST
JEF
EXP
VP3
HUS
XXX
Get this design →
|
Made this project? Share it in the gallery!
Recommended Comments
Join the conversation
You can post now and register later. If you have an account, sign in now to post with your account.