


The Sleeve is Not a Back Panel

By diver361
- 26 views
- View diver361's images
Let's be honest about something the tutorials don't say: the sleeve nearly always wins the first round.
You have embroidered successfully on flat fabric. On hoops. On cushion covers and tote bags and the back panel of a jacket. Each of those went well. So you look at the sleeve — a tube of denim with seams on two sides and a curve in every direction — and you think: how different can it be?
Considerably different. The sleeve is a three-dimensional object that must be temporarily flattened, registered, stabilized and stitched with a precision that flat work never demands — and then returned to its original shape carrying an embroidery design that must look as though it was always there. This is the challenge. And it is absolutely worth solving.
Why anyone bothers with sleeves at all
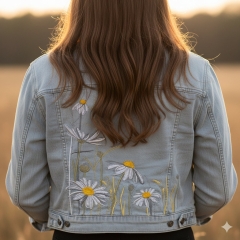
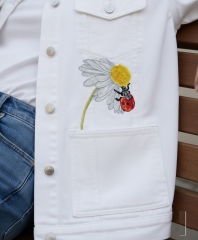
The back panel is the obvious choice for jacket embroidery. It's large, flat, easy to hoop, and commands attention from across a room. The chest pocket is the restrained choice — precise, intimate, professional. The sleeve is something else entirely. It is the theatrical choice.
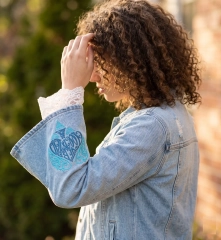
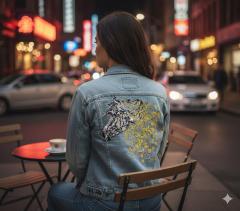
A sleeve design is never still. It appears and disappears as the arm moves. It catches light from angles that no other placement can access. It is seen by the person sitting next to you at a table, the person standing close in conversation, the camera held at arm's length — but not, significantly, by someone standing at a distance. It is an intimate detail. A secret that reveals itself by degrees.
In photography — the medium through which most fashion is now consumed — a sleeve design has a structural advantage no other placement shares: it appears in every natural pose. A hand raised to hair. An arm extended. A jacket half-removed. The design is always present, always dynamic, always telling part of the story.
For sellers, this is the difference between a piece that looks good on a hanger and one that photographs. In the current market, the piece that photographs is the piece that sells.
Six problems. Six solutions. No shortcuts.
These are the technical realities of sleeve embroidery on denim, in order of the frequency with which they ruin projects.
The sleeve is a tube — it has no flat state
You cannot hoop a cylinder. Forcing a sleeve flat to hoop it creates tension across the seams that distorts the design the moment the sleeve returns to its natural shape — which it will, the instant you take it off the machine.
Use a tubular hoop (specialty sleeve hoop that slides inside the sleeve without flattening it) — or open the sleeve seam before embroidering and re-sew it after. If neither is practical: hoop cut-away stabilizer, spray-baste the sleeve flat onto it with the seam carefully pinned away from the design area. Float, never force.
Hooping denim directly leaves permanent marks
Heavy denim resists the hoop ring. Forcing it creates hoop burns — circular impressions in the fabric that survive washing and ironing. On light-wash or vintage denim, they are immediately visible and cannot be fixed.
Always float on denim — hoop the stabilizer, not the garment. Apply temporary spray adhesive to the stabilizer surface, position the denim carefully, smooth from the centre out. Zero compression. Zero marks. Perfect registration.
What centres on a flat sleeve drifts on a worn one
The eye reads a design on a cylinder, not a plane. A motif centred by measurement on a flat sleeve will appear to shift forward when the jacket is worn — because the back curve of the sleeve carries a different visual weight than the front curve.
Mark placement while the jacket is worn or fitted on a dress form — never on a flat surface. The visual centre of a sleeve in wear is typically 1–2 cm forward of the geometric centre of the flat fabric. Trust what you see on the body, not what the ruler says on the table.
Thread tension behaves differently on curved fabric
Dense satin-stitch fill areas — like the ornate lettering in a complex sleeve design — pull differently on curved fabric than on flat. The result is thread loops on the surface, or bobbin thread visible at the edges of the design, or fill areas that look tight in the centre and loose at the edges.
Always stitch a complete test on matching denim scraps before touching the garment. Loosen top tension one step at a time until the satin fill lies flat and even. For the section of the sleeve that sits over the rounded cap, reduce speed to 70% — slower stitching gives the feed dogs more control over the fabric as it curves away from the needle.
The seam is always somewhere you don't want it
Denim jacket sleeves have visible seams running along the outside and underside. A design that crosses a seam encounters a sudden change in fabric thickness — the seam allowance — which creates a visible ridge in the stitching and forces the needle to angle sideways, breaking thread or skipping stitches.
Plan placement to keep the design well clear of both seams — typically centred on the back face of the upper sleeve, between the shoulder seam above and the elbow below. If the design must cross a seam, use a denim needle (size 90/14 with a reinforced shaft) and reduce speed to 60% at the crossing point.
There is no seam ripper solution for a ruined jacket
Removing dense embroidery from denim leaves needle holes that remain visible permanently. A ruined sleeve is a ruined jacket. Unlike a torn seam or a stain, a badly placed or badly stitched embroidery design on denim cannot be undone.
Buy two identical blanks. Embroider the first one completely — at full scale, with the actual design file, on the actual placement, with the actual stabilizer. Only after the test jacket stitches perfectly do you open the second one. This adds $20–40 to the project cost and removes the single largest variable. Every professional who does sleeve work on quality garments does this. Every time.
What makes a design work on a sleeve
A sleeve design should feel generous — not cramped. On an adult jacket sleeve, the sweet spot is 12–18 cm wide and 10–15 cm tall. Smaller reads as a chest pocket detail that got lost. Larger risks crossing seams and creating tension problems at the curved edges of the hoop.
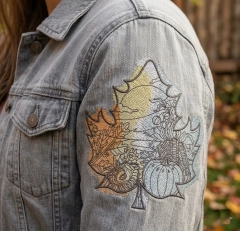
Very dense fills — fully packed satin stitch across the entire design — stiffen the sleeve and alter its drape. The most successful sleeve designs mix dense areas (lettering, focal elements) with open areas (scrollwork in running stitch, sketch-style fills). The contrast creates visual depth and keeps the fabric moving naturally.
Light-wash and mid-wash denim are the most forgiving sleeves to work on — and the most photogenic. Blues and teals read as tonal elegance. Warm terracottas and rusts create striking contrast. White and ivory feel vintage and considered. The one colour to avoid on light denim: pale grey — it disappears.
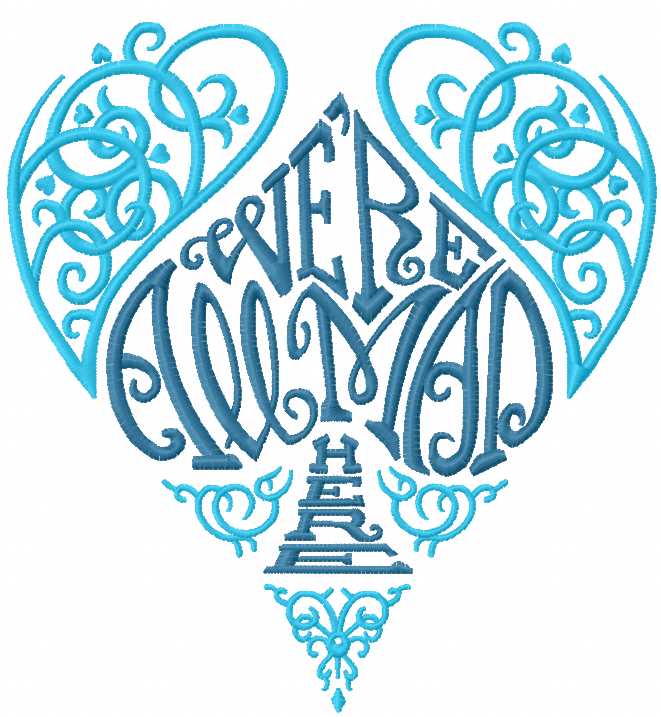
Ornate lettering — the kind with scrollwork, flourishes and dimensional depth — is the single most effective sleeve design category. It photographs from every angle. It rewards close inspection. It scales beautifully to sleeve proportions. And it says something specific, which is ultimately what all the best embroidery does.
A design built for this placement
The honest summary
Sleeve embroidery on denim is not forgiving. It punishes overconfidence, rewards preparation, and does not accept shortcuts. You will spend more time on setup than on stitching. You will probably ruin a test piece. You will definitely learn something from it.
And the result — a design moving with the arm, catching light in a way that no flat piece ever can, belonging so completely to the jacket that it seems as though it arrived that way — is unlike anything else in garment embroidery. That's why people keep attempting it. That's why, once you do it well, you can't stop.
Attempted a sleeve? Share your result in the comments.
