
diver361
Administrators
-
Joined
-
Last visited
-
 🧵 Where to Place Embroidery on Pillows – Smart Tips for a Perfect Look!Custom embroidered pillows are a beautiful and heartfelt way to decorate your home or gift something special. Whether you're crafting a romantic message or a personalized monogram, the placement of the embroidery and the font you choose can make or break your design. Let’s dive into the most popular placement options, the pros and cons of each, and helpful font suggestions to elevate your pillow embroidery. 🧸✨ 🎯 Popular Embroidery Placements on Pillows💖 1. Center PlacementThis is the most common and visually striking option. Pros: Naturally draws the eye Works well for symmetrical designs Ideal for large graphics or text Cons: Mistakes in alignment are more visible Can leave less room for borders or corners 🌸 2. Top-Center or Top CornersGreat for adding elegance with names, dates, or small elements. Pros: Perfect for minimalist or delicate fonts Looks refined and balanced Cons: Can feel too small or subtle Doesn’t work well for large graphics 💌 3. Bottom-Center or Bottom CornersOften used for dedications or signatures. Pros: Adds a personal touch Doesn’t interfere with main artwork in center Cons: May not be visible when the pillow is sitting upright Works best with contrasting thread color ✨ 4. Diagonal / Angled TextPlayful and modern—great for casual or whimsical pillows. Pros: Adds movement and creativity Makes the pillow feel custom and dynamic Cons: Harder to align properly Some fonts may be difficult to read at an angle ✒️ Choosing the Right Font for EmbroideryFont style is just as important as placement. Here are some tips for selecting the best fonts for pillow embroidery: 🧵 1. Script Fonts – Elegant and RomanticPerfect for weddings, love notes, or formal dedications. Examples: Great Vibes Dancing Script Lavanderia Best Used For: Names, quotes, romantic dedications. 👶 2. Rounded Sans-Serif Fonts – Friendly and PlayfulGreat for kids' pillows or fun messages. Examples: Comic Sans MS (yes, really!) Fredoka One Baloo Bhai Best Used For: Baby names, fun quotes, gifts for children. 🛏️ 3. Serif Fonts – Classic and ReadableTimeless and readable, even in smaller sizes. Examples: Times New Roman Bold Georgia Bodoni Best Used For: Housewarming gifts, monograms, or formal text. 💡 Pro Tips for a Beautiful Embroidered PillowUse water-soluble stabilizer on plush pillow fabric to avoid sinking stitches. Keep the contrast high between thread color and pillow fabric for legibility. If unsure about placement, print a paper template and pin it to the pillow for preview. Make sure text and design are centered and aligned before stitching. Use bold fonts or increase thickness to avoid thread breaks on intricate letters. 🪡 Final ThoughtsThe combination of placement, design, and font is what turns a pillow into a cherished keepsake. Whether you're adding a sweet message for your spouse, a baby’s name, or an inspirational quote, thoughtful layout and typography will help your embroidery shine! ✨
 -
 🍩☕ Cozy & Cute: Kitchen-Themed Hoodies Are the New Style Treat!Who says fashion can’t be delicious? Kitchen-themed hoodies — featuring embroidered donuts, coffee cups, cupcakes, and more — are quickly becoming a cozy trend for anyone who loves food, fun, and comfort. Used Glass of coffee and donut embroidery design Why Kitchen Embroidery Is In Style Right Now 🍰Whimsical Aesthetic – Cute embroidered food with smiling faces instantly lifts the mood and adds charm to any outfit. Comfort Meets Creativity – These hoodies aren’t just warm and comfy — they tell a story, your story. Perfect for Everyday Magic – Wear it while baking, brunching, vlogging, or just lounging at home. Instant personality! A Must-Have for Food Bloggers & Culinary Creators 🎥Kitchen-themed hoodies are the perfect signature look for food content creators and vloggers. Imagine filming your next latte art tutorial or baking session while wearing a hoodie that matches the treat on your table! Picture This:You're making donuts. Your hoodie? A donut with rosy cheeks is already smiling at your audience. Pouring coffee on camera? A cute embroidered cup is right there keeping you company. This little detail makes your videos more memorable — and more you. Where & How to Wear It 🎈🌸 Spring or fall picnics 🎁 Gifts for chefs, bakers, and baristas 📸 Instagram Reels or YouTube intros 🛋 Weekend chill vibes Final Bite: Fashion That Feels Like Home 🧁Kitchen-themed embroidery isn’t just trendy — it’s comforting, fun, and full of personality. Whether you're a foodie, a content creator, or just love cozy, playful clothing, this hoodie trend is your next wardrobe treat.
 -
 🛏️ Why Pillows Matter in a Child’s RoomPillows aren't just for sleep – in a child's room, they serve as cuddly companions, decor highlights, and cozy reading nook essentials. Whether decorative or functional, the right pillow brings personality and comfort to the space. 🎨 Choose Kid-Friendly StylesLet your child’s personality shine! Pillows with fun embroidery designs – like this adorable Stitch sleeps on a dandelion embroidery design – can transform a simple bed into a magical corner. Consider: Cartoon characters or animals for toddlers Fantasy themes for young dreamers Interactive textures (like fluffy ears or soft appliqués) 🧵 Fabric First: What’s Best for Kids?Comfort, safety, and washability should guide your choice: Cotton – breathable, soft, and hypoallergenic Minky or fleece – extra cuddly and warm Linen – great for summer months Avoid rough synthetics that may irritate sensitive skin For embroidery, choose tightly woven cotton or blends that provide stability and durability. 📏 Sizing Tips: What's Just Right?Pick the right pillow size depending on the child’s age and function: Age Group Recommended Size Use Babies (<2 yrs) Decorative only – small (20×20 cm) No use for sleeping Toddlers 30×40 cm Napping, reading School-age 40×40 or 50×50 cm Bed/pillow fights! Don’t overcrowd the bed – 1–2 decorative pillows are enough. 🧒 Let Kids Choose!Children are more likely to use and cherish what they helped choose. Offer a few options in colors and characters, and let them pick their favorite. It becomes a bonding moment and ensures they'll love their new pillow. 🪡 Bonus Tip: Personalize It!Add your child’s name or initials with embroidery – this makes the pillow special and can help with tidiness and ownership if they share a room or go to daycare. 💬 Final ThoughtsThe perfect kids’ pillow is a blend of fun, comfort, and creativity. With thoughtful fabric choices and a touch of whimsy, you can create a space your little one will love to snuggle into every day.
 -
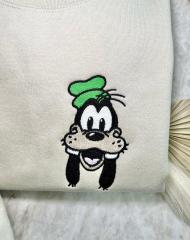 🐶 Finished Smiling Goofy Head Embroidery Design – Add a Touch of Classic Fun!If you're a Disney lover or simply enjoy fun character stitches, this Smiling Goofy Head embroidery design is sure to brighten your day. The bold lines, classic green hat, and friendly expression bring Goofy’s charm to life on any fabric — perfect for sweatshirts, tote bags, or personalized gifts. ✨ Embroidery Design FeaturesCharacter: Iconic Goofy face with a big smile Details: Black outline, cream face fill, green hat, and expressive eyes Best for: Sweatshirts, hoodies, tote bags, kids' wear, and Disney merch Fabric shown: Light cotton fleece — smooth finish and excellent color pop Size Options: Multiple hoop sizes available for flexible use 🎁 Great For:Disney-themed gifts or handmade merch 🎁 Personalizing apparel or accessories 🧥 Adding fun to embroidery hoop displays or patch collections 🧷 Craft fairs or kids' clothing lines 👶
 -
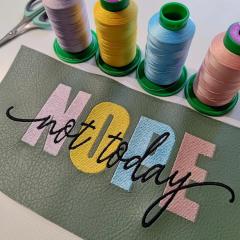 💬 “Nope Not Today” Embroidery Design – Bold Words, Beautiful StitchesLet your embroidery speak your mood! This playful “Nope Not Today” embroidery design features large pastel block letters filled with clean satin stitching, overlaid with an elegant script in bold black thread. Perfect for adding attitude to bags, jackets, notebooks, or even wall art. ✨ Embroidery Design DetailsStyle: Bold modern typography with a sassy script overlay Colors: Pastel shades (lavender, yellow, blue, blush) + black for contrast Fabric: Looks great on faux leather, cotton, canvas, or denim Skill Level: Confident beginner to advanced File Formats: Multiple machine formats available (DST, PES, JEF, etc.) 💡 Perfect For:Mood patches for jackets or totes Embroidered gifts for friends with a sense of humor 😎 Home office decor or sewing room inspiration Statement-making apparel and accessories
 -
 ☕ Hoodie with Espresso Patronum Embroidery Design 🧙♂️Bring a little magic to your wardrobe (and your morning routine) with this clever Espresso Patronum embroidery design. Featuring a coffee cup dressed like a wizard, complete with wand and glasses, this hoodie is perfect for caffeine-loving fans of the wizarding world! ✨ Embroidery Design HighlightsDesign Theme: Coffee cup as a spell-casting wizard ☕🔮 Typography: Bold red text in spell-inspired font (Harry Potter-style) Placement: Chest area on cozy cream-colored hoodie Fabric: Soft fleece or cotton blend – ideal for autumn and winter Occasions: Coffee dates, bookshops, conventions, lounging with lattes ☕📚 🎁 Great Gift For:Coffee addicts with a sense of humor 😄 Harry Potter fans and pun-lovers alike Embroidery enthusiasts looking for creative designs Cozy hoodie collectors and magical souls ✨
 -
 💤 Pillow with Sleeping Stitch Covered with a Blanket Embroidery DesignBring softness and charm to your home with this cozy pillow showcasing Sleeping stitch covered with a blanket embroidery design🛌. With delicate embroidery lines and vibrant thread colors, this design captures a tender Disney moment fans will instantly love. ✨ Embroidery Design HighlightsCharacter: Stitch snuggled under a blanket with peaceful expression Thread Colors: Soft blues, purples, and pastel accents 💜 Placement: Centered on a plush white pillow – ideal for beds or couches Fabric: Cotton or linen pillow cover for a clean, crisp look Size: Perfect for standard 40x40 cm (16"x16") cushion inserts 🧡 Embroidery is Perfect For:Disney lovers who enjoy handmade or embroidered home decor 🐾 Nursery rooms or children’s spaces with a cozy theme Gift ideas for birthdays, baby showers, or fans of Stitch Craft inspiration for your next embroidery hoop or pillow project!
 -
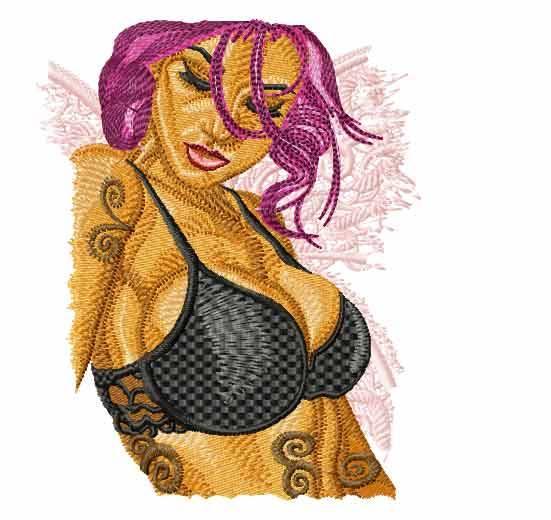
diver361 commented on ekatreina's comment on a gallery image in Elevate Your Creations with Flowers embroidery designs
-
🧵 Feeling Overwhelmed? Getting Started with the Brother Dream Machine 2 Embroidery MachineSo you’ve unexpectedly inherited a Brother Dream Machine 2 Innov-ís XV8550D, and you’re wondering... where do I even start? First off—congratulations! You’ve got your hands on one of the most advanced home embroidery machines out there. But with that power comes a learning curve that can feel steep, especially if your background is more in traditional sewing than digital embroidery. Here’s a guide to help you ease into the world of machine embroidery—one stitch at a time. 📘 Step 1: Understanding the Machine – It's Okay to Feel LostEven with the manual, the Brother Dream Machine 2 can seem like it assumes a lot of prior knowledge. You’re not alone! Many users feel the same way the first time they look at the touchscreen or hear the machine whirring away. It’s not just a sewing machine—it’s a computer with a needle. What to do first: Start with YouTube tutorials specifically for the Brother Dream Machine 2. These are often far more visual and helpful than the manual. Try stitching a built-in design to get used to the hooping process, stabilizer use, and threading for embroidery. Check out the Brother website for free sample embroidery files to test. 🎨 Step 2: Dipping into Digitizing – Start SimpleYou mentioned an interest in creating your own floral designs. Great! Designing for embroidery is a whole new creative skill, and your experience with ProCreate and Photoshop gives you a fantastic head start. Recommended tools for beginners:Ink/Stitch – A free, open-source plugin for Inkscape that allows basic digitizing. It’s perfect for experimenting without investing hundreds of dollars. SophieSew – Another free digitizing tool, though less frequently updated. Youtube + Forums – Search for beginner Ink/Stitch tutorials or join communities like r/MachineEmbroidery or specific Facebook groups. 🪷 Starting with a simple one-color, loosely stitched floral pattern is perfect. Renaissance-style blackwork embroidery (as you mentioned) is a wonderful beginner style—visually impactful, yet not thread-heavy or technically complex. 🧵 Step 3: Materials Matter – Threads, Stabilizers & HoopingYour machine is likely bundled with accessories, threads, and hoops. Open up that mystery bag—it might have treasure! Thread Tips:New Brothread Polyester – Affordable, vibrant, and beginner-friendly. Madeira Rayon or Frosted Matte – High-quality options when you're ready to level up. Avoid cotton and silk – They can be tricky, especially for beginners. Metallic threads – Beautiful but notoriously finicky. Save them for later. Stabilizer Basics:Cut-away stabilizer – Best for stretchy or delicate fabrics. Tear-away – Ideal for woven fabrics. Water-soluble – Great for freestanding lace or topping fabrics like towels. 🧪 Step 4: Test, Test, and Test AgainA design might look great on screen and terrible on fabric. That’s normal. Stitch out test samples—start with small sections of your design (like one flower). Try different thread types and stabilizers. Adjust tension settings and embroidery speed if needed. This is part of the learning process, and each stitch teaches you something new. 🌸 Final Thoughts – Give Yourself GraceYou’re entering an exciting new world of creative possibilities. Expect some frustration, trial-and-error, and yes—moments where you wonder if it’s worth it. But with your sewing experience and artistic background, you’re already halfway there. 📚 Books like The Sewing Machine Embroiderer’s Bible or Machine Embroidery With Confidence can be a helpful supplement to digital resources. ☕ Pour a coffee, dive into a tutorial, and give yourself time to explore. You’ve got this.
-
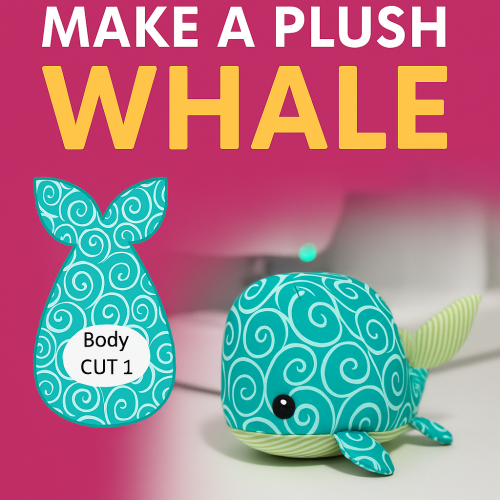 🧵 How to Sew a Plush Whale ToyUsing Two Fabrics – Simple Softie Project ✂️ What You’ll Need:Two types of fabric: Main fabric (e.g., printed cotton or fleece for body) Contrast fabric (e.g., stripes or solids for the belly and fins) Toy stuffing (polyfill) Matching thread Sewing machine or hand needle Pins or clips Scissors Printed pattern pieces at 1:1 scale 📐 Pattern Overview:Part No. Name Cut Instruction 1 Body (top) Cut 1 from main fabric 2 Side fin (small) Cut 1 from main fabric + 1 from contrast 3 Tail fin Cut 1 from main fabric + 1 from contrast 4 Side panels Cut 1 from main fabric + 1 from contrast 5 Belly (bottom) Cut 1 from contrast fabric Each piece marked "cut 2" means you'll cut one from each fabric type. 🪡 Sewing Instructions:1. Prepare All PiecesCut the pattern pieces at 1:1 scale. Make sure mirrored pieces are cut where necessary (for fins and sides). Keep right sides of the fabrics facing inward when pinning. 2. Assemble the Fins (Parts 2 & 3)Place each pair of fins right sides together (main + contrast fabric). Sew around the edge, leaving the base open. Turn them right side out and press flat. Optional: topstitch around the edge for a neat look. 3. Attach the Side Panels (Part 4)Sew each side panel (one from main, one from contrast fabric) to each side of the top body piece (Part 1). Align the straight edge of the side panel to the body’s side curves. You should now have a three-piece top with two fins sticking out from the sides. 4. Insert the Tail FinPlace the tail fin (Part 3) between the two side panels at the rear. Pin it in place between the layers. Sew across the back to secure. 5. Sew the Belly to the BodyPin the belly (Part 5) to the assembled top body part, aligning the curves. Leave a small opening at the underside for turning and stuffing. Insert the side fins (Part 2) into the seam, pinning securely before sewing. Sew around the entire body, leaving the gap open. 6. Turn & StuffCarefully turn the whale right side out through the opening. Stuff firmly with polyfill, shaping the body as you go. 7. Close the OpeningHand-stitch the opening with a ladder (invisible) stitch. Shape and press gently. 🐳 Optional Final Touches:Add safety eyes or embroider the eyes with black thread. Topstitch around belly seam if desired.
 -
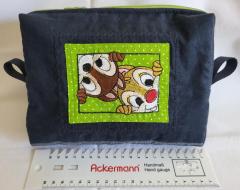 🐿️ Bag with Chip and Dale Embroidery Design – Playful Disney Duo in Stitch ✨Add a touch of nostalgic charm and Disney joy to your accessories with this handmade fabric bag showcasing the beloved chipmunk duo, Chip & Dale 5 embroidery design 🧵. Stitched on a bright green polka-dot background, the embroidery captures their playful expressions and is framed perfectly into the front panel. 🎨 Embroidery Design DetailsCharacters: Chip & Dale peeking with their iconic faces 🐿️ Material: Soft navy-blue fabric with a structured body Embroidered Panel: Bright green fabric with clean stitching and cartoon detail Size: Compact and versatile — ideal for cosmetics, sewing notions, or school supplies Zipper & Handles: Durable zip closure and side loops for easy carrying 🎁 Perfect ForDisney lovers of all ages 💫 Cute everyday pouch for travel or kids' essentials 🧳 Fun handmade gift for birthdays or holidays 🎁 Stitching inspiration for your own embroidery projects!
 -
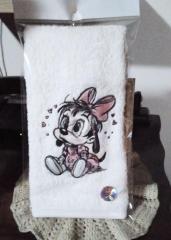 🐶 Towel with Goofy Baby Girl Sitting Embroidery Design 💕This adorable towel features an embroidered Goofy baby girl sitting embroidery design sweetly with a pink bow and hearts all around 🧷🎀. It’s the perfect soft-touch accessory for any baby shower gift, nursery decoration, or little one’s daily essentials. ✨ Design DetailsCharacter: Baby Goofy girl in sketch-style embroidery Placement: Centered on soft white terry cloth towel Color Scheme: Black outline with pink accents and heart details 💗 Material: High-quality absorbent cotton – gentle on baby’s skin 🎁 Perfect ForPersonalized baby gifts 👶 Nursery towel sets 🛁 Baby milestone or baptism keepsakes ✝️ Fans of classic Disney baby characters 🐾
 -
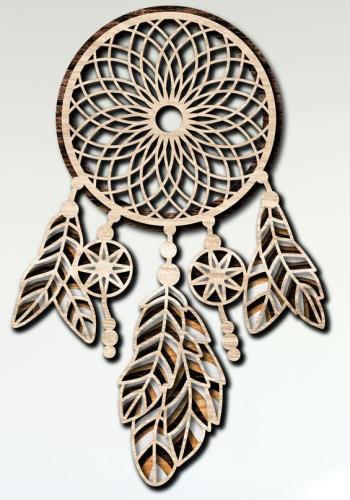 🌙 Classic Dreamcatcher – Free Multilayer 3D Laser Cut File for Elegant Wall Art🪶 Capture Creativity and Calm in Every LayerDownload this beautifully detailed Classic Dreamcatcher free multilayer 3D laser cut file and create a piece of wall art that’s both spiritual and stunning. Featuring a layered mandala-style hoop, intricate feathers, and geometric star elements, this design brings depth, balance, and texture to your crafting projects. Perfect for laser cutting with wood, acrylic, or layered cardstock, it’s an ideal addition to boho decor, handmade gifts, or spiritual-themed events. ✨ Design Details🔹 Layers: Multilayer construction for dimensional detail 🌙 Motif: Classic dreamcatcher with stylized feathers and geometric charm 🪵 Material Friendly: Suitable for wood, MDF, acrylic, and paper 🎁 Perfect For: Wall art, nursery decor, spiritual gifts, craft fairs
 -
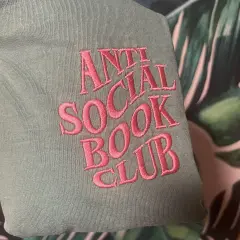 📚 Anti Social Book Club Embroidery Design – The Perfect Tee for Quiet Rebels😎 Boldly Bookish, Proudly IntrovertedMake a statement without saying a word with this clever Anti Social Book Club embroidery design stitched on a comfy olive-green T-shirt. Featuring playful pink typography and curved letters, this design is perfect for readers who prefer pages over parties and novels over noise. It’s not just a tee — it’s a lifestyle for book lovers who cherish silence, solitude, and sarcasm. 🧵 Why You'll Love It📖 Embroidery: Anti Social Book Club embroidery design in vibrant pink 👕 T-Shirt Style: Soft cotton with a relaxed, cozy fit 💬 Ideal For: Bookworms, introverts, book club rebels, or your next quiet gift idea 🎁 Makes a Great Gift: For that friend who always “can’t come, has reading plans”
 -
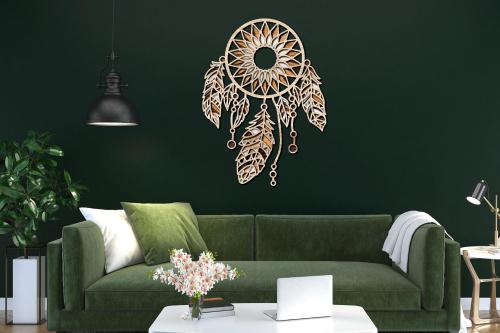 🪶 Native American Dreamcatcher – Free Multilayer 3D Laser Cut File🏡 Create Stunning Layered Wall Art with Boho SpiritBring a touch of heritage and harmony into your home with this free Native American dreamcatcher cut file. Designed with intricate layered feathers, a radiant sunburst center, and tribal geometry, this wall art makes a stunning focal point in any living room, bedroom, or creative space. 🧡🪵 Perfect for Glowforge, xTool, K40, Cricut Maker, or CNC routers. 📐 File Formats & Cutting Info📁 Includes: SVG, DXF, CDR, AI, EPS 🧩 Layers: 4–6 multilayer depth (scalable) 🪵 Recommended Materials: 3mm plywood, MDF, acrylic ✂️ Compatible With: Laser cutters, diode lasers, CNC routers 📏 Dimensions: Default 300–400mm tall (scalable for wall sizes) ✨ Add contrast with painted layers or wood stains for dramatic effect!
