
Clothes repair: How to move a zipper to another side
While sewing a pair of shorts or pants, a beginner tailor might easily, in the heat of work, make a mistake of attaching a zipper on the ‘men’s’ side instead of ‘women’s’ and vice versa. These shorts with a zipper on the ‘women’s’ came to me as the result of a young man’s hasty shopping. An unusual order resulted in a tutorial, which I’m now sharing with you.
How to move a zipper to another side. Materials
- Shorts
- A sewing machine
- A zipper foot
- A spare zipper (if necessary)
- Threads and needles, scissors, a seam ripper
How to move a zipper to another side. The work order
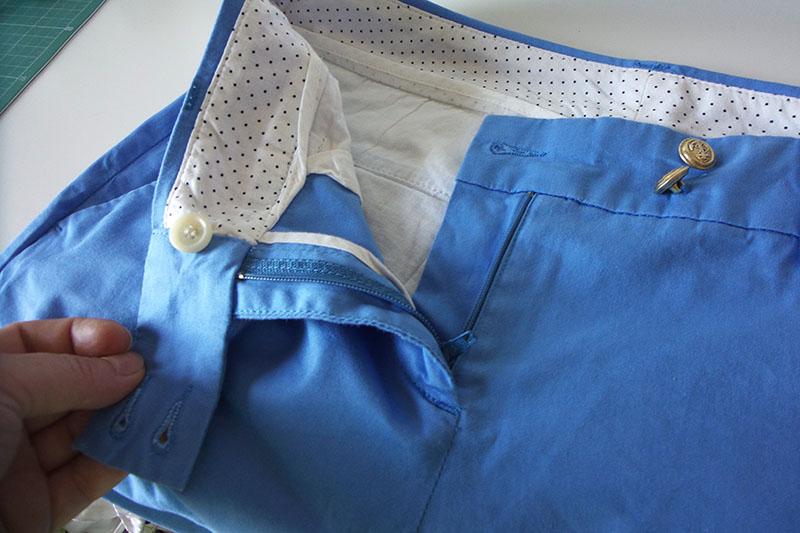
This is how the shorts looked before I started working on them. I want to call your attention to the waistband; we’ll be making changes to it as well.


A ready garment is not that different from a semi-finished one when it comes to preparation. You’ll need to get rid of unnecessary stitches and deconstruct the unit. Pick up a seam ripper and carefully deconstruct the whole thing. Don’t touch the cording or edge finishing made with a serger.


Let’s proceed to the zipper. On the fly front guard there already is a line that will serve you as a guide for sewing a zipper. Baste the zipper to the wrong side. Install a zipper foot on your machine and stitch the zipper tape.
Baste or pin the front fly extension to the other side of the tape and stitch. In order to prevent the pieces from getting nipped in the course of sewing, you may fold them in half and pin.


On the right side of the garment, mark where the topstitch will run. Align the edge of the zipper unit with the edge of your garment. Stitch the parts together.


Fold the zipper unit to the wrong side and topstitch along the edge from the lower to the upper edge. Edge stitch foot is your little helper here.


Set the values according to your own taste. You can easily determine the stitch length by simply measuring it with a ruler on a ready item. Different embroidery machine models have different stitch settings; there is a lot written about them in the manual. It often has tables that help to quickly choose the right stitch and the values.


Topstitch the fly guard along the drafted line. After that, join the free edge of the zipper tape and the garment.


This is how my shorts looked like after I relocated the zipper. Stitch the lower part of the front seam under the topstitching line to the center point where the seams meet, one or two times. Join the parts with their wrong sides together, and topstitch on the right side (optional).


All that’s left is to sew a waistband. In order to do it evenly, join the waistband and the garment, beginning at the center back. Evenly distribute the waistband, paying attention to where the side seams meet. If there are the belt loops, use them as guides. Stitch the waistband to the garment, then fold the waistband lining to the wrong side and topstitch along the lower edge or do the shadow seam. This will help to lower the burden on the first seam, and also to join the inner side of the waistband to the outer one.


Sew the buttons back on.
Compare the two photos. On the left are the shorts how they came to me, on the right — the shorts after I repaired them. This tutorial uses an unusual way of sewing a zipper.


In the clothing repair shop where I saw it first, it was called ‘the quick one’ and was intended for speedy clothes repair.
-
 3
3
There are no reviews to display.