
Original text by Marina Belova
Flat or decorative fills parameters are usually applied to the complex shapes with limbs and openings if they are big enough to be embroidered with satins.
At the first glance this seems the easiest object to digitize: first, you outline it, then mark the beginning and the end and specify only one stitch direction. Machine embroidery software does the rest.
But here's a trouble: you cannot just put the beginning and the end of the complex shape whenever it is logical and rational with regard to the embroidery sequence, i.e. in the shortest possible way from one object to another. Overlooking this point may result in a highly unpleasant defect – gaps between the segments of one big object. It is even more possible when embroidering segments that have opposite stitch directions on tricky stretchy fabrics.
The reasons for the gaps can be explained. During the sewing, the fabric stretches no matter what. It also begins to shift (you can see waves) in the direction of the embroidery. When the embroidery finish point is located in the middle of an element, and if stitches in segments lie in opposite directions, there will be a piece of unstitched fabric between them at the joining place.
All contemporary machine embroidery editors have an adjustable option called Overlap. It is used specifically for the gap prevention.
It is a value that defines the amount of overlap. Overlap is usually measured in the number of stitches (satins) or rows (fills) that will cover the assumed gap.
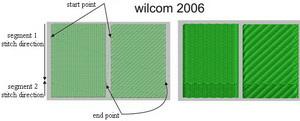
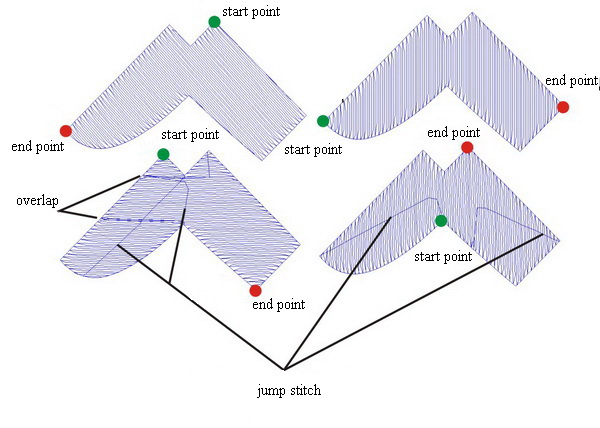
On the picture below you can see how to overlap segments in a rather simple object:

The algorithm depends on the stitch direction as well as start and end points.
As you can see, not only a complex but also a very simple outline can be split into segments. The number of segments will depend on the stitch angle as well as start and finish points defined by a digitizer.
Seems so easy: just set a value and that's it. Not so fast. Imagine a situation where you need to overlap not the stitches in a satin column but the ones in a flat or decorative fill. In this, a digitizer will need to find out how segments are overlapped in a particular editor so that the additional rows of stitches are in harmony with the texture of the fill.
Almost all popular editors give different patterns of needle penetrations even if there is only 1 row. It usually conflicts with the texture of the fill.
So as not to sound precarious, I'll give you an example: In each of the 4 embroidery editors, I drew 2 squares. Every square had its own texture. I set start and finish points for every object not at the ends, but about 1/4 from the edges. I chose horizontal stitch direction for every square. The objects overlapped for 1 row of stitches.
Wilcom in a standard mode does not show how the needle penetrations shift in the segments or in the additional line of stitches between them. But switch to the realistic mode and it will be a completely different matter:
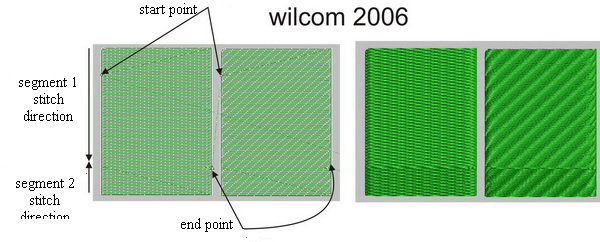
The way segments of one object overlap in Wilcom
It is similar in Tajima. There is a shift in the rows of needle penetrations, and the overlapping line looks odd:
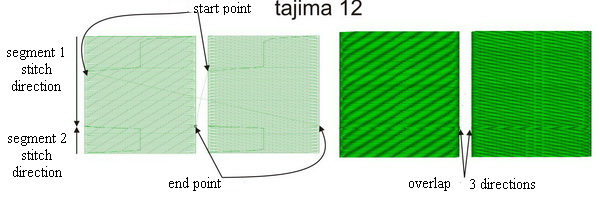
The way segments of one object overlap in Tajima
In WingsXP the texture in segments remained very similar, but the overlapping line seems out of place.
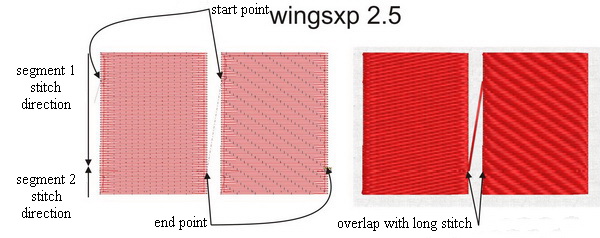
The way segments of one object overlap in WingsXP
In Stitch Era needle penetrations in the additional row create a texture closest to the specified.
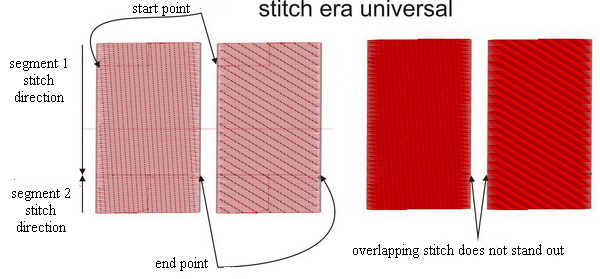
The way segments of one object overlap in Stitch Era
I didn't compare the other editors. It is clear that the calculation algorithms in different editors are also different. And consequently, the result will look different, too.
But the bottom line is that you should minimize the number of segments in one object:
- You should select your start and finish points so that they are located on opposing sides. Which ones will that be, depends on the stitch direction.
- Hence, you should adjust the stitch direction value to achieve the best result.
For example:
- Create one object with different start/finish points and stitch direction, one objects with a different number of segments.
- Reduce the number of overlaps to 1 per object where possible.
- If the overlap is present, it should be at least 1–2 rows wide.
- In case the start and finish points should be located in particular places, you can try to manually split a complex shape into segments with one stitch direction.
There are no reviews to display.