Sewing accessories: a Ruffler foot
Pleats are cute! Ruffles, pleats, and frills are fashionable again. You can use the main fabric or decorative ribbons, and attach the ruffles to the garment or at the edge. The variety of textures in one garment is very popular this season. This article contains three short tutorials. You may choose the one you like for the embellishment of your apparel. Revamp a dress you grew tired of, replace old and dull sleeves with the puffed ones with the cute ruffled ribbon decoration.
Revamping an old dress: Materials
- A dress
- A sewing machine
- Sewing threads
- The Ruffler foot
- 65 cm of chiffon fabric of the matching color
- Ribbons of varying width and texture, of the matching colors

Revamping an old dress: Ruffler foot
Attach the Ruffler foot and ruffle your ribbons. They will look as if made by a professional. Feeding the fabric to be ruffled into the foot with a steady hand at an even pace, you’ll finish the job quickly.
Adjust the depth screw. You may choose any value between 1 and 8. The higher the number, the deeper the pleat (more fabric is tucked into the foot). If you set it to 1 or 2, the attachment will create very narrow pleats. Set it to 8, and the pleats will be as deep as possible. Using the manual, replace your ordinary presser foot with a Ruffler foot.


Adjust the ruffle regulator. The lever can be put in one of the four possible positions: 1, 6, 12 and *. If set to 1, the ruffle will be made with every stitch. If set to 6, the ruffle will appear every 6 stitches, and if set to 12, every twelfth stitch. In case you need a straight stitch, set the lever to *. The stitch length also affects the distance between the ruffles. The lower it is, the closer together they will be.
Set your needle in the center position. Push a ribbon through the foot. Put one end of the ribbon in a piece of paper and push it between the ruffling blade and the fabric feed plate. After that, the paper can be removed.

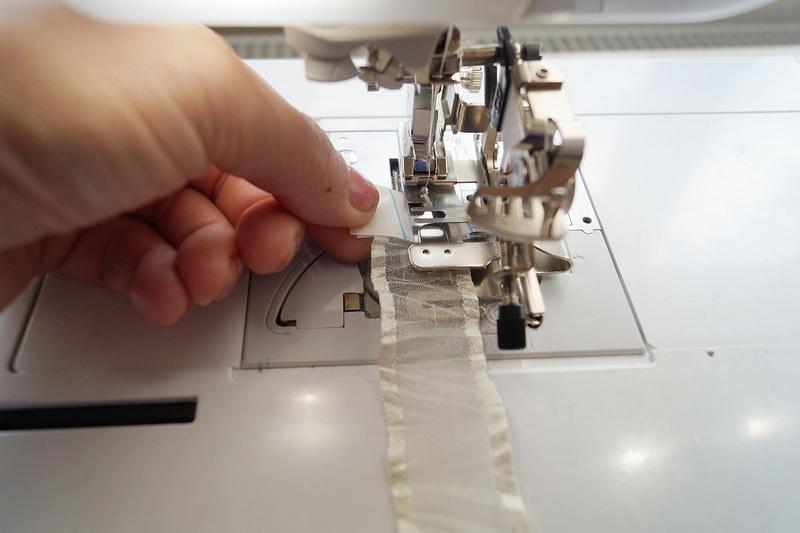

Position the ribbon in such a way that the needle is exactly in the middle between its two edges. Sew at a low speed. Don’t forget to check: the row of stitches should run in the middle.


Adjust the ruffle depth and the distance between the ruffles in accordance with the ribbon width. The narrower the ribbon, the lesser the pleat depth.


Revamping an old dress: Decorating the sleeves
Prepare your sleeves for the decoration. Rip them out, unravel the seams and iron out the pieces. Now, you need to cut the identical pieces out of the chiffon.
Fold the chiffon in half, with its right side inside. Place the “real” sleeve on top and cut along the outline. To the newly-cut chiffon parts, fuse the interfacing material. It will strengthen the fabric and prevent it from shifting.


Lay out the prepared ribbons on top. Alternate wide and narrow ones. Pin them and sew the straight stitch along the gathering line. You may cover the seam with a cord or a narrow satin ribbon. Attach the cord with a zigzag stitch.


Once the ribbons are attached, remove the interfacing material from the wrong side.


Fold the hems, sew the sleeves and attach them to the arm-holes.

Wear happily!


In the second part of our article, we are going to sew a summer jacket with basque and decorate it with a ruffled satin ribbon.
Summer jacket with basque. Materials
- Fabric for the jacket (110 cm long and 140 cm wide)
- Jacket sewing pattern (to the waistline)
- A 20x90 cm piece of colored satin for the decoration
- A Ruffler foot
- A sewing machine
- Sewing threads
Summer jacket with basque. Preparing the decoration
Adjust the depth screw. Set the depth screw to 8. Using the manual, replace your ordinary presser foot with a Ruffler foot. Set your needle in the center position.


Set the ruffle regulator to 6, so that every 6 stitches you get a ruffle.
Cut the colored satin fabric into strips 6 cm wide and approximately 180–200 cm long. Fold the ribbon in half (lengthwise) and iron out all the way. Put one end of the ribbon in a piece of paper and push it between the ruffling blade and the fabric feed plate. After that, the paper can be removed. Place the needle above the ribbon 1 cm from its edge. Sew at a low speed. Check the position of the seam: it should run 1 cm from the edge.


Press down the ruffles with an iron.


Summer jacket with basque. Sewing
Cut out the parts and sew the sides, shoulders, and darts.


Pin the already ruffled satin ribbon to the right front part along the centerline, around the neckline and 15 cm under the neckline on the left front edge. Stitch close to the edge.


Sew the facing and the neckline facing together. On top of the decoration, pin the facing and the neckline facing to the right front part of your jacket on the right side, and stitch 1 cm from the edge.
Turn the facing the wrong side out and iron out. Using the edge stitch presser foot, finish the edge (stitch on the right side).
For the basque, prepare a piece of fabric approximately 160 cm long and 11 cm wide. Turn up the lower edge and stitch.


Along the upper edge, attach the ruffles, 1 cm from the edge.


Press down the ruffles on the basque with an iron. Pin the basque to the lower part of the jacket and sew.


Cover the seam with a satin ribbon 1.5 cm wide (in the ready state) and stitch on both sides. Prior to that, fold the hems and flatten them with an iron.


Sew the sleeve, fold the hem and stitch. Attach the sleeve to the arm-hole. Attach the snap fasteners.


“One-click” cascade ruffles
All you need to sew a dress with cascade ruffles is a piece of fabric and a Ruffler foot. This tutorial will show you the possible variants of cascade ruffles, assembled at home.
“One-click” cascade ruffles Version 1
- For this job, you’ll need:
- A sewing machine
- Sewing threads
- A Ruffler foot
- A piece of lace 15 cm wide and 600 cm long, for a three-tier skirt with a 60–65 cm waistline
“One-click” cascade ruffles. Creating the ruffles
Prepare the lace for the skirt. Adjust the depth screw. Set the depth screw to 8.
Set the ruffle regulator to 6, so that every 6 stitches you get a ruffle. Set your needle in the center position. You can narrow the distance between the pleats by reducing the stitch length. Do the test sewing.


Push the lace through the foot. Position the needle above the lace 1 cm from the edge. Sew at a low speed. Check the position of the seam: it should run 1 cm from the edge. Ruffle the whole length of the lace piece. It will be used to create a three-tier skirt.


“One-click” cascade ruffles. Sewing the dress
Sew the bodice on the sides. Don’t touch the back seam. Starting from the center back, stitch the first tier of ruffles to the bodice along the waistline, right sides inside. Cut the excess lace. The seam at the back should remain open all the way.


Stitch the second tier of the ruffles to the first one. Hide the end of the ruffled lace under the first tier of ruffles. Sew the straight stitch on the right side. Cut the excess lace. Stitch the third tier to the second one. Sew the dress at the back, from the neck hole to the lower edge.


Finish the neck hole and attach the sleeves.

“One-click” cascade ruffles Version 2
For this job, you’ll need:
- A sewing machine
- Sewing threads
- A Ruffler foot
- A piece of lining 13 cm wide and equal to the lace in length.
- A piece of lace 15 cm wide and 500 cm long, for a three-tier skirt with a 55 cm waistline.
“One-click” cascade ruffles. Preparing lace
Do steps 1 and 2 from Version 1. Cover the lining with the lace, align them together and push the whole into the foot. Place the needle above the ribbon 1 cm from the edge.
Sew at a low speed. Check the position of the seam: it should run 1 cm from the edge. You will ruffle two fabrics simultaneously.


Ruffle the whole length of the lace piece. It will be used to create a three-tier skirt.


“One-click” cascade ruffles. Sewing the dress
Sew the bodice on the sides. Don’t touch the back seam. Starting from the center back, stitch the first tier of ruffles to the bodice along the waistline, right sides inside. Cut the excess lace. The seam at the back should remain open all the way.


Stitch the second tier of ruffles to the lining of the first tier, using a straight stitch. Cut the excess lace.

Stitch the third tier to the lining of the second one. Sew skirt at the back in two stages. First, all lace tiers, with their right sides together. Then, all lining tiers with one seam.


Finish the neck hole and attach the sleeves.

Original text by Olga Milovanova
Read also:
Edited by Irina
-
 1
1