
Search the Community
Showing results for tags 'sewing'.
-

Vintage Scissors Embroidery Design Revolution: Trends in Handbags
ekatreina posted a gallery image in Embroidered bag
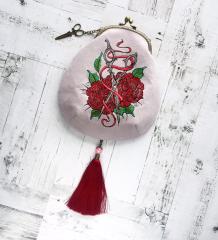 Embark on an exciting voyage of style and creativity as we explore the latest fashion trend that is making waves - the Vintage scissors and ribbon embroidery design. Resurrecting a classic symbol in a contemporary setting, these designs have quickly become a favorite in women's handbags. The Vintage Scissors Embroidery Design: A Classic Redefined The Charm of Yesteryears Vintage scissors, a tool that traces its origins back to the dawn of civilization, carries a nostalgic charm. This charm has been encapsulated in our embroidery designs, showcasing intricate and delicate patterns that echo the finesse of these age-old instruments. The depiction of these scissors on handbags evokes memories of a time when craftsmanship was treasured, striking a chord with those who appreciate the beauty of bygone eras. The Modern Craze The appeal of vintage scissors isn't just confined to their nostalgic allure. In the world of fashion, vintage trends are constantly being revived and reimagined to align with contemporary tastes. The vintage scissors embroidery design on women's handbags symbolizes this fusion of the past and present. It’s a fresh and exciting take on the vintage motif, redefining it as a stylish accessory that resonates with the modern fashionista. Setting the Trend The vintage scissors embroidery design is not just a fleeting fashion fad. It's a trendsetter. Women's handbags sporting these designs are making a bold style statement, communicating an appreciation for vintage aesthetics while embracing modern sensibilities. The design is a conversation starter, a unique element that sets these bags apart in a sea of mainstream styles. It's no wonder that this design has sparked a craze and is rapidly gaining popularity in the world of fashion. In conclusion, the vintage scissors embroidery design on women's handbags is a trend that celebrates the best of both worlds. It revives the charm of a bygone era while seamlessly blending it with the dynamic spirit of modern fashion. As more and more women embrace this trend, vintage scissors embroidery designs are set to become a staple in the fashion landscape, proving that sometimes, looking back can indeed be a great way to move forward.
 -
Embroidered Cosmetics Bag with Sewing Mouse Design of Style Function
ekatreina posted a gallery image in Embroidered bag
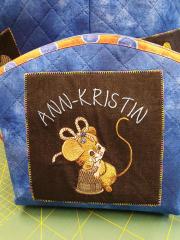 Adorable Embroidered Cosmetics Bag with Sewing Mouse Design Introducing the charming Embroidered Cosmetics Bag with Mouse likes sewing craft embroidery design, the perfect accessory to keep your makeup essentials organized and easily accessible. The delightful sewing mouse design adds a whimsical touch to this stylish and functional cosmetics bag, making it an ideal addition to any fashion-conscious individual's collection. Whimsical Sewing Mouse Design The enchanting Sewing Mouse Design features a cute and playful mouse diligently working on a sewing project. This unique and endearing design adds a touch of whimsy to your cosmetics bag, setting it apart from ordinary makeup storage solutions. Premium Quality and Durable Materials The Embroidered Cosmetics Bag with Sewing Mouse Design is crafted from high-quality materials, ensuring a durable and long-lasting accessory. The expertly stitched embroidery design not only adds visual appeal but also contributes to the bag's overall sturdiness and resilience. Spacious and Practical Design The generously sized cosmetics bag offers ample space to store and organize your makeup essentials, making it an ideal solution for both daily use and travel. The practical design features a secure zipper closure, ensuring that your belongings are safely stowed away and protected from damage. Add a touch of whimsy to your daily routine with the charming Embroidered Cosmetics Bag with Sewing Mouse Design. This delightful accessory is the perfect blend of style and function, providing ample space to store and organize your makeup essentials while adding a unique and endearing design element. The sewing mouse design is both adorable and captivating, making this cosmetics bag a must-have addition to any fashionista's accessory collection. Crafted from premium quality materials, this durable and long-lasting bag is perfect for daily use or travel, ensuring that your makeup essentials are always organized and easily accessible. Embrace the charm of the Sewing Mouse Design and elevate your cosmetics storage game with this enchanting accessory. Author: Ann-Kristin Kristoffersen
 -
Version any popular formats
183 downloads
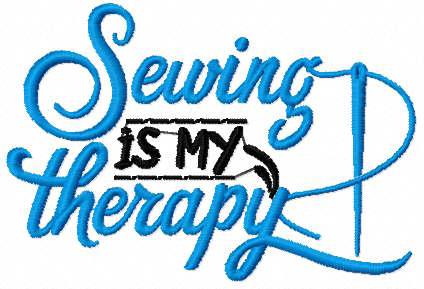
Size: 3.78 x 2.56' Also available EMB format. For open and resize this format you can download Embrace Your Passion with the "Sewing is My Therapy" Free Embroidery Design Dive into the therapeutic world of sewing and embroidery with the "Sewing is My Therapy" Free Embroidery Design. This delightful and heartwarming design is perfect for anyone who finds solace in the art of sewing, making it an ideal addition to your collection of embroidery patterns. Express Your Love for Sewing and Creativity The "Sewing is My Therapy" design is a charming and thoughtful way to express your love for sewing and the satisfaction that comes from creating something beautiful with your own hands. Whether you're a seasoned professional or just starting your sewing journey, this design is a reminder of the happiness and fulfillment that sewing can bring into your life. A Versatile Design for Multiple Projects The "Sewing is My Therapy" design can be used in various ways to add a personal touch to your sewing projects. Embroider it on a tote bag, apron, or even a wall hanging to showcase your passion for sewing in your everyday life. You can also use this design as a lovely embellishment on handmade gifts for fellow sewing enthusiasts. Easy-to-Follow Instructions and Support The free download of the "Sewing is My Therapy" design comes with easy-to-follow instructions, making it accessible for embroiderers of all skill levels. The forum at Embroideres.com also provides support and a sense of community for those who may have questions or need assistance with their embroidery projects. Discover Endless Embroidery Possibilities The "Sewing is My Therapy" design is just one of the countless free embroidery designs available at Embroideres.com. Explore the vast library of patterns to find the perfect designs for your next project, ranging from intricate florals to playful animals and everything in between. The extensive collection ensures that you'll never run out of inspiration for your sewing and embroidery endeavors. Connect and Share with Fellow Sewing Enthusiasts Embroideres.com is not only a treasure trove of free embroidery designs but also a thriving community of sewing enthusiasts. Share your completed "Sewing is My Therapy" project with others on the forum, or browse through the gallery to find inspiration from fellow embroiderers. Engage in discussions, exchange tips and tricks, and make new friends who share your love for sewing and embroidery. Unleash Your Creativity and Passion The "Sewing is My Therapy" Free Embroidery Design is a beautiful way to express your love for sewing and the therapeutic benefits it provides. By incorporating this design into your projects, you can create personalized and meaningful items that showcase your passion for the art of sewing. So, download the design today and start your next embroidery project, embracing the joy and tranquility that sewing can bring to your life.-
- 2
-

-
- handmade gifts
- creativity passion
- (and 9 more)
-

Square pillow with happy easter free embroidery design
diver361 posted a gallery image in Showcase with free embroidery designs
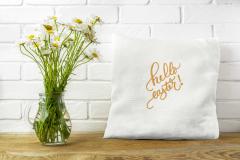 Hey there! I see you're interested in the Happy Easter script free machine embroidery design. How exciting! Happy easter script free embroidery design is perfect for adding a festive touch to your Easter celebrations. Whether you're looking to spruce up your home decor, create personalized gifts for loved ones, or add some extra flair to your wardrobe, this script design is a great way to do it. And the best part? It's completely free! Simply download the design, load it into your embroidery machine, and you're ready to start stitching. It's that easy. With this design, you can create beautiful, one-of-a-kind pieces that are sure to impress. Imagine a cute little Easter basket with the Happy Easter script embroidered on it, or a festive table runner to add some holiday cheer to your dining room. The possibilities are endless! So go ahead, get creative, and let your imagination run wild. And don't forget to have fun with it! After all, isn't that what the holidays are all about? Happy Easter, my friend!
 -
Sewing's bags with love is free embroidery design 2
diver361 posted a gallery image in Showcase with free embroidery designs
 Download free here Author: Theresa Sheak· Are you a fan of sewing and looking for a new project to work on? Check out the Sewing's Bags with Love is Free machine embroidery design! This embroidery design features the word "Love" in a beautiful script font, surrounded by a delicate heart. It's perfect for adding to sewing projects like bags, totes, or even clothing. The best part? The Sewing's Bags with Love is Free designs machine embroidery is completely free! You can download it and use it to create your own personalized sewing projects. It's a great way to add a touch of love and personality to your work, and it's sure to impress anyone who sees it. But here's the thing – this design is more than just a cute addition to your sewing projects. It's a way to show your passion for sewing and your dedication to creating beautiful, handmade items. And let's not forget about the versatility of this design. You can use it on any sewing project you can imagine, from bags and totes to clothing and home decor. So whether you're an experienced sewer or a beginner looking for a new project to try, the Sewing's Bags with Love is Free designs machine embroidery is a great choice. Download it today and get ready to add a touch of love and personality to your sewing projects!
 -
Version Any popular formats
167 downloads
Size: 7.79 x 1.55' Author: Marina Dudnik- 1 comment
- 2 reviews
-
- 3
-
-

-
- one colored
- scissors
- (and 5 more)
-
 I am searching for free software website for the purpose to change my vector art from .ai, .eps or other preparation in to sewing machine setups such as .jeff, .sew, .dst and many more. I heard about wilcom which is awesome but costly. I want to try this out and to perform customs designs for family and friends. Hey, I am searching for help. And, can you help in operating with illustrator, fireworks and Photoshop or other program?
 -

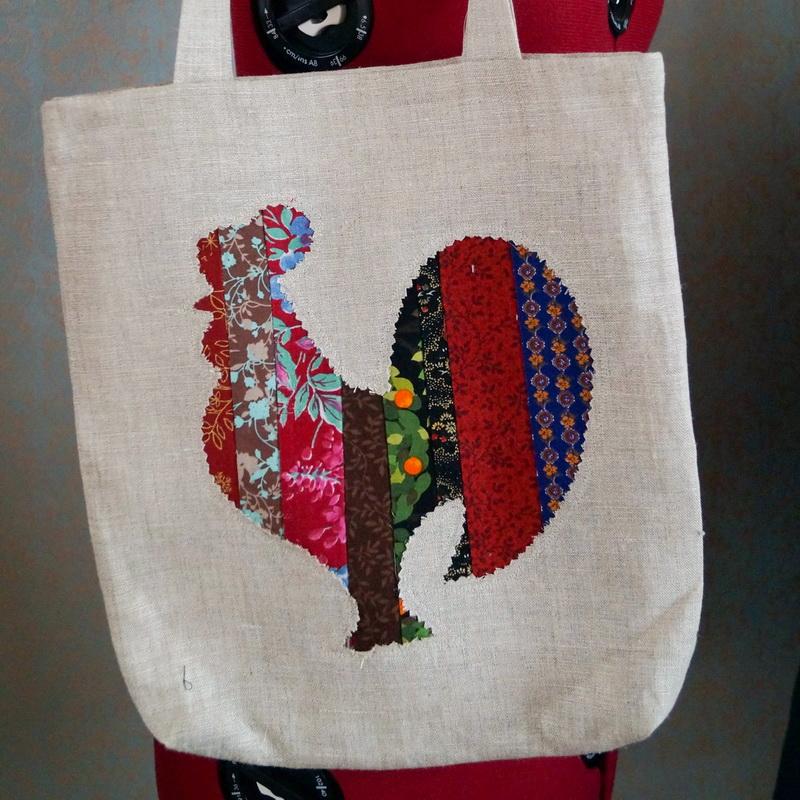 Sewing tutorial: an eco-friendly bag with a Rooster This is another one of the tutorials presented at the Mlyn exhibition in Minsk. In this tutorial, I’ll show you how to sew an eco-friendly bag with a reverse appliqué (Rooster). And not just a simple appliqué, but a quilted one, too. Sewing a Rooster eco bag. Materials: Unbleached linen fabric For the bag: 2 pieces, 30 x 35 cm each For the handles: 2 pieces, 7 x 60 cm each (or 1 piece, 7 x120 cm) For the lining: 2 pieces of calico, 32 x 30 cm plus 1 piece, 18 x 18 cm – for the pocket Colored strips of fabric 24 cm long for the appliqué (the width may vary: 2.5 or 3 or 3.5 cm) Sewing threads, erasable pen, zigzag scissors. Sewing a Rooster eco-friendly bag. The working process: For the decoration, we’ll be using a raw edge reverse appliqué. You can use any outline drawing of a rooster size 20 x 20 cm. Print it and cut out the pattern. Stitch the strips of fabric together to make a quilt: one after the other, alternating between different colors, until you get a piece 24 x 24 cm in size. Place the front part of your bag on top of the quilt and secure it with pins. Trace the design onto the fabric with an erasable pen. Make sure that the design isn’t bigger than the quilted area. Sew along the outline with a decorative stitch. Using your zigzag scissors, make a hole in the outlined area and cut it close to the outline. Use the resulting piece to create your eco-bag. Original text by Olga Milovanova
 -
Each of us wants to have our own sewing-embroidery corner. That he was comfortable, functional and beautiful. Let's show here our handmade corners, dream about which handmade corners and even workshops we would like to have and learn from each other useful experience.
-
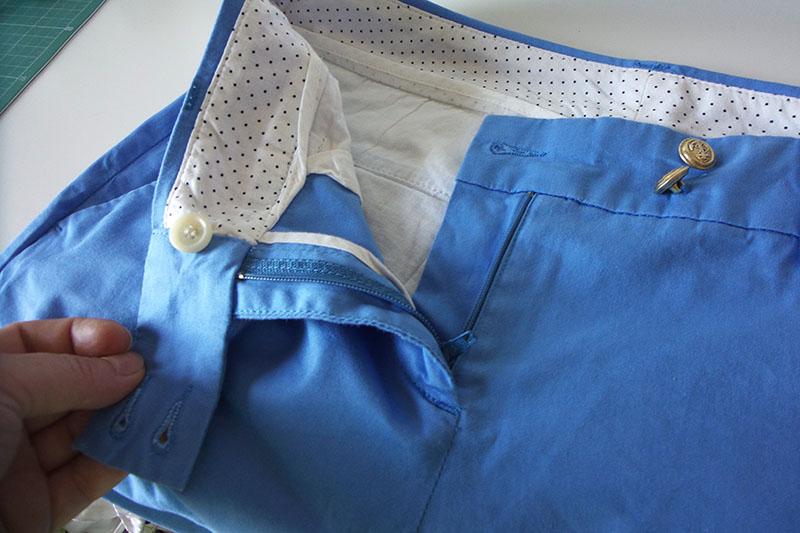 Clothes repair: How to move a zipper to another side While sewing a pair of shorts or pants, a beginner tailor might easily, in the heat of work, make a mistake of attaching a zipper on the ‘men’s’ side instead of ‘women’s’ and vice versa. These shorts with a zipper on the ‘women’s’ came to me as the result of a young man’s hasty shopping. An unusual order resulted in a tutorial, which I’m now sharing with you. How to move a zipper to another side. Materials Shorts A sewing machine A zipper foot A spare zipper (if necessary) Threads and needles, scissors, a seam ripper How to move a zipper to another side. The work order This is how the shorts looked before I started working on them. I want to call your attention to the waistband; we’ll be making changes to it as well. A ready garment is not that different from a semi-finished one when it comes to preparation. You’ll need to get rid of unnecessary stitches and deconstruct the unit. Pick up a seam ripper and carefully deconstruct the whole thing. Don’t touch the cording or edge finishing made with a serger. Let’s proceed to the zipper. On the fly front guard there already is a line that will serve you as a guide for sewing a zipper. Baste the zipper to the wrong side. Install a zipper foot on your machine and stitch the zipper tape. Baste or pin the front fly extension to the other side of the tape and stitch. In order to prevent the pieces from getting nipped in the course of sewing, you may fold them in half and pin. On the right side of the garment, mark where the topstitch will run. Align the edge of the zipper unit with the edge of your garment. Stitch the parts together. Fold the zipper unit to the wrong side and topstitch along the edge from the lower to the upper edge. Edge stitch foot is your little helper here. Set the values according to your own taste. You can easily determine the stitch length by simply measuring it with a ruler on a ready item. Different embroidery machine models have different stitch settings; there is a lot written about them in the manual. It often has tables that help to quickly choose the right stitch and the values. Topstitch the fly guard along the drafted line. After that, join the free edge of the zipper tape and the garment. This is how my shorts looked like after I relocated the zipper. Stitch the lower part of the front seam under the topstitching line to the center point where the seams meet, one or two times. Join the parts with their wrong sides together, and topstitch on the right side (optional). All that’s left is to sew a waistband. In order to do it evenly, join the waistband and the garment, beginning at the center back. Evenly distribute the waistband, paying attention to where the side seams meet. If there are the belt loops, use them as guides. Stitch the waistband to the garment, then fold the waistband lining to the wrong side and topstitch along the lower edge or do the shadow seam. This will help to lower the burden on the first seam, and also to join the inner side of the waistband to the outer one. Sew the buttons back on. Compare the two photos. On the left are the shorts how they came to me, on the right — the shorts after I repaired them. This tutorial uses an unusual way of sewing a zipper. In the clothing repair shop where I saw it first, it was called ‘the quick one’ and was intended for speedy clothes repair.
 -
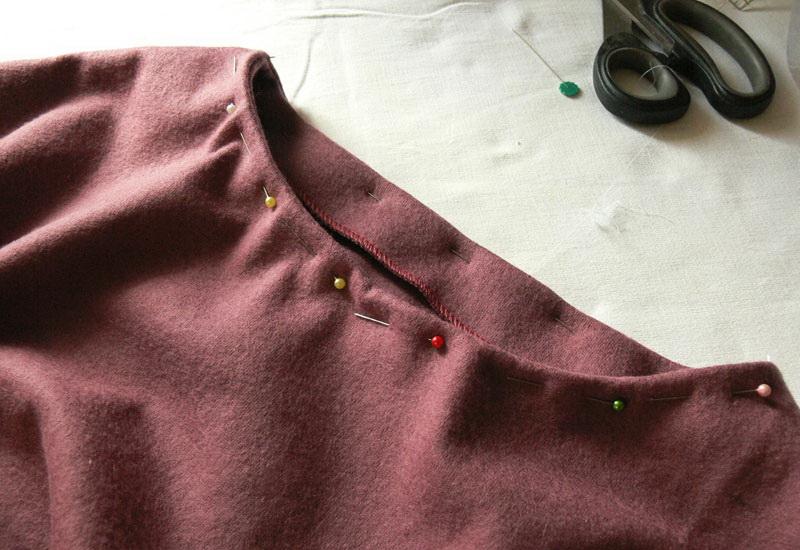 Wardrobe revamping: a dress with ‘bat’ sleeves A serger machine should not remain idle. Let’s use it to freshen up your old clothes and sew a knitted dress with ‘bat’ sleeves. In this tutorial, I’ll be employing simple dress sewing techniques: doing a blind hem on the serger and also attaching neckline facing. You’ll enjoy the work and the new dress will uplift your mood. To do this job, you’ll need: Fabric Sewing threads Serger and invisible stitch foot Adhesive sewing interfacing material for knits T-shirt or blouse pattern with 'bat' sleeves In order to buy the right amount of fabric, you need to know the length of your dress. Place the measuring tape at your shoulder and go all the way down (make sure that it is straight). Measure the desired length. The length of the piece of fabric will equal two lengths of the dress plus 20 cm. Wash or soak the fabric in hot water for approximately an hour. You need to do this in order for the fabric to shrink before you cut it. Skipping this step, you risk getting a smaller dress after the first washing. A dress with ‘bat’ sleeves. Cutting Fold the fabric in half, with its right side inside. Fold the T-shirt in half and align its fold line with the fold line of the fabric. Trace the outline with a piece of chalk. If you don’t have a blouse with ‘bat’ sleeves in your wardrobe, use a close-fitting T-shirt to find the key points, or a sewing pattern, changing the values to suit you. Having traced the outline and taking all basic measurements — chest, waist, and hips circumference — cut the back part with a 0.7 cm seam allowance. Place the cutout on top of the second piece of fabric, folded in half, and cut out the front part, making the front neckline approximately 3 cm deeper. Out of the remaining fabric, cut out a strip for the loops that will keep the belt in place. Sew, turn it right side out and press. Place the front and the back parts together, their right sides together. Position the belt loops at a waistline, over the side seams. Pin the side and shoulder edges, stitch the parts together on your serger with a 4-thread stitch. Attach the belt loops to the side seams. A dress with ‘bat’ sleeves. Facing Transfer the back and front neckline to the tracing paper, move down 3–4 cm down and cut out your future facing pattern. Glue the sewing interfacing material for knits to the piece of fabric. Cut out your front and back facing, together with seam allowance. Stitch the short sides together. Baste and finish the edge with a 3-thread stitch on your serger. Place the facing and the neckhole to each other, right sides together, and pin. Stitch with your serger, pin, and press lightly. Sew the facing to the neckline with invisible stitches. A dress with ‘bat’ sleeves. Hemming Mark the hemline on the right side of the fabric. Do the blind hem on your overlocker. You’ll know how to do that from our Blind hem with your serger tutorial (Link will be here in the future). Cut out the belt 11 cm wide (length should be equal to your waist circumference plus 3 cm). Attach the hooks, folding seam allowance inside. Your dress is now ready! Get your hair done, add some bijou and show off your new garment! Original text by Irina Lisitsa P.S. Sewing pattern
 -
Ways of creating a backpack sewing pattern
Irina posted an article in Machine embroidery materials and technology
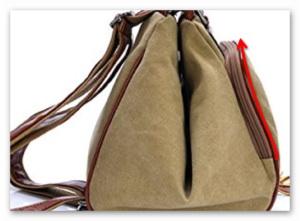
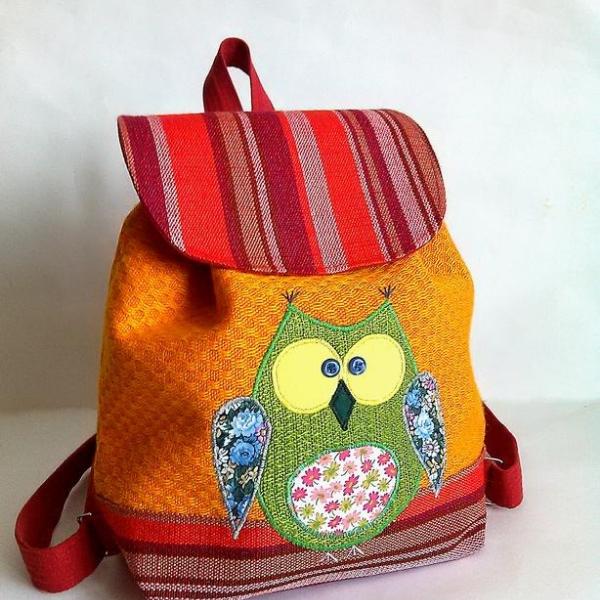 Ways of creating a backpack sewing pattern Backpacks remain in trend for a long time. Handmade backpacks, being unique, are valued most highly. A sewing pattern, suitable fabric, and decorations are all you need to create a stylish backpack at home. A creative approach and the enthusiasm of the seamstress also contribute to the success of the matter. Preparations In order to create a backpack by hand, you’ll need: A needle Threads A thimble Scissors Fabric A piece of dry soap for drawing. Best fabrics for a backpack: Denim (without elastane); Cotton — it breathes, maintains shape and is agreeable to the touch, an important point as you will wear it on your back; Dense synthetic fabrics — they come in handsome patterns, bright and printed. Bags made of such fabric do not need additional decoration. Make sure that the fabric doesn’t stretch too much under the strain and doesn’t crumble on bends. One disadvantage of synthetic fabrics is their ability to absorb smells. A synthetic backpack also feels unpleasant on the back in summer. Synthetic fabrics don’t breathe; they also hold water. You may use this to your advantage, making your bag double-layer to protect things in it from rain. For the lining, the following fabrics are most common: Satin — dense, reliable, and wear-resistant. Rayon — even more reliable than the satin. Cupro — similar to natural silk, soft, and stretchy. Polyester — durable and undemanding fabric, mud-resistant. Sateen — made of cotton and silk threads. Netting — has holes, breathes. Taffeta — a coarse fabric that maintains shape. Now, all that’s left is to decide how to sew a backpack without expensive garment accessories. You may create your own or take accessories off an old bag, coat, and other such things. You may use these for decoration: Belts, buckles, and other fasteners ripped off the old clothes. Leather or fabric fringe. A bunch of twisted colorful yarns (they will serve as strings). Curious-looking buttons, beads, and rhinestones. Ropes of various diameters and colors. Felt appliqué. Quilt, ribbon embroidery. Decorative zippers. Choosing decorations, you must keep in mind that they will be subjected to intense wear and tear and soil, too. So unpleasant when a ruined appliqué or a lost bead makes the whole garment unusable. Detachable garment accessories make washing much easier and allow you to revamp your old item in a simple way — by changing the color of a cord, for instance. You can create a hand-made backpack in two different ways: using your embroidery machine or your own hands. The first way is quicker and easier. Tools and materials: Dense sewing fabric title="Capro and polyester fabrics" The lining: cupro and polyester The lining: satin and rayon The lining: taffeta, netting, tulle netting Garment accessories How to use a sewing pattern If a newbie seamstress doesn't know how to sew a backpack with her own hands, a step-by-step guide and a sewing pattern is a must. They will help to bring her project to life. There are ready-made easy-to-transfer full-scale sewing patterns with measurements. To draft your own pattern, you’ll require the following: A sheet of paper (you may use tracing paper or a newspaper instead) A pencil A measuring tape A ruler A triangle ruler A French curve for rounding corners can be made by hand. Draw a circle on a piece of cardboard with an 18–20 cm radius and cut out one-third of it. With such a contrivance, you will be able to make symmetrically rounded corners. To draft a simple backpack sewing pattern, you’ll only need two measurements: shoulder width; center-back length from the natural neckline to the waist. On paper, draw a rectangle, its width less than your shoulder width. An important point: the backpack should not go below waist level, it would be inconvenient to wear. After that, draw a vertical line through the center of the rectangle — the center axis. Now fold the paper along the axis and draw the preferred outline of your backpack. Cut along the outline to get a symmetrical pattern piece. If you plan to attach things like pockets or cover or a movable bottom, it would be easy to mark them on the basic pattern, adjusting the sizes. In order to decipher the pattern, you need to learn the key notations: The line with the arrow — lengthen. The line with small triangles — the joining line is here. Identical numbers in the inner area — these pieces match together. The crosses work as alignment marks. The arrow between the lines is a place for a ruffle. A crisscross is the place for a button. If you've decided to use a ready complex pattern, you’ll need to enlarge it. On the pattern, measurements are given in cm. In this case, it’d better to use a dense fabric instead of paper. The cutouts are placed on top of the fabric and traced with a piece of soap, sharpened on one end. Before cutting out parts of the pattern, make sure that seam allowance is included. More often, it isn't, and therefore, you’ll need to add 1–1.5 cm on all sides. Sometimes the enclosed seam is used — first, the fabric is folded the wrong side out and stitched, then turned right side out and stitched again. Seams executed in this fashion look neat and add support to the backpack. They require a larger seam allowance. Making a sewing pattern according to the model Sewing your own backpack allows you to choose any model you like. What you need to understand that copying the manufactured models may be futile, due to the lack of the frame and finishing (plastic edges, metallic corners, coarse bottom, etc.). Even if your pattern is accurate, the backpack might turn out quite different. The advantage of homemade backpacks is the individual approach that makes them stand out. It improves the overall imagery, visible in decor and unusual joining seams. Backpack for kids Kids like backpacks shaped like animals. Bunny ears or button eyes are easy to attach, and will make a child happy. On a basic pattern, the upper part must be narrowed. The backpack should resemble a triangle with its apex facing upward. The bottom is made according to the pattern. You can make it two-part, joining the pieces accordion-style and strengthening the edges with a cord. The upper part will be gathered with a cord; to prevent the things from falling out, a flap cover may be added. Pom poms look marvelous on kids’ backpacks. If the kid will wear it to school, you may add the compartments with fasteners for books and exercise-books. Use thin fabric that doesn't soil easily. A detachable lining will be easier to wash. Sewing a pineapple-shaped backpack Cut four rectangular pieces, two out of your main fabric, two out of the lining fabric. Cut and stitch the future rings for the cord. Stitch the rings to the main part of the backpack. Cut and edge finish two rectangles. Join the main part to the rectangular pieces and stitch the base. Align the openings, pin, and stitch. Prepare the four rectangular pieces, draw the lines and stitch. Cut out the pineapple crown. Join the lining to the main part. Join the lining to the main part. Insert the cord (a ready one or made by you). Draw the cord through the rings and fix them with a clamp. Drawstring bag The most convenient shape for a hand-made backpack is a drawstring bag. It is a godsend for creative people. A simple structure leaves room for creating images, from dreamy and romantic to ascetic ones. A drawstring bag is a sack with strings on top and shoulder-straps. A well-known, traditional shape. A sewing pattern for such a bag is rectangular. The bottom edges may be rounded or left as is. The size depends on the maker’s wish. The upper part is not narrowed down, as it is gathered with the strings. The fabric should be soft, that ruffles beautifully — in that case, the upper part, folded like a hand fan, will be a decoration in itself. Romantic drawstring bags are ideal for slim young girls. You may decorate them with pleated straps, and to attach a fringe with beads to the edges. For a mature woman, a backpack bag may be made into a carry-all. The color of the bag should harmonize with the dress, and a brightly colored neck handkerchief may be wrapped around her neck and shoulders. A khaki drawstring bag is fine for men who prefer casual style. A drawstring bag made of thick water-repellent fabric will be indispensable while hunting, fishing, or just hiking. Thick ropes may be used instead of straps. You don't even need to sew them. Colorful ropes for women and restrained sole-colors for men. You may adjust the strap length simply by tying up the two ends where the knot will not rub sore. Straps like that make the backpack look stylish. A shoe bag made of an old pair of jeans: The necessary materials Shape and sew the bottom. Shape and sew a pass-through for the string. Sew the ring for the ribbon. Stitch the ribbon at the bottom. They will serve as straps. Backpack made from an old pair of jeans: Many people ask how to make a backpack without a sewing pattern. If you don’t have a ready sewing pattern, you can draft it yourself or find a tutorial that shows approximately what you want and take the pattern from there. The easiest way is to make your backpack bottomless. In such cases, a front part of the backpack is enlarged to serve as the bottom as well as the front. The following measurements are approximate, you’ll need to make some changes to them in order to suit the pattern to your tastes and needs. The back part, slightly narrowed down — 26 cm wide. You may add about 3 cm on each side in the middle. The front part is cut as a semicircle with a 38 cm radius. The flap cover is rounded. It should be one part with the back. It should drape freely and elegantly onto the gathered top. The straps are made of denim. If you don't have a sufficient amount of material, you may substitute denim for a decorative cord. If wished, a hanger is attached, so that the backpack is easy to pick up. The center of the semicircle and the lower edge of the back part are aligned along the vertical centerline of the pattern. The edges of the semicircle are stitched to the back part. The upper part of the backpack is gathered with strings and covered with a flap. The straps are stitched to the upper and the lower edges of the back part. For this model, you’ll need a very wide piece of fabric. If you don’t have a sufficiently wide piece, you may sew it from pieces, because this type of backpack may be quilted. A backpack from an old pair of jeans Draw the parts of the future backpack. Cut out the pattern. Sew the bottom, the parts, and the flap. Attach the denim straps. Sew the handles, if necessary. The fabric should not be threadbare. Patchwork backpack Being skillful at patchwork allows you to create beautiful garments out of scraps. You can join the fabric pieces haphazardly or create a particular pattern. It is not rational to cut the existing length of fabric to pieces, better to use the trimmings and leftovers already accumulated. For this reason, don’t try to make a facsimile of a backpack you’ve seen somewhere. Instead, find the backpack you like, alter it to suit your needs. A patchwork backpack without a bottom may be decorated according to your tastes. For example, a flap can be rendered as a divergent beam of light or a cluster of petals. The straps might be made of horizontal strips or pleated. The front part may be sole-colored or contain vertical insets that look beautiful between the pleats. Before sewing a new backpack, you should make a sewing pattern. Just draw the shape of the future item on paper, then cut and trace the pattern to the fabric. Don’t be afraid to spoil the materials in case something goes wrong. Failure helps you to master the necessary skill. Stitching the scraps of fabric into one piece. Cut the fabric according to the simple pattern. Out of the patchwork piece, prepare the flap with the clamp. Make the slash pockets with zippers on the front part. Slash pockets from inside: The front and the back parts remain sole-colored. Sew the hanger, the flap, and the straps. The back part and the lower part: Join the front part to the back. Draft the pattern of the bottom. Sew the bottom as pictured on the pattern. Sew the bottom to the front. Prepare the lining. Sew parts of the lining. Sew the base and attach the upper flap. Stitch the edging. A ready model should be supplemented with a cord. Make the openings for the grommets and draw the cord through them. A ready patchwork bag: Original text by sumki.guru title="Owl backpack"
 -
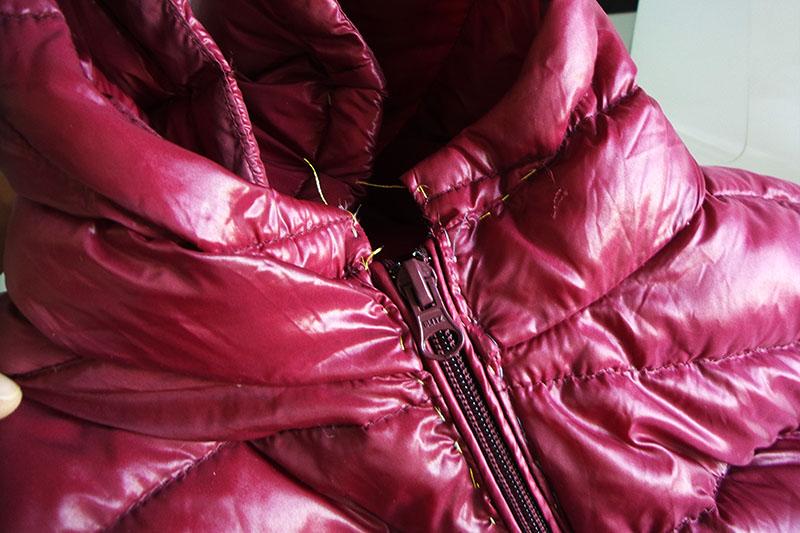 Clothes repair: Changing a zipper in a jacket If a zipper in your favorite jacket stopped working, don’t despair! Don’t be haste to chuck it. With a sewing machine at home, you’ll be able to repair it for a very small price. In this tutorial, I’ll show you how to change a zipper with a cord in a kids' jacket. The method used here is identical to the one in this article (link coming soon!). Changing a zipper in a jacket. Preparations To prepare for the job, you need to rip the seams open to remove the broken zipper, to buy a new one, preferably of the same length. Clear away the thread remnants. Close to the teeth of the new zipper, baste the cord. Changing a zipper in a jacket. Sewing To sew a zipper, you’ll need two pressure feet: a standard zipper foot and a cording foot. Prepare your machine for cording. Choose a straight stitch, with the needle in the center position, and set the stitch length at 3 mm. Place the zipper with the cording under the foot and stitch carefully. After that, baste the zipper to the jacket, and fold the cording to the wrong side. Likewise, fold the upper edge of the jacket to the wrong side and baste. Make sure that the two halves of the cording are equal in length. Now install the zipper foot, and position the needle at the right or at the left. The side depends on which side of the zipper you’re going to attach first. Sew the zipper to the jacket. The work is done, and the jacket gets the second life. Original text by Irina Lisitsa
 -
 A guide to sewing a freestyle backpack purse. Beginning Step 1. Let’s sew the straps. We have 4 of those. If you use fabric, fold the pattern No13 right side inside, stitch the sides together, turn right side out and finish the edges with a topstitch. If you use leather or artificial leather, trim allowance on the sides of the pattern No13. Glue the edges on the wrong side and fold them toward the center. Finish the edges with a topstitch. Put the resulting leather/fabric/webbing piece through the metallic frame, thus getting a part of the future strap. Step 2. Sew the straps to the pattern No5, in accordance with the plotted lines painted on it. Step 3. Place the pattern No6 (the lower edge) on top of the pattern No5 (the edge with the straps), and stitch with seam allowance, right sides facing each other. Turn the piece right side out and add do a topstitch along the seam (the seam allowance should be facing the bottom, the straps should be facing the back). Step 4. Now take resulting piece of Step 3, and match up the narrow part of the pattern No5 with the lower edge of the pattern No4, right sides facing each other. Stitch with seam allowance, fold back to the right side and finish with a topstitch along the seam on the side of the pattern No5 (the seam allowance should be facing toward the bottom). Step 5. To the resulting piece of Step 4, attach the edging, in accordance with the plotted lines on the pattern No6. Step 6. Preparing a zipper. Put the parts of the pattern No11 together, their right sides facing each other, so that the short end of the assembly covers a 40 cm long zipper. Stitch with 1 cm seam allowance and then topstitch along the seam. Step 7. Stitch the resulting pieces of Step 5 and Step 6 together, in accordance with the plotted lines. One flange of the zipper is now secured. Step 8. Place two parts of the pattern No7 (canvas) on top of each other, right sides facing each other, and sew along the lower edge with seam allowance. Flip both parts back. Place the resulting piece of Step 7 on the canvas, right sides facing each other, in accordance with the plotted lines. Sew with seam allowance to the edge of the pattern No4 (the assembly with the zipper). ***The beginning and the end of the line of stitching should not overlap the second canvas piece. Step 9. Turn the Pattern No8 right side out. Transfer the center point over onto the zipper tape. Cover it with the second piece of canvas, right sides facing each other, align the centers and the triangular bracings. Baste and stitch with 0.5 seam allowance. Step 10. Patch plate on the front. If you decided to make your patch plate rectangular, fold the edges to the center and do a topstitch along the folding lines. Sew the last pair of straps to the pattern No12. You may shorten these straps as much as possible. Step 11. Sew the resulting piece of Step 10 to the pattern No3. Step 12. Sew the resulting piece of Step 11 to the pattern No9, matching up the centers. Step 13. Now we’re going to sew the short handles. If you're using fabric, fold the parts of the pattern No10, right sides facing each other, and stitch with seam allowance. Turn the whole thing right side out, press it with an iron and do a topstitch along the folding lines. If you're using leather or artificial leather, glue the long sides to a depth of 2 cm. Hem in the seam allowance, then gently tap the folds with a small hammer. Fold the result in half and sew the folded hems together. Add another line of stitching at the same distance, parallel to the first. Round handle: an alternative. To make a round handle, you’ll need a cord, preferably the one that has a core. The circumference of the handle will depend on the diameter of the cord. The point here is to match the diameter of the cord to the inner part of the future handle. The cord should be equal to the pattern No10 in length, minus 2 cm of seam allowance. How to calculate the width of the pattern No10 (the round handle): Measure the diameter of the cord, if unknown. Add 3–5 mm so that is moves freely, and 2 cm allowance on top of that. That will give you get the necessary width. Fold the seam allowance to the wrong side. Glue (if you're using leather) or baste (if you’re using fabric). Match up the folded hems and sew. Using whatever you have at hand, pass the cord through the pattern. This is how I do it. First, I pick up a thick thread and a needle. Having cut 30 cm of the thread, I secure it at the end of the cord, winding it around several times with a needle. I also have a sturdy strand of wire. Folding it in half; I attach the free end of the thread to the bend. Then I pass the wire through my future short handle and draw the end of the cord on the other side. It will take some effort, because there is not too much room inside. It will be an easy journey from here. We now have the straps. Step 14. Sew the result of Step 13 (the short handles) to the short edges of the result of Step 12, right sides facing each other, at a distance of 1.5 cm from the corner. Step 15. Now let’s add our zipper. Fold the pattern No2 in half and put it on top of your main zipper, close to the teeth, but not too close. Sew along the folding line at a distance of 3–5 mm from the edge. If the zipper tape is wide, you may add another line of stitching, parallel to the first. Repeat with the second flange. Be sure to do the reversing to secure the end of the zipper so that it doesn’t pop open. Step 16. Sew the resulting piece of Step 15 to the even edge of the pattern No1 (made of outer fabric), right sides together. Repeat with the second part of pattern No1. Step 17. If you’re making a bag out of fabric, baste the resulting piece of the Step 14 to the resulting piece of the pattern 16, right sides together, at a distance of 1.5 cm from the upper edge of the pattern No1. Later this assembly will be stitched to the upper edge of the body of the bag. In order to make a beautiful even seam, use the markings on the pattern No1 that correspond to the markings on the bottom part of the resulting piece of Step 14. Do not sew the upper edges of the lining to the upper end of the body! Stitch the basted edges with seam allowance. Thus we get the future upper part of the backpack. Step 18. Put the two parts of the pattern No8 together, right sides facing each other, and stitch along the upper and lower edges. Turn right side out through the open sides. If you decided to make two pockets, repeat this last step with the second part of the pattern No8. Iron out the pocket edges. Step 19. Sew the resulting piece of Step 18 to the pattern No6, in accordance with the plotted lines. Sew or baste the sides, fixing them in place. Stitch along bottom folding line, thus attaching the lower part of the pocket. Or, you may stitch the pocket in one go: first the right side, then the bottom, and then the left. Step 20. Now, the lining for the body of your bag. Align the resulting piece of Step 19 and the pattern No9, and sew with seam allowance along the shorter edge, right sides facing each other. Press the seam allowance open. Step 21. Sew the result of the Step 20 with the pattern N1 (the lining), at a distance of 1.5 cm from the upper corner of that pattern. Leave an opening for turning your backpack right side out. Step 22. Unzip. Align the upper edges of the result of Step 21 (right side) to the upper edges of the resulting piece of Step 17 (wrong side). Sew with seam allowance. Step 23. Tuck the outer part of the bag into the lining. Do not turn the whole thing right side out yet. Align the open side edges of the lining and the zipper. Make sure that the edges of the inside and outside parts of the bag align. Sew with seam allowance. Step 24. Turn the backpack right side out through the opening in the lining. Tuck the lining into the backpack and check all of the seams for defects. All good? Then stitch the opening in the lining with a blind stitch. Step 25. Now let’s prepare the lower parts of the straps. Use the technique from step 13. We sewed the short handles there. Step 26. Slide on the strap adjusters. Detachable straps. Stitch the strap ends. Non-detachable straps. Pass the strap ends through the openings in the front part of the backpack and sew. Pass the other ends through the openings on the back (the ones on the straps) and then once more through the strap length adjusters, so as to form a second lover loop. Sewing the edge of the shoulder straps. P.S. If you find any part of the tutorial difficult, feel free to write a comment, and we’ll try to help. Please share the photos of your backpacks with us; we’ll be happy to add them to our Gallery! We’ll be happy to see your creations!
 -
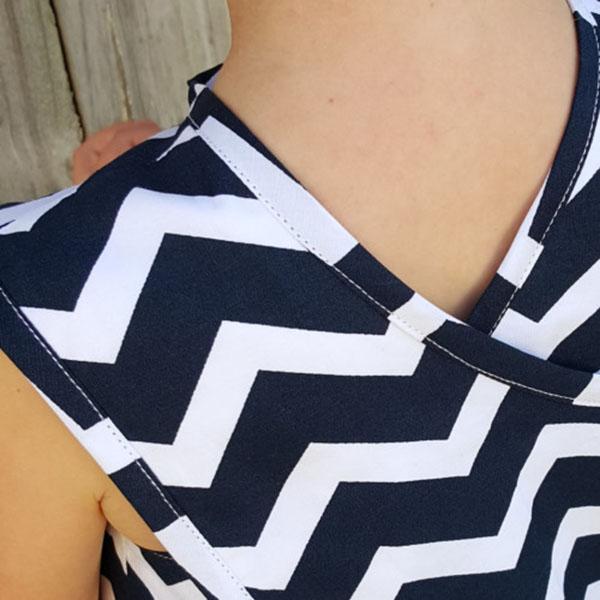 Make your own bias binding When sewing a garment, every little detail counts. However, it often happens that the most important one is missing. What if you need a bias binding, and the nearby craft shop has all the wrong colors? In that case, you can create your own bias binding. Read this article to learn how to make the binding of the right size, what tools to use and how to sew bias binding on the garment. Bias binding. Tools There are all kinds of tools for making bias binding that come in a variety of shapes; you can buy it in a specialty store. The number on a tool shows the width of bias binding with the folded edges. The double binding is two times narrower after being sewn on the edge of the garment. Bias binding. Tool size 6 mm—for the “textile mosaic” technique, which is used for decoration of dresses, shirts and so on. 12 mm—narrow bias binding, the width on a garment only 0.6 cm. It is cut from lightweight fabrics. Neck holes and armholes of the dresses/tunics, seams of the “high-class” garments, buttonholes on trousers and skirts. 18 mm—a good edge finishing for the garments or homemade textiles. It is, perhaps, the most common size, for you see it in the stores most often. This kind of binding is 0.9 cm wide when sewn. 25 mm—mostly for home textiles, table linen, kid’s clothes, such as bibs, pinafores, etc. 50 mm—almost a cording. It is used in the same way as 25 mm binding. The template should be exactly two times wider than the ready binding. For example, If you want 12 mm binding, you should cut a 12*2 = 24 mm tape. Align your fabric with the weft thread and the crosswise grain of the fabric (the one that runs along the selvage). Trim the selvage. Use a triangle ruler or a quilting ruler or fold the fabric at a 45° angle. Bias binding. Sewing the strips into one continuous tape Set the quilting foot with a blade on your machine, and select the straight stitch with the needle in a center position. Place the ends of the strips one over another with a 7 mm overlap, right sides together. The overlap is there for the stitching line that will join the strips. Stitch back and forth a few times at the beginning and the end. After sewing, press the seams open and flat. Trim the “dog ears”. Bias binding. Shaping Cut your binding on the bias; it will be easier to insert it into the bias binding maker this way. Feed the strip into the wide end of the maker and pull it out of the narrow one. You may poke it with a needle if the fabric is of a heavier kind. The strip of fabric will come out with folded edges. All you’ll need is to press them with an iron. Bias binding. Sewing The methods of attaching bias binding to the garment are aplenty. There are feet designed specifically for the purpose, which can be used in a variety of ways. We described one of them in our previous articles: Original text by Irina Lisitsa
 -
Sewing accessories: a Ruffler foot
Irina posted an article in Machine embroidery materials and technology
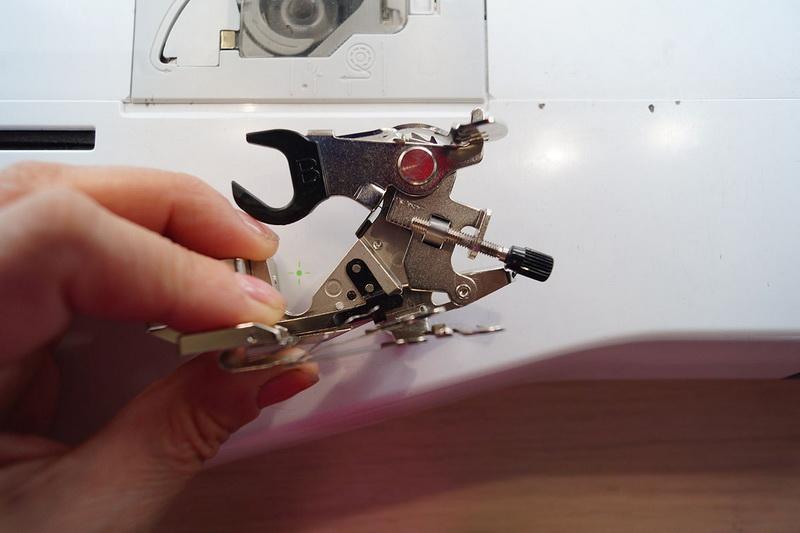 Sewing accessories: a Ruffler foot Pleats are cute! Ruffles, pleats, and frills are fashionable again. You can use the main fabric or decorative ribbons, and attach the ruffles to the garment or at the edge. The variety of textures in one garment is very popular this season. This article contains three short tutorials. You may choose the one you like for the embellishment of your apparel. Revamp a dress you grew tired of, replace old and dull sleeves with the puffed ones with the cute ruffled ribbon decoration. Revamping an old dress: Materials A dress A sewing machine Sewing threads The Ruffler foot 65 cm of chiffon fabric of the matching color Ribbons of varying width and texture, of the matching colors Revamping an old dress: Ruffler foot Attach the Ruffler foot and ruffle your ribbons. They will look as if made by a professional. Feeding the fabric to be ruffled into the foot with a steady hand at an even pace, you’ll finish the job quickly. Adjust the depth screw. You may choose any value between 1 and 8. The higher the number, the deeper the pleat (more fabric is tucked into the foot). If you set it to 1 or 2, the attachment will create very narrow pleats. Set it to 8, and the pleats will be as deep as possible. Using the manual, replace your ordinary presser foot with a Ruffler foot. Adjust the ruffle regulator. The lever can be put in one of the four possible positions: 1, 6, 12 and *. If set to 1, the ruffle will be made with every stitch. If set to 6, the ruffle will appear every 6 stitches, and if set to 12, every twelfth stitch. In case you need a straight stitch, set the lever to *. The stitch length also affects the distance between the ruffles. The lower it is, the closer together they will be. Set your needle in the center position. Push a ribbon through the foot. Put one end of the ribbon in a piece of paper and push it between the ruffling blade and the fabric feed plate. After that, the paper can be removed. Position the ribbon in such a way that the needle is exactly in the middle between its two edges. Sew at a low speed. Don’t forget to check: the row of stitches should run in the middle. Adjust the ruffle depth and the distance between the ruffles in accordance with the ribbon width. The narrower the ribbon, the lesser the pleat depth. Revamping an old dress: Decorating the sleeves Prepare your sleeves for the decoration. Rip them out, unravel the seams and iron out the pieces. Now, you need to cut the identical pieces out of the chiffon. Fold the chiffon in half, with its right side inside. Place the “real” sleeve on top and cut along the outline. To the newly-cut chiffon parts, fuse the interfacing material. It will strengthen the fabric and prevent it from shifting. Lay out the prepared ribbons on top. Alternate wide and narrow ones. Pin them and sew the straight stitch along the gathering line. You may cover the seam with a cord or a narrow satin ribbon. Attach the cord with a zigzag stitch. Once the ribbons are attached, remove the interfacing material from the wrong side. Fold the hems, sew the sleeves and attach them to the arm-holes. Wear happily! In the second part of our article, we are going to sew a summer jacket with basque and decorate it with a ruffled satin ribbon. Summer jacket with basque. Materials Fabric for the jacket (110 cm long and 140 cm wide) Jacket sewing pattern (to the waistline) A 20x90 cm piece of colored satin for the decoration A Ruffler foot A sewing machine Sewing threads Summer jacket with basque. Preparing the decoration Adjust the depth screw. Set the depth screw to 8. Using the manual, replace your ordinary presser foot with a Ruffler foot. Set your needle in the center position. Set the ruffle regulator to 6, so that every 6 stitches you get a ruffle. Cut the colored satin fabric into strips 6 cm wide and approximately 180–200 cm long. Fold the ribbon in half (lengthwise) and iron out all the way. Put one end of the ribbon in a piece of paper and push it between the ruffling blade and the fabric feed plate. After that, the paper can be removed. Place the needle above the ribbon 1 cm from its edge. Sew at a low speed. Check the position of the seam: it should run 1 cm from the edge. Press down the ruffles with an iron. Summer jacket with basque. Sewing Cut out the parts and sew the sides, shoulders, and darts. Pin the already ruffled satin ribbon to the right front part along the centerline, around the neckline and 15 cm under the neckline on the left front edge. Stitch close to the edge. Sew the facing and the neckline facing together. On top of the decoration, pin the facing and the neckline facing to the right front part of your jacket on the right side, and stitch 1 cm from the edge. Turn the facing the wrong side out and iron out. Using the edge stitch presser foot, finish the edge (stitch on the right side). For the basque, prepare a piece of fabric approximately 160 cm long and 11 cm wide. Turn up the lower edge and stitch. Along the upper edge, attach the ruffles, 1 cm from the edge. Press down the ruffles on the basque with an iron. Pin the basque to the lower part of the jacket and sew. Cover the seam with a satin ribbon 1.5 cm wide (in the ready state) and stitch on both sides. Prior to that, fold the hems and flatten them with an iron. Sew the sleeve, fold the hem and stitch. Attach the sleeve to the arm-hole. Attach the snap fasteners. “One-click” cascade ruffles All you need to sew a dress with cascade ruffles is a piece of fabric and a Ruffler foot. This tutorial will show you the possible variants of cascade ruffles, assembled at home. “One-click” cascade ruffles Version 1 For this job, you’ll need: A sewing machine Sewing threads A Ruffler foot A piece of lace 15 cm wide and 600 cm long, for a three-tier skirt with a 60–65 cm waistline “One-click” cascade ruffles. Creating the ruffles Prepare the lace for the skirt. Adjust the depth screw. Set the depth screw to 8. Set the ruffle regulator to 6, so that every 6 stitches you get a ruffle. Set your needle in the center position. You can narrow the distance between the pleats by reducing the stitch length. Do the test sewing. Push the lace through the foot. Position the needle above the lace 1 cm from the edge. Sew at a low speed. Check the position of the seam: it should run 1 cm from the edge. Ruffle the whole length of the lace piece. It will be used to create a three-tier skirt. “One-click” cascade ruffles. Sewing the dress Sew the bodice on the sides. Don’t touch the back seam. Starting from the center back, stitch the first tier of ruffles to the bodice along the waistline, right sides inside. Cut the excess lace. The seam at the back should remain open all the way. Stitch the second tier of the ruffles to the first one. Hide the end of the ruffled lace under the first tier of ruffles. Sew the straight stitch on the right side. Cut the excess lace. Stitch the third tier to the second one. Sew the dress at the back, from the neck hole to the lower edge. Finish the neck hole and attach the sleeves. “One-click” cascade ruffles Version 2 For this job, you’ll need: A sewing machine Sewing threads A Ruffler foot A piece of lining 13 cm wide and equal to the lace in length. A piece of lace 15 cm wide and 500 cm long, for a three-tier skirt with a 55 cm waistline. “One-click” cascade ruffles. Preparing lace Do steps 1 and 2 from Version 1. Cover the lining with the lace, align them together and push the whole into the foot. Place the needle above the ribbon 1 cm from the edge. Sew at a low speed. Check the position of the seam: it should run 1 cm from the edge. You will ruffle two fabrics simultaneously. Ruffle the whole length of the lace piece. It will be used to create a three-tier skirt. “One-click” cascade ruffles. Sewing the dress Sew the bodice on the sides. Don’t touch the back seam. Starting from the center back, stitch the first tier of ruffles to the bodice along the waistline, right sides inside. Cut the excess lace. The seam at the back should remain open all the way. Stitch the second tier of ruffles to the lining of the first tier, using a straight stitch. Cut the excess lace. Stitch the third tier to the lining of the second one. Sew skirt at the back in two stages. First, all lace tiers, with their right sides together. Then, all lining tiers with one seam. Finish the neck hole and attach the sleeves. Original text by Olga Milovanova Read also:
 -
This beautiful and useful biscornu
Irina posted an article in Machine embroidery materials and technology
This beautiful and useful biscornu Biscornu is a French word, meaning something like “quirky”. You can see these cute thingies in almost every home. Even those who only sew on a button or two from time to time, keep them within reach as something to stick superfluous pins and needles in. A skillfully crafted biscornu may serve as an admirable decoration. But that’s all prattle. My point is this: almost all DIY biscornu tutorials concentrate on pincushions for cross-stitch embroidery done by hand, and practically nobody ever mentions the possibility of doing all the sewing and embroidery on a machine. As I already said, the work “biscornu” is of a French origin. It literally means “something uneven”, “with horns or projections”, “irregular”, “funny”, absurd”. For the embroiderers, this word denotes a small polygonal cushion, more or less symmetrical. This skewed little thing may serve as a pincushion, a pendant, a keychain, a scissors fob, and even an ornament. If you add some suitable adornment, you can even hang it on a Christmas tree! Many people would be happy to receive one as a present. Let’s create a biscornu. In this article, I’ll tell you how I made my own. To make a biscornu, you’ll need: 1. A piece of evenly woven fabric (linen or dense cotton). 2. An embroidery machine. 3. Embroidery threads. 4. Optionally, buttons, beads or seed beads, sequins, and rhinestones. 5. Water-soluble or tearaway stabilizer. 6. A design (you may get one from our store https://embroideres.com/). 1. Let’s start by hooping stabilizer and fabric. Tighten the screw and additionally secure the fabric with pins, so that it doesn’t shift during the embroidery. 2. Load the design into the embroidery machine, attach the hoop and embroider both parts of your biscornu. 3. Attention! The essential part of biscornu decor is backstitch running along the edge of the design. It will be used for the joining of the two parts. 4. Both parts of our biscornu are ready. Cut them out with a 1 cm seam allowance. 5. Before you start assembling the thing, locate the centers of every side of your squares. Mark center points with pins. Join the center of one square with the corner of another. This will give the thing the required skewed shape. The assembling process is fun, but it’s also time-consuming, so switch on an audiobook or an episode of your favorite TV series. We’re going to sew the parts of our biscornu by hand. 6. Pick up the needle and the thread (same as you used for the backstitch), fold it in half so that there is a loop at one end. Move the needle through the first backstitch, then back and through the loop, thus securing the thread with an invisible stitch. 7. Pull the thread through 2 corner stitches. 8. Continue in this manner, joining the stitches of square No1 with the stitches of square No2, until your biscornu is stitched up on three sides. You only sew half of the fourth side, leaving an opening for the stuffing. 9. Snip the inner corners. 10. Stuff the things with bits of polyester batting or another padding material. 11. Sew the opening. 12. Your biscornu is almost ready. Let’s add some finishing touches. 13. Fold the thread in half, so there is a loop at one end, and thread the two ends through the needle. Find the center of every side of the square, and with a long needle pierce the biscornu through. Then bring the needle back and through the loop. 14. Pull the thread through the buttons, gathering your biscornu a bit. Having looked at my biscornu the following morning, I realized that I didn’t like the buttons. So I replaced them with beads. Good luck and easy stitching to you all! Creating biscornu is fun! Tutorial supplement. How to create a design for a biscornu Loading the design 1. Open Embird Editor and click on Cross Stitch. 2. Load the design via Chart Import. 3. In the window, click on the part of the design and use the Crop tool on it. You should get something like this. Press OK. While cropping the image and placement of the marks, use +/- to zoom in or out. 4. In the next window, place the red marks as shown in the picture below, and click on Align Grid. In the window that pops up, you’ll be offered to place a number of crosses between marks 1 and 2, and also between marks 2 and 3. Type in 10 (the number corresponds with the real number of crosses between the marks) and press OK. 5. See whether the red greed aligns with the chart greed. If yes, press OK. If the two grids don't align, click on Undo Alignment and change the placement of the three marks. A 100% alignment is not necessary. The loading image FAQ How to activate the Crop button? Open your image (step 3), and immediately after that place the cursor in the spot A. Holding down your left mouse button, move the cursor to the spot B. Release the button. Now the Crop tool is active. Why did you place the red marks in those places, and not in the corners? Why 10 crosses? You can place the red marks whenever you want them, and set any spacing you like (even if it is only 1 cross). Play around with the options and see what works best for you. Drawing the pattern 1. First of all, let’s choose the color. Click on the Eye Dropper tool on the toolbar. Left-click on the wine-red color. It will appear in your color chart. 2. Click on Line and create the objects 1, 2 and 3. 3. Now, click on Pencil, and create the objects 4, 5 and 6. Play with these tools a bit. Note the difference between them. Decide for yourself, in which cases you would prefer Line, and when Pencil would be better. 4. Click on the Eye dropper again, but this time choose grey. 5. Now click on Line and draw the objects 1,2 and 3. 6. Click on Pencil and draw the rest of the objects. We’re done with drawing. Let’s proceed to the last part, copying and pasting. Copying and placement Before copying and placing the symmetrical pattern, you’ll need to change the size of your work area. 1. Go to the Options menu and click on Preferences. 2. Check the Keep Aspect Ratio box and change the value to: 3. Your work area now looks like this: 4. Click on Marquee (vertical toolbar) and select your pattern. Press Auto Repeat. 5. In the opening window, set the following values: right pointing arrow (1), mirror horizontally (2), spacing -1 (3). Press OK. 6. Using the Marquee tool (step 4), select the pattern and click on Auto Repeat. 7. The window will pop up, where you set the following values: The arrow pointing down (1), mirror vertically (2), spacing -1 (3). Your pattern is ready. Save the file in the necessary format. For those who don’t want to bother with all that, here you can download the design. Original text by Irina Lisitsa, tutorial supplement by Lisa Prass- 1 comment
-
- 1
-
-
- biscornu
- embroidery
- (and 3 more)
-
Sewing essentials. Double stitched seam
Irina posted an article in Machine embroidery materials and technology
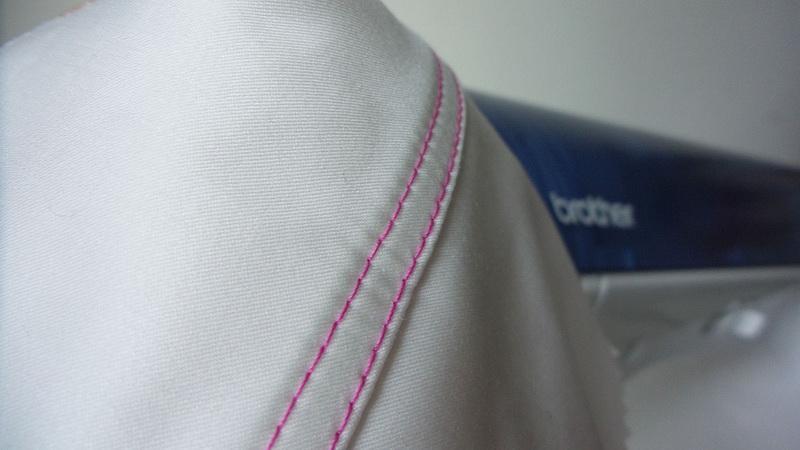 Sewing essentials: Double stitched seam Double stitched seam is one of the basic seams that are used for sewing shirts, swing blouses, jeans, sport trousers, bed linen, etc. If you only have a sewing machine and no overlocker, no need to worry about it. Thanks to the double stitched seam, both right and wrong sides of your garment will look perfect. Ready? Let's go! Before you start working on the actual garment, find some leftover pieces of fabric and do some tests. In this tutorial, I’ll be using a piece of middle-weight fabric, but keep in mind that double seam is also suitable for delicate fraying fabrics as cheesecloth and batiste. I strongly advise against using it on highly stretchable knits, unless you’re an owner of a coverstitch machine with adjustable differential feed. Creating double stitched seam Far left needle position Standard Brother sewing machine presser foot Pink upper thread and turquoise lower thread Blue-colored wavy line on the right side of the fabric Put the fabric pieces with their wrong sides together. Stitch at a distance of 0.5 cm from the edge. To get a nice straight row of stitches, use the scale on your standard presser foot. Keep the width steady by using a seam guide on your throat plate. In the photo, you can see the two details stitched together from the wrong side. Press the seam allowance with an iron. Put the details with their wrong sides together, circumventing the protruding seam allowance. Stitch at a distance of 0.7 cm from the edge. You can choose a different value if you want. Play with the stitch width, do several test pieces and decide which one works best in your case. For the purposes of this tutorial, I set the values as follows: ready double stitch width 0.7 cm, seam allowance 1 cm (0.3 cm will be “lost” in turndowns). As a result, the wrong side of your garment will look like the one in the photo below. The edge of the fabric is hidden inside the seam allowance. After that, not a single loose thread will escape. Press the seam allowance with an iron. Right (the photo above) and wrong sides (the photo below). > Now all that’s left is to add a finish. It’ll kill two birds with one stone: secure the seam allowance on the wrong side and serve as a decoration. You may add one or two lines of decorative stitches. If you chose the latter of the two options, place the fabric under the foot and stitch the first line of decorative stitches at a distance of 0.25 cm from the joining stitchline. For the sake of convenience, you may draw a line with an erasable pen on the foot itself (see the photo). Or, you may skip this and proceed to the second line of decorative stitches. It will be just as durable, but on the right side, there will be less decoration. The second line of decorative stitches should lie at a distance of 0.7 cm from the joining stitchline. Use the scale on your presser foot while doing that. All done! You now have two parallel lines of stitches on the right side, and three on the wrong side. Original text by Irina Lisitsa
- 2 comments
-
- 1
-

-
- sewing
- essentials
- (and 1 more)
-
Placemats with machine embroidery
Irina posted an article in Machine embroidery materials and technology
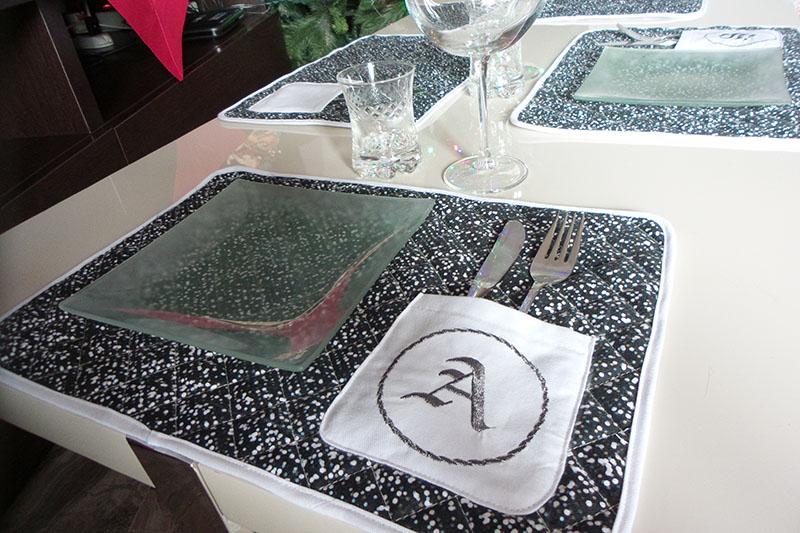 Placemats with machine embroidery Preparing for a holiday, one must take a number of things into account, such as buying or creating presents, inviting guests, home decoration, etc. To make your table look inviting, you’ll only need several pieces of fabric and a sewing and embroidery machine. Sew the placemats and decorate them with machine embroidery that your guests will love! Placemats with machine embroidery. Materials Outer fabric Inner fabric Between-lay Tearaway adhesive stabilizer Sewing and embroidery threads Placemats with machine embroidery. Preparations Cut the 48x38 cm rectangles out of the outer and inner fabrics, as well as the between-lay material. Put them together in this way: first goes the inner fabric, right side down, then the between-lay, and the upper fabric with its right side up on top of it all. Pin the layers together and draw the straight or diagonal lines with the help of a long ruler. Using the walking foot with a guide, stitch the layers together along the lines you’ve just drawn. Start with the centerline, and gradually work your way to the sides. Placemats with machine embroidery. Embroidery Choose a design from the machine’s memory or download one from our store. When you use designs from your machine’s memory (letters, for example), you can change their size up to 20% directly in the machine. If you are in a mood for creativity, and the machine’s capabilities are not enough, you might want to use PE Design. Stick a tearaway adhesive to the wrong side of your fabric. Hoop and run the embroidery. After the machine has finished stitching, unhoop the fabric, and remove the stabilizer leftovers. Cut out the pockets or decorations for your placemat. In order to create a pocket for the cutlery, stitch on the seam allowance. Insert a cardboard pattern and gather the thread. Press the cutout with an iron. Placemats with machine embroidery. Assembling The pockets can be sewn on with a straight stitch on the sewing machine or by hand (blind stitch). For the neat edges, use the edge stitch foot. The details may be attached by a zigzag stitch or any of the decorative stitches. Bias binding is good for the edges. You can cut it from the main fabric or you may use the companion fabric to make your bias binding a part of the decoration. To attach it to the placemat, use the edge stitch foot. Placemats are easy to sew, and there is an unlimited number of decorations. Original text by Irina Lisitsa
- 2 comments
-
- 1
-
-
- sewing
- embroidery
- (and 1 more)
-
Heart-shaped scissors holder with embroidery
Irina posted an article in Machine embroidery materials and technology
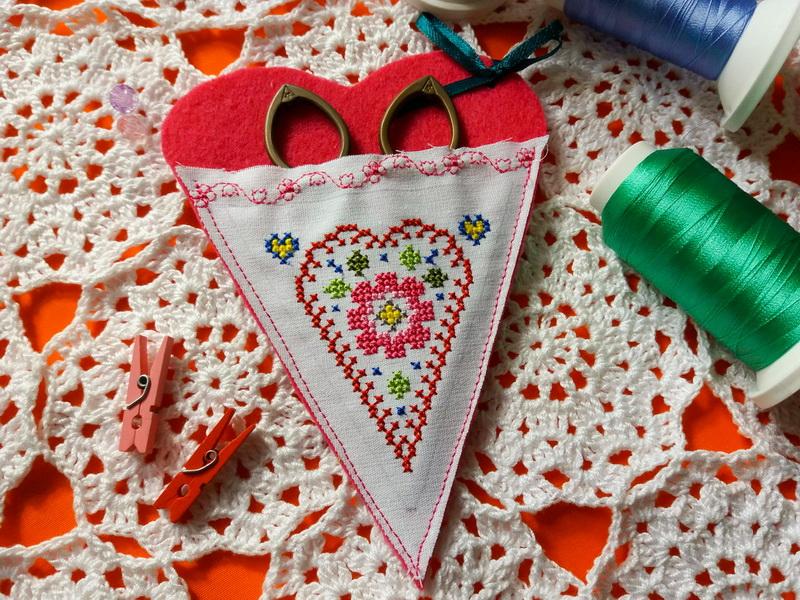 Heart-shaped scissors holder with embroidery Want to learn how the simplest design, a couple of stitches and tools make a cute item? This tutorial contains a bare minimum of technique, a couple of tips and a step-by-step guide to creating an original scissors holder shaped like a heart. A gift like this will warm the heart of any crafter. And, if you have a really creative sewer/embroiderer for a friend, who owns lots of scissors, you may even give it to them instead of a Valentine. Heart-shaped scissors holder with embroidery. Materials: Sole-colored fabric (non-stretchy) Felt (thick) Tearaway adhesive stabilizer Upper embroidery threads Lower embroidery threads Scissors Machine embroidery design Heart-shaped scissors holder with embroidery. The making process Prepare the necessary materials. Load the design into your embroidery machine and attach the sole-colored fabric to the stabilizer. This will be our front (embroidered) panel. I usually prefer a tearaway adhesive, but in this case, a nonadhesive tearaway will do just as good, as will a cutaway stabilizer. If you use the last one, you may leave it in place after embroidery; in that case, you’ll have a strengthened front panel. If you’ll choose to make an entire holder out of thick felt, you may spare the stabilizer altogether. The next step is to attach the hoop to the embroidery machine and start the embroidery. Home embroidery machine will make stops for a thread change. Once the embroidery is finished, unhoop. Leave the stabilizer in place, if you wish. On the embroidered fabric, draw a triangle in such a way that the design fits exactly in its center. Keep in mind the size of the scissors, for which the holder is intended. Before cutting the triangle out, decide whether you will fold the edges or not. If yes, don't forget to leave some fabric for seam allowance (or fraying, as shown in this tutorial). Pick up a sheet of paper, draw the triangle and then add two half-circles to transform it into a heart. You may skip this part and draw directly on felt. It is easier to draw on paper, so, if you're not an artist (I’m not), do as I did. Press the paper template to the felt and cut the back panel of your holder. You’re almost done. The fabric I chose for my front panel frays a bit. I decided not to fold the sides in order to hide the edges. In order to prevent the upper edge from fraying more than it is necessary for decoration, I add a decorative stitch at some distance from it. Now I join the sides with the back panel. I use threads of the same color as the felt. One last thing: I pierce a hole on the side and tie the ribbon in a bow. A piercer came with my sewing and embroidery machine. If you do not own one, use a substitute. Voila! Your scissors holder is ready! Original text by Mary Stratan Pick the design you like from our store! https://embroideres.com/
 -
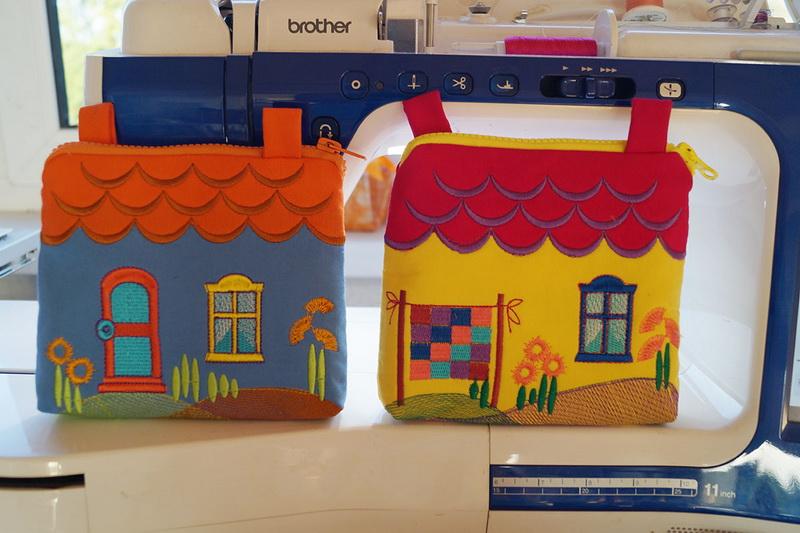 Sewing in the hoop: An embroidered bag in the shape of a house An embroidered bag in the shape of a house For this job, you’ll need: A hoop, size 20 x 30 cm A design, size 20 x 30 cm A piece of yellow fabric, size 20 x 24 cm Two pieces of red fabric, size 20 x 8 cm each Two strips of fabric for the eyelets, size 7 x 3 cm each A piece of lining, size 32 x 18 cm Colored embroidery threads High-loft interfacing material (adhesive) Tearaway stabilizer A zipper If you’re going to use a Brother V machine, you’ll need to have the Premium Pack I installed to be able to enlarge the embroidery field to 20 x 30 cm. An embroidered bag in the shape of a house. Embroidery With an iron, fuse the high-loft interfacing material to the yellow fabric. Place a piece of tearaway stabilizer under the fabric and hoop them together. Make sure that the center of the yellow piece corresponds to the center of the hoop. Begin the embroidery. The machine will stitch the outline and make a stop. Don’t unhoop; place the red pieces on top. Fuse them to the high-loft interfacing material with an iron, fix the edges with glue and continue embroidery. Trim the extra fabric from the scallops and embroider the rest of the design. An embroidered bag in the shape of a house. Sewing Iron the embroidery and cut along the outline. Now create the eyelets. Fold the 14 3 cm strip of fabric in two, stitch along the longer side and turn the right side out. The ready eyelets should measure 7 x 2 cm. Fold the strip in two and stitch it to the right side of the fabric with a straight stitch, as shown in the picture. Sew the zipper to the upper part of the bag. Stitch the lining along the zipper. Fold the bag, right side inside, align the sides. Stitch the sides. Leave 5 cm of the lining for the turning out. Fold the lower corners inside and stitch across, 2 cm from the edge. Turn the right side out and iron. Drag a cord or a band through the eyelets. It will serve as a handle. Original text by Olga Milovanova
- 5 comments
-
- 4
-
-
-
- in the hoop
- kids
- (and 2 more)
-
Machine embroidery on leather. DIY bracelets
Irina posted an article in Machine embroidery materials and technology
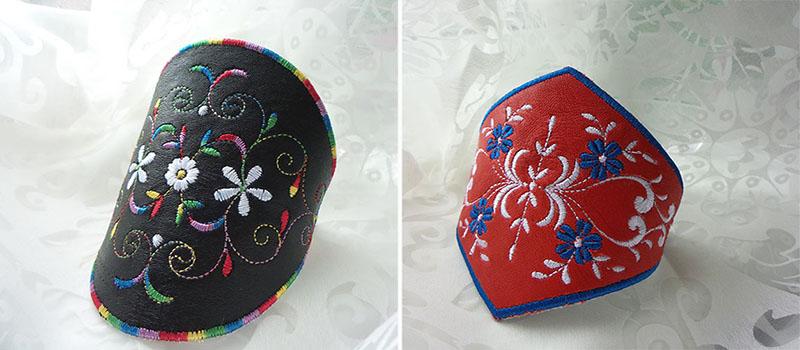 Machine embroidery on leather. DIY bracelets Leather bracelets. Materials: A piece of leather or faux leather Dense interfacing material Tearaway nonadhesive stabilizer Temporary spray adhesive Upper thread Underthread Machine embroidery design A needle for metallics or for the leather Machine embroidery on leather: Tips When choosing a design, pick one that is not too heavy and with satin columns in it. Designs containing dense Tatami fills might cut the leather, causing the design to fall out. For your future bracelet, you can choose any shape you like and draw it in the editor, same way as you do appliqué. As for the stitch types, motifs and lightweight fills, straight single and triple running stitches or designs with loose Tatami fill will do fine. Choose a thin needle with a sharp tip; a thick one would cut through the leather, leaving a big hole in it. Embroidery on leather requires commitment, for it is hard to rip off the already embroidered part, and the holes made by the needle are permanent. More information about embroidery on leather in the article This Mysterious leather. If you're interested in more articles and tutorials on the subject, please don't be too shy to comment! We’ll appreciate the feedback. https://forum.embroideres.com/articles.html/articles/this-mysterious-leather-r73/ Before you start, don’t forget to reinforce your leather with fusible/woven interfacing of a suitable weight! Machine embroidery on leather. Method No1 Choose this one if you have a piece of leather of the same size as the design or bigger. Glue dense fusible interfacing to the back side of your leather piece. Hoop the cutaway nonadhesive stabilizer. Sprinkle the stab with a temporary spray adhesive. Stick your reinforced piece of leather to the stabilizer. Load the design into the machine and change your standard embroidery needle for a thin one with a sharp tip, the one you use with metallics. Or, if the leather you’re going to embroider is thick, better choose a leather needle instead. Set your machine to the minimum speed. When it has finished stitching, detach the hoop but do not unhoop the leather. Instead, sprinkle the wrong side of the stabilizer with temporary spray adhesive. Stick another piece of leather onto it. Wind the upper thread on a spool and attach it to the machine. Install the hoop back on the machine and zigzag through the layers to join them. Having done that, remove the hoop and trim the leather along the stitched outline on the right and wrong sides. Cut close to the stitching line. Attach the hoop once more and embroider the last part of the design, the satin column. Tear the stabilizer along the outline. Singe the stab leftovers with a lighter or candle. Machine embroidery on leather: Method No2 For the embroidery on thin or textured leather, it is crucial to choose the right interfacing material (fusible or woven). For bracelets, shirt collar interfacing will do splendidly. It is very dense and won't tear even when embroidering on a piece of thin leather. Lightweight sewing interfacing materials for the delicate fabrics or knitwear are not suitable for the job. The second method is handy whenever you have a small size piece of leather that should fit into a chosen shape. Load the design into the machine and attach the hoop. Embroider the outline and the first color of the design. Spray the stabilizer with temporary spray adhesive and press the piece of leather to it in such a way that it covers the stitched outline. The rest is done in the same way as in Method No1. Machine embroidery on leather. Assembling In the corners of the ready bracelets, poke holes for the eyelets, using a pair of pliers or a hole punch. Insert the eyelet into the holes. Pick up a grommet/eyelet setting tool and insert the eyelets. Once they are ready, drag a chain with a clasp through them. Enjoy your bracelets! Original text by Irina Lisitsa
 -
Dreamcatcher embroidery design in progress
diver361 posted a gallery image in Textile art with FSL and Lace embroidery designs
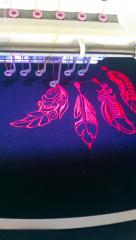 Work on Dreamcatcher embroidery design is in progress. You already can see some feathers decorating bottom part of this nice symbol. Author chose bright color of thread for this embroidery. It looks very beautiful and bright on dark background. It is nice composition based on contrast between them. But you can make your own choice suitable for your idea.
 -
Dreamcatcher embroidery design on hoop
diver361 posted a gallery image in Textile art with FSL and Lace embroidery designs
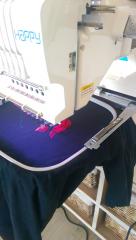 This is first stage of work on Dreamcatcher embroidery design. Author choose bright color scheme for this sample: intensive shade of thread looks very beautiful on dark background. Dreamcatcher design requires only one color of thread so it is easy enough even for beginners. But you will definitely be satisfied with result cause it is really very beautiful picture.


