
Search the Community
Showing results for tags 'hooping'.
Found 2 results
-

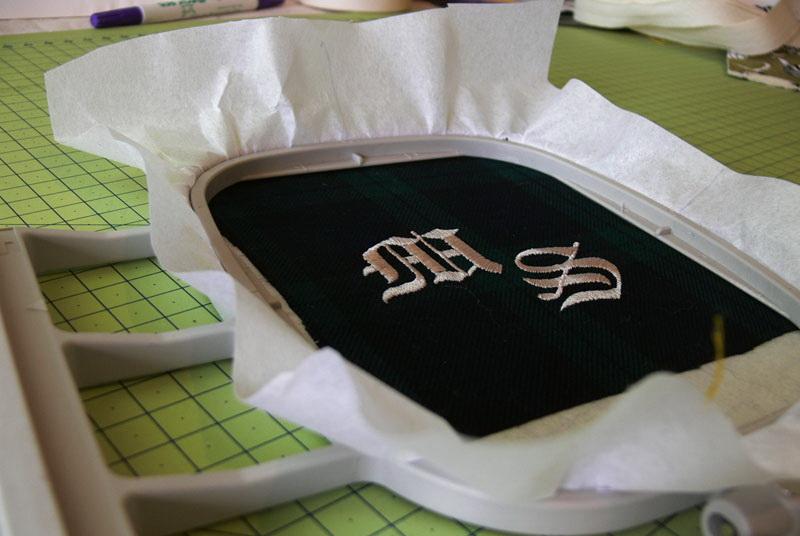 How to embroider small items of clothing. Hooping tricks Whenever there is a need to embroider small items of clothing, such as future pockets or cuffs, and your machine only has one hoop, these hooping tricks will do the job. There are several ways of hooping a small item, and in this article, I’m describing two of them. Either one will get you a beautiful high-quality embroidery. The first way of hooping a small item is to glue it to the tear-away adhesive stabilizer. Just what you need for not-too-heavy designs and small monograms. Adhere the item to the stabilizer and hoop in the usual way; the adhesive will secure the fabric in place and prevent shifting during the embroidery. The second way is to hoop the fabric itself. Suitable for smaller and bigger items alike. This is called the fabric extension method. You’ll need a few strips of extra fabric (calico, for example). Stitch them to the main fabric with a straight stitch about 5 mm long. After that, it is advisable to press seams with an iron to make them flatter. Adhere the stabilizer to the wrong side and hoop the item. If you're an owner of a Brother Innov-is le sewing and embroidery machine, you can use the built-in camera for the exact positioning of the design. This is very handy whenever the accurate placement of the design is crucial, such as while working with checkered or striped fabrics. How to use the built-in camera Press the Fabric scan key to view the location of the pressing foot on the LCD screen. Pick one of the positioning stickers that come with the machine and affix it within the embroidery field specified by the machine. Take away the sticker and your hands and wait for the machine to perform the scan. Now the pattern can be viewed in the Embroidery Edit screen, allowing for the better positioning of the design on the hooped item. When the embroidery is finished, remove the stabilizer leftovers or rip off the extra strips of fabric and iron the item on a soft underlay, right side down. Original text by Irina Lisitsa Don't forget to buy some lightweight designs from our store! See also:
 -
Hooping the fabric without hooping
Irina posted an article in Machine embroidery materials and technology
 Hooping the fabric without hooping Practically any new technique is born in the course of creation. Again and again, we conjure out new techniques that make our production time shorter and our coffee breaks longer. The hooping method I’m going to describe in this article was suggested to me by one of the Broidery.ru forum first members. And, just like in the Broken Telephone game, while passing hands the concept changed somewhat, though I tried to stick to the original one. Sergei Demin, who inspired me, endorsed my version and promised to elaborate on the original idea in the nearest future. Before you start reading, I’d like to tell you in what cases this wonderful little technique might come in handy: Use it to embroider a large number of the same size designs. It will save you a lot of time. If your fabric is of a lightweight and delicate kind, this method will allow you to forego the hooping part. If you do not own a small hoop, and for a larger one the piece to be embroidered is too tiny, this method will spare you sewing on additional strips of fabric in order to enlarge it. You understand, no doubt, that I’ve covered only the basic rules here — it is for you, dear reader, to expand upon them! So, happy hooping without hooping! The work order You’ll need a piece of polyethylene a little larger than your hoop, double-sided painter’s tape, and the hoop. Hoop the polyethylene. Better pick plastic sheeting they use for covering greenhouses: it is dense enough and doesn't warp (almost). Stick the painter’s tape to the inner side of the hoop. After that, unpeel the protective layer. Stick another layer of tape on top of the first. Determine the size of the embroidery area. Then, cut the hole with 5 mm allowance. Choose an appropriate stabilizer and attach it to the wrong side of the fabric. Place the fabric on the prepared surface and start the embroidery. Having finished, remove the embroidered piece of fabric and replace it with the new one. Continue the embroidery. In order to determine the size of the embroidery area, attach the taped hoop to the machine. Load the design and observe the embroidery area on your display. The machine will determine the boundaries of the design and move the needle bar to outline the perimeter, making short stops at the corners. When the needle is directly above the corner, drop it to make a puncture in the polyethylene sheet with the painter’s tape attached to it. Raise it, and the machine will continue the demonstration. Having found the 4 corner points, you’ll draw a rectangle without difficulty. After that, cut the hole the size of the embroidery area with 5 mm allowance. Keep in mind that the sticky side of the tape should hold the fabric in place, and therefore, this method may not be suitable for the designs almost as big as the hoop. Use the sticky hoop until the adhesive tape fails to hold the fabric in place. Idea by Sergei Demin See also:

