
Original text by Marina Belova
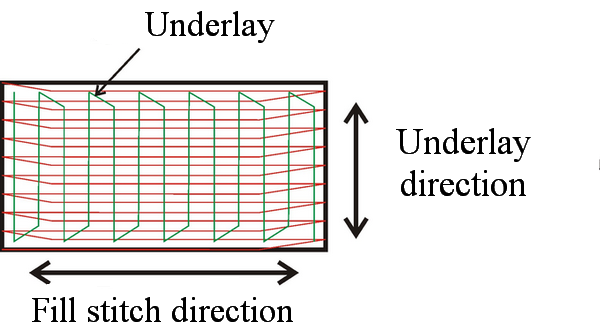
What is understitching (or, as it's also called, underlay or strengthening layer)? This is the most important element of the design — the embroidery basis, its "skeleton". Being embroidered first, before the outer layer of stitches, understitching creates the foundation. In order to make this basis for the future embroidery strong enough and the end result a good-quality one, you need to choose the right type of underlay.
Two main goals of understitching are:
- To stabilize the fabric by attaching it to the stabilizer
- To give a support and make a platform for the outer layer of decorative stitches
Additional advantages of using an underlay:
- It helps to reduce the stitch count
- Prevents the upper layer of stitches from sinking into the fabric, trample ribbing and pile
- Participates in reducing the push and pull deformation
There are 3 types of stitches that can be used to form the underlay:
- Running stitch
- Zig-zag stitch
- Fill (Tatami)
These types of stitches combine to make the 6 possible types of underlay. They can be created manually or applied automatically in the embroidery software.
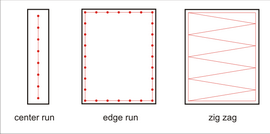
The main types of underlay
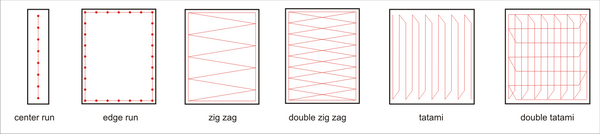
- Center Run (Perpendicular, Center Walk). This is a simple running stitch that goes right in the middle of a satin column that is usually no more than 2 mm wide. You can combine it with the Edge Run when a satin column is wider than 2 mm, and it is necessary to lift the upper layer of stitches up a bit.
- Edge Run (Contour, Edge walk). This type of underlay consists of a running stitch tracing the object outline. It is essential for creating a neat even border of the embroidery (its profile). Edge Run is the most frequently used type of underlay.
- Zig-Zag (Parallel). This type of understitching is made by a zig-zag stitch that goes through the entire object once. It is mostly used for lifting the stitches over the fabric and trampling pile or ribbing. It is recommended for the objects no less than 2,5 mm wide.
- Double Zig-Zag. This type of underlay is also made by zig-zag stitch. But in runs through the entire object twice.
- Tatami (Lattice, Mesh). This type of understitching is based on the standard fill. But is has a very limited density. Usually, the stitches here go at an angle of 45 or 90° in relation to the upper stitch layer. It is used for stabilizing big size embroidery areas in order to reduce the pull.
- Double Tatami (Full Lattice). This type of underlay is likewise based on the standard fill, but it makes a full lattice — the stitches are placed at an angle of 90° in relation to each other. It is used to stabilize big size embroidery areas on highly stretchy fabrics in order to reduce the pull. Often used in highly contrasting embroidery.
All main types of understitching can be combined with each other if the embroidery design requires. Usually, the embroidery software either offers the choice of underlay types and their combinations or allows the users to set the values manually.
Tajima DGML by Pulse, for example, allows to combine up to 4 types of underlay at the same time, and it also has lots of options for every one of them.

The underlay stitch length depends on the kinds of fabric used. For example, the ordinary stitch length value is 2.5 mm. For slippery fabrics like satin, you can set it less than 1.5 mm.
When is the understitching not necessary?
You don't need an underlay for non-woven materials: leather, vinyl or paper. Also, when embroidering the designs like redwork or quilt the understitching is not needed.
This is important! Understitching doesn't replace the stabilizer. In order to achieve a good result, the understitching and stabilizers should work together.
One point is worth noting: An underlay created by hand often adds a much less amount of stitches to the design because of the well-planned sequence. But it requires spending more on digitizing and also experience. Automatic underlays are highly adjustable and scalable compared to the manually created ones.
Edited by Irina
-
 1
1
There are no reviews to display.