
Original text by: Marina Belova
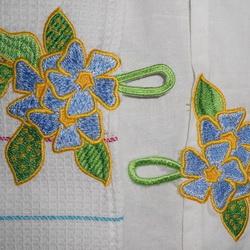
I have once already mentioned in passing that the stitch length greatly influences the overall visual effect the embroidery creates. I thought of it because I recently embroidered an eyelet for a towel. So, after much digitizing and trying various textures and fill stitch lengths to get a softer embroidery, I got two different results from the same embroidery pattern, but with different settings:
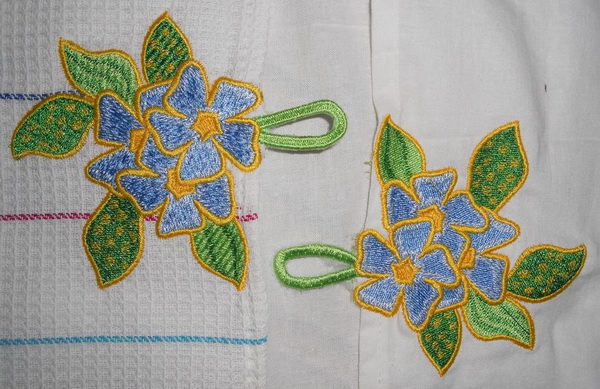
On the left you see the embroidery with the fill stitches 5.5 mm long, and on the right — the fill stitches 3-3.5 mm long. The embroidery on the left is softer than the one on the right, and it is only natural because of the greater stitch length.
Of course, the fill texture is also of great importance. Only now I've come to understand why a lot of professionals recommend to make a sample of every texture available in the embroidery software, at a different stitch length. Making these samples requires some labor inputs, but they will vividly illustrate the information a design creator needs and which he or she will knowingly use in their work in future:
The understanding of what the particular texture will look like in reality and not on screen.
How changing the stitch length will affect its look, and how and where one can use it.
The difference in stitch count for the same texture in case the stitch length is increased or reduced.
I'll give you a simple guide of how to create such a sample sheet. I embroidered just 9 squares and got a ton of information as a result:
The upper row consists of the satin columns with the stitch length increasing from 2 to 12 mm. The two lower rows consist of fills, also with the stitch length starting at 2 mm and gradually increasing in value. All the squares are of equal size, the only thing that differs the look of the outer layer of the embroidery. Here is the stitch count (each cell corresponds to one embroidered square):
|
814
|
560
|
321
|
|
1094
|
757
|
594
|
|
1101
|
765
|
598
|
The advice to make such samples turned out to be rather a sound one. Sure, it is next to impossible to embroider all the textures that can be found in embroidery software, but if you do at least half of them, you'll get a perfect sample sheet which will make life for both you and your client much easier.
Edited by Irina
-
 2
2
-
 1
1
Recommended Comments
Join the conversation
You can post now and register later. If you have an account, sign in now to post with your account.