Search the Community
Showing results for tags 'overlap'.
Found 4 results
-
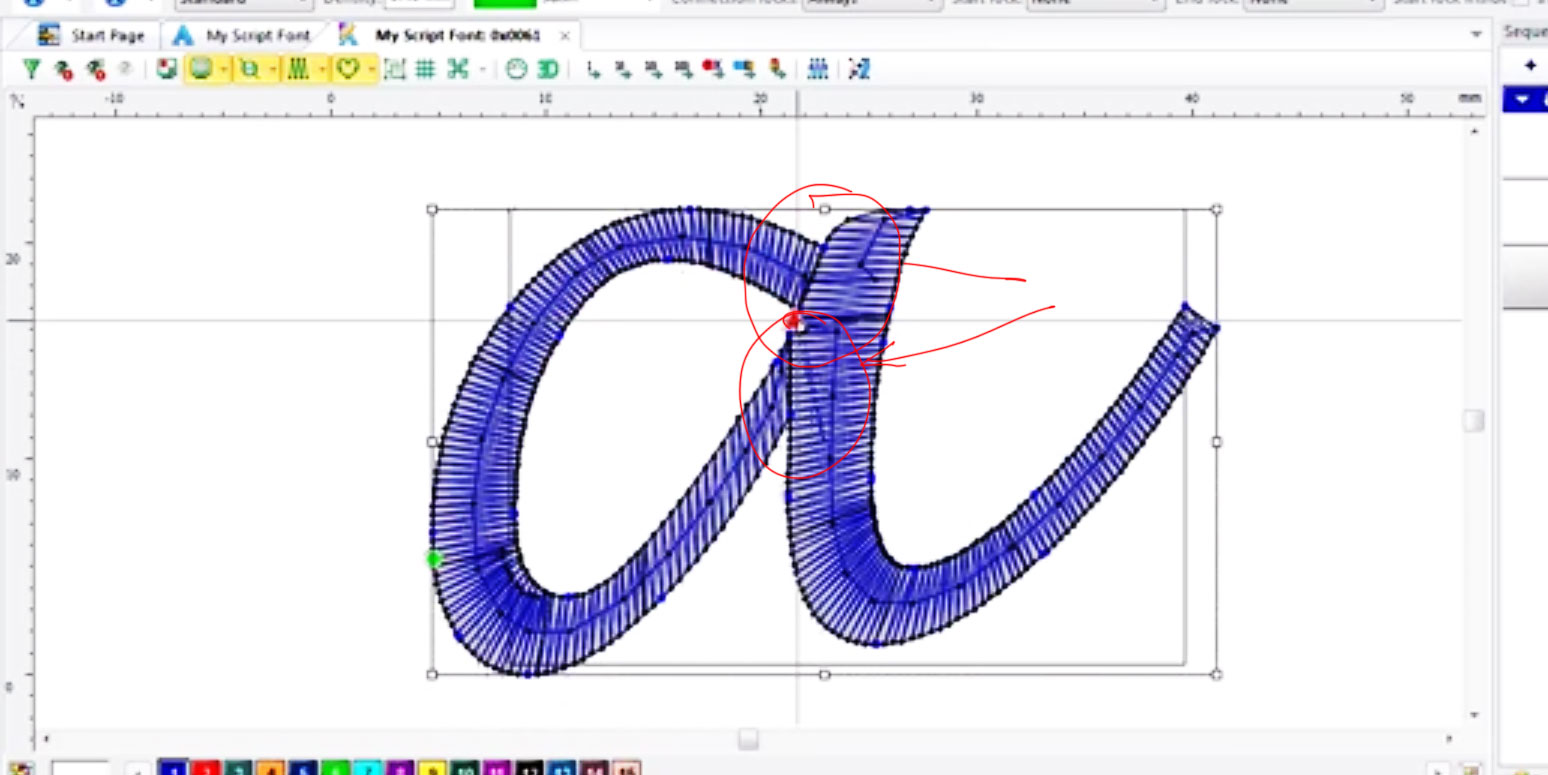
When i create embroidery with branched areas, how can i change overlap? Example letter a. My customer like format PXF for using in Ambassador. If he resize my work, may be have a problem (non sewed areas). Of course I can set it manually by simply digitize overlap. But as it can be set automatically? Example percentage or distance?

- 6 replies
-
- 1
-

-
- embroidery digitizing
- complex fill
- (and 3 more)
-
Just bought a brother v3 with pe design plus2 as digitzing software, am a newbee at machine embroidery... i'm playing around with the software to get to know the program, and am encoutering the following problem : when I combine two shapes, I can modify the overlap and prevent that certain sections will be stiched twice when I combine a shape and some text, I can not modify the overlap. I tried, looked in the manual, searched the internet, but can't find the answer... can anyone help me ? thanks, gudrun
-

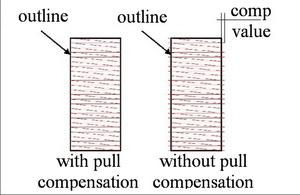 Original text by Marina Belova Compensation (or Comp) is a stitch object property around which a great number of myths, mysteries, and puzzles have emerged. Let's try and figure out what it is. Compensation: generalities Compensation is a deliberate distortion of the shape of the objects in an embroidery design at a digitizing stage. This distortion serves to prevent the appearance of various defects during the embroidery: gaps between the object outlines and shape deformation (circles becoming ovals and squares turning rectangular). There are 2 main types of shape deformation: Pull — decrease of the object thickness in the stitch direction. Push — object elongation in the stitch direction. Outline distortion is a result of the upper and the lower threads interacting with the fabric when changing the stitch direction during the embroidery. In this article, we'll cover pull compensation only. Pull compensation There are 3 ways of adding compensation to the object: distort the shape manually by digitizing an object wider than it is in the original design adjust the respective parameter in the embroidery software combine the previous two options I want to point out that to do the first one you need to have a vast experience and a trained eye. Many western sources state that the option #3 is the most effective. They think that compensation should mostly correct shape distortion during digitizing. Adding some automatic compensation will allow adapting the design for various kinds of fabric. A second way where compensation is added automatically is much easier and much more obvious. There are 2 methods of adjusting the automatic compensation value: absolute (fixed) value in millimeters on a percentage-of-stitch length basis Some embroidery editors have additional options for compensation: you can choose to compensate only one side of the design you can compensate in one direction only (X or Y — Tajima DGML by Pulse has such an option) What determines the compensation value and how can it be adjusted? type of fabric: the thinner and softer is the fabric, the more compensation it requires compared to the thick, densely-woven fabric upper and lower threads tension regulation on your machine the size of the embroidery area. The thicker is the element, the more compensation it needs the density of the embroidery. The higher is the density, the higher is the compensation value And the last thing that everybody is interested in: what are the benchmark pull compensation values? Ways of adding pull compensation: set it at the value of 0.1—0.4 mm. I've heard that 0.4 mm value is good for standard situations. adjust compensation on a percentage basis for sharp and straight corners to make them more clearly defined when joining two objects make them overlap no less than 1 mm by hand or with the help of the compensation adjustment option. too much compensation may damage the outer look of your embroidery and even lead to distortions Of course, these parameters are only nominal and can be used as a starting point for design creation. Compensation is not a science, therefore, you cannot tell which value is the most optimal. You can always find the right value by doing test samples. You can read here why you should test every design. In the following article, I will continue on the subject and will describe push compensation.
 -
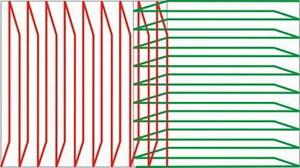 You can often see a machine embroidery defect where an outline pulls in the stitches of the bottom layer and the fabric becomes visible. Or there is a gap between the objects where the stitches run in the same direction. Or a gap between the design and the outline made with running stitches. Avoiding these may seem a hard task. But in reality, it is not so. Means have been invented long ago, beginning with choosing the right kind of stabilizer and hooping method, and concluding with foreseeing the possible damage at the digitizing stage and taking measures to avoid it. I'll skip the hooping methods and the choice of the stabilizer. Let's highlight the simple digitizing recommendations. If you have the neighboring objects where stitches run in the same direction, a digitizer should apply pull compensation. It is necessary for the needle not to make multiple penetrations at the joining places that result in huge holes. If the fabric is also not stable enough, you may get a huge gap like the one in the second photo. Compensation settings depend on the type of fabric to be embroidered, the density of the machine embroidery design, stitch length, and other parameters. But the usual advice is to overlap the objects at least by 1–2 mm. When the objects adjoin and the stitches in them run parallel, you should split the objects in order to avoid bulging. This means creating a distance between the objects no less than 2 rows of stitches. This gap will be closed during the embroidery due to push deformation of both objects in the stitch direction. If two objects where stitches run in opposite directions adjoin, you may have to tackle this problem: too much pull compensation may result in the ridge at the place where the two objects overlap. There may be several possible outcomes: if a green object is embroidered last, the stitches on its edge will become interlinked with the ones in the lower red layer and pulled to the side, separate from the fill. The longer are filling stitches, the more probably they will be pulled under the upper layer, leaving the gap and revealing the fabric. In order to avoid that, you'll need to add an underlay at the place where two objects join. Low-density satin with a jagged edge will be sufficient. Thus, even if the stitches will end up under the upper layer, you'll see not the fabric, but the underlay. If the direction of the stitches in the upper, red layer, is perpendicular to the one in the green layer, no deformation will occur. The stitches in the red layer work as a bridge in this case. Therefore, no preventive measures should be taken. Running stitch outline is believed to be the most difficult in machine embroidery – it allows of no mistakes. In case a mistake takes place, the outline immediately goes off the track. There are only 2 ways of avoiding a gap between the outline and the design: the first is to spare the outline altogether, and the second is to overlap the fill and the running stitch outline. That's why I mentioned that digitizing should begin with the image analysis. You can see the potential problems at this stage and avoid them while digitizing.
- 2 comments
-
- 1
-

-
- overlap
- digitizing
- (and 3 more)