Knit Fabric Stretches. Your Stabilizer Must Not

By diver361 in Help for embroiderers
· 17 views
Knit Fabric Stretches.
Your Stabilizer Must Not.
The complete guide to stabilizing knit fabrics for machine embroidery — why it's the most skipped step, and why skipping it explains every puckered disaster you've ever produced

Knit fabric does one thing better than any other fabric type: it stretches. This is the property that makes a t-shirt comfortable, a hoodie wearable, a knit dress flattering. It is also the property that will ruin your embroidery if you don't address it directly, deliberately, and before the first stitch is laid.
Puckering. Distortion. Wavy lines where there should be straight ones. Designs that look perfect on screen and collapse on fabric. These are not design file problems. They are not machine problems. They are stabilization problems — specifically, they are what happens when a stretchy fabric is asked to hold a permanent stitch structure without adequate support.
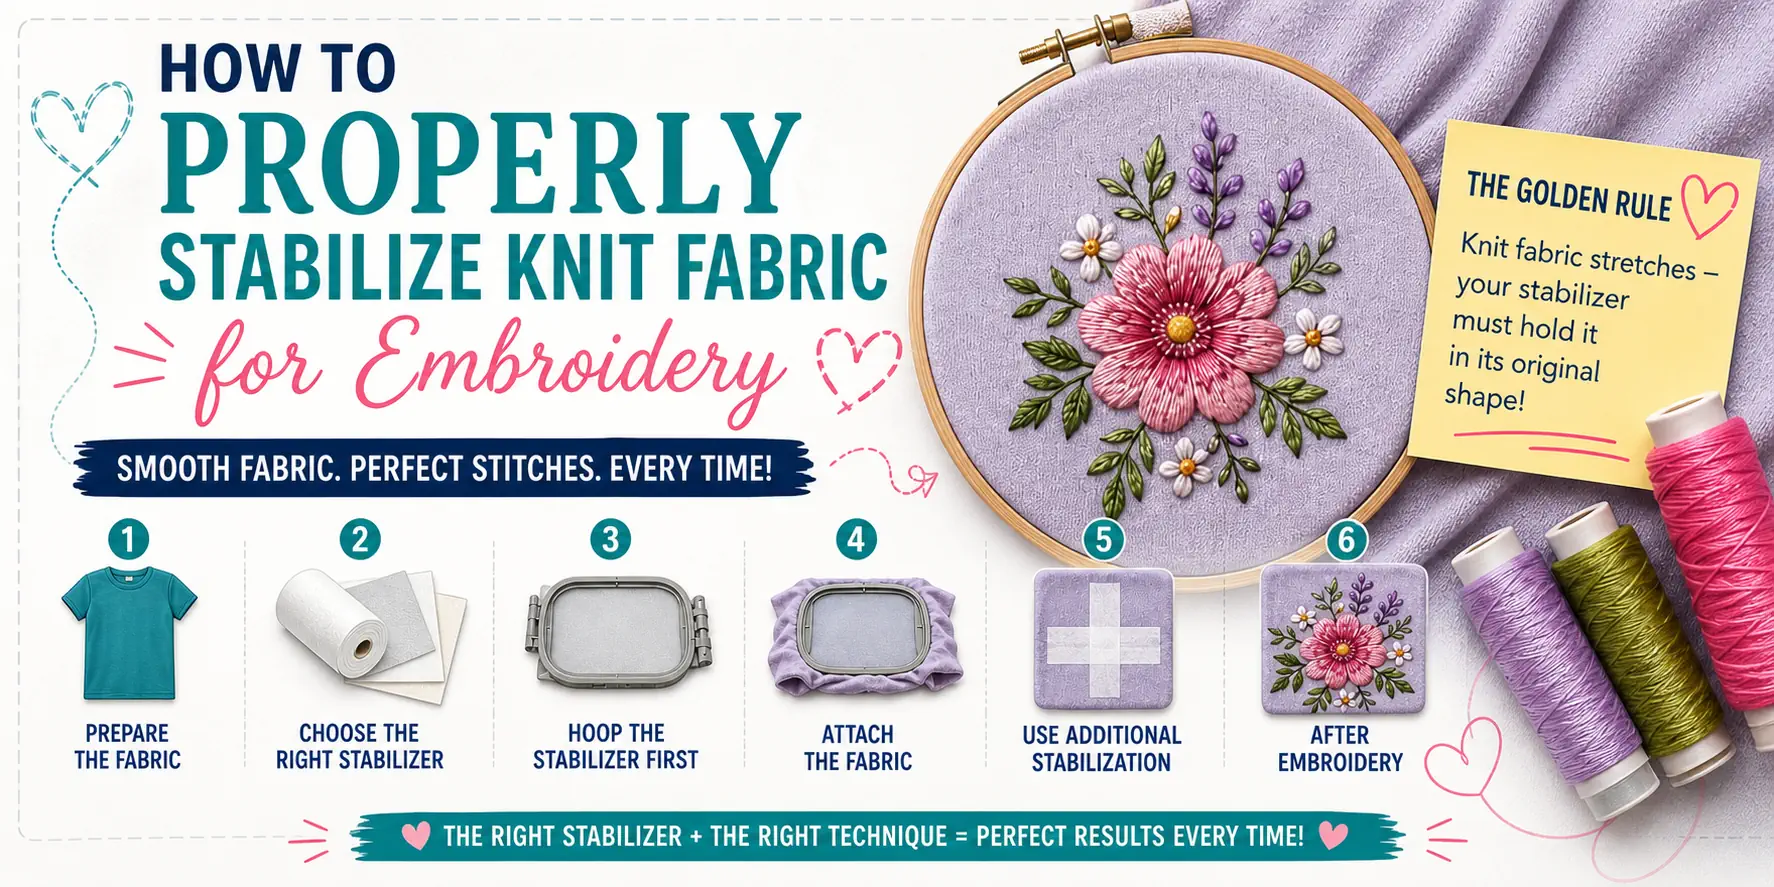
The golden rule printed at the top of the infographic above is worth reading twice: knit fabric stretches — your stabilizer must hold it in its original shape. Not approximately. Not mostly. Exactly, completely, throughout the entire stitching process. This is what good stabilization does. Everything else in this guide is the practical detail of how to achieve it.
Stabilization is not optional on knits. It is the secret to clean, smooth and professional embroidery. Every time.
Step 1. Prepare the fabric
The step everyone skips. The step that explains half of all puckering problems.
A new knit garment contains sizing — a stiffening agent applied during manufacturing — and residual dye tension from the production process. Both affect how the fabric behaves under the needle. Wash and dry the garment before embroidering. This removes the sizing, completes any residual shrinkage, and allows the fabric to settle into its permanent stable state. Do not use fabric softener: it coats the fibres and reduces the stabilizer's adhesion to the fabric surface.
Press lightly if needed after washing — but only with a cool iron and a pressing cloth. Steam-pressing knit fabric before embroidery can temporarily relax the fibres beyond their stable state, creating false flatness that disappears once the garment cools and the tension returns.
Step 2. Choose the right stabilizer
Not all stabilizers are equal. Not all knits need the same one.
The stabilizer must provide both support and appropriate flexibility — enough rigidity to prevent stretch during stitching, enough give to not crack or delaminate when the garment is worn and washed. Three types cover the full range of knit embroidery situations.
Provides permanent support. Stays in place through all washes, holding the stitch structure flat and preventing long-term distortion. The correct choice for stretchy knits, dense designs, and anything that will be laundered frequently. Trim close to the design after stitching — it becomes invisible from the front.
Easy to remove after stitching, leaving a clean finish on the back of the garment. Appropriate for stable, light knits with small designs and low stitch counts. Not suitable for highly stretchy fabrics or dense fills — the support it provides degrades with washing. Use cautiously and only when the design genuinely does not require permanent stabilization.
Dissolves completely in water, leaving no residue on the back of the garment. Used when leaving any permanent material is not acceptable — sheer fabrics, open-weave knits, baby clothing, intimate apparel. Often used as a topping on fleece and towelling to prevent stitches from sinking into the pile.
Step 3. Hoop the stabilizer — not the fabric
This is the most important mechanical step. Read it twice.
The stabilizer goes in the hoop. The fabric floats on top of it. These are not interchangeable. When knit fabric is hooped directly — forced between the inner and outer hoop rings — the ring pressure distorts the fabric edges. Worse, as the machine stitches toward the edges of the hooped area, the fabric is under uneven tension that it will relieve the moment it is removed from the hoop. The design warps.
The correct method: hoop the stabilizer alone, drum-tight, so it vibrates when tapped. Apply temporary spray adhesive to the stabilizer surface. Position the garment over the hooped stabilizer, smooth from the centre outward removing all air bubbles, and baste or pin if needed at the edges. The garment is held by adhesion, not by hoop pressure. Even tension across the entire embroidery area. No distortion at the hoop edges.
A well-hooped stabilizer is the foundation of great embroidery. Test this by tapping the centre of the hooped stabilizer — it should return a clear, drum-like resonance. If it feels soft or moves, re-hoop tighter. This is non-negotiable.
Step 4. Attach the fabric
Taut — not distorted. There is a precise difference.
Place the fabric over the hooped stabilizer. Gently stretch it evenly — not toward any single direction, but outward from the centre in all directions simultaneously. The fabric should be taut, which means it has no slack and no bubbles. It should not be stretched out of shape, which means it has not been pulled beyond its relaxed dimensions.
Even tension across the full embroidery area is what prevents puckering. Uneven tension — higher on one side, lower on another — creates differential shrinkage when the hoop is released. The design distorts in the direction of the lower tension. Smooth hands, centred pressure, even pull in all directions. This takes practice. It also takes under sixty seconds once you understand what you are doing.
Step 5. Add extra stabilization when needed
Very stretchy knits require an additional layer. This is not a weakness — it is correct practice.
Two situations call for extra stabilization beyond the standard single layer. The first is very stretchy or lightweight knits — fabrics that, even with a standard cut-away below, continue to shift slightly under the needle due to their inherent elasticity. The second is dense designs with high stitch counts — the cumulative force of many thousands of stitches can overcome a single stabilizer layer on a fabric that has no woven structure to distribute the load.
Step 6. After embroidery — finishing matters
How you remove the hoop and stabilizer affects the final result.
Remove the hoop carefully — never pull at the fabric or tear the garment from the frame. Support the weight of the garment as you unhoop. Trim excess stabilizer close to the stitching using sharp embroidery scissors — within 5mm of the design edge on cut-away. If using tear-away, tear gently and slowly in multiple directions rather than one sharp pull. A single aggressive tear can disturb newly stitched thread tension.
If using wash-away stabilizer: rinse according to the manufacturer's instructions — typically cool running water for 30–60 seconds, then air dry flat. Do not wring. Do not tumble dry before the wash-away has fully dissolved — heat sets any remaining residue into the fabric.
The five mistakes that explain most disasters
No stabilizer on a knit is not a shortcut — it is a guarantee of puckering. Using tear-away on a highly stretchy knit is only slightly better. The fabric moves. The design moves with it. The result looks like the embroidery was applied to fabric that was then crumpled.
A loose stabilizer provides no meaningful support. The fabric moves on top of it, and the design drifts as the frame repositions between colour changes. Drum-tight is the standard. If you can press the stabilizer and it gives more than 2mm, rehoop.
Stretching the fabric before stitching creates a false flat state that the fabric will try to return to after removal. The design that looked centred and even on the machine will pull, distort and pucker once the fabric relaxes. Taut means no slack. It does not mean under tension.
A single layer of cut-away is sufficient for most knits. For high-stretch fabrics — athletic knits, ribbed fabrics, four-way stretch — one layer is not enough. This is not a failure of technique. It is a characteristic of the fabric. Add a second layer or a water-soluble topping.
A sharp single tear on tear-away stabilizer near the design edge can pull newly stitched threads, distort satin fill edges, and loosen thread tension at the boundary of the design. Tear slowly, in multiple directions, holding the design area flat and still with your other hand.
Test before you stitch. Always run a test design on a scrap of your fabric with your stabilizer set-up. Small test — perfect results.
Five things. Every project. No exceptions.
Good stabilization is not a variable. It is not something you assess on a per-project basis and sometimes skip when you are in a hurry. It is the foundation on which every embroidery result on knit fabric stands or falls. The right stabilizer plus the right technique equals perfect results — every time. This is not optimism. It is what happens when you follow the steps.
Good stabilization equals happy stitches. Every single time.
Questions about stabilizing? Ask in the comments.
Recommended Comments