
Original text by Marina Belova
I decided to try cord embroidery and digitizing for it on my embroidery machine. I have a cording device but has so far been standing idle; I should start using it. The only thing I lack to begin practicing is the cord winded on plastic spools. But I just looked it up on the internet – it won't be hard to purchase one. When I buy it, I'll write a separate article on how to use cord in the field, so to speak.
As for today, I decided to sift through the mass of material on cording and digitizing designs with a cord that has accumulated in the course of time. The big plus of cord embroidery is high productivity level. Also, if one uses imagination, amazing designs can be created by combining traditional embroidery techniques with cording. I saw some examples in Bonnie Nielsen's book Punch and also in the photos on the Internet.
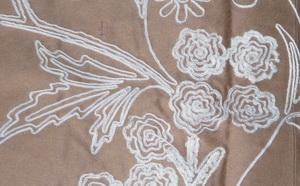
The cord is commonly used for creating lines and rarely for the fills. Classically, cord is used in flowers, spirals, and alphabets. The outer look of the embroidery with a cord has a splendid 3D effect to it.
I've tried cord embroidery once 5 years ago. Then I was inventing the wheel and made quite a few of test pieces.

The biggest problem was to buy a right kind of cord. Therefore, I had to buy various threads in a shop that sold knitting paraphernalia, rewind them manually and combine them with various machine settings. This method is only good for those who have a lot of spare time and enthusiasm. That's because it's full of riddles and puzzles. In those days there was no knowledge on how to work with all that.
As it turned out later, cord embroidery is simple:
- Insert the cord into a special device on your embroidery machine (the way of doing so depends on the machine's brand).
- Position the foot.
- Embroider the design.
- I've seen contradictory recommendations on the machine's speed – some people think that it should be lowered to almost 400 rpm, and some believe that you can work at the usual speed. If I'm not mistaken, the speed depends on the embroidery machine.
- In the end of the embroidery, the cord is cut by hand.
Ways of finishing the cord ends:
Tuck the ends of the cord to the wrong side so that they don't stick out.
They can be hidden under the embroidery.
The cord ends also can be secured with a zigzag or satins.
There are numerous types of cords in use. Braided cords embroider well, as do the twisted ones. But where the cord bends to a small radius, the yarns may unravel.
A cording device can be configured to do loop embroidery, which creates a wonderful 3D effect, especially in large areas. Loop embroidery of an area of an equal size consumes much less time. This method of cording is often used for hair, fur, leaves and so on imitation. With some practice, loop embroidery with a cord on an ordinary embroidery machine can be as effective on one of special loop stitch devices. Hence, there is a room for improvement.
A monofilament yarn (fishing twine) is commonly used because it is transparent and will suit any cord. But, in my opinion, an ordinary polyester embroidery thread can be used for soft cords.
Digitizing for cord embroidery is not difficult either. But choosing of the design is a task that requires diligence.
The entire design is digitized with running stitches. The recommended stitch length is 1–2 mm. Reduce the stitch length on bends in order for them to fit the curve.
The design should have 1 start and 1 end point and no trims. You should get a line, drawn as if in one stroke on a pen.
Get rid of the tie-offs.
Avoid sharp angles, repeats, superimposition, sharp turns – everything should be smooth and flowing. Although, now, after having practiced cording embroidery, I would call that last one quite a disputable statement.
The machine should make a stop before and after cord embroidery as the cording device is adjusted, prepared and removed manually.
P.S. I already posted an article about me practicing cord embroidery.
Edited by Irina
-
 1
1
-
 1
1
There are no reviews to display.