Jump to content
  • Articles

    Our website articles

    Cat on Embroidery Machine? Cute, but Risky – Real Stories & Melco Tips

    By diver361, in Machine embroidery materials and technology, , 0 comments, 20 views
    “You’re Not Using This, Are You?” — Cats, Embroidery Machines & Maintenance Tips
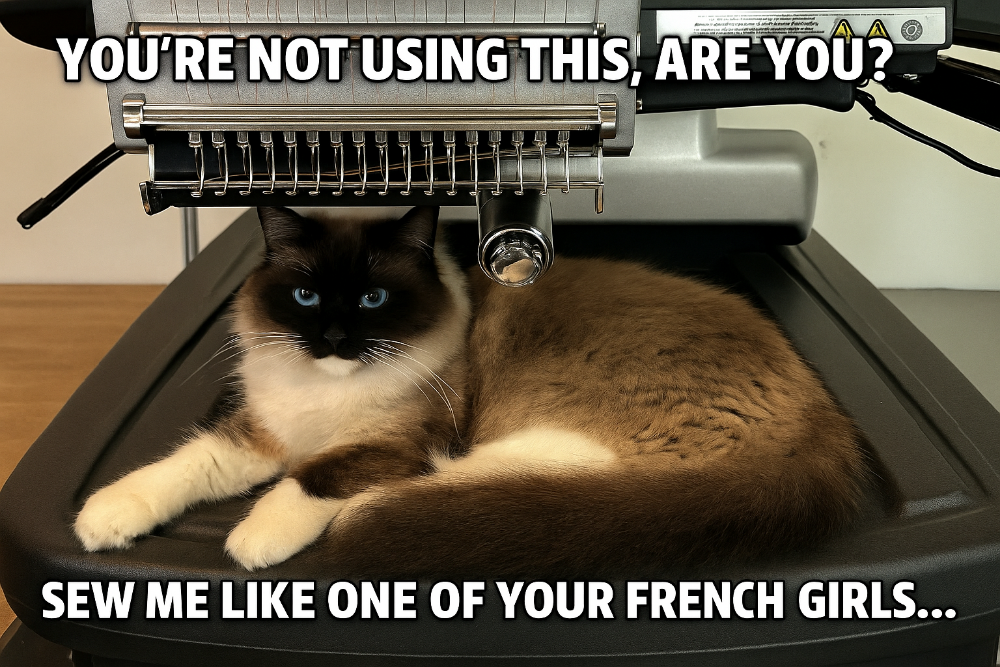
    When your embroidery machine becomes a luxury cat bed. Meet the real boss of the sewing room—proof that even the Melco Bravo bows to feline royalty.
    There’s nothing quite like sitting down at your embroidery machine and finding a regal furball claiming your workspace like they own it. If you've ever caught your cat lounging atop your Melco Bravo like it's a spa bed, you're not alone. Cue the iconic line: “You’re not using this, are you?”
    This hilarious and heartwarming moment was captured by one user who shared a photo of their majestic feline commandeering their machine like royalty. But it sparked more than just a laugh—it opened up a real conversation about pet safety and machine maintenance.
    When Cats and Embroidery Collide
    One member shared a sobering experience: her cat jumped onto the machine while it was stopped for a thread trim—and startled her so badly that she ended up with an ER visit and two stitches. A reminder that as adorable as these fluffy assistants are, embroidery machines are no place for paws.
    Pro Tip: Always make sure your machine is turned off or the head is moved away from working zones if your pet has access to the room. Those curious little explorers can pop up out of nowhere.

    Keeping Your Melco Running Smoothly
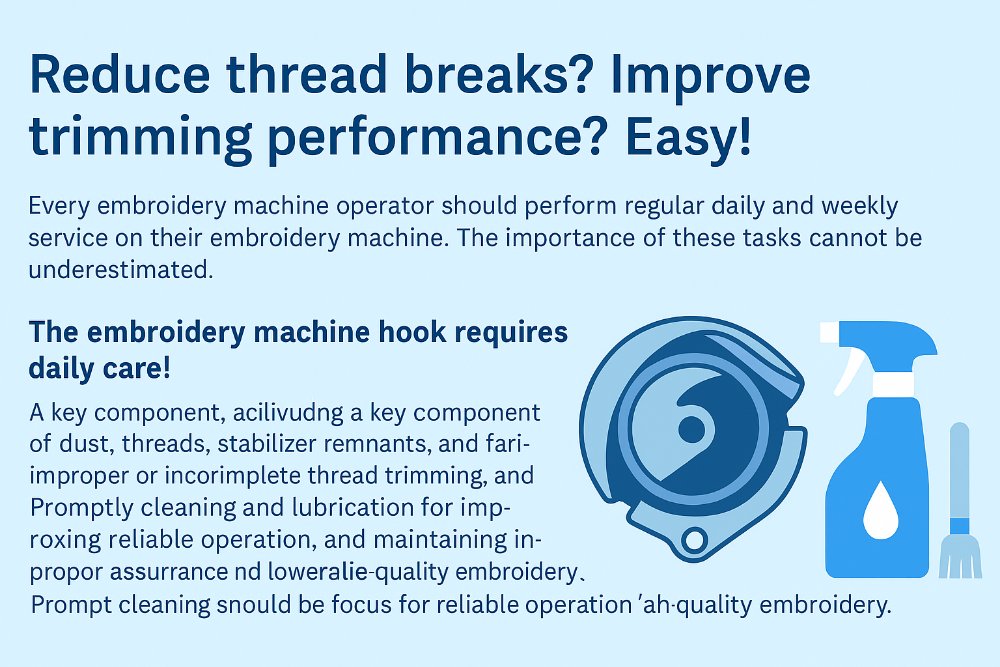
    The thread quickly turned into a helpful exchange of tips about Melco Bravo maintenance—especially regarding the needle carriage rail. While older models may not have had this in the manual, newer guidance recommends applying HP grease to both sides of the plastic rails (the black track running side to side), not the metal parts (those still take regular machine oil).
    Maintenance Checklist:
    Quarterly: Take-Up Lever Cam, Presser Foot Cam Follower, Right Needle Bar Guide Use light red HP grease — not oil — on plastic rail channels Search YouTube for: Melco Daily / Weekly / Monthly Maintenance The Most Cat Thing Ever
    The best part? The cat chose to lay exactly where a finished piece was placed to prevent her from lying there. Naturally, that meant another round with the lint roller—for the third time.
    Want to Join the Club?
    This beloved Melco Bravo was scored second-hand on Craigslist or Facebook Marketplace—proof that high-quality equipment is accessible if you're patient and persistent.
    And as one commenter put it: “Nice machine… but wow, that’s a really realistic cat you embroidered!”
     
    Final Thoughts
    Embroidery is a blend of creativity, technical skill, and—if you’re lucky—a touch of chaos courtesy of your pets. Whether it’s a stitch gone wrong or a cat claiming your machine like a throne, the embroidery community always finds humor and wisdom in every thread.
    Stay stitched, stay safe, and keep those cats off the hoop.

    Reduce Thread Breaks and Improve Trimmer Performance with Simple Maintenance

    Want Fewer Thread Breaks and a Smoother Thread Trimmer? It’s Easier Than You Think!
    Every embroidery machine operator should follow a regular maintenance schedule—both daily and weekly. And when it comes to performance, this is not just a recommendation—it's a necessity.

    The Hook Assembly Needs Daily Attention
    The hook assembly is one of the most critical parts of your embroidery machine. It plays a direct role in stitch quality and overall machine operation. Keeping it clean and properly oiled can help you avoid many common embroidery issues.
    What Happens Without Maintenance?
    Dust, stray threads, stabilizer residue, and fabric lint accumulate quickly in the hook area. This buildup:
    Reduces stitch accuracy
    Causes frequent thread breaks
    Absorbs oil, reducing lubrication
    Increases resistance and wear on moving parts
    This not only affects your embroidery results—it can shorten the machine’s life.
    Insufficient Oil = Expensive Repairs
    Without proper oiling, parts wear out faster. This can lead to breakdowns, costly repairs, and downtime. Oiling ensures smooth motion, reduces friction, and helps prevent overheating.

    What About the Thread Trimmer?
    Inconsistent trimming is often caused by dust and thread bits lodged in the hook assembly. When debris blocks the trimmer’s blades, they can’t cut the thread cleanly—leading to missed trims or thread nests in your work.
    Quick Takeaway: Clean and Oil = Reliable Embroidery
    Daily cleaning and oiling of the hook area ensure:
    Fewer thread breaks
    Smoother trimming
    Higher stitch quality
    Longer machine life
    Fewer surprises during production
    Just a few minutes of maintenance can save you hours of frustration. Treat your machine well—it’ll return the favor with flawless stitching.

    Embroidery on Tulle and Organza: Tips for Delicate Fabrics

    Embroidery on Tulle and Organza: Techniques for Sheer Success
    Machine embroidery on delicate fabrics like tulle and organza may look intimidating, but with the right approach and machine setup, the results can be stunning. These lightweight, transparent materials are often used in bridal wear, evening gowns, accessories, and home décor — and embroidery can elevate them beautifully.
    Can You Embroider on Tulle or Organza?
    Yes! Even sheer mesh fabrics like euro-mesh, netting, or tulle can be embroidered successfully. Despite their fragile appearance, these fabrics can hold embroidery stitches when treated correctly.

    How to Digitize a Design for Tulle or Organza
    Creating embroidery files for tulle requires special attention:
    Avoid tiny stitches
    The minimum stitch length must be longer than the holes in the mesh. For example, if your tulle has a 1mm grid, don’t use stitches smaller than 1mm — they won’t hold.
    Use light stitch density
    Dense fills can tear or warp sheer fabric. Choose airy, minimalistic designs like redwork, sketch-style, or straight stitch outlines.
    Limit trims and color changes
    Each trim increases the chance of shifting or pulling. Ideally, your design should flow from start to finish without stops or thread cuts.
    Watch your stitch length
    Don’t use stitches that are too long either — they can create loops or distortion.
    How to Embroider on Tulle or Organza
    Once your design is ready and transferred to your embroidery machine, follow these preparation steps:
    When to Use Stabilizer
    Small and light designs:
    You can embroider directly on tulle without any stabilizer.
    Large or dense designs:
    Use a water-soluble stabilizer or film underneath. It provides support during stitching and disappears afterward, leaving your sheer fabric intact.
    Proper Hooping Technique
    Avoid pulling the tulle too tight — over-tensioning distorts the weave.
    If needed, secure the fabric edge inside the hoop with clips, double-sided tape, or fabric adhesive.
    Press the hoop gently but firmly — tulle is slippery and may need reinforcement around the edges.
    Pro Tips for Success
    Always test your design on a fabric scrap first.
    Choose sharp embroidery needles (size 70 or 75).
    Use fine polyester or rayon thread for best results on sheer fabric.

    Embroidery on Leather: Tips, Tools & Best Machines

    Embroidery on Leather: Techniques, Tips & Machine Advice
    Embroidering on leather or faux leather can add a luxurious and personal touch to clothing, bags, upholstery, car accessories, and more. But leather is unlike any other embroidery surface — it stretches, doesn’t heal from needle punctures, and demands a special approach. Here’s everything you need to know for beautiful, lasting results.
    Key Considerations When Embroidering on Leather
    1. Always Stabilize Your Material
    Leather is flexible, which means you must stabilize it. Use fusible interfacing or a high-quality cutaway stabilizer. This prevents puckering and distortion during stitching. Faux leather typically comes pre-backed, but verify before starting.
    2. Hoop With Care
    Traditional hoops can leave marks on leather. A border frame is ideal: hoop the stabilizer alone, then float the leather on top. Secure it with temporary fabric spray or double-sided tape. Be mindful of the hoop's depth — leather plus interfacing is thick!
    3. Digitize With Leather in Mind
    Leather embroidery requires lower stitch density to avoid tears. Avoid overly dense fills, short stitches, and excessive trims. Light, airy designs — like line art or sketch-style — tend to work best.
    4. Embroider on a Flat Surface
    Don’t let your hoop hang! Heavy leather or thick materials can sag if unsupported. Always embroider on a flat table to maintain accuracy.

    What Thread and Needles Work Best?
    Thread: Use high-strength polyester thread — it’s more durable and flexible than rayon, perfect for tough surfaces.
    Needles: A size 80 embroidery needle is typically recommended for leather.
    Metallic Thread: If you're using metallics, reduce tension and follow all standard leather guidelines.
    Which Machine Handles Leather Best?
    When it comes to leather embroidery, you need a machine that’s built for strength and stability. All Ricoma embroidery machines are optimized for heavy materials and offer professional results on both real and faux leather.

    Machine Embroidery on Sweaters and Knitted Fabrics: What You Need to Know

    Machine embroidery on sweaters and knitted garments opens up beautiful possibilities — cozy monograms, delicate florals, or whimsical designs. But due to the stretchy and looped nature of knit fabrics, special care is needed to avoid distortion or sinking stitches. Here’s a complete guide to getting professional, long-lasting results.
    Understanding the Nature of Knit Fabrics
    Knits are stretchy, soft, and textured. While this makes them incredibly comfortable to wear, it also poses challenges for embroidery:
    They stretch easily, especially side-to-side.
    They can snag or distort if hooped too tightly.
    Stitches may sink into the fabric without proper support.
    That’s why preparation is key.
    Choosing the Right Embroidery Design
    When working with knits and sweaters, design choice matters more than ever.
    Best Design Types:
    Low-density designs (less filled areas)
    Sketch-style or outline designs
    Watercolor or hand-drawn effects
    Avoid:
    Dense, heavy fill designs that may pucker or distort
    Small text or overly detailed logos (especially on looser knits)
    Stabilization Is Everything
    Stabilizers are your best friends when embroidering on stretchy materials. For knits, you’ll usually need a combination of top and bottom stabilizers.
     
     Recommended Setup:
    Bottom stabilizer: Medium-weight cut-away or tear-away (cut-away is better for stretch)
    Top stabilizer: Water-soluble film (WSS) or heat-away film to prevent stitches from sinking into the loops
    Hooping & Fabric Preparation
    Knits should never be hooped tightly like woven fabric. That could stretch them out and cause distortion once removed.
    Use temporary adhesive spray to attach fabric to stabilizer before hooping
    Consider floating the fabric (hoop just the stabilizer and stick the fabric on top)
    Use magnetic hoops when possible — they’re gentle on knits
    Don’t:
    Overstretch the fabric in the hoop
    Embroider without a top stabilizer on sweater textures
    Needles and Thread
    Using the right needle prevents damage to the fabric’s loops.
    Needle: Ballpoint (jersey) needles – they glide through without piercing the loops
    Thread: Polyester or rayon embroidery threads – strong yet soft enough for knits
    Finishing Touches
    After the embroidery is done:
    Remove the top stabilizer with warm water or heat (depending on type)
    Carefully trim the excess cut-away stabilizer from the back
    Steam or press lightly with a cloth on top (don’t iron directly!)
    Which Knits Are Best for Embroidery?
    Knit Type Embroidery Friendly Notes Cotton Jersey Yes Stable and easy to hoop French Terry Yes Use top film for loops Chunky Sweater Knit With care Needs extra stabilizer, avoid dense designs Acrylic Knit Yes Watch heat when pressing Wool Blend Knit Be gentle Can felt with heat or dense stitching Final Thoughts
    Embroidering on sweaters and knits is incredibly rewarding — just imagine cozy holiday sweaters, personalized gifts, or fashionable statement pieces. With a few adjustments in your materials and technique, your embroidery can look flawless and last a long time.

    When Barudan Skips a Beat: Solving Bobbin Catch Issues on Multi-Needle Machines

    Barudan Not Catching Bobbin on Three Out of 15 Needles? Here's What to Check
    Running a 15-needle Barudan can feel like piloting a spaceship—when it works, it’s magical. But when three out of those 15 needles suddenly refuse to catch the bobbin thread? It becomes a test of patience, tension, and sanity.
    A user recently shared their experience, and if you’ve found yourself in a similar bind (literally), you’re not alone.
    The Problem
    Sound familiar? The photo (attached above) shows thread buildup right under the bobbin case — a classic symptom of a few potential culprits.

    Step-by-Step Diagnostic Checklist
    1. Threading Direction – Double and Triple Check
    It might seem basic, but threading incorrectly is the most common cause. On Barudan, the thread must follow a specific path — one user mentioned they looped thread from the back instead of the front and nearly replaced their rotary hook!
    2. Clean the Bobbin Area Thoroughly
    Thread debris, lint, or even stray thread tails can prevent a clean pickup of the bobbin thread. Remove the bobbin case and give it a solid clean — especially around the rotary hook.
    3. Check Needle Bar Height (Needle Penetration Depth)
    Since it’s only some needles, chances are good the needle bar height is slightly off on those specific heads. If the needle isn’t going deep enough into the bobbin hook’s path, it simply won’t catch the thread.
    On some Barudan models, adjusting the needle bar means opening the machine and adjusting the stacker bar (often located behind the front plate). Only attempt this if you're confident or have the manual on hand.
    4. Needle Type and Damage
    Double-check that you're using the correct needle type for your Barudan and that they’re not damaged or slightly bent. Even a slight curve can throw off the hook timing.
    5. Rotary Hook Timing
    While rare, if everything else checks out and the issue persists, it may be a hook timing issue. However, since it’s only 3 out of 15 needles, this is unlikely to be the root cause unless the rotary system is misaligned in specific zones.
    Pro Tip: Adjust One Needle First
    If you're considering adjusting the needle bar height, try it on just one faulty needle head first. That way, you can see if it resolves the issue before making adjustments across all three.
    As one tech-savvy embroiderer put it:
    Helpful Tools & Manuals
    Your Barudan service manual (usually available in PDF format)
    Flathead screwdrivers, Allen keys, and a flashlight
    Phone camera (to document positions before you change anything)
    What This Looks Like
    Photo: Thread bunching under the bobbin case
    In the attached image, you can clearly see where the thread is building up and failing to loop. This is what an un-caught bobbin thread looks like—messy, loose, and a nightmare for clean stitches.
    Final Thoughts
    Embroidery machines can be fussy, especially high-speed, multi-head units like Barudan. When bobbin catch issues strike on just a few needles, it's almost always mechanical—needle height, threading, or cleanliness.
    Have you ever had this issue? How did you fix it? Let us know in the comments or share your photo story!

    Which Embroidery Machine Should I Buy as a Beginner?

    Embroidery Dreams on a Budget: What Machine Should I Choose?
    So you're ready to dive into the creative world of machine embroidery — customizing hoodies, adding flair to jeans, personalizing snapbacks, or even stitching unique designs onto your pup's harness. But the question is: which embroidery machine should you start with?
    You’re not alone in this journey — many beginners are asking the same question, especially when working with a budget around €1000. Let’s walk through some honest advice and user experience shared by hobbyists just like you.
    What Do You Want to Embroider?
    First, think about your goals:
    Hoodies & Jeans: These need a machine that can handle thick fabrics and large designs.
    Snapbacks: These are more challenging due to their structure — single-needle machines might struggle here.
    Dog Harness/Collars: A small hoop or free-arm functionality helps for tight or narrow areas.
    Custom Designs: You'll want a machine that allows importing your own digital embroidery files (usually .PES, .DST, .EXP formats).
    Real Advice: Hoop Size Matters
    This is a golden rule. A larger hoop means you can create bigger and more versatile designs without splitting them into multiple files. For beginners, it’s frustrating to constantly re-hoop.
    Minimum recommended hoop size: 5x7 inches
    Ideal hoop size for versatility: 6x10 or 7x11 inches
    One User’s Experience: Poolin EC05 vs. EC06
    Poolin embroidery machines are gaining popularity for their affordability and performance. The EC05 is a great budget option but has a narrower hoop width which might feel limiting for hoodies or back pieces. The EC06, slightly above your budget at €1,400 regular price, offers more workspace and flexibility.
    Tip: Check for direct sales on Poolin’s official site — they often include tax and sometimes even free shipping.
    Snapback Warning: Single-Needle Limitations
    Snapbacks and structured hats are notoriously tricky for single-needle machines. Multi-needle embroidery machines handle these much better thanks to their tubular arms and cap frames.
    However, if you're sticking to a budget, you can still do snapbacks with some creative workarounds — just prepare for a learning curve.

    What to Look for in a Beginner Machine:
    Hoop size: As large as your budget allows
    USB or Wi-Fi import: So you can use your own designs
    Sturdy frame: For thick fabrics like denim or canvas
    Reliable support and community: Look for brands with active forums, tutorials, and troubleshooting help
    Software compatibility: Make sure it works with digitizing programs like PE-Design, Embrilliance, Ink/Stitch, etc.
    Good Beginner Machine Options (Within or Near €1000)
    Machine Max Hoop Size Price Range Notes Brother SE1900 5”x7” ~€900-1000 Great entry-level combo sewing/embroidery machine Poolin EC05 4”x9.25” ~€589-800 Affordable, decent hoop size, limited width Poolin EC06 7”x11” ~€1400 Bigger hoop, worth saving up for Janome Memory Craft 400E 7.9"x7.9" ~€1000-1200 Dedicated embroidery-only, high-quality Final Thoughts: Choose Based on Your Projects
    If your primary focus is customizing clothing and accessories with your own designs, aim for a machine that:
    Accepts your file formats
    Has a hoop large enough for hoodies and jean pockets
    Can handle thick layers and small areas (like collars)
    Even if snapbacks are trickier at first, you can always grow into it — many creators start simple and upgrade later.
    What’s Next?
    Explore second-hand deals or seasonal discounts
    Start learning digitizing software — it’ll unlock your creative potential
    Join embroidery forums and subreddits for support and inspiration
    And remember: whatever machine you choose, the real magic comes from you — the artist behind the stitches.

    Cursed Totoro? Solving Embroidery Tension Issues with Thread Tips

    When Totoro Goes Wrong: Thread Tension Troubles in Machine Embroidery
    A Stitch Too Far: The Cursed Totoro Incident
    If you've ever looked down at your embroidery mid-stitch and gasped at the unholy creature being born beneath your needle — you’re not alone. One user recently shared their struggle with a “cursed Totoro,” complete with red bobbin thread showing through where it definitely didn’t belong. While their choice of bobbin color made the issue vividly clear, the real culprit turned out to be a classic embroidery challenge: thread tension imbalance.

    Tug of War: Top Thread vs. Bobbin Thread
    Think of embroidery tension as a tug-of-war. Your bobbin thread and top thread are constantly fighting for control — ideally meeting somewhere in the middle of your fabric. But when that balance is off, it shows. Literally.
    If your bobbin thread is showing on top, two things could be going wrong:
    Your top thread tension is too tight (it’s winning the tug too easily).
    Your bobbin tension is too loose (it’s not pulling its weight — pun intended).
    In our Totoro tragedy, the bright red bobbin thread overpowering the white top thread was a telltale sign of tension trouble.
    Diagnosing Tension Issues: Rule of Thumb?
    Here’s what experienced stitchers recommend:
    Try adjusting one thing at a time. Start with the top tension. Loosen it slightly and stitch a single letter (like an “I” or “H”) as a mini test.
    If that doesn’t help, check your bobbin tension. Many bobbin cases have a tiny screw — a quarter turn tighter may be all you need.
    Always make sure your bobbin is threaded and inserted correctly. It should pull the thread in a lowercase "p" shape — “p” for put it in!
    Secret Weapon: The Tension Gauge
    Not sure how much is too much tension? Enter the tension gauge — a handy tool that lets you measure the tension on both your bobbin and top thread. These come in both analog and digital versions and are surprisingly affordable.
    Madeira’s website offers a range of options, but you can also find similar tools on Amazon and other online embroidery suppliers. For beginners, a cheaper analog gauge does the trick just fine.

    Bonus Tip: Thread Weight Matters!
    Another often-overlooked culprit in tension chaos? Mismatched thread weight.
    In this case, the red bobbin thread appeared to be heavier than the top thread, which made it more dominant and harder to keep hidden. Make sure to:
    Match thread weight where possible.
    Check the labels — most threads have their weight printed on the spool.
    If unsure, eyeball the thickness and avoid big mismatches unless you're experienced.
    One Last Word on Color…
    Yes, the red bobbin thread was used on purpose to make the issue easier to spot — but it’s worth noting that matching thread colors (or at least coordinating them) makes a big difference in how forgiving your stitch-outs will look.
    And hey — winding bobbins might be annoying now, but it gets easier with time. Promise.
    Conclusion: Don’t Curse Your Totoro Just Yet
    Embroidery is a beautiful mix of art and precision, and every “cursed Totoro” is just another learning step on the journey. With a little patience, a few tension tweaks, and maybe a tension gauge or two, you’ll be on your way to creating embroidery magic — not mayhem.

    Why My Embroidery Looked Better on the Back: A Beginner’s Machine Embroidery Lesson

    My First Embroidery Machine Project: Why the Front Looked Terrible (But the Back Looked Great!)
    Hi there! I'm brand new to the embroidery world, and I recently gave my very first machine embroidery a try using my Brother SE700. I was super excited, but... let’s just say, things didn’t go exactly as planned.
    I used:
    Simthread 40wt embroidery thread on top
    Simthread 60wt embroidery bobbin thread
    Sulky Cut Away Plus Midweight stabilizer
    The result? The front looked awful—loose, gappy, and uneven—while the back looked amazing… as if it was meant to be the front! Totally confusing, right?
    Take a look:


    My Embroidery Looked Backwards?!
    I tried adjusting the top tension (each “B” in my test has a different setting), but nothing fixed it. The middle bar of the “B” even looked like it wasn't attached to the vertical stroke.
    I had no idea what was going wrong. I started wondering things like:
    Did I hoop my fabric upside down?
    Could the design file be corrupted?
    Was the machine trying to stitch from the wrong side?!
    The online community (thank you amazing folks!) chimed in with some solid tips, hilarious theories, and reassuring support. Here's a breakdown of what I learned.
    Top Lessons I Learned (So You Don’t Have to Go Crazy Like I Did)
    1. Tension Matters... A LOT
    Several people pointed out that my bobbin tension was likely too loose. That would explain why all the bobbin thread was being pulled up and dominating the front.
    Fix: Tighten your bobbin tension in tiny increments. A quarter turn clockwise on the tension screw is a safe place to start.
    2. Thread Weight Differences Count
    Using a 60wt bobbin thread and a 40wt top thread is totally normal—but it means your tension has to be dialed in perfectly. The thicker 40wt should dominate on top, but if the bobbin tension is too loose, the thinner thread will get yanked to the surface.
    3. Threading Must Be Perfect
    Yep—rethread the machine from scratch. Make sure your presser foot is raised when threading so the thread goes through the tension disks properly. A lot of machines won’t apply correct top tension if this step is skipped!

    4. Double Check Your Bobbin Direction
    Several people mentioned that a backwards bobbin can cause major chaos. So if you’re seeing weird results, reinsert it carefully and make sure it’s turning the correct way in the case.
    5. Stabilizer Is Your Best Friend
    Turns out, I got drastically different results depending on whether I used stabilizer or not. When I skipped it? Disaster. When I used it? Much better!
    Always use stabilizer (especially as a beginner!) and consider topping it with a wash-away if you’re working on stretchy or textured fabric.
    The Verdict?
    It was a mix of things: bobbin tension, thread weight difference, and possibly threading mistakes. But now I know, and I hope this helps you avoid the same frustrations.
    Most importantly, if your embroidery looks better on the back, don’t panic—you’re not crazy. You’re just learning, and we’ve all been there.
    Thanks to everyone who helped troubleshoot—I genuinely would’ve gone nuts without you
    Have you ever had a similar embroidery fail?
    Share it in the comments—I’d love to hear your story (and feel a little less alone ).
    Happy stitching,
    A New Embroidery Addict

    Recreating a Patch Design: When Learning Meets Resistance

    Recently, I was asked to recreate an embroidery design for a client who used to outsource their patches but now wants to support local makers. It sounded simple enough—just reproduce an existing 2.25-inch patch. I’ve done similar work before, so I figured I’d digitize it myself and get stitching.
    Cue: frustration.

    No matter how many adjustments I made to the file or tweaks I tried on the machine, I couldn’t get it to look as clean and professional as the original version. The fill stitches looked okay, and tension wasn’t the issue (I double-checked needle gauges and everything), but the lettering—especially at the bottom—just wouldn’t cooperate.

    So... Is It Me? Or Is It My Machine?
    At a certain point, I started to wonder if the real issue was my Ricoma machine. It seems like it's just not built for super fine lettering, especially when it gets down to those 2-inch patch sizes. I know machines have their quirks, but when your file looks great on screen and stitches out like a mess, it’s enough to drive you up the wall.


    The Community Weighs In: Actual Life-Saving Tips
    Thankfully, I wasn’t alone in this. I reached out and got some solid advice from folks who've been in the same boat:
    1. Design Size vs. Font Size
    Even though the patch is 2.25 inches (which matched the original), that still doesn’t leave a lot of space for clean, crisp lettering. Fonts get tricky fast when they drop below a certain size, especially if you're using standard 40wt thread and a 75/11 needle.
    2. Stitch Strategy Tweaks
    For the yellow outline around “Penn”, instead of outlining it literally, try making a wider fill base and letting the white letters overlap slightly.
    Add or adjust pull compensation: set it between .010 and .012 for better coverage.
    Don’t skip underlay, even for thin elements like ribbon lines. A single run underlay can stabilize the stitches and reduce distortion.
    Bump density to .014 for words like "Construction" or "Comprehensive Design" that sit on curves or small spaces.
    3. Small Fonts Need Special Tools
    For really fine lettering:
    Use 60wt thread (Gunold is a favorite for this).
    Switch to a 65/9 needle for better control and less distortion.
    Increase density slightly (around .011) to help with clarity.
    4. Removing Underlay Isn’t Always the Fix
    I was removing underlay from thinner text elements because it was getting messy, but without it, things didn’t look much better either. Sometimes, the messiness is a sign the design just needs more support—not less.
    On the Topic of Outsourcing: A Learning Perspective
    I got a few suggestions to outsource the digitizing entirely—just pay the $25 and be done with it. And honestly, I get that. Sometimes, it is the smartest path.
    But here’s where I stand: I already spent a year having my designs digitized professionally. I’ve studied every stitch from those files, reverse-engineered how they’re built, and have been digitizing my own work for over a year and a half now. Most of the time, the results are solid. But these patch-style designs really push the limits, and that’s exactly why I want to do this myself.
    I have the time. I have the drive. And this project gives me a chance to truly figure it out—not just imitate the look, but understand the logic behind it.

    A Reminder to Fellow Creators
    If you're in the same boat—frustrated with inconsistent results and tempted to throw in the towel—you're not alone. Sometimes, the hardest projects are the ones that push your skills to the next level. Take the feedback that helps, ignore the noise that doesn't, and give yourself space to improve.
    At the end of the day, I’m not just trying to make this patch. I’m trying to master the craft.
    Have you wrestled with small fonts, tricky underlays, or machine limitations? Drop your thoughts below or send me your go-to fixes. Let’s keep learning together, one stitch at a time.

  • Top Downloads

  • Recently Browsing   0 members

    • No registered users viewing this page.
×
×
  • Create New...