
Search the Community
Showing results for tags 'patchwork'.
Found 9 results
-

Discover the Charm of an Embroidered Bag with Writing Mouse Design
ekatreina posted a gallery image in Embroidered bag
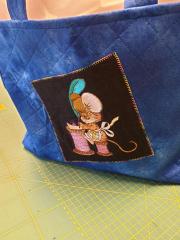 Adorable Writing Mouse Design Embroidery enthusiasts, prepare to be smitten by the charm of this embroidered bag featuring a delightful Mouse writing letter embroidery design. This enchanting creation beautifully showcases the intricate artistry of machine embroidery, turning an ordinary bag into a lovely, eye-catching accessory. A Touch of Whimsy for Your Daily Life This embroidered bag is the perfect companion for those who love to add a touch of whimsy to their daily life. The writing mouse design is beautifully detailed, capturing the imagination and bringing a smile to everyone who sees it. With this bag, you'll be carrying a little piece of magic with you wherever you go. Perfect for Personal Use or Gifting The writing mouse embroidered bag is not only a fantastic addition to your personal collection, but it also makes a wonderful gift for a loved one. Whether it's for a birthday, special occasion, or just to show you care, this unique embroidered bag is sure to delight. Explore the World of Embroidery If you're inspired by this enchanting embroidered bag, why not dive deeper into the world of embroidery? There are countless designs available to suit your interests, ranging from intricate florals to adorable animals. By exploring the vast possibilities of embroidery, you'll be able to create stunning, personalized items that reflect your style and personality. In conclusion, the embroidered bag with writing mouse design is a captivating example of the creativity and beauty that embroidery can bring to everyday items. So, why not add a touch of whimsy to your life with this charming accessory? Author: Ann-kristin Kristoffersen
 -
Enchanting Bag with Cheshire Cat Embroidery Design Perfect Blend
ekatreina posted a gallery image in Embroidered bag
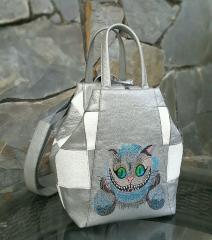 Whimsical Embroidered Bag with Cheshire Cat Design Introducing the enchanting Embroidered Bag with Cheshire Cat embroidery design, a delightful accessory that captures the magic and whimsy of the beloved Alice in Wonderland character. This unique and stylish bag is perfect for literary lovers looking to add a touch of whimsy to their accessory collection. Iconic Cheshire Cat Design The iconic Cheshire Cat design is instantly recognizable and expertly embroidered, bringing the beloved character to life. The cat's signature mischievous grin and vibrant colors make this bag a true conversation starter and an unforgettable accessory. Premium Quality and Craftsmanship The Embroidered Bag with Cheshire Cat Design is crafted from high-quality materials, ensuring a durable and long-lasting accessory. The expertly stitched embroidery adds an extra layer of detail and quality, making this bag a truly special piece. Spacious and Practical Design The generously sized bag offers ample space to store and organize your belongings, making it perfect for daily use or as a unique travel accessory. The practical design features a secure closure, ensuring that your items are safely stowed away and protected from damage. Step into the world of Wonderland with the enchanting Embroidered Bag with Cheshire Cat Design. This whimsical and stylish accessory is the perfect addition to any literary lover's collection, capturing the magic and mystery of the iconic character. The expertly crafted embroidery and high-quality materials make this bag both a durable and visually stunning piece. The spacious and practical design allows you to store and organize your belongings with ease, making it perfect for daily use or as a unique travel accessory. Embrace the wonder and whimsy of the Cheshire Cat and elevate your accessory game with this unforgettable bag.
 -

Big Quilt with free embroidery designs
diver361 posted a gallery image in Showcase with free embroidery designs
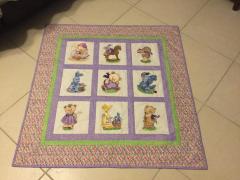
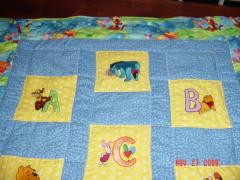 This is nice blanket for children executed in popular patchwork technique. This work piece is decorated with come samples from our Winnie pooh and friends machine embroidery collection. They show figures of favorite characters added by first letter of English alphabet. So your child can not only look at funny cartoon pictures but also remember useful letters while sleeping.
 -

Ways of creating a backpack sewing pattern
Irina posted an article in Machine embroidery materials and technology
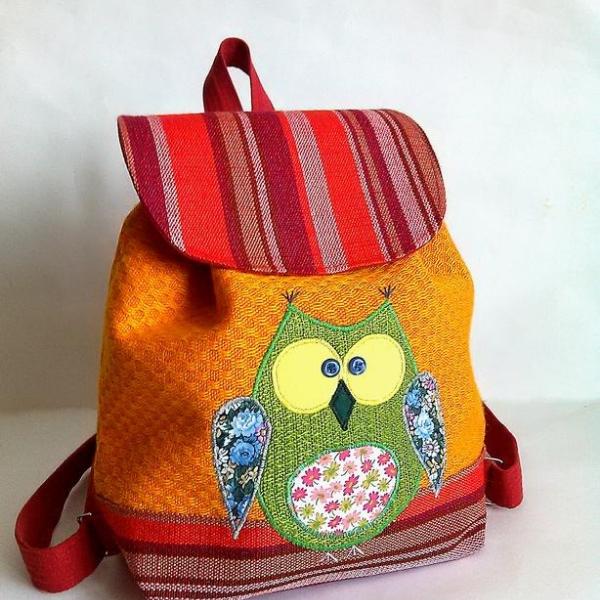 Ways of creating a backpack sewing pattern Backpacks remain in trend for a long time. Handmade backpacks, being unique, are valued most highly. A sewing pattern, suitable fabric, and decorations are all you need to create a stylish backpack at home. A creative approach and the enthusiasm of the seamstress also contribute to the success of the matter. Preparations In order to create a backpack by hand, you’ll need: A needle Threads A thimble Scissors Fabric A piece of dry soap for drawing. Best fabrics for a backpack: Denim (without elastane); Cotton — it breathes, maintains shape and is agreeable to the touch, an important point as you will wear it on your back; Dense synthetic fabrics — they come in handsome patterns, bright and printed. Bags made of such fabric do not need additional decoration. Make sure that the fabric doesn’t stretch too much under the strain and doesn’t crumble on bends. One disadvantage of synthetic fabrics is their ability to absorb smells. A synthetic backpack also feels unpleasant on the back in summer. Synthetic fabrics don’t breathe; they also hold water. You may use this to your advantage, making your bag double-layer to protect things in it from rain. For the lining, the following fabrics are most common: Satin — dense, reliable, and wear-resistant. Rayon — even more reliable than the satin. Cupro — similar to natural silk, soft, and stretchy. Polyester — durable and undemanding fabric, mud-resistant. Sateen — made of cotton and silk threads. Netting — has holes, breathes. Taffeta — a coarse fabric that maintains shape. Now, all that’s left is to decide how to sew a backpack without expensive garment accessories. You may create your own or take accessories off an old bag, coat, and other such things. You may use these for decoration: Belts, buckles, and other fasteners ripped off the old clothes. Leather or fabric fringe. A bunch of twisted colorful yarns (they will serve as strings). Curious-looking buttons, beads, and rhinestones. Ropes of various diameters and colors. Felt appliqué. Quilt, ribbon embroidery. Decorative zippers. Choosing decorations, you must keep in mind that they will be subjected to intense wear and tear and soil, too. So unpleasant when a ruined appliqué or a lost bead makes the whole garment unusable. Detachable garment accessories make washing much easier and allow you to revamp your old item in a simple way — by changing the color of a cord, for instance. You can create a hand-made backpack in two different ways: using your embroidery machine or your own hands. The first way is quicker and easier. Tools and materials: Dense sewing fabric title="Capro and polyester fabrics" The lining: cupro and polyester The lining: satin and rayon The lining: taffeta, netting, tulle netting Garment accessories How to use a sewing pattern If a newbie seamstress doesn't know how to sew a backpack with her own hands, a step-by-step guide and a sewing pattern is a must. They will help to bring her project to life. There are ready-made easy-to-transfer full-scale sewing patterns with measurements. To draft your own pattern, you’ll require the following: A sheet of paper (you may use tracing paper or a newspaper instead) A pencil A measuring tape A ruler A triangle ruler A French curve for rounding corners can be made by hand. Draw a circle on a piece of cardboard with an 18–20 cm radius and cut out one-third of it. With such a contrivance, you will be able to make symmetrically rounded corners. To draft a simple backpack sewing pattern, you’ll only need two measurements: shoulder width; center-back length from the natural neckline to the waist. On paper, draw a rectangle, its width less than your shoulder width. An important point: the backpack should not go below waist level, it would be inconvenient to wear. After that, draw a vertical line through the center of the rectangle — the center axis. Now fold the paper along the axis and draw the preferred outline of your backpack. Cut along the outline to get a symmetrical pattern piece. If you plan to attach things like pockets or cover or a movable bottom, it would be easy to mark them on the basic pattern, adjusting the sizes. In order to decipher the pattern, you need to learn the key notations: The line with the arrow — lengthen. The line with small triangles — the joining line is here. Identical numbers in the inner area — these pieces match together. The crosses work as alignment marks. The arrow between the lines is a place for a ruffle. A crisscross is the place for a button. If you've decided to use a ready complex pattern, you’ll need to enlarge it. On the pattern, measurements are given in cm. In this case, it’d better to use a dense fabric instead of paper. The cutouts are placed on top of the fabric and traced with a piece of soap, sharpened on one end. Before cutting out parts of the pattern, make sure that seam allowance is included. More often, it isn't, and therefore, you’ll need to add 1–1.5 cm on all sides. Sometimes the enclosed seam is used — first, the fabric is folded the wrong side out and stitched, then turned right side out and stitched again. Seams executed in this fashion look neat and add support to the backpack. They require a larger seam allowance. Making a sewing pattern according to the model Sewing your own backpack allows you to choose any model you like. What you need to understand that copying the manufactured models may be futile, due to the lack of the frame and finishing (plastic edges, metallic corners, coarse bottom, etc.). Even if your pattern is accurate, the backpack might turn out quite different. The advantage of homemade backpacks is the individual approach that makes them stand out. It improves the overall imagery, visible in decor and unusual joining seams. Backpack for kids Kids like backpacks shaped like animals. Bunny ears or button eyes are easy to attach, and will make a child happy. On a basic pattern, the upper part must be narrowed. The backpack should resemble a triangle with its apex facing upward. The bottom is made according to the pattern. You can make it two-part, joining the pieces accordion-style and strengthening the edges with a cord. The upper part will be gathered with a cord; to prevent the things from falling out, a flap cover may be added. Pom poms look marvelous on kids’ backpacks. If the kid will wear it to school, you may add the compartments with fasteners for books and exercise-books. Use thin fabric that doesn't soil easily. A detachable lining will be easier to wash. Sewing a pineapple-shaped backpack Cut four rectangular pieces, two out of your main fabric, two out of the lining fabric. Cut and stitch the future rings for the cord. Stitch the rings to the main part of the backpack. Cut and edge finish two rectangles. Join the main part to the rectangular pieces and stitch the base. Align the openings, pin, and stitch. Prepare the four rectangular pieces, draw the lines and stitch. Cut out the pineapple crown. Join the lining to the main part. Join the lining to the main part. Insert the cord (a ready one or made by you). Draw the cord through the rings and fix them with a clamp. Drawstring bag The most convenient shape for a hand-made backpack is a drawstring bag. It is a godsend for creative people. A simple structure leaves room for creating images, from dreamy and romantic to ascetic ones. A drawstring bag is a sack with strings on top and shoulder-straps. A well-known, traditional shape. A sewing pattern for such a bag is rectangular. The bottom edges may be rounded or left as is. The size depends on the maker’s wish. The upper part is not narrowed down, as it is gathered with the strings. The fabric should be soft, that ruffles beautifully — in that case, the upper part, folded like a hand fan, will be a decoration in itself. Romantic drawstring bags are ideal for slim young girls. You may decorate them with pleated straps, and to attach a fringe with beads to the edges. For a mature woman, a backpack bag may be made into a carry-all. The color of the bag should harmonize with the dress, and a brightly colored neck handkerchief may be wrapped around her neck and shoulders. A khaki drawstring bag is fine for men who prefer casual style. A drawstring bag made of thick water-repellent fabric will be indispensable while hunting, fishing, or just hiking. Thick ropes may be used instead of straps. You don't even need to sew them. Colorful ropes for women and restrained sole-colors for men. You may adjust the strap length simply by tying up the two ends where the knot will not rub sore. Straps like that make the backpack look stylish. A shoe bag made of an old pair of jeans: The necessary materials Shape and sew the bottom. Shape and sew a pass-through for the string. Sew the ring for the ribbon. Stitch the ribbon at the bottom. They will serve as straps. Backpack made from an old pair of jeans: Many people ask how to make a backpack without a sewing pattern. If you don’t have a ready sewing pattern, you can draft it yourself or find a tutorial that shows approximately what you want and take the pattern from there. The easiest way is to make your backpack bottomless. In such cases, a front part of the backpack is enlarged to serve as the bottom as well as the front. The following measurements are approximate, you’ll need to make some changes to them in order to suit the pattern to your tastes and needs. The back part, slightly narrowed down — 26 cm wide. You may add about 3 cm on each side in the middle. The front part is cut as a semicircle with a 38 cm radius. The flap cover is rounded. It should be one part with the back. It should drape freely and elegantly onto the gathered top. The straps are made of denim. If you don't have a sufficient amount of material, you may substitute denim for a decorative cord. If wished, a hanger is attached, so that the backpack is easy to pick up. The center of the semicircle and the lower edge of the back part are aligned along the vertical centerline of the pattern. The edges of the semicircle are stitched to the back part. The upper part of the backpack is gathered with strings and covered with a flap. The straps are stitched to the upper and the lower edges of the back part. For this model, you’ll need a very wide piece of fabric. If you don’t have a sufficiently wide piece, you may sew it from pieces, because this type of backpack may be quilted. A backpack from an old pair of jeans Draw the parts of the future backpack. Cut out the pattern. Sew the bottom, the parts, and the flap. Attach the denim straps. Sew the handles, if necessary. The fabric should not be threadbare. Patchwork backpack Being skillful at patchwork allows you to create beautiful garments out of scraps. You can join the fabric pieces haphazardly or create a particular pattern. It is not rational to cut the existing length of fabric to pieces, better to use the trimmings and leftovers already accumulated. For this reason, don’t try to make a facsimile of a backpack you’ve seen somewhere. Instead, find the backpack you like, alter it to suit your needs. A patchwork backpack without a bottom may be decorated according to your tastes. For example, a flap can be rendered as a divergent beam of light or a cluster of petals. The straps might be made of horizontal strips or pleated. The front part may be sole-colored or contain vertical insets that look beautiful between the pleats. Before sewing a new backpack, you should make a sewing pattern. Just draw the shape of the future item on paper, then cut and trace the pattern to the fabric. Don’t be afraid to spoil the materials in case something goes wrong. Failure helps you to master the necessary skill. Stitching the scraps of fabric into one piece. Cut the fabric according to the simple pattern. Out of the patchwork piece, prepare the flap with the clamp. Make the slash pockets with zippers on the front part. Slash pockets from inside: The front and the back parts remain sole-colored. Sew the hanger, the flap, and the straps. The back part and the lower part: Join the front part to the back. Draft the pattern of the bottom. Sew the bottom as pictured on the pattern. Sew the bottom to the front. Prepare the lining. Sew parts of the lining. Sew the base and attach the upper flap. Stitch the edging. A ready model should be supplemented with a cord. Make the openings for the grommets and draw the cord through them. A ready patchwork bag: Original text by sumki.guru title="Owl backpack"
 -
 Patchwork quilt for a child If you have a small kid or are expecting one and love sewing, this tutorial is for you. Using only natural fabrics, you can decorate a child’s bed with a patchwork quilt of your own making. Haven't tried patchwork quilting yet? Now is the right time! To create a simple quilt block, you’ll need scraps of bright-colored fabrics and a sewing machine. Let’s go! Patchwork quilt for a child. Materials For this patchwork quilt, I’ve bought a ready set of fabrics with batik print and a piece of sole-colored backing fabric. There were 40 squares in the bundle, size 12.5x12.5 cm. You may cut your own squares or buy a ready fabric set, as I did. To make the quilt warmer and puffier, you’ll need a thing called quilt batting, designed specifically for this purpose. It is usually made of cotton, bamboo, wool, or their combinations. You’ll also need some lining fabric. As you’re making a kid’s quilt, this fabric ought to be natural. Cotton, calico or lightweight calico will do splendidly. Patchwork quilt for a child. Cutting For a patchwork quilt, cut the same number of squares out of your sole-colored backing fabric. Place the squares by pairs with their right sides together, a bright-colored plus a sole-colored one. Draw the lines on the sides to mark the seam allowance. In my bundle, the size of the squares didn't ideally correspond to the one I needed. So I drew two parallel lines at a distance of 11.5 cm. That would mark the width of the ready square. Done that? Pin the pieces together. Patchwork quilt for a child. Joining the pieces Stitch along the lines on the right and of the left. Repeat with the top and the bottom of the square. Press the seam allowances. Now draw the diagonal lines from one corner to the other. Cut the squares along those lines. Join these smaller pieces by pairs, their right sides together. This is the most interesting part; you can “play” with the squares and create various combinations. Remember the kaleidoscope you’ve probably had in your childhood. Choose your pattern, arrange the blocks and pin them together so as not to mess up the whole thing. Baste them together and press the seam allowances. Lay the resulting short strips of fabrics together and sew them to each other. While arranging the pieces, position them so that their seam allowances are oriented in different directions, thus “locking” them. Having sewn the pieces together, unstitch the fabric near the “lock” and press the seam allowance open (see in the photo below). In our future tutorial, we’ll tell you how to arrange the quilt blocks into a ready quilt. Original text by Irina Lisitsa See also:
 -
Embroidered patches with bear and cats designs
ekatreina posted a gallery image in Look how right using Cartoon Embroidery designs
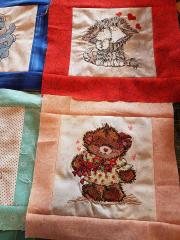 There are two embroidered patches with the images of cute cartoon heroes made by Marita Tjulander. At this time she chose two embroidery samples for her work. First of them is Fluffy pair embroidery design — the picture of two funny cats loving each other. The other one is Cute bear girl embroidery design — the image of cute little bear with the gift in red package for the beloved person.
 -
Embroidered quilt with old toys designs
ekatreina posted a gallery image in Look how right using Cartoon Embroidery designs
 This is pretty embroidered quilt which will perfectly look on children room’s floor. We used some interesting samples. You may find all of them in our Old Toys machine embroidery designs collection. There are some rabbits, bears and other toys on this mat. They seem to be shown at frame of huge window. Each of embroidered picture is executed on separate piece of fabric. Then they were collected on one big space.
-
- 1
-

-
- patchwork
- embroidery design
- (and 7 more)
-
Embroidered patchwork with cartoon heroes
ekatreina posted a gallery image in Look how right using Cartoon Embroidery designs
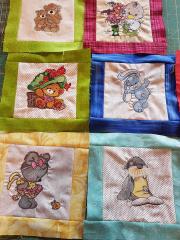 There is the set of six patches with embroidered cartoon characters made by Marita Tjulander. These funny pictures are ready to decorate the clothes or any textile accessories: Twinkletoes machine embroidery design is the pretty blue rabbit, Blubber machine embroidery design — funny lazy seal, Shy teddy bear machine embroidery design — pretty bear girl, Fashion teddy bear machine embroidery design — little bear in huge hat, Duckling with bouquet embroidery design — cute bird with many flowers.
-
- 1
-
-
- patch
- embroidery design
- (and 3 more)
-
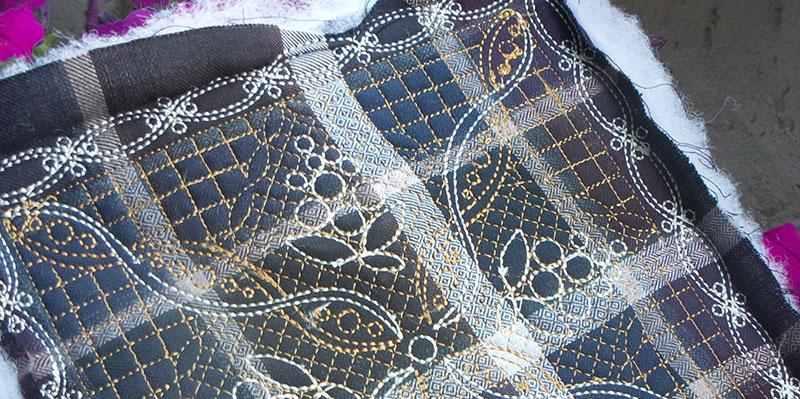 Making patchwork quilt on the embroidery machine Level: beginner. If you are fond of both quilting and machine embroidery, this tutorial is for you. Do want to make high-quality quilt blocks quickly? Patchwork quilt on the embroidery machine: high quality without painstaking and time-consuming work. Just a few easy steps will enable you to decorate your project with an ornate stitched pattern. Patchwork quilt on the embroidery machine: Materials: Upper fabric (front) Mid-layer (batting) Lower fabric (back) Upper thread Machine embroidery design (straight stitch) Visit our store to find a suitable embroidery design! Patchwork quilt on the embroidery machine: preparations Load the design into the embroidery machine or use the one from the memory. Activate the Basting option. Hoop the mid-layer only. For the mid-layer, you may use a high-loft polyester batting (150 gsm, two layers), cotton batting or any other kind of wadding for quilt. Choose your batting in accordance with your needs and the desired outer look of the ready item. In this tutorial, we’re going to quilt both the front and the back. In order to attain high quality and a beautiful back side, use identical upper and lower threads. Secure a piece of the backing fabric on the wrong side of the hoop with the help of a temporary spray adhesive. The wrong side of the fabric should face the batting. The piece of fabric should be approximately 5 cm larger than the ready quilt block on each side. When you make a quilt with the high-loft mid-layer, the covering fabric will get smaller, hence the shrinkage allowance. Patchwork quilt on the embroidery machine: machine embroidery Having attached the hoop to the machine, cover it with the fabric for the front, with its wrong side facing down. Hit the start button. With the Basting option turned on, all layers of the future block are first stitched together with a basting stitch. If your machine doesn’t have this option, create an outline with straight stitches no less than 7 mm long in any embroidery software. You will be able to use this outline for basting in your future projects. The outline comes first in the sewing order, before the design. After the embroidery is finished, you’ll have a ready quilt block. The front and back will look equally fine due to the identical threads. Original text by Irina Lisitsa

