Search the Community
Showing results for tags 'puff'.
Found 5 results
-

Embroidered puff with funny cats free designs
ekatreina posted a gallery image in Things embroidered with Animals designs
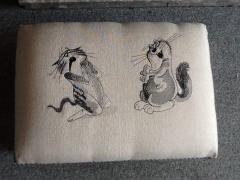 This picture shows the extraordinary puff which is decorated with two embroidery samples. All of them are made in black and white color scheme which makes them look like drawn by thin black pencil. Left one is Sneaky cat free embroidery design and right picture is Funny cute cat free embroidery design. The rough texture of the fabric of this puff is the excellent background for embroidery samples.
 -
Embroidered puff with funny cats free designs
ekatreina posted a gallery image in Things embroidered with Animals designs
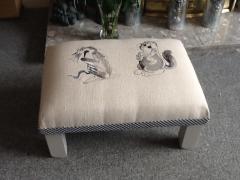 On this picture you can see the original furniture which is made with usage of embroidery. It is the low puff which is ok for the hall or lounge. The surface of this puff executed from rough textile is decorated with the pictures of two cats. Left of them is Sneaky cat free machine embroidery design and the right one is Funny cute cat free machine embroidery design, both are made in white and black color scheme.
-
- 1
-

-
- decoration
- bench
- (and 9 more)
-
I am embroidering puff onto a baseball cap (Hawk Head) design. Using a tearaway stabilizer and 2mm puff. I am experiencing a problem with the final sew out where the design is pulling in (concave) the area of the design on the front of the hat. Get the same happening on other puffed designs also. Using a Pantogram 1501 single head machine. Looking for suggestions as to what I may be doing wrong. Ideas?
- 1 reply
-
- 1
-
-
- puff
- stabilizer
- (and 3 more)
-

How to make puffs on your embroidery machine
Irina posted an article in Machine embroidery materials and technology
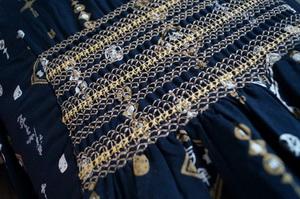 Original text by Olga Milovanova The word "puff" derives from the French verb "bouffer" – to puff up. Puffs are rows of pleats arranged in a certain way. The fabric for them is gathered manually. The puffs were especially popular in the 70s and 80s: so-called "waffles", a type of handmade puffs, were used then for dresses and blouses. Nowadays we witness the second wave of popularity. Modern designers use this type of decoration in their collections. Puffs are becoming a fashionable detail of the clothes. Thanks to the innovations, it became possible to make puffs and create embroidery designs with crashing on the embroidery machines. Brother Innov-is XV embroidery machine has an unusual library of designs with 3–5 mm stitches, which are repeated 3–5 times. These are crashing designs that imitate puffs. (Crashing effect is also called crinkle effect). Madeira Smoking thread is used for that. After washing and ironing the threads on the wrong side gather and create wrinkles on the fabric. These are what we can call «designs with crashing effect». Let's play around! Wind the Smocking thread on a spool, hoop the fabric, pick a crashing design from the library and start embroidering it. You won't need a stabilizer here. After unhooping, the embroidery looks just like usual. Iron it. Set your iron at the maximum temperature for your fabric type and gently slide across its wrong side. No pressing down! The thread will gather about 30%. The lighter is the fabric, the more pronounced will be the crashing effect. I used a ready shirt as a test sample. I aligned my future embroidery with the waistline. Framed the shirt, without a stabilizer, and embroidered it. Set an iron at "Cotton" and "heated" the embroidery through, from the wrong side. This resulted in a "crashing" effect. I decided that I wanted more volume and made changes to the sewing pattern. I cut the pattern for the back bodice along the princess line and the waistline. On the lower side of the back bodice, starting from the folding line, 5–10 cm were left for allowance. No allowance in the upper part; I cut it from the folding line. Gathered the fabric with the basting stitch along the waistline, and pinned the lower and upper sides face-to-face. Stitched the upper and the lower parts of the back bodice. Time to embroider! Frame the fabric so that the seam line runs parallel to the edge of the frame. Position the design in such a way that the design will cover the seam joining the two details. Stitch several times to make it more expressive. Unhoop the whole thing, iron it with a hot iron from the wrong side. The smocking thread will shrink 30%, gathering the fabric, and the allowance will add the volume. Now sew up the item. This is the ready item embroidered on the back. The experimenting continues )
- 1 comment
-
- 1
-
-
- instruction
- step by step
- (and 1 more)
-
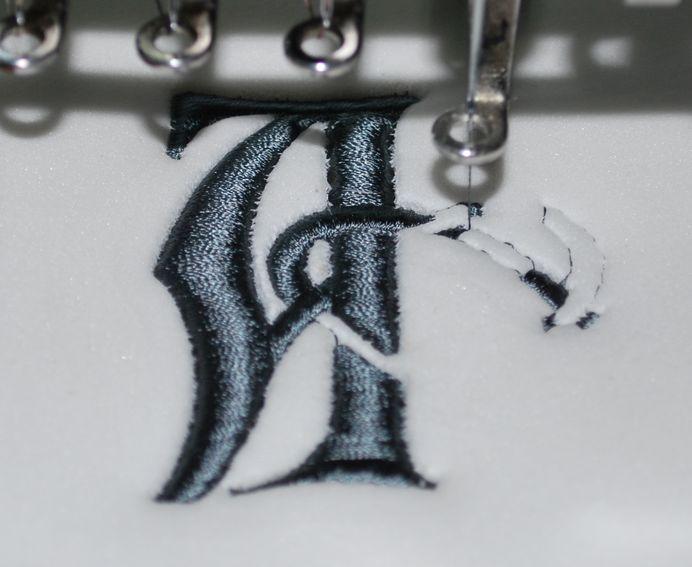 Original text by: Marina Belova One of these days Lubov Tabunidze puzzled me with her conclusions on the subject of different ways of making of 3D machine embroidery by using From what I've read on the topic in the open sources, I've learned that there seem to be at least 3 different methods of making 3D embroidery design, depending on your preferences. I mean the amount of understitching: The one I described, where there was a large amount of it (edges + zig-zag stitch). Along the edges only. And without any understitching at all. In one source I found a clear explanation on why the second method is the best — because the understitching flattens the 3D Foam and the upper layer of stitches, which is very thick, is not as smooth as you would want it to be. Of course, I'd like to try all of these methods myself, to see with my own eyes, if there is the difference. I embroidered a monogram using a large amount of understitching (on the right) and with minimum amount of it along the edges (on the left): I swept aside the method without understitching for I had found it futile. In the process of embroidering a monogram with minimum understitching: And this is a monogram with a lot of understitching: Here is the end result of the embroidery design: It turned out that a monogram with zig-zag understitching is more flat than the one done with common stitch. Satin columns don't look smooth on zig-zag understitching, the thread begins to twist, and that is very conspicuous and very ugly. As for the 3D Puff perforation, these two techniques are the same — in either case you should make a finish and remove the Puff leftovers. This given the fact that there is quite a task to find a 3D Puff of the same color as the thread: I've only seen white and black on the market. Such are my observations on the technique nowadays.
-
- 4
-

-

-
- foam
- understitching
- (and 6 more)