
Search the Community
Showing results for tags 'my editor'.
Found 9 results
-
 I am new to My editor. I cannot see the tool button on bottom of the screen so I can resize. How do I get it. My embroidery design is bigger than the space to work on. How do I also change this.
 -

Version 5.0.8517
982 downloads
My Editor from WingsXP is even more than a machine embroidery format converter. And all because, apart from the standard features for reading and re-saving the file, the developers provided users with a little extra convenience. I believe that it is for these small bonuses that the converter is called My Editor. With standard features (from left to right): 1) Opening, recording, inserting, etc .; 2) Scaling; 3) Tools for selecting and inverting selection; 4) Tools for manipulating the visibility of objects; 5) Navigating the project on objects and stitches; 6) Tools for manipulating the display of puncture points, stitches, contours (for native files); 7) The player to simulate the embroidery process; 8) Project information panel; Toolbar 2 Toolbar with special features (listed from left to right): 1) A tool that opens the color manager (thread and background); 2) Color palette with the ability to control the visibility of each color; 3) Special machine functions for deletion or insertion; Vertically on the left there is a toolbar for design manipulation (selection, scaling, rotation, stitch editing, etc.): Toolbar 3 Each toolbar can be customized in appearance by hiding or opening tools. The File menu is standard. Print settings, send design by e-mail standard. The list of file formats that the program opens: List of file formats to save: It is possible to manage the beginning and end of the project at its discretion (last line). The View menu gives users several options: Preview3D - shows the design in a realistic form. Realistic look my editor Toggle grid - enable or disable grid display. Grid options - setting grid parameters. Guidelines - opens a window for guide manipulations. In My Editor, it is possible to set guides both in the traditional way through a ruler, and through this window. But at the same time put in it the exact coordinates of the guides and close them from random editing. Types of guides in this application: horizontal, vertical, inclined, circles. You can also set the guides by right-clicking on the top ruler. And then you can get something like this: Types of guides in my editor Crosshair - includes a large crosshair at the tip of the mouse pointer. Toolbar - controls the visibility of toolbars. Rollups - allows you to display 1) ImageMap palette satellite window for easy navigation throughout the design satellite window for viewing and navigating the entire design my editor 2) Sequence manager - a window with a display of a sequence of embroidery on objects. Reorder panel of my editor objects The Layout menu allows you to duplicate the embroidery design by specifying the number of copies and the distance between the designs: Design duplication in my editor The Stitches menu looks like this: It gives users the ability to remove all short stitches smaller than a given length in the design through the window.: removing short stitches in design And make a recalculation of the density of the embroidery design (even stitch) when resizing it with the AutoDensity Apply tool. This application adjusts the density to the new size on its own, according to its internal algorithms and it is impossible to control the quality. You can also download software in official website: My editor free embroidery software System Requirements Minimum CPU: 1,5 GHz Intel or AMD 32-bit x86) processor RAM: 2GB of RAM Hard disk: 300 MB of free uncompressed space Graphics card: 3D PCI-X accelerator with DirectX 9.0c, 32-bit color, and at least 256MB of RAM Monitor Resolution: 1024x768 32bpp O/S: Windows XP (with Service Pack 3 or later) or Vista™ or 7, or 8.1 or 10 Recommended CPU: 2+ GHz Intel or AMD 32-bit (x86) processor RAM: 3GB of RAM Hard disk: 300 MB of free uncompressed space Graphics card: 3D PCI-X accelerator with DirectX 9.0c compatible drivers and at least 1GB of RAM Monitor Resolution: 1920x1080 monitor resolution O/S: Windows XP (with Service Pack 3 or later) or Vista™ or 7, or 8.1 or 10 Printer: Windows-compatible Laser-inkjet printer. The following tutorials are available for this program. This will help you understand how to use this software. -
 View File My Editor free embroidery software My Editor from WingsXP is even more than a machine embroidery format converter. And all because, apart from the standard features for reading and re-saving the file, the developers provided users with a little extra convenience. I believe that it is for these small bonuses that the converter is called My Editor. With standard features (from left to right): 1) Opening, recording, inserting, etc .; 2) Scaling; 3) Tools for selecting and inverting selection; 4) Tools for manipulating the visibility of objects; 5) Navigating the project on objects and stitches; 6) Tools for manipulating the display of puncture points, stitches, contours (for native files); 7) The player to simulate the embroidery process; 8) Project information panel; Toolbar 2 Toolbar with special features (listed from left to right): 1) A tool that opens the color manager (thread and background); 2) Color palette with the ability to control the visibility of each color; 3) Special machine functions for deletion or insertion; Vertically on the left there is a toolbar for design manipulation (selection, scaling, rotation, stitch editing, etc.): Toolbar 3 Each toolbar can be customized in appearance by hiding or opening tools. The File menu is standard. Print settings, send design by e-mail standard. The list of file formats that the program opens: List of file formats to save: It is possible to manage the beginning and end of the project at its discretion (last line). The View menu gives users several options: Preview3D - shows the design in a realistic form. Realistic look my editor Toggle grid - enable or disable grid display. Grid options - setting grid parameters. Guidelines - opens a window for guide manipulations. In My Editor, it is possible to set guides both in the traditional way through a ruler, and through this window. But at the same time put in it the exact coordinates of the guides and close them from random editing. Types of guides in this application: horizontal, vertical, inclined, circles. You can also set the guides by right-clicking on the top ruler. And then you can get something like this: Types of guides in my editor Crosshair - includes a large crosshair at the tip of the mouse pointer. Toolbar - controls the visibility of toolbars. Rollups - allows you to display 1) ImageMap palette satellite window for easy navigation throughout the design satellite window for viewing and navigating the entire design my editor 2) Sequence manager - a window with a display of a sequence of embroidery on objects. Reorder panel of my editor objects The Layout menu allows you to duplicate the embroidery design by specifying the number of copies and the distance between the designs: Design duplication in my editor The Stitches menu looks like this: It gives users the ability to remove all short stitches smaller than a given length in the design through the window.: removing short stitches in design And make a recalculation of the density of the embroidery design (even stitch) when resizing it with the AutoDensity Apply tool. This application adjusts the density to the new size on its own, according to its internal algorithms and it is impossible to control the quality. You can also download software in official website: My editor free embroidery software System Requirements Minimum CPU: 1,5 GHz Intel or AMD 32-bit x86) processor RAM: 2GB of RAM Hard disk: 300 MB of free uncompressed space Graphics card: 3D PCI-X accelerator with DirectX 9.0c, 32-bit color, and at least 256MB of RAM Monitor Resolution: 1024x768 32bpp O/S: Windows XP (with Service Pack 3 or later) or Vista™ or 7, or 8.1 or 10 Recommended CPU: 2+ GHz Intel or AMD 32-bit (x86) processor RAM: 3GB of RAM Hard disk: 300 MB of free uncompressed space Graphics card: 3D PCI-X accelerator with DirectX 9.0c compatible drivers and at least 1GB of RAM Monitor Resolution: 1920x1080 monitor resolution O/S: Windows XP (with Service Pack 3 or later) or Vista™ or 7, or 8.1 or 10 Printer: Windows-compatible Laser-inkjet printer. The following tutorials are available for this program. This will help you understand how to use this software. Submitter diver361 Submitted 07/15/2019 Category Free embroidery software
 -
 i have a brother SE600 and just cannot seem to get purchased fonts into my machine. I purchase, download, unzip, copy the PES file to my flash drive then when i insert into machine it displays folders (side, middle letters) but cannot view any letters or open the folders. I have used all the monogram fonts that came on my machine and want a fancier monogram for granddaughter. Hope someone can tell me what I am doing wrong!
- 1 reply
-
- 1
-

-
- brother se 600 embroidery machine
- hoop size
- (and 1 more)
-

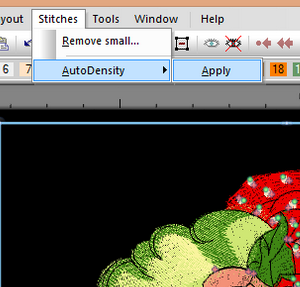 How open file you can read here For example, used he design of Fashion teddy bear design from our embroidery library. The format is chosen arbitrarily. Open the design you want to resize. Click on Upscale design. Increase the size of your design either by percent or by a certain number of cm. (I added 10%). Press OK. As you can see in the lower left corner of the window, your design is now bigger than it was, but the number of stitches remains the same. This means that the embroidery may look a bit bald when finished. And we don’t know that, do we? Press Ctrl + A to select the entire design. Ultimately, left-click on any part of the background and drag to enclose the entire design. You’ll see a rectangular frame around it. Now, go to Stitches > Auto Density > Apply. My Editor has automatically added the stitches in the required places. You can see that your stitch count went up. All that is left is to store your design where you want it on your computer.
 -
In My Editor embroidery converter software, you can open your machine embroidery design in several ways. The first one is to select File > Open. The second is to select File > Browse to find the embroidery design on your computer. The third is to click on this icon on toolbar. Select the design you want and click on Open. Voila! To save your embroideyr design in another stitch format, select File > Save As. Choose the desired format (determined by the type of your embroidery machine, ex. for BROTHER PR 1000- you can choose PES or DST) from the drop-down list. Now press Save and store it wherever you want.
-
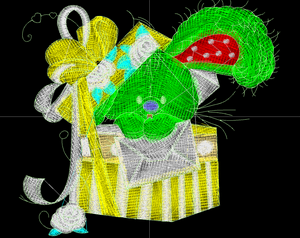
Rainbow cats embroidered on a scrap of denim
diver361 posted a gallery image in Showcase with free embroidery designs
 Author: Cindy Stokes Boucher Author comment: 'This is my first attempt at editing. I used My Editor, reducing it to fit a 5x7 hoop. Embroidered on a scrap of denim for weight and it still puckered a little. Used 3 sheets of Floriani tear away stabilizer. How can I stabilize it better, reduce a little more density and embroider it on a t-shirt? (I'm a little new to all this.)"
 -
 You can do that by either using a color palette from a .EDR file (what's this?) or change the color of every object manually. Today we’ll focus on the second method. It will be handy for those who like to create their own color schemes. Open the design in My Editor and see that the colors are all wrong. Look at the top left corner of My Editor window and find the Color Manager icon. Click on it. A pop-up window will appear, divided into several parts. On the left, you see the available palettes and the colors they contain. On the right are the colors used in your design. You can use a color chart that comes with the order as a reference point or choose any color you like from any of the available palettes. The color chart for this particular Bunny is for the Robinson-Anton Rayon threads. 1.Set your cursor at the color you want to change. From the color chart that comes with the order, you know that this object should be painted ruby glint instead of yellow. 2. Choose Robinson-Anton color palette from the drop-down list. For your convenience, the items in the palette can be arranged either by name… …or by colors. 3. Find Ruby Glint on the list, set your cursor at it and click on Set Color. You’ll instantly see how the embroidery design looks with this new color. Repeat the steps 1–3 until you are satisfied with the result, then press OK. In this example, I used Robinson-Anton color palette, but you can choose any one you like. You can even combine them if you’re going to use different types of threads. Don’t forget to save the design after you’ve completed tinkering with it!
 -
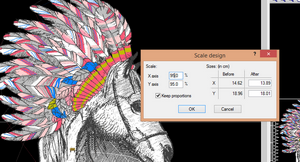 For this operation used free machine embroidery software My Editor. To show you how to change the size of a machine embroidery design without changing the number of stitches in it, we are going to use this lovely horse’s head. Note the original stitch count in the lower left corner of the window. Find a Scale design icon on the screen left and click on it. You can scale your design in two slightly different ways. The first way is to change the size of a design by X percent: The second is to manually enter the height and width values in cm: Unless the image is skewed in the first place, don’t forget to check the “Keep proportions” box. This way, you’ll only need to change either the height or the width, and the correct aspect ratio will be maintained. Now, press OK. Note that the number of embroidery stitches in the design in both cases stays the same. If you accidentally entered the wrong value, just undo it by pressing Ctrl + Z on your keyboard. Having made all the alterations, Select File > Save as and store your resized design somewhere on your computer. Keep in mind that it is generally not recommended to scale your embroidery designs by more than 5%. Used Stay Wild machine embroidery design

