Search the Community
Showing results for tags 'thread'.
-

Embroidered Cosmetics Bag with Sewing Mouse Design of Style Function
ekatreina posted a gallery image in Embroidered bag
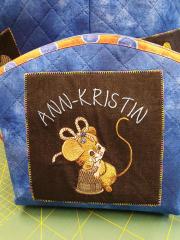 Adorable Embroidered Cosmetics Bag with Sewing Mouse Design Introducing the charming Embroidered Cosmetics Bag with Mouse likes sewing craft embroidery design, the perfect accessory to keep your makeup essentials organized and easily accessible. The delightful sewing mouse design adds a whimsical touch to this stylish and functional cosmetics bag, making it an ideal addition to any fashion-conscious individual's collection. Whimsical Sewing Mouse Design The enchanting Sewing Mouse Design features a cute and playful mouse diligently working on a sewing project. This unique and endearing design adds a touch of whimsy to your cosmetics bag, setting it apart from ordinary makeup storage solutions. Premium Quality and Durable Materials The Embroidered Cosmetics Bag with Sewing Mouse Design is crafted from high-quality materials, ensuring a durable and long-lasting accessory. The expertly stitched embroidery design not only adds visual appeal but also contributes to the bag's overall sturdiness and resilience. Spacious and Practical Design The generously sized cosmetics bag offers ample space to store and organize your makeup essentials, making it an ideal solution for both daily use and travel. The practical design features a secure zipper closure, ensuring that your belongings are safely stowed away and protected from damage. Add a touch of whimsy to your daily routine with the charming Embroidered Cosmetics Bag with Sewing Mouse Design. This delightful accessory is the perfect blend of style and function, providing ample space to store and organize your makeup essentials while adding a unique and endearing design element. The sewing mouse design is both adorable and captivating, making this cosmetics bag a must-have addition to any fashionista's accessory collection. Crafted from premium quality materials, this durable and long-lasting bag is perfect for daily use or travel, ensuring that your makeup essentials are always organized and easily accessible. Embrace the charm of the Sewing Mouse Design and elevate your cosmetics storage game with this enchanting accessory. Author: Ann-Kristin Kristoffersen
 -
 My wife and I have had a Brother PE770 for a year or so and have been able to resolve most issues by running down the checklist (e.g. rethread, reset bobbin, clean bobbin area, etc), but this one has us stumped. All of a sudden the upper thread is stitching out very loose, with big open loose loops on the bottom and virtually no bobbin thread on the bottom at all. See pictures of what's happening here: We've made no changes in how we embroider at all - standard upper and bobbin thread we always use, same fabric, same fonts, etc. This just started happening out of nowhere. It even "fixed" itself at one point in the middle of a pattern where it had been stitching out loose, only to go back to stitching loosely. We've seen some posts online saying the upper thread tension is loose and we should increase the tension through the digital settings, but (i) we've tried that and it didn't work and (ii) we've never fiddled with those settings so it shouldn't all of a sudden need that digital adjustment. We are a bit desperate and would love any help or tips!
-
 Are you looking for a stylish and practical accessory for your beach day? Look no further than towels with machine embroidery! These unique and personalized towels are not only functional but also add a touch of style to your beach day. In this article, we will explore the benefits of using towels with machine embroidery as your go-to beach accessory. Teddy bear with I LOVE YOU board embroidery design 1. Introduction When planning a beach day, towels are an essential item that cannot be forgotten. Not only do they keep you dry and comfortable, but they also protect you from the hot sand. While ordinary towels serve their purpose, towels with machine embroidery add a personalized touch that sets them apart. These towels offer an excellent opportunity to show off your personality while also being functional. Flying fairy with magic wand embroidery design 2. What is machine embroidery? Machine embroidery is the process of creating patterns or designs using an embroidery machine. The machine uses various threads to create intricate and detailed designs on fabric. The embroidery machine allows for a wide range of customization, making it possible to create unique and personalized towels for your beach day. Cute puppy with big flower embroidery design 3. The benefits of towels with machine embroidery 4. Personalization One of the significant advantages of towels with machine embroidery designs is the ability to personalize them. Whether it is your name, initials, or a fun beach design, the possibilities are endless. Personalization adds a unique touch to your beach day, and it also makes it easy to identify your towel among the sea of towels on the beach. Teddy bear after shower embroidery design 5. Variety of embroidery designs With machine embroidery, designs you have a vast array of designs to choose from. From fun beach designs like palm trees and sea turtles to more elegant and sophisticated designs like monograms, there is something for everyone. Additionally, if you have a specific design in mind, you can work with a professional to create a custom design. 6. Durability Towels with machine embroidery designs are made to last. The embroidery process designs reinforces the fabric, making it less likely to fray or tear. This is especially important for beach towels, which are exposed to sand and saltwater, causing regular towels to wear out quickly. 7. Versatility Machine embroidery designs allows you to personalize towels for more than just the beach. You can use them for pool days, picnics, and even as a unique gift for a loved one. The versatility of these towels makes them an excellent investment. Teddy bear in the bathroom embroidery design 8. How to choose the right towels for machine embroidery designs Love you machine embroidery design 3 Choosing the right towels for machine embroidery designs is critical to ensure a high-quality end product. Here are some factors to consider when selecting your towels: Material: Select towels made of high-quality cotton or cotton blends that are absorbent and soft. Size: Consider the size of the towel, it should be large enough to provide ample space for the embroidery design. Color: Choose towels in neutral colors, like white or beige, as they provide a blank canvas for the embroidery design to stand out. 9. Types of embroidery machines Frog's rest under mushroom embroidery design There are two main types of embroidery machines: single-needle and multi-needle. Single-needle machines are more affordable and suitable for personal use, while multi-needle machines are more expensive and designed for commercial use. 10. Materials needed for machine embroidery design To create towels with machine embroidery, you will need the following materials: Embroidery machine Embroidery thread Stabilizer Towels Embroidery designs 11. Maintenance of towels with machine embroidery designs Proper maintenance of towels with machine embroidery designs is essential to ensure their longevity. Here are some tips to keep your towels looking like new: Avoid using bleach or harsh detergents. Wash towels in cold water and tumble dry on low heat. Do not iron directly on the embroidery design. 12. How to care for your towels with embroidery designs To care for your towels with machine embroidery, follow these simple steps: Shake out the towel to remove any sand or debris. Rinse the towel with fresh water to remove any salt or chlorine. Hang the towel to dry in a shaded area to prevent fading or discoloration. ips for using towels with designs for embroidery at the beach To make the most out of your towels with machine embroidery at the beach, consider these tips: Bring multiple towels to use throughout the day. Use a waterproof bag to protect your towel from sand and water. Avoid leaving your towel in direct sunlight for prolonged periods. Where to buy towels for designs embroidery There are many places to buy towels. Consider searching for local shops or online retailers that specialize in personalized towels. Conclusion Towels with designs for embroidery are a functional and stylish accessory for any beach day. They offer personalization, durability, and versatility, making them an excellent investment for any beach-goer. With proper care and maintenance, these towels will last for many summers to come. FAQs Can I use any type of towel for machine embroidery designs? It is best to use high-quality towels made of cotton or cotton blends to achieve the best results. How long does it take to create a machine embroidery design? The time it takes to create a machine embroidery design varies depending on the complexity of the design and the machine being used. Can I create my own embroidery design? Yes, you can create your own embroidery design or work with a professional to create a custom design. Can I wash towels with machine embroidery in a washing machine? Yes, but be sure to follow the care instructions for the towels to ensure the embroidery design remains intact. Are towels with embroidery designs more expensive than regular towels? Yes, towels with machine embroidery are typically more expensive due to the personalization and intricate embroidery process. However, they are a worthwhile investment for any beach-goer looking to add a touch of style to their beach day.
 -
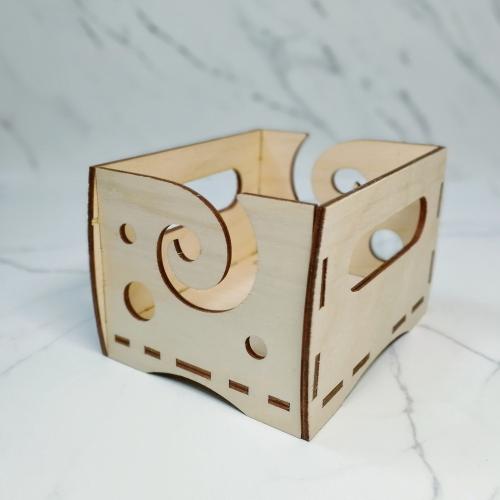
Version CDR format
27 downloads
Storage box for wool or thread. You can change the size. Format for Corel Draw software. -
There is a wide range of thread choices available to todayís embroiderer. However, unless time is taken to experiment with different choices, they may never get a chance to offer them to their customer. Most new embroiderers purchase a start up kit with their equipment that contains one type of thread. They start with and continue to use this same thread as if it is the only style available, without ever considering if there is a better alternative. As it turns out, there are several types and styles of thread and the professional embroiderer needs to be aware of their characteristics and applications. Commercial embroidery threads are most commonly grouped by fiber content as follows: rayon, polyester, metallic and cotton. Within each fiber group, threads are available in different thicknesses or weights. Weight is an important consideration, as it can affect the visual quality of a design. A 40 weight is considered the standard for the industry. A higher number is thinner, while a lower number is thicker. Most designs are digitized with a 40 weight thread in mind. For example, a large area designed to be filled with stitches created using 40 weight thread would appear nice and solid upon completion. If the embroiderer switched to 60 weight thread, which is not as thick, then the ìfilledî area would have many gaps. One trick for reducing thread counts is to use a heavier thread such as 35 weight. Because it is thicker, fewer stitches are needed to cover the same area than if a 40 weight thread were being used. RAYON Rayon thread has been the mainstay of the commercial embroidery industry for many years. It is soft, brilliant and durable. Rayon is available in a wider range of colors, than any other thread. It can withstand dry cleaning and multiple washings. However, some colors do not resist bleach very well. A 40 weight is considered the standard for rayon. Several manufacturers offer it in other weights such as 60, 35, 30 and 12. A 60 weight rayon is ideal for creating smaller detail work. To be successful, it should only be used with a smaller needle such as a 60 or 65. When using a heavier weight thread such as 30 or 35, a larger needle will be required. POLYESTER Polyester thread has gained popularity in the last few years and is fast overtaking rayon as the thread of choice amongst commercial embroiderers. Though not available in as many colors as rayon, there is still a wide range of choices, with more being added every year by the manufacturers. Polyester thread is considered more durable than rayon and can withstand the harsh effects of bleaching. This makes it the ideal choice for garments that will undergo frequent washings, such as service uniforms that are worn in ìdirtyî environments. Like rayon, the standard weight for polyester is 40. Some manufacturers offer it in 30 weight as well. Because polyester is slightly stiffer than rayon, fine design details may need to be digitized differently when using it. Another characteristic of polyester thread is that it is more elastic than rayon. Thus, some stretching followed by rebounding can occur while sewing. The result is tiny loops forming on top of the embroidery design. Therefore, the thread tensions should be increased (on the machine) to control this problem. METALLIC Metallic thread is a specialty thread that is used to create unique textures and special effects. Their construction is very unique and they come in three different variations: core-wrapped, twisted and flat-foil. All of them have some sort of foil used in their construction. These foils are generally metalized polyester. Core-wrapped is the most common and gives the smoothest, most even shine. It is created by wrapping the foil around a core yarn of rayon, polyester or nylon, resulting in a round thread with a metallic covering. Metallic threads can be difficult to use. They are less flexible than rayon or polyester and do not flow easily. In fact, there is a tendency for them to ìkinkî while sewing which leads to thread breaks and ìbird nests.î Thus, when sewing with metallic thread, slower machine speeds are required along with the undivided attention of the machine operator. Once again, 40 weight is the most common size. However, even though it is approximately the same thickness as a 40 weight rayon, the density of an area sewn with metallic should be programmed five to ten percent less than if rayon were being used. I recommend a large eye needle when using metallic threads. COTTON Rayon and polyester threads are known for their high luster finishes. Cotton on the other-hand has a low luster, almost dull finish. This can be quite useful for creating different looks. It is available in many weights, with 40 being the standard, but a limited number of colors. It withstands repeated washings very well, but not bleaching. Cotton is an excellent choice for sewing designs with high detail. It is also very useful for creating designs where the desire is for a low key, understated appearance. There are many thread choices available to the embroiderer. Chances are you will use 40 weight rayon or polyester for the majority of your work. But take some time to experiment and see what you can create using different weights and styles. THREAD STORAGE Thread should be stored in a cool, dark location. Manufacturers suggest a humidity level of 40% to 60% and a temperature ranging between 50 and 70 degrees Fahrenheit. Direct sunlight is also not good for thread, as it can cause discoloration over time. Threads should also be kept covered to prevent dust and lint buildup, which will cause the thread to soften. This leads to thread breaks. Thread is one of those things that we depend heavily on, but typically ignore until it causes a crisis, such as excessive thread breaks and/or shreds. Such problems may be the result of a defective cone, but it is far more likely that the quality issues are the result of improper handling and storage. The most important aspect of thread care is proper storage. Most embroiderers use the same system for managing their thread inventory ñ all over the place. Walk in to almost any shop and you will see various cones piled up in every available location ñ counter tops, shelves, desks, the back of a machine, etc. This is the worst possible way to handle your valuable thread as it can lead to the following situations: Thread Dents ñ (What the heck is that?) When a cone falls onto the floor, the point of impact can ìdentî the thread, resulting in a weak spot (or spots) that can ultimately lead to problems as the thread travels towards the needle. If you are one of those people who sees the machine as the idle storage location for unused cones, then you are at high risk for causing thread dents, as those cones will ìwalkî across the machine table due to the vibration of sewing and ultimately end up on the floor. Discoloring & Fading ñ Threads, especially rayon, will fade when exposed to sunlight for extended periods of time. If your threads are stored on a window sill or anywhere that sunlight can strike them full force, you risk fading and discoloring. Lint Build-up ñ If your thread is sitting out, exposed to the elements of your shopís environment, chances are that dust and lint are building up on it at a rapid clip. Over time, such buildup can sink down into the threads. When the thread travels through the upper thread path, it takes the crud with it, dispensing it along the way onto critical surfaces (such as tensioners) that need to remain clean and smooth. The result will be inconsistent upper thread tension and possible thread breaks. Brittleness ñ In addition to discoloring and fading, excessive exposure to sunlight can dry out the thread and lead to brittleness in the fibers. Obviously, this will weaken the thread and lead to excessive thread breaks. So now that you know the results of improper thread storage, it is time to focus on how to prevent such problems. The key is to store your threads the right way each and every day. The best storage system is one that keeps the threads in a secure location, out of sunlight and free from dust and lint. In addition, it should be a cool environment. If you are a small shop with only a hundred cones of thread or so, then a large plastic container with a snap-on lid will probably work just fine. Avoid the clear-plastic models. For larger shops, running multi-head machines, thread storage becomes a bit more complex. Consider a large cabinet with shelves and pull-out bins, either plastic or cardboard. Such bins should not be mechanically connected to the shelves, such that they can be fully removed from the cabinet for easy access. Usually such bins are available in a wide range of sizes. If you have a six head machine, then you want to find bins that can hold at least six cones of thread each. This way, you can store all of one color in one bin and label it on the outside for easy reference. Such a storage system not only protects your threads, it also increases your efficiency, as all threads are stored together and labeled for quick identification. Of course, if you donít put the threads away promptly after using, then any thread storage system you invest in probably wonít help very much. You can also invest in plastic sleevs for your threads
-
 Brother embroidery machine | Thread too short, always jumps out Hey guys, I have a request / question, with my Brother PR 670E the thread jumps out every time I change the needle. It is cut too short or not at all. Already cleaned X times downstairs, what needs to be exchanged? Here video:
 -

Version 5.0.8517
1,011 downloads
My Editor from WingsXP is even more than a machine embroidery format converter. And all because, apart from the standard features for reading and re-saving the file, the developers provided users with a little extra convenience. I believe that it is for these small bonuses that the converter is called My Editor. With standard features (from left to right): 1) Opening, recording, inserting, etc .; 2) Scaling; 3) Tools for selecting and inverting selection; 4) Tools for manipulating the visibility of objects; 5) Navigating the project on objects and stitches; 6) Tools for manipulating the display of puncture points, stitches, contours (for native files); 7) The player to simulate the embroidery process; 8) Project information panel; Toolbar 2 Toolbar with special features (listed from left to right): 1) A tool that opens the color manager (thread and background); 2) Color palette with the ability to control the visibility of each color; 3) Special machine functions for deletion or insertion; Vertically on the left there is a toolbar for design manipulation (selection, scaling, rotation, stitch editing, etc.): Toolbar 3 Each toolbar can be customized in appearance by hiding or opening tools. The File menu is standard. Print settings, send design by e-mail standard. The list of file formats that the program opens: List of file formats to save: It is possible to manage the beginning and end of the project at its discretion (last line). The View menu gives users several options: Preview3D - shows the design in a realistic form. Realistic look my editor Toggle grid - enable or disable grid display. Grid options - setting grid parameters. Guidelines - opens a window for guide manipulations. In My Editor, it is possible to set guides both in the traditional way through a ruler, and through this window. But at the same time put in it the exact coordinates of the guides and close them from random editing. Types of guides in this application: horizontal, vertical, inclined, circles. You can also set the guides by right-clicking on the top ruler. And then you can get something like this: Types of guides in my editor Crosshair - includes a large crosshair at the tip of the mouse pointer. Toolbar - controls the visibility of toolbars. Rollups - allows you to display 1) ImageMap palette satellite window for easy navigation throughout the design satellite window for viewing and navigating the entire design my editor 2) Sequence manager - a window with a display of a sequence of embroidery on objects. Reorder panel of my editor objects The Layout menu allows you to duplicate the embroidery design by specifying the number of copies and the distance between the designs: Design duplication in my editor The Stitches menu looks like this: It gives users the ability to remove all short stitches smaller than a given length in the design through the window.: removing short stitches in design And make a recalculation of the density of the embroidery design (even stitch) when resizing it with the AutoDensity Apply tool. This application adjusts the density to the new size on its own, according to its internal algorithms and it is impossible to control the quality. You can also download software in official website: My editor free embroidery software System Requirements Minimum CPU: 1,5 GHz Intel or AMD 32-bit x86) processor RAM: 2GB of RAM Hard disk: 300 MB of free uncompressed space Graphics card: 3D PCI-X accelerator with DirectX 9.0c, 32-bit color, and at least 256MB of RAM Monitor Resolution: 1024x768 32bpp O/S: Windows XP (with Service Pack 3 or later) or Vista™ or 7, or 8.1 or 10 Recommended CPU: 2+ GHz Intel or AMD 32-bit (x86) processor RAM: 3GB of RAM Hard disk: 300 MB of free uncompressed space Graphics card: 3D PCI-X accelerator with DirectX 9.0c compatible drivers and at least 1GB of RAM Monitor Resolution: 1920x1080 monitor resolution O/S: Windows XP (with Service Pack 3 or later) or Vista™ or 7, or 8.1 or 10 Printer: Windows-compatible Laser-inkjet printer. The following tutorials are available for this program. This will help you understand how to use this software. -
I'm running into an issue where the auto trim works then moves to the next object but the initial thread at the start of the new object doesn't push down and just hangs loose up top. Would anybody be able to help me fix this? I contacted brother support but they couldn't help. I have a brother NQ1600E embroidery machine. The top and bobbin tensions are set correctly where 1/3 bobbin shows on a stitchout of the letter I. I've tried going up and down with the tensions on both the top thread and the bobbin case to see if that would do anything but doesn't. I tried putting a spool net around the spool while it is being used and that makes it to where when the auto trim trims, it leaves a much smaller amount of thread length then the thread just slips out of the needle. If I go lower on the tension with the spool net on there's a tension where I can get it to where it cuts short and slips out about half of the time and then if I go any lower it's back to just having the hanging thread. using 75/11 needle with 40wt thread. video link attached, any help would be appreciated, thank you very much for your time!
-
When digitizing or adding a new thread type to your system, you can also input the desired thickness of that thread. This helps when trying to determin the coverage of a fill on a large area. A bit of back ground the industry standard thread weight for most industrial shops is 40wt this has the best coverage on standard logos and works with a widest variety of applications. However there are specialty areas that can get better results when working with other areas. Small Diameter 60wt Threads. When working with small diameter threads you can use smaller needles like a 65/9 needle this allows for more detail and less bulk, applications that this excells at is small lettering under 4mm or .25 of inch. The thread thickness is half the size of the standard thread and the needle is considerably smaller allowing for more needle penetration in a very small area, 60wt threads are also commonly used in the craft and home embroidery segments, there is a wide range of colors available in this wt and often you get get 5000m spools as well. In the example below you can see that we made very small text , using standard Pulse Microsystems Fonts. These fonts are specially designed for small lettering and have the underlay and compensation built in, Large Diameter 20 pr 30wt Threads When working with large fills where you want to cover a wide are on a jacket or what to keep the density to a minimum then you may want to consider using a large needle and larger size thread. There are quite a few applications where you can substiture a larger thread but working on jackets like leather that rip when putting too many needle penetrations in the design using a larger needle and larger thread reduces the amount of needle penetration but allows for great coverage. It also reduces the puckering of the fabric. In the example below you will see a design that is made by Campus Crew a Canadian Company that excels in using large threads. They use it to cover large areas with stitches and they also use it for effect on applique designs as well. Changing thread thickness When you need to change thread on your embroidery machine you should also change the thickness in your digitizing software so the appearance of the designs is correct, this will give you a visual que on how dense or how much detail to add. Its often over looked in the software when digitizing for these types of applications. To change (1) color on demand without effecting the color chart follow steps below. 1. Right Click on the color 2. Goto Properties 3. Change the highlighted value 1. 20wt thread very large thread 2. 30wt thread 3. 40wt thread default 4. 50wt thread 5. 60wt thread very small thread This method changes the thread in the design only.. Its a great option for on demand digitzing for clients or designs when you normally do not work with the type of embroidery thread.
-
View File My Editor free embroidery software My Editor from WingsXP is even more than a machine embroidery format converter. And all because, apart from the standard features for reading and re-saving the file, the developers provided users with a little extra convenience. I believe that it is for these small bonuses that the converter is called My Editor. With standard features (from left to right): 1) Opening, recording, inserting, etc .; 2) Scaling; 3) Tools for selecting and inverting selection; 4) Tools for manipulating the visibility of objects; 5) Navigating the project on objects and stitches; 6) Tools for manipulating the display of puncture points, stitches, contours (for native files); 7) The player to simulate the embroidery process; 8) Project information panel; Toolbar 2 Toolbar with special features (listed from left to right): 1) A tool that opens the color manager (thread and background); 2) Color palette with the ability to control the visibility of each color; 3) Special machine functions for deletion or insertion; Vertically on the left there is a toolbar for design manipulation (selection, scaling, rotation, stitch editing, etc.): Toolbar 3 Each toolbar can be customized in appearance by hiding or opening tools. The File menu is standard. Print settings, send design by e-mail standard. The list of file formats that the program opens: List of file formats to save: It is possible to manage the beginning and end of the project at its discretion (last line). The View menu gives users several options: Preview3D - shows the design in a realistic form. Realistic look my editor Toggle grid - enable or disable grid display. Grid options - setting grid parameters. Guidelines - opens a window for guide manipulations. In My Editor, it is possible to set guides both in the traditional way through a ruler, and through this window. But at the same time put in it the exact coordinates of the guides and close them from random editing. Types of guides in this application: horizontal, vertical, inclined, circles. You can also set the guides by right-clicking on the top ruler. And then you can get something like this: Types of guides in my editor Crosshair - includes a large crosshair at the tip of the mouse pointer. Toolbar - controls the visibility of toolbars. Rollups - allows you to display 1) ImageMap palette satellite window for easy navigation throughout the design satellite window for viewing and navigating the entire design my editor 2) Sequence manager - a window with a display of a sequence of embroidery on objects. Reorder panel of my editor objects The Layout menu allows you to duplicate the embroidery design by specifying the number of copies and the distance between the designs: Design duplication in my editor The Stitches menu looks like this: It gives users the ability to remove all short stitches smaller than a given length in the design through the window.: removing short stitches in design And make a recalculation of the density of the embroidery design (even stitch) when resizing it with the AutoDensity Apply tool. This application adjusts the density to the new size on its own, according to its internal algorithms and it is impossible to control the quality. You can also download software in official website: My editor free embroidery software System Requirements Minimum CPU: 1,5 GHz Intel or AMD 32-bit x86) processor RAM: 2GB of RAM Hard disk: 300 MB of free uncompressed space Graphics card: 3D PCI-X accelerator with DirectX 9.0c, 32-bit color, and at least 256MB of RAM Monitor Resolution: 1024x768 32bpp O/S: Windows XP (with Service Pack 3 or later) or Vista™ or 7, or 8.1 or 10 Recommended CPU: 2+ GHz Intel or AMD 32-bit (x86) processor RAM: 3GB of RAM Hard disk: 300 MB of free uncompressed space Graphics card: 3D PCI-X accelerator with DirectX 9.0c compatible drivers and at least 1GB of RAM Monitor Resolution: 1920x1080 monitor resolution O/S: Windows XP (with Service Pack 3 or later) or Vista™ or 7, or 8.1 or 10 Printer: Windows-compatible Laser-inkjet printer. The following tutorials are available for this program. This will help you understand how to use this software. Submitter diver361 Submitted 07/15/2019 Category Free embroidery software
-
- 5 comments
- 5 reviews
-
- 6
-

-

-

-
- cross stitch
- pink
- (and 4 more)
-

 Original text by: Marina Belova Now that I've come close to creating cutwork and lace, I encountered a serious problem: how does one choose the right type of thread for such projects? Should I select the threads according to the design or, on the contrary, to select the design according to the particular threads? I've noticed before that threads identical in composition, but of different brands lie down in different ways, and the embroidery has a different look. The embroidery will look completely different if you just change a spool. On the weekend I embroidered a cutwork design using the Chinese cotton thread #30. And after the test run the bridges seemed rather untidy. And the reason was not only the embroidery sequence I'd created. I set a very low density; as for the bridges, I made them a bit too thick, but it was not critical. It was how the threads performed, the way they lay down on the fabric or a water soluble stabilizer, that was the matter. It didn't dawn on me until I had remembered that I had once embroidered a simple design with different types of threads and that the result had vividly demonstrated me the contrast between their quality. Chinese cotton thread on the left and German on the right: So I decided to make a comparison for my own benefit, to learn how different types of threads I owned performed with different stitch parameters — the threads that could be potentially used for cutwork and FSL. Here are the threads I picked out for the test: I'll name them for you. The upper row from left to right: WonderFil Chinese cotton thread #30 Gunold German cotton thread #30 Fufu's Taiwanese polyester #40 WonderFil Chinese rayon #40 The lower row from left to right: Amann German polyester #40 Gunold German rayon #40 Rheingold German metallic thread #40 Nitex Chinese metallic thread #40 I made a very simple embroidery sequence for all of them (the density for cotton threads was 20% lower than that for the ordinary ones): I embroidered different colors in the same order as the spools on the photo above. And of course what I got was an embroidery of varying quality; the difference was especially noticeable before I washed away the water soluble film and cleaned the fabric: Here is the fabric already washed and dried: As you can see on that photo: 2 of the cotton threads gave different performances not only in bridges, but in satin columns around the openings. German threads made thicker bridges and very smooth columns. One might think that the density for this type of thread can be lowered even more. As for the Chinese threads, they were a disappointment in all cases: they didn't lie down smooth, and they made uneven bridges. Metallic threads seem to have given the similar performances. Taiwanese and German polyester threads were different, too — the German one made slightly thinner and looser bridges with less luster, which was good, because I don't like my cutwork to gleam. Chinese rayon thread gave an atrocious performance — it broke all the time, especially on bridges, though the end result looks better than the one embroidered with German rayon thread. German rayon thread made loose and ugly bridges. So in the end it all amounts to this: no matter however much the manufacturers overpraise the quality of their goods, the crucial point will always be the look of the embroidery and the usability. And you'll always have to set the design parameters according to the thread you have. To my own personal regret. Maybe the bobbin thread is a partly responsible for that as well? Perhaps, someone could suggest the other influences on the quality of the embroidery in our case?
 -
 Hi, I'm not sure if this is the right subform to be posting in, I received my machine today and I've been struggling to thread the needle ( Unless the way im doing it is right )., I'm following the steps 1-8 with the thread when I get to step 6 on the 1150e the thread likes to slip out very easily, when I do finally get it to stay in place and get to step 7 than 8 to cut the extras and press down the threading slider it dosen't thread, now if from step 6 I go around the BACK of the needle in to step 7 an 8 an press down the threading slider it threads but than after a few stitches my thread will snap. I've been googling and googling for answers but I can't find any real videos for my model, I've been looking for other models that might be similar but they're all threading from the front ( from what Im seeing ) any words of advice?
 -
Design available here I love you bunny embroidery design in Madeira Rayon thread palette.
- 1 reply
-
- 1
-
-
- bunny
- color chart
- (and 4 more)
-

Small wall carpet with Cats meet free embroidery design
SuperduperSally posted a gallery image in Customer Image Gallery
 A simple rug on the wall or for your pet. A very simple project that will surely appeal to beginners in machine embroidery. You will never get a bad result. Minimum thread and stabilizer. Simple embroideries in one color of thread are good for products from thin fabrics. For example, summer T-shirts. If you decide to embroider this design, be sure to take into account, you need to use a contrast fabric. The best choice is black color. Also do not use a cloth with a pile.
 -
Hello! I recently purchased a Brother SE600 embroidery machine and am having issues with actually embroidering. I think I do not have the correct supplies, and need some guidance. I have 75/11 and 90/14 needles, 40W thread, using sketch paper as a stabilizer, and primarily want to embroider on jersey. Do I have the correct supplies? Everytime I attempt to embroider, thread is bunching together in the bobbin case and the machine says to rethread the upper threads. Please help! I want to get embroidering. JOe
- 3 replies
-
- 1
-
-
- help
- embroidery machine
- (and 3 more)
-
 I have a Brother 4000D embroidery machine that has just been a pain. I finally got it to not break threads and so now it will not grab the bobbin thread when I change colors because it is cutting the embroidery thread too short. Has anyone had this issue? My dealer just lost their repair guy and is training another.
 -
- 4 comments
-
- 3
-
-
-
- cross stitch
- france
- (and 9 more)
-
 This is simple and original interior detail which is suitable for almost any kind of home design. It has quite calm color scheme but choice of embroidery sample makes it memorable and unique. It is Dreamcatcher embroidery design which seems to be painted by sharp pencil. This traditional talisman is well-known in Indian culture. That’s why this image is added by thematic inscription.
- 2 comments
-
- 1
-
-
- indian
- native american
- (and 19 more)
-
Little mouse embroidery design
ekatreina posted a gallery image in Things embroidered with Animals designs
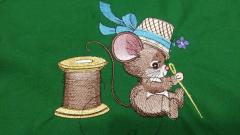 This is pretty embroidery design that is very good to decorate little box or another thing connected with handicraft. You can keep your threads, needles and other things you need to make original and amazing work pieces. This picture is figure of little mouse with thimble used as hat on its head. It hold big needle in its paws trying to put thread into it. This design is Elegant tailor embroidery design.
 -
Scissors cross stitch free embroidery design
diver361 posted a gallery image in Cross stitch embroidery art gallery
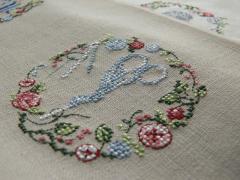 This is beautiful embroidery sample made in vintage style. It is silhouette of scissors surrounded by amazing flower frame. Sample is executed in cross stitch technique. Rough texture of natural material underlines its simplicity and beauty. You need our Scissors cross free embroidery design to create such picture. You may use it to decorate your box for handicraft or other textile accessories.
-
- 1
-
-
- hand made
- handicraft
- (and 11 more)
-
Sewing cross stitch free embroidery design
diver361 posted a gallery image in Cross stitch embroidery art gallery
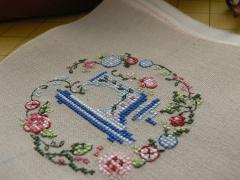 This is beautiful and simple embroidery made in cross stitch technique. This picture shows stylized silhouette of sewing machine in frame of flowers. Sewing machine cross stitch free embroidery design is quite easy sample even for beginners in embroidery. This picture will be liked by all lovers of handicraft. You may use it to decorate of your box with threads or other sewing accessories.
 -
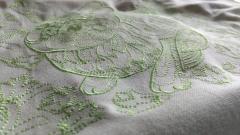
Beautiful look embroidered bunny mosaic design
diver361 posted a gallery image in Things embroidered with Animals designs
 Side view of an embroidered napkin. We deliberately took such a low angle that it would be seen how beautiful and quality the stitches lay. Mosaic bunny embroidery design
-
- 2
-
-
-
- flower
- beautiful look
- (and 8 more)
-
Embroidered napkin with mosaic bunny design
diver361 posted a gallery image in Things embroidered with Animals designs
 Embroidered napkin with Mosaic bunny embroidery design. This large embroidery design in one color is useful for those who like embroidery, who like simple, normal interesting work. Who does not like to change embroidery threads often and look for the right color. Any thread one will do.
-
- 1
-
-
- embroidery thread
- thread
- (and 5 more)
-
Phone case with squirrel sewing embroidery design
diver361 posted a gallery image in Showcase with different style embroidery
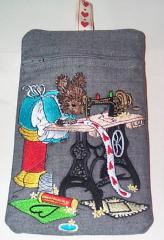 This is cool handmade embroidered phone case with squirrel sewing design. It is suitable for all who love handicraft and embroidery and respect interesting work pieces with original design. Picture executed on its surface is Squirrel sewing embroidery design. Case is made of dense jeans fabric that is able to protect your phone well from occasional stains or even damage.
-
- 2
-
-
-
- mobile phone case
- embroidered case
- (and 13 more)