Dealing with sequins
By
Irina, in Machine embroidery materials and technology, , 1 comment, 5,932 views
Dealing with sequins is one of the blank spaces on my map of machine embroidery. And as I have to deal with them more and more often these days, I'm pushed into learning many new things. All of this because this topic is of the less researched. Nevertheless, our colleagues from China are ahead of the curve — as indeed is their custom — in using sequins in their designs. They of all people know how to digitize them properly.
And I look on them with admiring envy for I haven't yet mastered this particular skill.
But as it is time for me to learn how to do this, I'll proceed to the theory.
It turned out that round sequins with a hole exactly in the center — you can see an ordinary Chinese-manufactured reel with such sequins on the photo below — are not the only ones: there are other varieties.
Sequins come in all shapes and sizes, from square to star-shaped ones. Besides, there are also sequins where the hole isn't centered. Just think about it, how much creative freedom this allows you! The main question is where to buy them.
Wilcom 2.0 sequin collection proves that they indeed come in a variety of shapes:
Later I'll photograph and show you how sequins of various shapes and sizes look in reality.
In theory, sequining is not at all difficult. You'll need a special device for it. What is extremely important — you should know how to adjust this device. Standard #40 threads are used for sewing sequins onto the fabric in most cases, and if you don't want to accentuate the sequins, select a monofilament yarn.
Machine embroidery design with sequins is easy to make — you'll only need to adjust several parameters, the most important of which are as follows:
The main parameter is sequin size.
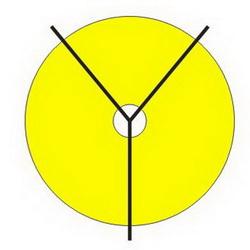
The first adjustable parameter is the fix type. I.e. the way in which sequins will be attached to the fabric. The classic method is using the Y-stitch, which firmly holds the sequins and the fabric together:
Other ways of attaching sequins:
Which type to use depends on your embroidery software. In the Stitch Era editor there are the following types:
Which one of them to choose depends on the goal you want to achieve: you can create one design and change the fix type only, but not the thread and get different color when embroidering. The more threads cross the sequin, the more it abandons its own color, adopting the color of the thread instead.
The second adjustable parameter defines how far the next stitch will be from the sequin:
It is generally thought that if the distance will be excessive, the sequin won't sit tight. But I haven't found out what value is considered appropriate. Looks like I'll have to experiment a little. But if the next stitch begins right at the edge of the sequin, the resulting embroidery will be too stiff because such a short stitch will hold the sequin and the fabric together sure as death.
The third parameter determines the sequence of the sequins overlapping each other in the neighboring rows.
For example, Bonnie Nielsen considers the upper way incorrect and bad-looking. For me, it is a matter of opinions.
The fourth and the fifth parameters determine how far the sequins will be from one another in a single row and between different rows.
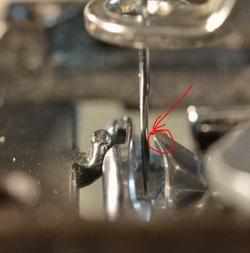
As for the sixth parameter, it determines which side of the sequin will be stitched down. When using the ordinary embroidery machine, the sequins should be stitched down on the north side, in order for preventing it from being shifted by the thread. Meaning, if you look at the sequining device from the top, you'll see that a sequin is situated below (south), the needle on top of it (north), and you sew it down from the other side, towards the feed. Wilcom even allows the users to adjust the angle at which the sequins will be attached (Set maximum allowable angle):
You can use the sequins in the following ways:
Set them along the line:
Fill the space with them (I can do in my Stitch Era along a straight or a curved line or in spirals):
Usually, you have almost no influence on the way the software transfers the contours onto the fabric. It will be as luck will have it.
You can add the sequined border to give the embroidery a nice finishing touch:
But some embroidery editors allow setting the standalone sequins in the places you need them.
This is all for now. But I have plans for the future: I'll show you how I did adjust the sequining device on my Chinese-manufactured machine, and the problems I encountered on the way.