Search the Community
Showing results for tags 'needle'.
-

Version dst, exp, hus, jef, pes, vp3
1,581 downloads
Size: 5.35 x 10.31' -

Embroidering Dwarf with lantern design - in hoop
alex-sirius6 posted a gallery image in Now in work.
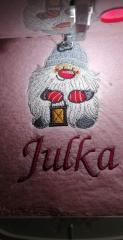 In the process of embroidering a Christmas present. Gnome embroidery designs are one of the most popular motifs for home decoration for the winter holiday. Available here Dwarf embroidery design 2
 -

 Today I decided to check whether the high-quality lace embroidery designs on netting without using a stabilizer is possible. What kind of stabilizer do you need for the netting? Either water soluble film or other water soluble stabilizer. This means an extra cost, and not a small one; besides, you'll need to wash the embroidery afterward, which also complicates the matters. I also checked whether it was possible to embroider on such a delicate material as netting using any type of needle. I do not have SUK ball point needles, which do not cut through the yarn, only the standard R and SES ones. I created a machine embroidery design: Set the most ordinary density, 0.4mm. Put 2 edge runs of understitching under the satin columns. In my opinion, an underlay like this one allows for the satin columns to maintain their shape and work as a backbone, because the stitch has nothing to rely on within the particle, and it therefore creates the ugly ragged edges. The reason for ragged edges is the large particle mesh size, so that some of the stitches fall first into one particle, then the other, and so on. And because the mesh particles are on different levels, the edges become ragged. I saw this method in the Italian embroidery design when I was just beginning to embroider on netting. I hooped the netting without the stabilizer. It was the ordinary netting — knit and quite stretchy. There are no difficulties in hooping the netting. I just place it on the inner ring of the hoop and cover it with the outer one, without tugging it in the hoop and other intricacies. The pressure caused by the outer ring is enough to pull it tight. The crucial thing is not to overstretch the netting, in order not to damage the mesh even before starting the embroidery. Otherwise, it will break during the embroidery under the pressure of the stitches pulling it, and very ugly-looking holes will appear along the perimeter. I chose a standard rayon #40 thread right away. Polyester, in my opinion, is not good for netting. I may be wrong, though. Below is the result of my first attempt, still in the hoop: Numerous perforations along the perimeter and in the corners are visible right away, as well as the underlay showing in several places: Below is the photo of the netting already unhooped but not yet pressed. The pull is not critical and can be corrected by pressing: After the pressing: In my opinion, there exists a number of reasons for perforations: High density No stabilizer Wrong type of needlepoint As I cannot change the type of needlepoint, I decided to lower the density by 20% (it allowed me to save about 2000 stitches), and in order for the fill to look dense enough, I changed the embroidery thread from #40 to #30. Now I'll try to embroider again. The holes along the perimeter and in the corners are still present. Maybe not so many. The pull is not so bad: After pressing the item some of the holes become less visible, but don't disappear completely: But if you try, you try. Then I decided to embroider on the netting with large square mesh. I hooped it without a stabilizer as well: But my attempt to embroider on the netting with a large mesh particle size (on nothing, as one may say) didn't work out. Thread kept breaking, and the embroidery became distorted: That's why I decided to put a piece of thick water soluble stabilizer (80 microns) on top. Using thin stabilizer for this purpose is like flogging a dead horse. I instantly realized that I cannot spare the stabilizer this time. This is what I got — like it had been embroidered on the ordinary fabric: Almost no puckering: See the photo of this embroidery after washing and pressing below. An excellent sample. I thought it would look much worse: Then I decided to try to embroider on the ordinary netting (like in the first 2 tests), but with the use of the thin water soluble film. But instead of placing it on top for cost reasons, I hooped it together with the netting, as required: In this case, the advantages of using stabilizer are apparent — the result looks much better than the one without it: neat and tidy, without the underlay showing. I cannot say anything about perforations until I wash off the film: Below is the photo of the already washed embroidery: The pull is visible, of course, but I'll try to iron it out. The ironing goes smooth and without effort. And the most remarkable thing is the absence of the perforations along the perimeter. It means that the needlepoint and high stitch density are not so much the reasons for perforations as using only one layer of thin water soluble stabilizer. Stabilizer is a great invention. Though too high a density is not good for embroidery. To put in a nutshell, my experience convinced me of the futility of not following the standard procedure, even for cost reasons. Here you can read my article about embroidery
- 3 comments
-
- 3
-

-

-

-
- netting
- stabilizer
- (and 1 more)
-
Knowing your Needles The needle: Itís a small innocuous component of every embroidery machine that tends to get overlooked, even ignored ñ until it breaks. Even then, the typical response is to change it out and keep going. Small, inexpensive, rather boring, but extremely critical to the embroidery process. Without a needle, stitches could not be formed. Knowing your needles are critical. Needles have various. Needle Application While most shops are guilty of this or just don't know they use the same needle for all their designs and jobs. There are many types of needles available and we will cover some types of neeedles, applications for needles, types of needles and troubleshooting needles. Needle Sizes and Applications Below you will find a needle recommendation chart, which has the garment type, needle size and type of needle, While you can use the same needle for various applications sometimes the quality will be affected due to the wrong needle choices that you make or ignore. The System Number The system number is an additional descriptive term for needles. It is actually a combination of numbers and/or letters referring to the total length of the needle and variations in the needle eye. Each machine is setup to use a specific needle system number. Changing to a needle with a different system number may require changing the timing of the machine.Here are some examples of commonly used needles for commercial embroidery machines. Your manufacturer will tell you which is appropriate for your model. DBxK5 : This is considered the standard needle for many of the popular brands of commercial embroidery machines. It works well with most threads. DBx7ST: This needle is similar to the DBxK5, except that it has a larger eye that is elongated and rectangular in shape. Itís designed to be used with metallic threads. DBx9ST: This needle is designed for use with heavy embroidery threads and has an eye size twice as large as a basic needle such as the DBxK5. (In most cases, the above-listed needles are interchangeable.) Needle Tips The are a wide range of tips the most common is the sharp , but there are times when a wedge point or ball point can come in handy, Needle Eye The are times you will need to order a needle with a specifice eye size, especially for working with Metallic threads. COATED NEEDLES Needles may be available with a special non-stick coating that will reduce heat buildup and allow the needle eye to remain clear of thread or garment fibers. These needles are referred to as TeflonÆ-coated or Cool Sew, depending upon the manufacturer. Their ability to reduce friction makes them ideal for synthetics like cordura and nylon. The most common problems caused by needles are thread breaks, thread shreds and broken needles. In order to troubleshoot these problems you have to visualize the movements and path of the needle. THREAD BREAKS Needles only break when they encounter a solid obstruction. The only parts of a machine that the needle can run into are the hoop, the trimmer knife, the bobbin hook and the needle plate. Hitting the hoop is a pretty obvious problem that can be attributed to operator error. If a hoop crash does occur, either the design is larger than the hoop or the hoop was not centered properly before sewing. The trimmer knife is sometimes the culprit behind a needle break. Though not a common occurrence, there are occasions where the trimmer knife (located below the needle plate) doesnít fully retract, placing it directly in the path of the descending needle. This is usually caused by a build-up of dirt in the retract area where the knife normally resides. You should periodically remove the needle plate and clean out any dust, dirt or lint buildup to prevent this from happening.If the bobbin hook timing gets out of synch, the needle may run into the bobbin hook as it descends. Machine timing is something that should not need frequent adjustment. However, in the case of a hoop crash, the timing might be affected, such that an adjustment becomes necessary. You can make a quick check by turning off the machine and manually rotating the main shaft while watching the needle go through a stitch cycle (remove the needle plate while doing this). It will be obvious if the needle is coming into contact with the hook. Most machines can be reset manually check with your machine manual. NEEDLES BREAKING By far, the most common source of needle-related problems is the needle coming in contact with the needle plate. As it sews, the point of the needle may be deflected slightly as it pierces the fabric being sewn. (Obviously a smaller needle such as the 65/9 will see more deflection than a larger one). If a mild deflection occurs, the needle will pass very close to the inside edge of the needle plate hole, possibly grazing it. This in turn may allow the upper thread (being carried by the needle) to rub along the edge of the needle plate hole as well, resulting in thread shreds or breaks. If a more drastic needle deflection occurs, the needle itself may catch the edge of the needle plate hole, resulting in a broken needle. A prime example is a six-panel cap with a heavy center seam. As the needle encounters the edge of the seam, it may start deflecting slightly, which in turn leads to thread shreds, thread breaks and even needle breaks. Thread shreds and thread breaks can also be caused by at least three other needle problems as follows:- Using a needle with an eye that is too small in relationship to the thickness of the thread.- A burr in the needle eye or along the front of the blade.- High temperature caused by friction during the sewing process. If you start having sewing problems that can be attributed to the needle, donít hesitate to change it out, since the cost of a needle is only a few cents. Periodically replace your needles as they do get dull over time. Is there a recommended frequency for replacement? Ask your needle supplier. In reality, some fabrics will dull a needle faster than others, plus itís nearly impossible to track the usage of each needle on a multi-needle machine. So, itís difficult to determine needle life. When you see the quality of your stitching starting to decrease, then it might be time to change the needles. Though small in size, needles can have a big impact on sewing. Donít take them for granted. Before starting each job, take a minute to analyze the needle requirements, then choose the correct needle for the job. This small sliver of silver can help you bring in the gold on every job. Sometimes during the sewing process, you can end up with small cuts or holes around the edges of the embroidery (not to be confused with large holes left behind after a birdís nest develops). These small defects usually are less visible after the garment is unhooped, but they are still there, and can lead to quality problems in the long-term. In the case of a knit garment, small holes and/or cuts can lead to ìrunsî in the fabric after one or two washings. Here are the likely causes: TROUBLESHOOTING NEEDLES Replace the needle. Dull needles have difficult time getting through the garment, causing some fabrics to tear. Wrong Needle Point Type , Sharp-point needles can cut some delicate knits. Try a ball-point needle. Needle is too Large- Large needles can stretch fibers excessively, causing them to burst or become distorted. needle size that is still acceptable for the thread size you are using. RULES FOR NEEDLES Rule #1 Sharp point needle for woven. Ball point needle for knits. Rule #2 Larger diameter needle for stiff, thick and/or heavyweight fabrics. Rule #3 Smaller diameter needle for lightweight and delicate fabrics. Rule #4 ñ Smaller diameter needle for intricate designs and/or small details. Rule #5 -- Small text under .30 inch use a 65/9 needle with 60weight thread REVIEW In taking a look at the different types of needles they also work hand in hand with your thread choices, not all jobs can be achieved by one type of needle will it work yes, will it look its best know.. In my shop I keep several types of needles a box of titanium coated 80/12 needles for carpets, 65/9 needles with 60 wt thread for doing small letters, and a box of ball point needles when sharp needles won't work. A box of Wedge point needle for leather work. While a sharp needles are used primarly in the industrial shops its a good ideam to use special needles for some applications so you get better results.
-
 Original text by Marina Belova I've long wanted to embroider with two threads in one needle, being mighty curious how the whole thing would turn out. So a couple of days ago I saw a video on Gunold's Youtube channel in which Debora Jones demonstrated the way of doing it and shared basic recommendations for those who are going to repeat it on their own machines. Below are her recommendations to which I added a few things that could be guessed from the context: Use standard #40 rayon or polyester threads. A 90/14 needle has a large enough ear to accommodate both threads. The point type depends on the type of fabric, I suppose. You should increase the thread tension to prevent looping. And reduce the design's density by at least 20%. The issue of underlay wasn't specified but the understitching was present, therefore, you'd better use it. I also think that the stitch length should be increased in relation to the standard one. The important thing to remember is that a thread supply failure detector won't work in this case because the second thread will remain intact even if the first one snapped. In my opinion, pull compensation needs to be increased substantially, for two threads will distort a design a great deal in spite of the reduced density. What else one needs to do to master this not too complicated a skill, according to the video in question? Not much – to create a design in the way that was suggested and go to the machine: So I threaded my needle with 2 threads: Adjusted the tension – I had to tighten all the screws all the way in so that to prevent loops – and went to the machine: Nevertheless, there were some loops during the embroidery of the twig (done with satins). The leaf is very puffy and looks like it had been embroidered with a multicolor thread made of 2 different strands (below on the right). Judging from the result, the stitch density could be reduced even more that by 20%. For reference, here is the same leaf embroidered with one thread at a time – each half with a different color. I used my standard density values (below on the left): The most interesting aspects of this technique are: You can choose the colors you like and not the ones in the multicolor palette. You don't need to use (almost) any special tricks when digitizing in order to successfully mix the two colors. This technique is excellent for the embroidery of flowers, leaves, hair (fur) and whenever you need things to look natural.
 -
- 5 comments
- 5 reviews
-
- 6
-
-
-
-
- cross stitch
- pink
- (and 4 more)
-
 We have three Janome MB4 embroidery machines in the office and they are frequently jamming, resulting in the . We are based in Northern Mozambique and our nearest technician is in Johannesburg and it is expensive to bring him up to fix the machines (>$1600). I want to learn how to do this myself. At the moment I have the needle alignment out on all machines. I have a service manual which shows me how to remove and replace parts - which is potentially very helpful. So, if I know the sequence of maintenance activities I need to do to resolve this issue, then I might be able to fix the machines myself using the service manual. Can anyone help by indicating what are the steps I need to take to resolve this problem? I have looked for a Janome video dealing with this specific issue, but to date I have not found one which addresses this problem. Thank you very much for your assistance.
-
- 1
-
-
- janome mb4
- needle
- (and 1 more)
-
Hello! I recently purchased a Brother SE600 embroidery machine and am having issues with actually embroidering. I think I do not have the correct supplies, and need some guidance. I have 75/11 and 90/14 needles, 40W thread, using sketch paper as a stabilizer, and primarily want to embroider on jersey. Do I have the correct supplies? Everytime I attempt to embroider, thread is bunching together in the bobbin case and the machine says to rethread the upper threads. Please help! I want to get embroidering. JOe
- 3 replies
-
- 1
-
-
- help
- embroidery machine
- (and 3 more)
-

Little mouse embroidery design
ekatreina posted a gallery image in Things embroidered with Animals designs
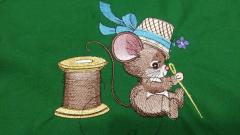 This is pretty embroidery design that is very good to decorate little box or another thing connected with handicraft. You can keep your threads, needles and other things you need to make original and amazing work pieces. This picture is figure of little mouse with thimble used as hat on its head. It hold big needle in its paws trying to put thread into it. This design is Elegant tailor embroidery design.
 -
Hello, Hopefully someone can help me on here. I have a Tajima TMAR-K 1508C. Recently I been seeing that the machine shakes a lot when its stitching at certain angles and causes the needle to break at times. Does anyone know why this could be happening? It doesn't shake as much when I change to the hat attachment and run hats. Thanks!
- 1 reply
-
- 1
-
-
- tajima
- embroidery machine
- (and 1 more)
-

Thimble cross stitch embroidery design
diver361 posted a gallery image in Cross stitch embroidery art gallery
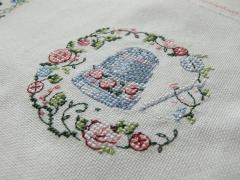 This is original embroidery sample in vintage style. It is part of our beautiful collection of pictures for decorating of accessories for handicraft. For example Thimble cross stitch free machine embroidery design shows this necessary thing surrounded by stylized frame of amazing flowers. Retro manner of this embroidery will give special charm for your work piece decorated with it.
 -
Scissors cross stitch free embroidery design
diver361 posted a gallery image in Cross stitch embroidery art gallery
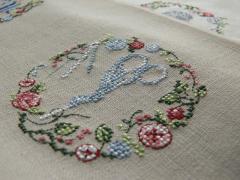 This is beautiful embroidery sample made in vintage style. It is silhouette of scissors surrounded by amazing flower frame. Sample is executed in cross stitch technique. Rough texture of natural material underlines its simplicity and beauty. You need our Scissors cross free embroidery design to create such picture. You may use it to decorate your box for handicraft or other textile accessories.
-
- 1
-
-
- hand made
- handicraft
- (and 11 more)
-
Small sewing pillow with red star cross stitch embroidery design
diver361 posted a gallery image in Cross stitch embroidery art gallery
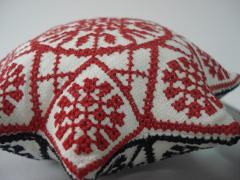 In fact this is practical accessory that is useful for every person who like handicraft. But when you look at it you can’t deny that it is also stylish souvenir. You don’t need to hide it into the box or locker cause it is really able to embellish your room. If you also like this thing you can create same work piece using our Star cross stitch free embroidery design.
-
- 1
-
-
- embroidery design
- red star
- (and 14 more)
-
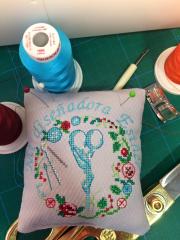 If you have just simple needle bar of one color fabric you may want to change it looking at this picture. Now we see that this little thing can be true work of art. Its relief surface is decorated with Scissors cross free embroidery design added by thematic inscription. It is truly good idea where to use this unusual embroidery sample.
-
- 1
-
-
- needle bar
- needle
- (and 3 more)
-
Embroidered cover with sewing squirrel design
ekatreina posted a gallery image in Embroidered Decoration real art for clothes and interior
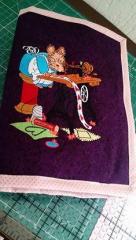 It is the textile cover which can be used for protection of book or tablet PC from scratches or bumps. It has dark background and white polka dot border, but its true highlight is the funny picture of squirrel making the long band with the hearts. Squirrel sewing embroidery design is the nice sample for decoration this textile accessory. It requires some skills for making it but the result is really spectacular.
-
- 1
-
-
- cover
- sewing machine
- (and 3 more)
-
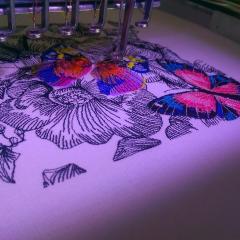 Here you may see the process of creating the beautiful embroidered picture with many splendid flowers and spectacular butterflies. The specificity of this picture is that flowers are made in graphic black and white manner while butterflies have many intensive colors. This feature gives the expressive contrast for the picture and make in unusual embroidery sample. Gorgeous butterfly embroidery design is the nice option for decoration light home textile or summer clothes.
 -
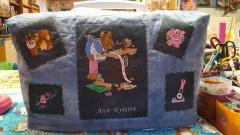 There is the nice case for sewing machine decorated with some samples of embroidery. Main of them is Squirrel sewing embroidery design. It shows the funny picture of little squirrel sitting on the big thread bobbin and sewing the long band with hearts. All embroidered pictures are made on black background which makes them more expressive. The main image is also added by the name of the owner of sewing machine.
 -
An embroidered patch is a piece of art which is created by using a fabric backing thread and some form of a needle. Embroidered patches can be attached with a pin or can be sewn on, but some of the more modern methods of attachment include iron-on, dryer heat activated adhesive, and Velcro backing. The art of making embroidered patches is decades old but the introduction of new high speed, computerized machines have brought a once rare, time consuming art into mass production.[citation needed] Embroidered patches, an important identification tool for military and other uniformed personnel, trace their roots thousands of years ago to ancient cultures of the Mediterranean, Mideast, China, India and South America where the art of decorating fabric with thread stitching originated.[1] Elaborate hand-stitched designs and patterns were used to embellish the robes of royalty and for religious artifacts.[citation needed] Today, embroidery designs are used by government (including uniforms of the military, emergency services and other specialized workers) sports teams and companies in the private sector to denote rank, job, specific position or specialized unit. Youth groups, including sports teams, scouting organizations and specialized clubs often wear clothing emblazoned with embroidered patches. They are also used by space agencies on the uniforms of astronauts to denote the mission. Since 1971, the sole manufacturer of mission patches for NASA has been A-B Emblem of Weaverville, North Carolina. Space mission patches as well as fire and police patches are collected by enthusiasts as well.
- 1 reply
-
- 1
-
-
- embroidered patches
- design
- (and 3 more)
-
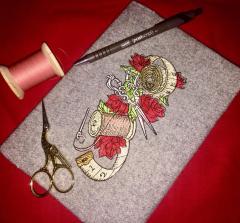
Vintage scissors and measure embroidery design
ekatreina posted a gallery image in Embroidered Decoration real art for clothes and interior
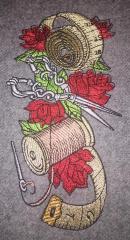 It is the thematic embroidered picture which is one of the best ways to pleasure the needlewoman. It includes all her favorite accessories such as tape, scissors, thread and needle. All these things are surrounded by the splendid red flowers. The picture is executed at a bit vintage style so it looks very originally. Bright intensive colors of Needlework set embroidery design are perfectly underlined by the calm grey background.
- 1 comment
-
- 2
-
-
- embroidery design
- vintage
- (and 6 more)
-
Vintage needlework set embroidery design
ekatreina posted a gallery image in Embroidered Decoration real art for clothes and interior
 This interesting picture with embroidered postcard has double sense. At the first glance you may see here the process of creating work piece based on Needlework set embroidery design. But when you look at this image at the second time you may note that the things used for postcard’s creation are the modern sample of vintage accessories on the picture. Anyway the embroidery sample is the beautiful and original idea for making handmade gift.
 -

In hoop Dwarf with lantern embroidery design
Nenychi posted a gallery image in Showcase with Christmas embroidery designs
 In our age of high technology, embroidery is still relevant in everyday life and in fashion. But thanks to technical progress, the tedious manual work of the craftsmen was replaced by machine embroidery. And making embroidery on everyday objects and clothes became much faster. Buy this design Dwarf embroidery design
 -
Vintage needlework set embroidery design
Nenychi posted a gallery image in Things embroidered with Animals designs
.jpg.75dc526672838731b94b4a49cc14e656.jpg) Machine embroidery can bring to life any fantasy, any pattern. Do not believe me? Go to our website and there you will find a wide variety of designs. Buy this design Vintage needlework set embroidery design
Machine embroidery can bring to life any fantasy, any pattern. Do not believe me? Go to our website and there you will find a wide variety of designs. Buy this design Vintage needlework set embroidery design -
Owl in color free embroidery design
Nenychi posted a gallery image in Showcase with free embroidery designs
.jpg.45df0a04360008d8b9e356542179dac0.jpg) Not for nothing black color is called universal. The black color you can combine with all other colors. Charming bright owl, embroidered on a black background, confirms this. Find this design Owl in color free embroidery design
Not for nothing black color is called universal. The black color you can combine with all other colors. Charming bright owl, embroidered on a black background, confirms this. Find this design Owl in color free embroidery design-
- 1
-
-
- needle
- embroidery machine
- (and 8 more)
-
Embroidered textile Basket with Mouse design
ekatreina posted a gallery image in Things embroidered with Animals designs
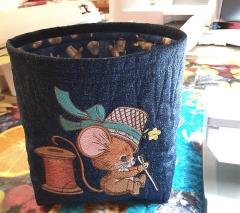 This is pretty embroidered textile basket made by Ann-kristin Kristoffersen. It is suitable for keeping any little accessories. For example you can store your sewing tools or other things for craft. There is pretty embroidery sample on basket’s front side which shows its content. It is Elegant tailor embroidery design. It is portrait of nice little mouse in cool hat with big needle and thread.
 -
Embroidered needle pillow with Snowflake design
ekatreina posted a gallery image in Showcase with Christmas embroidery designs
 This is pretty little accessory executed in traditional holiday color scheme. It is decorated with Light green snowflake free embroidery design which is made with thread of other shade. In spite of this small size it can be used in different ways. If you like handicraft you may use it as pillow for needle. If it is not your hobby you may take this work piece as pretty accessory for decoration of your home.
-
- 1
-
-
- decoration
- gift
- (and 15 more)