Jump to content
  • Articles

    Our website articles

    Padded appliqué in machine embroidery

    By Irina, in Machine embroidery materials and technology, , 3 comments, 6,585 views
    Original text by Marina Belova 
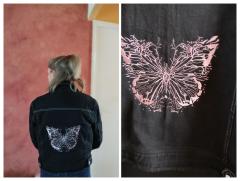
    Padded appliqué that creates volume is an ordinary appliqué with a special material under the appliqué fabric called padding. 
    3D Puff (Foam), polyester batting, foam rubber and other materials can be used as such. The number of layers in the padding can vary depending on the thickness of the material and the desired effect. According to my experiments with trapunto, knitwear is the best appliqué fabric that does not crumple the padding too much. 
    I didn't find the process of creating a padded appliqué too different from the one of the traditional patched appliqué. 
    It is simple and includes 3 steps: 
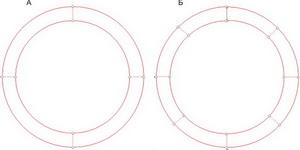
    First, a running stitch outline that will show where to put the "layer cake" (the appliqué fabric together with the padding). Having embroidered an outline, the machine stops and the frame comes out. It is necessary for the better placement of the fabric and the padding.  After that, a running or a zig-zag stitch joins the appliqué fabric and the padding together. Having stitched them to each other, the machine stops and the frame comes out for trimming of the fabric and the padding along the perimeter of the running stitch or zig-zag.  The finishing border that covers the edges is embroidered next.  There can be a slight variation to the process. It involves first stitching the padding to the main fabric and trimming it, then stitching the appliqué to them and trimming all three together. Everyone should choose what is more convenient for them: stitch and trim all the layers together or separately. 
    If you ask my opinion, there are not too many variations to a finishing border: 
    Satin  Fill  Digitizing a padded appliqué by hand: 
    Create a running stitch outline that will show where to place the fabric and the padding.  Insert a stop so that the frame will come out for positioning of the appliqué fabric together with the padding. The way of adding commands depends on the type of your embroidery machine.  Create an outline that stitches the appliqué fabric to the main one.  Insert a stop so that the frame will come out for positioning of the appliqué fabric together with the padding. The way of adding commands depends on your embroidery machine type.  Create a finishing stitch column border.  The width of a finishing border should be no less than 4–5 mm. It is necessary because it is rather hard to trim extra fabric with the padding so that the edges of this "layer cake" didn't show from under the thin outline. Therefore, you can't be too cautious with the width of the finishing border. 


    Secrets of prolific digitizers. Operational standards in machine embroidery software

    By Irina, in Machine embroidery materials and technology, , 0 comments, 1,708 views
    Original text by Marina Belova 
    I want to return to the question of digitizing efficiency raised in my previous article. Today I want to add 2 more methods that I learned from the
    Western embroidery professionals and tried out myself – they do indeed work. 
    These methods are standard regardless of the software you've chosen: 
    you need to digitize all designs at a scale of 6 in 1 (i.e. increase them 6 times in size)  and avoid drawing too many points on the curves  A 6 to 1 scale is a legacy of the pre-computer digitizing era. So why do modern punchers, operating in the up-to-date software, stick to that standard? 
    I think the answer is, "They got used to it". When you digitize on the same scale over and over again, you get in the groove. 
    So you can work out every object in detail and estimate the distance between the elements by the naked eye. To reckon whether there is enough compensation to counter-balance push&pull. Actually, many parameters can be worked out in advance. Therefore, an experience of using one and the same scale can help to prevent a lot of mistakes. 
    On top of that, with this scale, you can avoid drawing too many points. Superfluous points > unnecessary details > waste of stitches. 
    When digitizing on a big scale you'll get lots of possible points defining the shape of an object, whether you like it or not. You'll need some time to mark the object out. To substantiate my statement here is the classic example: To define the circle, 4 pairs of points will enough (image A).
    But you can go overboard and draw a lot more of them (image B). 

    The result will be the same in both cases. Therefore, as the commercials put it, "Why pay more?" 
    That's where goes the lion's share of the digitizer's effort – additional points. As a consequence, they have low digitizing speed and low efficiency, and the design needs modifications after testing. 
    To be honest, I had trouble growing out of a habit of zooming. I had to reconfigure my embroidery software so that there was no zooming when I spun the mouse wheel. You can always see how the design looks in the preview window. But I liked the result – my digitizing speed went up. 

    Secrets of prolific digitizers. Getting started 

    By Irina, in Machine embroidery materials and technology, , 0 comments, 3,382 views
    Original text by Marina Belova 
    We often search for the ready scenario of what and how to do in order to digitize successfully. But we never touch the subject of getting prepared.
    It is, perhaps, our biggest mistake. 
    Last year I was surprised to hear a few tips on how to digitize in a more effective way from several embroidery veterans. Those were 2 simplest actions that should be taken before digitizing starts: 
    1) to print the design in the full size 
    2) to create the embroidery sequence on paper even before you sit in front of your computer. 

    Isn't it ridiculous? Not it the very least. I tried these myself. 
    Printing the design on paper gives you the opportunity of taking an unbiased look at the design. I, for instance, conceptualize my future embroidery by looking at the size of the design and the number of stitches in it. First, I determine what stitches and stitch directions I'm going to use. Then, I assess the small details: is it possible to embroider them all or should some of them go. After all, you can draw the stitches on paper.
    And then many things will become clear. 
    Outlining your future embroidery sequence on paper saves a lot of time. The only thing left is to digitize the design as planned. You won't have to modify the design afterward, set the start/end point of every object and do such routine tasks. Except perhaps for some small things that escaped your attention. But in general, it makes the project much quicker to carry out. 
    A not-so-unknown pro by the name of Ed Levy states that preparation is 75% of digitizer's work and is done without a computer. I think we should listen to these words. Besides, he's not the only one who says so. 

    Kitten in your pocket: a master-class

    By Irina, in Machine embroidery materials and technology, , 3 comments, 10,256 views
    Original text by slavyankarusi
    Free download design 
     
    Today I want to share my first (and, hopefully, not the last) master-class with you
    It's called "A kitten in your pocket" and was inspired by a Japanese embroiderer Hiroko Kubota. 

    Of course, machine embroidery cannot entirely convey the charm of the hand embroidery, but I tried to create something similar, nevertheless, and you get to evaluate the result. I used Janome 126x110 mm embroidery frame. 
    For this occasion, I cut out a blouse with patch pockets according to a shirt sewing pattern, out of cotton calico; you can also embroider this design on a ready blouse with patch pockets, but you need to rip the pocket off before the embroidery. 

    The design consists of two parts that are printed. (Beside the stitch files, there 3 .jpg files in the folder: the first and the second parts of the embroidery and the entire kitten, with the enter line and center lines, full-size, for printing). 


    On the placket the sewing line is drawn, the first part of the design is put on top of it; the lines on the pattern and on fabric should match together.


    Center lines are marked with chalk, and the fabric is hooped in accordance with them. (On the wrong side is the adhesive tear-away stabilizer). 


    Embroider the first part of the design, with the alignment crosses, unhoop the embroidery and sew on the pocket. 


    Put the second part of the pattern on top (the paw that "lies" on the pocket) so that the alignment crosses superimpose. Join them with pins and adjust center lines. 


    The crosses are embroidered first; they should exactly match with the ones embroidered previously. 

    When embroidering the second part, I lowered the machine embroidery speed 400 SPM because of pocket's thickness. 
    You be the judges of the result. I'm sure not a superpro, but I hope that you'll like the cat and also that someone will have a go at the embroidery, too. It would be splendid if you shared your results with us.  


    Alternately, you can stick the design onto Filmoplast and embroider the paw separately, then sew on the pocket so that it can be opened. 
     

    A creative patch for your jeans or the "Hole with the fringe"

    By Irina, in Machine embroidery materials and technology, , 3 comments, 4,682 views
    Free download design 
     
    Although the entire topic on our forum is dedicated to mending jeans, I dare to suggest a creative patch of my own design, which I affectionately named the "Hole with the fringe". Generally, we do either what we like or what we need to do. This time I tried to combine business with pleasure. The business in my case involved my husband's jeans in need of a repair (he tried to sit down in them and here you are; someone here sure needs to eat less ), and the pleasure lied in my interest in what I could do with them, so I hoped that he will discard these old jeans entirely and buy a new pair (those were his exact words the moment he saw the design I created in Wilcom). But it didn't work out that way at all. After the work was completed, my hubby refused to let go of his favorite jeans, what's more, my daughter literally demanded to winterize her trendy ripped ones. Which is something that I still have to face. I hope someone likes my idea. 
    But let's get to the point. 
    What you'll need: 
    1. Torn jeans. 
    2. A piece of dense fabric (denim is preferable). 
    3. A tear-away stabilizer or embroidery paper. 
    4. A set of embroidery threads (I use sewing polyester ones). 

    5. And your embroidery machine, of course. 
    6. I created the design myself for this occasion. 

    The making process goes like this: 
    Hoop the tear-away stabilizer.  Stick a piece of denim (it can be of a matching or a contrasting color) onto it. 
    Embroider the design at a low speed, making 15 color changes instead of all 18 (polyester sewing thread is a bit coarse for such a small design, so it can rip off the stabilizer; also, in my opinion, jeans require stronger threads than the embroidery ones but this is a matter of preferences; the size of the design is fitted to the hole on the jeans). 
    Then, there is a stop. Without unhooping the fabric, put the torn jeans on top of the already embroidered fragment and secure them with needles. (If necessary, unseam the jeans prior to that). 
    Insert the hoop back into the machine and embroider the three remaining color changes. 

    After that, make incisions from the center of the hole toward its edges (preferably at the right angle). 
    Fluff up the incisions, picking out the threads you don't need with the blunt side of scissors (the way kids curl strips of paper). 
    Cut out the patch from the wrong side, leaving allowance, and remove the stabilizer wherever possible (the rest will gradually wash away).  If you unseamed the jeans, now is time to sew them up.  The "hole with the fringe" is ready for use. 
    By the way, this method is good not only for mending accidental tears but also for winterizing ripped jeans. 
    In between, I repaired the hems: 
    I cut away the frayed parts. 
    Divided the leftover denim into strips.  Formed them in two circles matching the hems in circumference: 
    Folded these welt pieces in two, stitched them to the hems and serged the edges. 
    Folded the hems to the face and added two stitch lines along the serge finish. 
    In such a way I repaired the frayed edges without changing the jeans length. 
    This is how the jeans look on a person. 


    And in case they tear again I'll think of some other technique. 
    Good luck and good day to all!

    How to change the colors of a design in My Editor?

    By Irina, in Machine embroidery materials and technology, , 1 comment, 6,965 views
    You can do that by either using a color palette from a .EDR file (what's this?) or change the color of every object manually. Today we’ll focus on the second method. It will be handy for those who like to create their own color schemes.
    Open the design in My Editor and see that the colors are all wrong. 

    Look at the top left corner of My Editor window and find the Color Manager icon. Click on it. 

    A pop-up window will appear, divided into several parts. On the left, you see the available palettes and the colors they contain. On the right are the colors used in your design.

    You can use a color chart that comes with the order as a reference point or choose any color you like from any of the available palettes. 
    The color chart for this particular Bunny is for the Robinson-Anton Rayon threads.
    1.Set your cursor at the color you want to change. From the color chart that comes with the order, you know that this object should be painted ruby glint instead of yellow. 

    2. Choose Robinson-Anton color palette from the drop-down list.

    For your convenience, the items in the palette can be arranged either by name…

    …or by colors.

    3. Find Ruby Glint on the list, set your cursor at it and click on Set Color.

    You’ll instantly see how the embroidery design looks with this new color.

    Repeat the steps 1–3 until you are satisfied with the result, then press OK. 

    In this example, I used Robinson-Anton color palette, but you can choose any one you like. You can even combine them if you’re going to use different types of threads.
    Don’t forget to save the design after you’ve completed tinkering with it!

    Openwork machine embroidery

    By Irina, in Machine embroidery materials and technology, , 0 comments, 3,958 views
    Original text by Marina Belova 
    Beside FSL and artistic embroidery with complex tone renditions, there is much hype around the various types of openwork (broderie à jour, the word "ajouré" meaning "openwork" in French). 
    There are several types of openwork in machine embroidery: 
    Cutwork that can be made with "bridges" or without. Cutwork is a pattern in which pieces of fabric are cut out and outlined with satins.  Pulled thread work. Yarns in the fabric are pulled in a specific way to create the lacy effect. It should be noted that the yarns are not pulled out. Various motifs are used to create the interweaving.  Lacework – pieces of fabric are cut out and the holes are filled with lace. In my opinion, lacework is similar to FSL, which looks as if it has been "embroidered" into the openings in the fabric.  Richelieu embroidery consists of holes of varying size and shape. Holes can be stand-alone or arranged in a chain-like fashion. They are usually outlined with thick satin columns.  All of the above types of openwork are widely used in combination with other techniques or on their own, giving the embroidery the rich outer look, which is why they are so popular. 
    Almost all of them can be created both in advanced embroidery software and in the simplest one. Although, creating such a design in an ordinary editor will take more time. The same can be said about the type of an embroidery machine: You can embroider on any one of them but you'll use different devices. 

    Machine embroidery needles: characteristics and choice

    By Irina, in Machine embroidery materials and technology, , 2 comments, 3,862 views
    Original text by Marina Belova 
    A needle is the most important part of the stitch-forming mechanism on embroidery machines. 
    How the needles are made 
    A blank for a needle is a piece of wire that is shaped mechanically, and the ear is formed in it. Then the eye is either chemically or mechanically planarized to remove burrs. After that, a size and a brand are indicated on the needle. The final step involves smoothing and polishing of the surface. The needle is first clad in chromium, then in nickel. 
    Chromium sticks better than other metals, it dissipates heat and works well with both natural and synthetic fibers. Nowadays you can find more expensive needles with new kinds of coating, such as teflon, titanium nitride and ceramic, which are much more durable than chromium and, therefore, more longevous. 
    Anatomy of a needle 
    A needle consists of the following parts: 

    Shank, which is the upper, the thickest, part of a needle that is inserted into a needle carrier and is secured with a screw clamp. A needle for industrial embroidery has a rounded shank, and one side of a shank of a needle for home embroidery is flat. 
    A blade is a narrow part of a needle that penetrates the fabric. The diameter of a blade defines the size/number of a needle. 
    Taper (also called shoulder) is a sloping transition area between the shank and the blade. 
    Butt is a dull part of a needle on top of the shank. 
    A tip is a sharp end of a blade. 
    A point is a part of a blade between the eye and the tip. 
    An eye is an opening that is perpendicular to the blade, through which the thread is passed. An embroidery needle has a bigger eye than a sewing one. This allows for the thread to pass through the opening more freely, whereby reducing the number of twists and, consequently, thread breaks. 

    A scarf is a short cup-like section at the back side of the blade slightly above the needle's eye, which enables the point of a hook passing right beside the needle's center axis. Here the point of a hook comes very close to the eye and catches the upper thread to form a loop and make a stitch. The depth of the scarf varies in different types of needles. 
    A long groove is a furrow along the front part of the blade that goes from the shank to the eye. The cross section of a groove is about 40% of the needle width, which puts certain restrictions on the number of a thread that can be used with the needle of a particular size. The long groove guides the thread into the eye and allows it to pass freely and quickly. 
    Basic technical characteristics of a needle 
    Needle markings consist of 3 main parts: 
    System  Size  Point type  One needs to know these specifications not only to insert the right kind of needle into the machine but also to consider thread type and particular qualities of the fabric on which the design will be embroidered. 
    Needle system 
    Needle system describes physical parameters: 
    needle length  shank length and diameter  distance from the butt to the eye  shape of the beveled edge  Some of these parameters determine the type of embroidery machine, and some – the particularities of a needle. All these specifications are put into numbers and letters. For example, DB x 1, DB x K5. 
    Sometimes several different marking systems can be found in one package. If we turn to history, we'll see that these tend toward standardization among the embroidery machines manufacturers. Each of those systems describes the same needles that can be inserted into one machine. 
    Needle size (number) 

    Most needles have as many as 2 numbers: one pertaining to European metric system and the equivalent USA one (Zinger). There, numbers usually have a slash in them – 90/14, 80/12 and so on. The real diameter of a needle is defined by a European system: 75/100 = 0.75 mm. There are needles from #55 to 130. 
    Needlepoint types 
    Sharp needlepoint is used for almost all kinds of fabrics except knitwear.  Acute/slim set point (SPI) – a very sharp needlepoint. It is recommended for leather and also dense and coarse woven materials.  Sharp (K or no markings) is one of the most frequently used needlepoints in the industry. It is best for woven materials or dense fabrics that do not unravel; also good for the caps. A sharp needlepoint cuts through the fibers, and that reduces pull & push deformation.  Normal round point (R)  Ball point is used for almost all types of fabrics except knitwear.  Light ball point (SES) – another one of the most popular needlepoints. The point being slightly rounded, this needle can be used not only for the woven materials but also for knitwear – it doesn't leave holes around the embroidery, as it pushed fibers apart, not cuts through them.  Medium ball point (SUK) – the needlepoint is rounded and meant for the coarse knitwear and elastic materials.  Heavy ball point (SKF) – a dull rounded needlepoint. It is designated for stretchy materials.  Wedge point is used with leather and artificial leather.  Narrow wedge point (cutting point, P). The last one is used for leather, vinyl and very dense materials. It leaves a cut instead of a hole, which makes it better for non-woven fabrics.  cross point (CR)  reverse twist point (RTW)  triangular point (TRI)  square point (SQ)  Needlepoint identifiers: 

    Some manufacturers offer the needles with Teflon coating. Those needles were created for the dense abrasive materials and watertight fabrics. 
    You can find needles coated with titanium nitride. These needles are meant for very dense materials. Also, they can be used during the embroidery that involves sticky materials. This coating prevents the blade from accumulating adhesive and it also warms up less than standard needles. 
    Reasons for changing your needle 
    A dull needle can be a reason for the fabric puckering and distortion.  A wrongly chosen needle can cause tension problems.  It is not always right to use a needle of a bigger number because it may lead to the thread twisting and breakage.  A thick needle makes unjustifiably large holes or cuts through the fabric, which may result in gaps between the stitches.  A wrongly chosen needlepoint may lead to the cutting of the fibers, fabric distortions, and a sloppy edge.  If you take a #30 thread and try to match it to a thin needle, you may get thread breakage as the result of the thread wearing away.  If you take a #60 thread and try to match it to a thick needle, you may get loops. The reason for this is the thread moving without sufficient guidance from the groove.  How to choose a needle 
    One should choose the embroidery thread according to the density and the type of fabric and also the thickness and type of thread. Denser fabrics require needles of a bigger size and thin/loose ones – the opposite. 
    How needle size corresponds to the thread thickness and fabric thickness 
    Thread

    Thin fabric

    Thick fabric

    poly/rayon 60

    70-75

    70-75

    poly/rayon 40

    75-80

    75-80

    poly/rayon 30

    75-80

    90

    rayon 12

    100

    100-110

    twist 30

    75-80

    90

    twist 30

    75-80

    90

    cotton 50

    100

    100-110

    cotton 30

    75-80

    90

    cotton 20

    80

    90

    wool/acrylic

    90-100

    90-100

    metallic 50

    65-75

    65-75

    metallic 45

    90

    90

    metallic 40

    65-75

    65-75

    metallic 35

    90

    90

    metallic 30

    90

    90

    metallic 20

    100

    100

    metallic 15

    100

    100

    Mylar

    80-90

    90

    Matching fabrics/point types/needles 
    Fabric type

    Needlepoint type

    Needle #

    Home embroidery needles

    Commercial embroidery needles

    Home embroidery needles

    Commercial embroidery needles

    Thin satin

    H-M, H, H-J

    SPI

    70-75

    65-70

    Lycra, spandex, fabric stretching in all directions

    HE, H-SUK

    SES/SUK

    70-75

    65-75

    Thin cloth, poplin with spandex

    H-M, H, H-J

    SPI

    70-75

    70-75

    Natural thin leather

    H-J

    SPI/R

    70-80

    70-80

    Natural soft leather

    H-E

    SES

    75-80

    75-80

    Thin vinyl

    H-J

    R

    70-80

    70-80

    Thick vinyl

    H-E

    SES

    75-80

    75-80

    Transparent natural/synthetic fabrics

    H-M, H, H-J

    SPI

    65-75

    65-70

    Thin knitwear

    H-E

    SES

    70-75

    70-75

    Voluminous knitwear

    H-SUK

    SUK

    70-75

    70-75

    Organza

    H, H-J

    R/SES

    70-75

    70-75

    Thin nylon

    H, H-J, H-E

    R/SES

    70-75

    70-75

    Dense nylon

    H-J, H-E

    R

    90

    80-90

    Polyester taffeta

    H-E

    SES

    70-75

    70-75

    Corduroy, velvet

    H-E

    SES

    75

    75

    Terry cloth

    H-E

    SES

    75

    75

    Piled fleece

    H-E

    SES

    75

    75

    Fake fur

    H-E

    SES

    75

    75

     
    Read here how to match a thread to a needle without having these tables at hand. 

    Needle and thread. Matching thickness

    By Irina, in Machine embroidery materials and technology, , 2 comments, 3,759 views
    Original text by Marina Belova 
    Recently I've been thinking how one can match a needle and a thread in thickness without consulting any guides. In theory, according to the manufacturers' booklets, everything is very simple: threads should be 40% thinner than the needles. That is, a thread should as thick as a long groove on a needle that plays an important part in forming a stitch. 
    This is shown in the following picture: 

    In picture 1, the thread is much thicker than the long groove of a needle. This is fraught with the twisting of the thread, skipping stitches, flagging, and thread tension problems. 
    In picture 2, the thread fits tightly into the groove, which results in fine, crisp stitches and precise thread tension, because the thread slides along the groove, keeping friction to a minimum. 
    In picture 3, the thread is very thin and the groove is too wide for it, which leads to uncontrollable loop formation, stitch skipping and, again, tension problems. 
    In theory, everything is clear, but how does one determine it with a thin needle and thread? After all, you cannot see distinctly, whether the thread fits the groove or not. And you are not going to pick up a magnifying glass every time when you need to match a needle to a thread, will you? 
    The only system that shows the thread thickness is TEX, according to which we could calculate the thickness of a needle, using the rule of proportions. But if we don't know the thread's TEX as there are no inscriptions on it concerning its thickness, what can we do? 
    It turns out that there is an answer to this awkward question. As usual, it is quite simple: 
    Cut a piece of the thread with which you plan to embroider, about 45–50 cm long.  Take a needle that seems appropriate and thread it like you do with an ordinary thread.  Pick up two ends of the thread so that one end is 20–25 cm higher than the other (the thread should be at 45°).  If the thickness is chosen correctly, the needle will move slowly down the thread under its own weight. The needle should not stop anywhere (if it does, it's too thin) or to move too freely (in this case it is too thick).  Our task is to find the thinnest possible needle that will slide down smoothly. P.S. I found one more way of matching a needle to a thread. It is very similar to the previous one but I'll describe it anyway: 
    Cut a piece of the thread with which you plan to embroider, about 45–50 cm long.  Take a needle that seems appropriate and thread it.  Pull the thread from both ends vertically, as in the picture below. The needle starts to slide down the thread: 
    If it rotates a little around the thread, this is a match. And if the needle doesn't rotate or doesn't encounter any resistance on its way, it is a bad match. Frankly speaking, I think that you need some experience to do this test, i.e. you need to watch how the needle behaves on a thread in various cases. It seemed to me that the second method of matching a thread to a needle was in no way representative and somewhat contentious. According to it, you can use an ordinary #40 thread with a #65 needle. 

    Boring

    By Irina, in Machine embroidery materials and technology, , 0 comments, 3,907 views
    Original text by Marina Belova 
    Again I'll dwell on the subject of openwork or rather one of its variations – cutwork with holes made with the help of a special device for industrial machines called "bore". Let's call this process "boring". 
    Creating holes by boring is very interesting. But, if I remember correctly, digitizing and testing designs is an extremely laborious task. It may be necessary to perform lots of tests to find the right digitizing settings for the particular type of fabric and, consequently, to modify the design after the tests are over. 
    A bore is a knife that cuts holes in the fabric. It is usually shaped like a pyramid with 4 cutting blades, but some of them have only 3. The device structure depends on the embroidery machine brand. 
    This is how my boring device looks like: 

    It consists of a special foot with a spring that contains a knife inside. The foot is necessary for holding the fabric in place while cutting a hole. My boring device is inserted into the machine in place of the first needle. Meanwhile, the throat plate is substituted for another one, with an opening for the bore. This opening is covered with a pliant material that serves as a cap of sorts. 
    This is how the knife itself looks like. From above: 

    There is nothing difficult in the installation. 
    Let's go to the beginning, to what exactly we want to achieve using this wonderful device. And what we want to achieve is Richelieu embroidery. 
    Richelieu consists of small holes of varying size and shape in the fabric. They can be placed separately or arranged in a chain. The edges of the holes are usually reinforced with thick satin columns. Cores of the flowers are one example. This is what will determine the digitizing settings. 
    The main digitizing principles for the boring device are: 
    Outline the future hole with a running stitch. Stitch length is ~ 2 mm, for fabric stabilization.  Create a path for the bore. There can be variations:  1. If the future hole will be less than 1 cm in diameter, cut the fabric crosswise. The stitch length is 1–1.5 mm. But the stitch length and the number of repeats may vary depending on the characteristics of the fabric: 

    I've seen the recommendations to cut the ovals only along the long center axis. 
    2. If a future hole is over 1 cm in diameter, it should be cut according to its shape. 

    Between the trajectory of the knife and a stabilizing stitch, there should be some fabric left.  Don't forget to activate the bore in the beginning and deactivate it at the end.  After that, you digitize a zigzag that will pull the cut fibers to the edges. The density value here is ~ 0.6–0.8 mm. But I've seen the embroidery sequences where this step was omitted.  Lastly, you digitize a satin column several mm wide so that the inner edge of the column is inside the opening. The density value should remain standard.  There is one more advice concerning the color of the bobbin thread to the color of the upper thread. 
    I myself digitized for boring only twice. If was 5 or 6 years ago. And, as usual, I was reinventing the wheel because there was no information except the Tajima help guide that shortly described the principles of creating a design. As I recall, every time I wasted 4 or 5 hours for testing and altering the design. All of this only to find the right offset parameters, satin densities, and stitch lengths. 
    Nevertheless, the result was achieved by trial and error, albeit not a high-quality one, with fibers sticking from the edges and other unpleasant things. But it was so exciting to do something new. 
    Though, I remember that I didn't succeed in cutting the holes crosswise, so did perimeter-wise instead. You need to test every little thing, you know.

  • Top Downloads

  • Recently Browsing   0 members

    • No registered users viewing this page.
×
×
  • Create New...