Jump to content
  • Articles

    Our website articles

    Embroidery with flat metallic foil threads

    By Irina, in Machine embroidery materials and technology, , 0 comments, 3,850 views
    Original text by Marina Belova 
    Not so long ago I saw a flat metal foil thread in a shop and decided to try it. It is basically a polyethylene + polyester tape dyed in shiny colors that reflect light on both sides. This thread reminds me of tinsel that is used to decorate Christmas trees, although cut in narrower and longer strips. About 5 years ago I tried to embroider with this thread but failed to understand its advantages and disadvantages. 
    Metallic foil threads are made by almost all manufacturers, big and small alike, but it cannot be easily bought just anywhere. The one I'm using today is a Chinese WonderFil. 

    Manufacturers tend to use different words for this type of threads: Glitter (Gunold), Sulky Holoshimmer (Gütermann), Hologram (WonderFil), Spectra (Madeira). But no matter how it is called, it looks pretty much the same: a thin sparkling strip that glitters in the light. The only thing that varies is the way of winding it on a spool/bobbin (straight or cross). To know how the way of winding affects the embroidery, click here. This is directly relevant to what I'm talking about because all manufacturers except Gunold wind their bobbins straight, which leads us to buying a winding device or making it ourselves. 
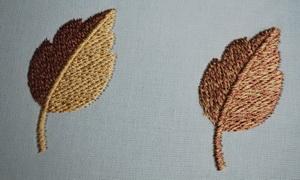
    This is how the thread looks from the front: 

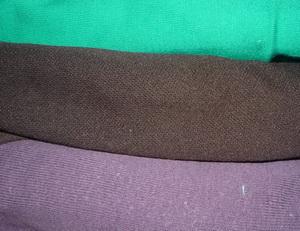
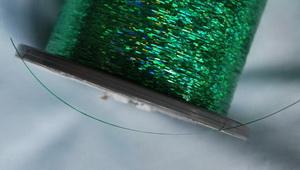
    This is how it looks from the side: 

    As usual, what intrigues me the most is that there is no information on how to work with such threads if you discard generalizations. But you can learn something from the open sources as well, there is no need to reinvent the wheel every time: So, the technical recommendations are the following: 
    In case a spool is straight-winded, make sure that the thread comes off of it in the right way.  If the spool is cross-winded, you can cover it with a net like the one used for metallics, because the thread will twist a great deal. See the Gunold's video on the subject. There you can find some instructions that may interest you before you start working on your first test piece. For example, a needle should be marked DBx7 instead of a DBxK5 all of us are accustomed to. Reduce the tension.  Bobbin thread thickness: 120–150.  A #75–80 needle (like the one used with metallic threads) is preferable. Madeira even suggests using #90.  Design creation and digitizing tips: 
    Use big designs  And long stitches  I would also advise reducing density a little bit, as one does when working with metallics.  So, I created a design and embroidered this Christmas tree: 

    While digitizing, I didn't include any extra steps except making stitches longer, but it took me a great deal of time setting the right tension because this thread behaves in a different way from the ordinary ones, and you have to pay close attention to prevent breakage. But the resulting look of the embroidery is worth it – it's much more lustrous than the one embroidered with metallic threads. The very thing you need for Christmas and New Year designs. 

    How to embroider with two threads in one needle

    By Irina, in Machine embroidery materials and technology, , 10 comments, 19,034 views
    Original text by Marina Belova 
    I've long wanted to embroider with two threads in one needle, being mighty curious how the whole thing would turn out. So a couple of days ago I saw a video on Gunold's Youtube channel in which Debora Jones demonstrated the way of doing it and shared basic recommendations for those who are going to repeat it on their own machines. 
    Below are her recommendations to which I added a few things that could be guessed from the context: 
    Use standard #40 rayon or polyester threads.  A 90/14 needle has a large enough ear to accommodate both threads. The point type depends on the type of fabric, I suppose.  You should increase the thread tension to prevent looping.  And reduce the design's density by at least 20%.  The issue of underlay wasn't specified but the understitching was present, therefore, you'd better use it. I also think that the stitch length should be increased in relation to the standard one.  The important thing to remember is that a thread supply failure detector won't work in this case because the second thread will remain intact even if the first one snapped.  In my opinion, pull compensation needs to be increased substantially, for two threads will distort a design a great deal in spite of the reduced density.  What else one needs to do to master this not too complicated a skill, according to the video in question? Not much – to create a design in the way that was suggested and go to the machine: 
    So I threaded my needle with 2 threads: 

    Adjusted the tension – I had to tighten all the screws all the way in so that to prevent loops – and went to the machine: 

    Nevertheless, there were some loops during the embroidery of the twig (done with satins). The leaf is very puffy and looks like it had been embroidered with a multicolor thread made of 2 different strands (below on the right). Judging from the result, the stitch density could be reduced even more that by 20%. For reference, here is the same leaf embroidered with one thread at a time – each half with a different color. I used my standard density values (below on the left): 

    The most interesting aspects of this technique are: 
    You can choose the colors you like and not the ones in the multicolor palette.  You don't need to use (almost) any special tricks when digitizing in order to successfully mix the two colors.  This technique is excellent for the embroidery of flowers, leaves, hair (fur) and whenever you need things to look natural. 

    Appliqué with polyester batting

    By Irina, in Machine embroidery materials and technology, , 2 comments, 6,017 views
    Original text by Marina Belova 
    Today I'll continue my article about padded appliqué and show the simple yet effective technique of making it on an example. 
    I'll make this teddy bear: 

    I chose this particular image of a teddy bear because its simplicity perfectly suited my goals: 

    So I digitized the image and got a machine embroidery design. It's a very simple design, an ordinary patched appliqué. See the preview below: 

    I chose a stretchy and fluffy knitwear fabric for the teddy's body – namely, fleece. For the face and the belly, I took out trims of fake fur that remained of a stuffed toy I hadn't made. I used polyester batting for stuffing it. Despite the batting being thin (1 cm), I nevertheless decided to use only one layer of it. Now I realize that I could have used 2 layers to make the embroidery puffier. 
    So, let's proceed to action. I hoop the fabric together with the stabilizer: 

    Load the design into the machine and start the embroidery. The first step is the simplest – a guideline for positioning of the appliqué: 

    When creating an embroidery sequence, I planned to sew on the belly first. Because the fake fur itself has volume and also does not stretch, I will not put a polyester batting under it. I'll only use fur instead. I place the fur where the belly is intended to be: 

    I start the machine and sew on the fur with a small zig-zag stitch: 

    Now I pick up the scissors and trim the extra fur along the perimeter as close to the zig-zag stitch as possible so that the fur won't show from under the finishing border in future: 

    Right after trimming I place polyester batting on top of the embroidered outline of the bear: 

    Fleece goes on top of that: 

    I start the machine and stitch one more zig-zag stitch. This time it outlines the body of the bear. 

    I take the hoop off the machine, pick up the scissors and trim the entire "layer cake" perimeter-wise: 

    After that, I embroider the outline showing where to put the face: 

    I put the fur on top of that outline: 

    Stitch the fur with a zig-zag stitch and trim the extra material: 

    Then I start the machine again and embroider the rest: finishing borders, eyes, nose, and so on. 
    I decided against the water-soluble film, despite fleece being a piled fabric, but I used a plastic bag when embroidering the heart on the fur (I tore the leftovers prior to embroidering the border around the heart): 

    The resulting embroidery is quite neat – nothing shows through the satins, and that indicates that I chose the right border width, 5–6 mm). 
    That's all that is to it. The whole thing isn't much different from an ordinary appliqué, except perhaps trimming – I had to trim the layers of the "cake" separately: first polyester batting and then fleece. 

    Immersing in the knitwear

    By Irina, in Machine embroidery materials and technology, , 0 comments, 2,599 views
    Original text by Marina Belova 
    Today I decided to summarize all knowledge about knitwear that I learned from various sources. For me, this is a rather interesting subject because I don't have much experience in working with knitwear, that is, I have literally none. For that reason, I always regard good embroidery made by others with respect and admiration, and that kindles a desire in me to do something like that myself. 
    Lately, I've been trying to study the theory before starting work in order to make fewer blunders when in comes to practice, and also to reduce the time loss. 

    So, let's take another step to machine embroidery on knitwear. The first step was my general overview of knitwear as an embroidery basis. 
    Embroidery on knitwear is simple but requires a few skills: 
    You need to choose a right kind of stabilizer. Density and weight are the key factors that influence the decision: the thinner is the knitwear, the denser should be the stabilizer. According to the most common recommendations, a cut-away or even an adhesive stabilizer is best. For knitted garments of a rough texture, a polyester organza of a matching color will be a good choice. Alternately, you can use a dense tear-away stabilizer, either with a temporary spray adhesive or without it. Spunbond is also an option as the most tactile of all the stabilizers. All of these recommendations should be tested because different embroiderers use different stabilizers. A water-soluble film can be used to get the neat right side, especially if the design abounds with small details and letters.  You should always test the fabric prior to the embroidery, to see in what direction it stretches better.  When hooping you can pull the fabric only slightly and only in the direction it stretches least. It's important to remember that too tightly hooped a fabric will return to its natural condition after the embroidery and this will result in puckering (deformation) around the design.  Knitwear: to hoop or not to hoop; that is the question. The first advice goes like this: you should hoop it only with the stabilizer, not place the stabilizer under the hoop for costs or whatever other reasons. 
    An argument to the contrary is rather wide-spread. It is simple – do not hoop the fabric but glue it with a temporary spray adhesive instead, and additionally secure it with a stitch along the perimeter of the embroidery. 
    This is something that everyone should figure out themselves. As for me, I tend to the hooping. Especially after I've tried to embroider a knitwear pincushion and a stuffed toy. 
    If there are hoop marks, you'd better wrap the hoop into something soft. I've read that there are even special materials for hoop wrapping. Here you can read how I removed the hoop burn.  Correct hooping is important for the designs that contain over 5 thousand stitches and many colors. I've written an article on how to check the quality of the hooping, and I also mentioned it in my article about the embroidery of the pincushion.  Reduce the machine's speed.  Adjust thread tension in the right way so that the upper thread isn't too tight.  Soft rayon threads are preferable.  You'll need ball-pointed needles (SUK), their thickness depending on the thickness of the fabric and may be anything between #65 and #75. Read more about choosing a right kind of needle here. 
    The basic principles of digitizing for knitwear and knitted garments: 
    You should choose a right kind of design or create a new one in accordance with the fabric type. The main criterion is as follows: the embroidery should not change the basic knitwear characteristics – its softness and the ability to arrange in folds.  The design should not contain too many details and stitches or be of a large size.  If the fabric is loosely spun, it's better to use an applique or chevron.  Don't make the embroidery too dense.  Be sure to avoid large filled areas.  Also, it's better to do without outlines, especially the running stitch outlines.  A rightly chosen underlay is immensely important. For large areas, an overarching underlay is recommended. It should be a full grid at 45/135° in relation to the finishing layer, not too dense with not overly long stitches (2.5–3.5 mm). Zig-zags and double zig-zags for the satins.  Avoid too thick satin columns with great stitch length.  Pull compensation should be increased compared to the standard value.  Planning an embroidery sequence, follow this rule: from the center outwards.  Nothing difficult, just practice. In future there will be an article on my attempt at embroidering on one of the knitwear varieties – pique. And also one about embroidery on dense knitwear. 

    Meet the chevron. Part 3

    By Irina, in Machine embroidery materials and technology, , 0 comments, 3,039 views
    Original text by Marina Belova 
    I'm back on the topic of chevrons and today I'm going to examine the basic technology of creating a badge. Woven fabrics like gabardine or twill, non-woven fabrics like felt and special materials like Step, Twilly and Canvay may serve as a background. 
    These special materials were manufactured for appliqués and patches. They often have an embroidery-like texture. This helps to save on stitches. For example, you don't have to embroider the background. This is Gunold Step viewed from the right side: 

    Its wrong side is made of something similar to adhesive spunbond (poly mesh). I think it's done not only for sticking it to the fabric but also for better stabilization. 

    This material is dense and nice on the touch. 
    I won't labor the point of producing chevrons with serging the edges after embroidery. For I don't have an overlock machine of that kind, how am I supposed to write about it? Additionally, I don't see any sense in doing so. That process is simple: embroider, trim perimeter-wise and serge the edges. I'm more interested in trimming the edges of a fully embroidered chevron and embroidering a chevron on a blank. 
    First, I'll tell you about a chevron created on a blank, where the edges are already serged. The digitizing process: 
    You create a pattern of your future chevron. To do this, you scan the chevron and digitize its shape along the perimeter with a running stitch. In the end of this stitch, there is a stop and the frame comes out.  Create a design on the blank.  The embroidery process is simple and somehow resembles the creation of a traditional patched appliqué:  You hoop the stabilizer with an adhesive layer on one side and something akin to Filmoplast on the other. The adhesive side should be facing up. You remove the protective layer from the stabilizer. If you don't have such a stabilizer, you can use an ordinary one but with a temporary spray adhesive.  The sequence is loaded into the machine. The machine embroiders the first outline, makes a stop and the frame comes out.  The blank is glued to the stab, fitting in the outlined area.  Embroider the entire design.  Unhoop the stabilizer and tear it away from the badge.  Apply the adhesive.  The interesting point is that they don't sell these blanks where I live. Or I just haven't heard about them. Although there is a variety of shapes and sizes in the USA and Europe. Here I only saw them once, at the Textillegprom exposition. To me, it seems strange to make them by hand instead of just embroidering the chevron and not overcomplicating things. 
    Let's get to the completely stitched chevrons. I've seen two variations of a technique: 
    In 1 go.  In 2 steps.  The first one goes like this: 
    Hoop the fabric together with 1–3 layers of the dense tear-away stabilizer. The fabric may be strengthened with a fusible interfacing material. You may additionally hoop the buckram with the fabric. In other words, you can play around.  Embroider the entire design.  Unhoop and trim. You can either trim by hand or use a laser cut. Some additionally singe the edges using various devices ranging from a lighter to even a blowtorch. Each in their own fashion.  Then you apply the adhesive.  To embroider a chevron in one go, you digitize it in the simplest way possible: 
    First, digitize the entire design.  Then, add a finishing border. The border should be no less than 3 mm thick. You can also do a double layer border. The second layer is laid along the outer edge. It is thinner and half as dense as the border. It will work as a protective layer in case you accidentally damage the stitches while trimming. I wrote about it here.  This is a badge of some European soccer club I embroidered on fabric. I used Step as a base. This is my second chevron; that's why I picked a simple design for it. Everything here is easy except the letters at the bottom. These letters, they didn't come out as planned at all. They are only 2 mm high. But I think I can tinker with them a bit more to make them readable. 

    Embroidering a chevron in 2 steps is very much like making an appliqué to a ready pattern: 
    You hoop the fabric together with the dense tear-away stabilizer. If necessary, it may be additionally strengthened, as described above.  Embroider the entire design. Stitch the running stitch instead of a border.  Then unhoop the whole thing and trim along the perimeter.  Hoop 1 layer of the tear-away stabilizer.  Stitch a basting stitch. The machine stops and the hoop comes out.  A blank that was made and cut out prior to the embroidery is glued to the outlines area of the stabilizer with a temporary spray adhesive.  Embroider the finishing border.  Detach the chevron from the stabilizer.  Apply the adhesive.  Digitizing for the embroidery in 2 steps: 
    First, digitize the entire design.  After that, digitize the stitch according to which the chevron will be cut out.  Copy this stitch to the new file. It will be a guideline for positioning of the chevron. After that, you add a stop command and the hoop coming out.  Digitize the finishing border. The border should be no less than 3 mm thick. The recommendations listed above also apply here.  Actually, there are many ways of creating borders, you only have to choose the one suitable for your purpose.  P.S. I think that digitizing chevrons is hardly different from digitizing ordinary designs. The same principles are applicable here: you consider compensation values, use underlay, pay close attention to the areas where the objects meet, and so on. Only with chevrons, you have to choose the values more carefully in order to achieve a high-quality result. This is true for all types of chevrons, whether the completely stitched ones or the ones embroidered on a background. 
    Of course, you don't always use a special fabric because of its cost. Consequently, you have a reason for looking around and trying a sharkskin (a tent-cloth; you can also consider slicker fabrics), a gabardine or an ordinary blended diagonal fabrics (or a blended/completely synthetic twill) – all of the materials on the list being substantially cheaper than the sewing twill mentioned above. 

    Meet the chevron. Part 2

    By Irina, in Machine embroidery materials and technology, , 0 comments, 2,956 views
    Original text by Marina Belova 
    Today I decided to elaborate on the making process of a completely stitched chevron. To learn about the types of chevrons, click here. I once read that chevrons of this type are the easiest to embroider. 
    The method itself is good because is allows one to create a chevron of any shape. 
    After three unsuccessful attempts and modifications to the design I got this (see the photo below): 


    This is my first chevron. I've never digitized and embroidered chevrons before. I simply followed the rules listed below and kept an eye on the embroidery process in order to see what needs to be corrected. 
    Digitizing seems quite easy at first: 
    Create a first strengthening layer – a running stitch along the perimeter.  Create the second strengthening layer – a full grid at 45 and 135°.  Create a background for your chevron. This is usually a Tatami fill.  Create everything that will be visible against the background: letters, logo, emblems, etc.  Create a finishing border. The latter is usually made with satins no less than 2-3 mm wide. But there can be variations that have embellishments or are of a different width.  Naturally, this type of embroidered patches is not compatible with any kind of design. You can't use designs with separate elements. The main secret of digitizing chevrons of that kind is to plan the embroidery sequence in such a way that all the elements are interlinked, otherwise, the embroidery will fall apart. This is usually achieved with the right kind of underlay, with the stitches arranged in a criss-cross manner. 
    The technique is not overly complicated: 
    1. Hoop or frame one of these stabilizers: 
    2–3 layers of a dense 100 m2 tear-away  2–3 layers of a thick (80 microns) water-soluble film  2–3 layers of a heat-away 100 microns film  2. Embroider the design. 
    3. Detach the chevron from the stabilizer. 
    In case you used the tear-away one, you should singe the edges in order to prevent fraying.  Water-soluble film leftovers can be removed with a damp cloth.  As for a heat-away stabilizer, you can get rid of it by using an iron or a press.  4. The final step is to put glue on the wrong side of the chevron that will attach it to the garment. 
    Gunold offers a special BSN thermofoil for that. This foil can be of 2 types: The 1st is meant for commercial use, it is glued to the garment with an ironing press, and the 2nd can be glued with an ordinary iron. 
    This is all, in a nutshell. 
    P.S. Not so long ago I've read that it's possible to embroider chevrons of this type on polyester organza with a layer of a tear-away stabilizer. Would be interesting to try that. 

    Meet the chevron. Part 1

    By Irina, in Machine embroidery materials and technology, , 0 comments, 3,820 views
    Original text by Marina Belova 
    Chevrons (labels, badges or embroidered patches) are a wonderful thing. It is a patch of varying shape and size that helps to adorn (and not only adorn) such parts of a garment and such fabrics that are hard to embroider. Chevrons should be loved if only for that. 
    They are one of the main products of many embroidery companies if I'm not mistaken. Among those who do home decor machine embroidery, there is a common opinion that can be described in a succinct phrase: "Pshaw, chevrons! Anybody can do that." 
    But if you ask my opinion, reality is quite the opposite: home decor machine embroidery is something anybody can do, even a green as grass digitizer. Why do I think so? Because all those flowers, leaves and flourishes are easier to digitize: any slip will look like a feature. 
    Lettering is a different story. A little mistake in compensation, kerning or size, and it's a complete wash-out. And what about geometric objects?
    They don't come out as conceived at the first try. Try to recall the ovals that were meant to be circles and rectangulars that were set to be squares. 
    So it's hard to escape the conclusion that digitizing and producing chevrons and logotypes requires knowledge, a flawless technique, and skills.
    As Stephen Batts rightly put it, a chevron is a puzzle for a common digitizer. Therefore, if chevrons are so mysterious, one should dig into the subject a bit, in order to unveil their mystery. Isn't it interesting? 
    So, back to our chevrons. As I found out, there are only 2 types of chevrons: 
    Completely stitched ones. There are so-called "chevrons deluxe".  Chevrons embroidered on a background stitched less than 100%. These are standard chevrons.  Methods of their production vary depending on the number of stitches. 
    For patches that are completely stitched there are only a few variants: 
    Embroidery on 2 or 3 layers of a very dense tear-away stabilizer.  Embroidery on a special film. Gunold offers its 80 microns water soluble film for this purpose, and Madeira — a 100 microns MadeirAS Film. All of these films should be applied in several layers. Manufacturers advise using 2 or 3.  Patches that are not completely stitched can be embroidered on a variety of materials. Those can be woven fabrics like gabardine, non-woven like felt or special ones like Step, Twilly or Gunold Canvay. 
    These chevrons can be reproduced in the following ways: 
    Embroider, cut out, serge the edges on a Merrow machine.  Embroider and cut along the edges.  Embroider on a badge blank.  After the embroidery is completed, there is only one step left in making of a chevron of any type — sticking an adhesive foil (like BSN, for instance) to the wrong side. 
    As for the choice of threads, one should pay attention to the future use of the item. If it is going to be washed in hot water or whitewashed, you'd better use polyester threads. But you can also use metallics rayon and acrylic threads as well as threads with "special effects". Thread thickness may range from the biggest numbers to the smallest for tiny details and texts. 
    As for the software, well, in my opinion, there is no special editor that was meant for creation of the embroidered patches. It is easy to digitize a design for chevron in any embroidery editor, but you need to understand what you're doing and why. 
    Here, I covered the basic concept of this embroidery goods. Nevertheless, I call your attention to the fact that all kinds of embroidered patches and the ways of creating them deserve a closer look. Which what I plan to take to in the nearest future. 

    What is digitizing in machine embroidery?

    By Irina, in Machine embroidery materials and technology, , 1 comment, 3,400 views
    Original text by Marina Belova 
    There are numerous names people give the process of transforming an image into a design. Just as with naming software, everyone is saying whatever he or she can think of: 
    punching  digitizing programming for machine embroidery  embroidery file creation  planning a stitching sequence  pattern creation  design development  design creation  So what is this process, whatever the name you use for it? Does it mean converting analog data into numeric one? Transforming a regular image into a file an embroidery machine understands, with the help of special tools? A complex technical process that includes a row of steps, based on the profound knowledge of theory? A creative process that requires artistic training and a great talent? All of this is unclear and boring. Too hard to understand, too. 
    Whatever highfalutin definitions others give this process, I like John Deer's one the most: "All that you need to do is to look at the image and apply stitches to it. You merely choose an appropriate stitch type and direction and use various gimmicks and tricks." These words inspire hope. A hope that everyone with basic digitizing knowledge can create a machine embroidery design. There is only one thing left to decide: where to obtain the knowledge and from whom? One needs to remember that gaining skills requires practice and time. 
    This knowledge should help you answer these questions: 
    How to give consideration to all of the input parameters of the image before digitizing?  What types of stitches to apply?  How to make an efficient embroidery sequence?  What tricks to use so that the embroidery is by all definitions a work of quality?

    Embroidery navigation

    By Irina, in Machine embroidery materials and technology, , 0 comments, 2,529 views
    Original text by Marina Belova 
    Embroidery navigation is planning the embroidery sequence from the beginning to the end. 
    In Russia this is usually described as follows: 
    Navigation  Sequence  Embroidery process  Arranging the objects in a sequence from the first to the last   In English-speaking countries this process is called by the following names: 
    Pathing  Sequencing  Routing  Mapping  The goal of all this planning is to create an optimal sequence of embroidery elements so as to reduce the production time. 
    Sequencing starts even before digitizing, with studying of the image that is to become the future embroidery, printed in full size. Mapping your embroidery will allow you to become more productive: 
    you spend less time creating designs  you need to modify them less often  you reduce the number of stitches and, therefore, limit the production time  Main factors that should be regarded as a foothold when mapping a design: 
    The logic of the embroidery path  Using as few color changes as possible  Using as few trims as possible  The rational embroidery path is in many ways defined by the start/end points position. The start/end points should be at a minimum distance during color changes and trims, and also between connector stitches. This minimizes the hoop trajectory and the time spent on the embroidery. 
    It is often necessary that all elements of the same color were embroidered before color change. The reason for this is that every color change can be equaled to 130 stitches. So, by using as little colors as possible, we save time. 
    Having as few trims as possible is also closely connected with the time saving because every trim is equal to 65 stitches. Therefore, digitizers try to avoid trims with the help of several tricks. 
    For example, you can substitute a trim for a connector stitch if the distance between two outlines is less than 2 mm. A jump stitch is not visible at such a short distance. That is, if the threads are not contrasting to each other in color. Another way involves hiding a connector stitch of one color behind the objects of another color in case they will be embroidered later. 
    Unfortunately, you cannot always follow the "minimize everything" motto. The designs differ from each other, and the fabric on which these designs are embroidered are also different. To give you an example, the aforementioned factors are less important for the embroidery on stretchy fabrics or a rounded surface of a cap. In that case, the quality standards are in the foreground – the embroidery should have no defects. The minimization requirements are often sacrificed in favor of quality. 
    Besides the minimization factors, there are also general recommendations on sequencing. They are: 
    Begin the embroidery from the biggest object in the design and move to the smaller ones.  Begin the embroidery from the center outwards.  Studying the designs digitized by others help a great deal. You can view the designs created by others in a sewing simulator software or during the embroidery. Also: you yourself should embroider, embroider again and then embroider some more. 


    Checklist of a machine embroidery design creator 

    By Irina, in Machine embroidery materials and technology, , 0 comments, 4,103 views
    Original text by Marina Belova 
    The checklist is the terms of reference a digitizer should stick to. A freelance digitizer gets terms of reference from a client and a hired employee – from a manager. A checklist contains the input parameters of a design which a digitizer should consider even before getting to work. 
    Terms of reference usually contain: 
    the image that will become a design  the size of that image  type of material on which it will be embroidered  where on an item the embroidery will be placed  the number of colors in the design  thread type and thickness  number of supposed stabilizers and their type  and, of course, the customer preferences.  Also, one should not forget a very important thing – the time frame. 
    Taking all the factors into account will help a digitizer to decide how the design will be digitized. And whether it will be possible to modify the image to get the embroidery of a high quality. 


  • Top Downloads

  • Recently Browsing   0 members

    • No registered users viewing this page.
×
×
  • Create New...