Jump to content
  • Articles

    Our website articles

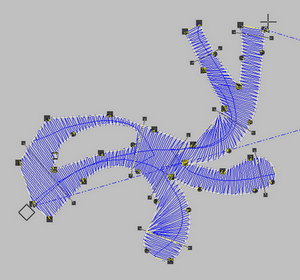
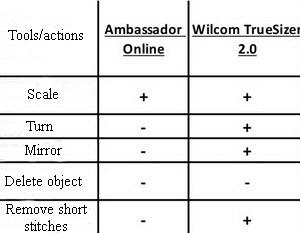
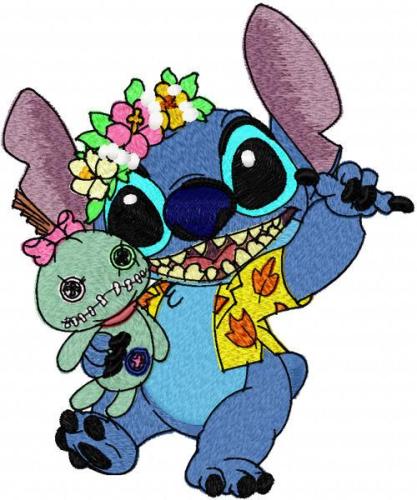
    How do I delete the parts of the design that I don’t need? 

    By Irina, in Machine embroidery materials and technology, , 0 comments, 5,515 views
    To chop off the unwanted parts of a design in My Editor, open it and left-click on the element you want to get rid of. The selected element will be marked with a blue outline. 

    Now, press Delete. 

    Keep doing this until you get rid of all the unwanted elements. 
    If you want to delete several objects at once, left-click somewhere in the area where are no objects and drag and let go. Several objects will be selected. Again, press Del.

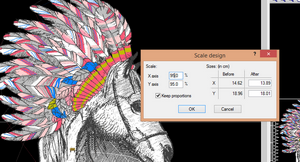
    When finishing, select File > Save as and store your design on your computer. 


    How do I resize a design in My Editor without reducing the stitch count?

    By Irina, in Machine embroidery materials and technology, , 0 comments, 8,542 views
    For this operation used free machine embroidery software My Editor. 
    To show you how to change the size of a machine embroidery design without changing the number of stitches in it, we are going to use this lovely horse’s head. Note the original stitch count in the lower left corner of the window. 

    Find a Scale design icon on the screen left and click on it. 

    You can scale your design in two slightly different ways. The first way is to change the size of a design by X percent: 

    The second is to manually enter the height and width values in cm:

    Unless the image is skewed in the first place, don’t forget to check the “Keep proportions” box. This way, you’ll only need to change either the height or the width, and the correct aspect ratio will be maintained. Now, press OK. 
    Note that the number of embroidery stitches in the design in both cases stays the same.

    If you accidentally entered the wrong value, just undo it by pressing Ctrl + Z on your keyboard.
    Having made all the alterations, Select File > Save as and store your resized design somewhere on your computer. 
    Keep in mind that it is generally not recommended to scale your embroidery designs by more than 5%.
    Used Stay Wild machine embroidery design

    How to open file in My Editor and save it to another stitch format

    By Irina, in Machine embroidery materials and technology, , 4 comments, 6,383 views
    In My Editor embroidery converter software, you can open your machine embroidery design in several ways.
    The first one is to select File > Open.

    The second is to select File > Browse to find the embroidery design on your computer.

    The third is to click on this icon on toolbar.

    Select the design you want and click on Open.

    Voila!

    To save your embroideyr design in another stitch format, select File > Save As.

    Choose the desired format (determined by the type of your embroidery machine, ex. for BROTHER PR 1000- you can choose PES or DST)   from the drop-down list.

    Now press Save and store it wherever you want.


    Quality benchmarks. Controlling the stitch angle

    By Irina, in Machine embroidery materials and technology, , 1 comment, 4,246 views
    Original text by Marina Belova 
    Setting a stitch angle means fitting the stitch direction to the shape of the object. Only two types of stitches can change their direction: satins and fills. There are just two aspects of stitch direction you can control: 
    The first is the direction of inclination. This is true, first, for fills and, second, for straight satin columns. Important! Although all stitches in a straight column have one and the same direction, you need to set 2 parallel directions at the object's ends.
     
    Multiple directions. Multiple directions can only be set for the satins of a complex shape. This is true for almost all kinds of machine embroidery software. 
    Wilcom, with its Fusion Fill tool, is the only exception. 
    This tool is essentially an ability to set a complex outline as one object, which is basically several segments with branches (it often contains openings, too). 

    Every segment is a separate object, filled with satins running in their different directions. The editor automatically adds connectors between these objects, sparing you the routine of drawing them manually. The resulting number of segments within an outline depends on starting/end points and the number of stitch directions. The only thing left to do is to set the stitch directions in the object, which can be quite a challenging task. 
    In my example Wilcom divided a complex shape into 5 segments that looked like this: 

    Main factors that can influence your choice of the stitch direction: 
    Creating an effect  Adding volume  Avoiding distortion  General recommendations on the choice of the angle: 
    90° angle between the stitch and the outline is considered classical. 
    By changing a stitch angle you can visibly separate the stitches in the neighboring objects of the same color. For example, you can embroider an entire leaf with the stitches running in one direction or divide it in two and change the stitch direction. This will add volume. 
    When changing the stitch angle from classical to randomly chosen one, be sure to check whether the stitches won't become too long as the result.  Carelessly set stitch directions or an overabundance of them may lead to the embroidery looking untidy. 
     

    Embroidery on satin stitches

    By Irina, in Machine embroidery materials and technology, , 0 comments, 5,306 views
    Original text by Marina Belova
    Synthetic satin (polyester or acetate) is for some reason considered a rather tricky fabric, prone for puckering and other embroidery distortions, the one that does not tolerate any mistakes. So I decided to check if that was indeed so and why: to me, the fabric seems quite stable and not likely to present any problems. Except that it is very smooth and able to slip out of the hoop; there also can be hoop marks, like on silk or organza.
    But first, let's see some general recommendations on working with this fabric:
    When choosing the image or digitizing the design you should not forget to lower the density (0.45–0.5 mm would be OK). Understitching should be kept to a minimum. Although, in you ask my opinion, sparing the underlay seems strange for such a slippery fabric. Satin and filling stitches should not be over 3–4 mm in length. It is important to stick to the embroidery sequence (from the center onward). In order to avoid gaps, filled objects should be embroidered in one direction and not in multiple crossing ones. Read more about it in my article about digitizing complex shapes. The fabric should be hooped together with the stabilizer, trying to keep their contact to a minimum; also, don't forget to wrap the hoop in the fabric or paper prior to that. The stabilizer should be of a tear-away middleweight variety. Or, you can use an adhesive stabilizer like Filmoplast + an additional tear-away stabilizer under the hoop to avoid hooping the satin. Any kind of threads can be used, but everyone seems to prefer rayon. Needles should correspond in thickness to the thread and the fabric. SES light and round needlepoint is preferable. I created a flower design and embroidered it on the satin. The result, in my eyes, is very good:

    That is, despite the rather dense fill, all puckering and distortion were easily removed with an iron. There was no hoop burn whatsoever on any of these satin pieces. A slightly visible ring on the fabric was easily ironed out in both cases:


    I probably didn't problems with this because I usually wrap the smaller ring of the hoop in order to prevent the fabric from slipping. About this and other little things that make hooping more easy and efficient, read my article called "Hooping minutiae".
    The only embroidery defect I saw was shifting of the fibers along the perimeter (which is not a rare occurrence). The embroidery being dense, this defect is visible, but it doesn't bother me:

    I also want to point out that the design of a lower stitch density, embroidered on the same fabric, puckered as well. But, again, it is not a big problem and can be removed by washing and ironing:

    I think, this fabric is nothing to be afraid of. I used the ordinary threads and #70-75 needles with SES needlepoint present on my machine. And one layer of 40 g tear-away stabilizer. But I added temporary spray adhesive because I thought that my fabric, a very fluid one, needed it. I didn't use any additional fabric or paper between the rings, and the front side of the satin touched the hoop.
    I digitized the design as usual, except lowering the density in the fills. The resulting density was 15–20% lower than the default one in my embroidery editor. And it is usually set at 5 lines per mm (~ 0.4 mm). To prevent the fabric showing through the stitches, I added density to the underlay.
    The bottom line is, the more I embroider on different fabrics, the more intuitive I get considering both the digitizing and embroidery processes.

    A souvenir made of the toilet paper

    By Irina, in Machine embroidery materials and technology, , 0 comments, 2,965 views
    Original text by Marina Belova 
    Yesterday I was writing an article about the embroidery on paper and remembered an old video on YouTube that described the embroidery on toilet paper. My American colleagues regard embroidery on the rolls of toilet paper as a joke gift or a gag. And they also match the designs to the various dates and holidays so that it did well. 
    And not only Americans! Last year (or was it the one before last?) on Textillegprom you could see an embroidered roll of toilet paper on the
    Amaya exhibition stand, which was demonstrated to everybody who was interested. Like Amaya was the only paper on which this stunt was possible. 
    I'll show you my own attempt at that step by step. 
    For this, may I say, intimate item, I chose the design carefully. This is the one I settled upon (naturally, it came from an open source): 

    Then I picked up a roll of the ordinary cheap toilet paper: 

    Checked the size of one section to fix upon a size of the design: 


    Having done that, I created a simple design containing only satins: 

    I set the stitch density at 3 lines per mm (In Stitch Era), used no underlay and tried to avoid jump stitches between the segments. The stitch density value depends on the quality of the paper, I guess. 
    Anyone can create a design like that in no time. 
    Let's go to the machine. 
    Hoop a cut-away stabilizer only: 

    Find a center of the section of the paper and mark it with a dot – this will be the starting point. I decided to embroider not the first, but the second section so that I could later roll it properly. 
    Then I took a temporary spray adhesive, sprinkled my stabilizer and stuck the paper onto it, trying not to skew it. 

    I started the machine and began embroidering. 

    The embroidery is ready! Sure thing, in only has 770 stitches: 

    I unhoop the embroidery and carefully so that not to ruin the paper trim the extra stabilizer from the wrong side: 

    In the photo below you can see the result of my efforts: 

    I didn't fold the paper in several layers, like my American colleagues do, but decided to embroider on just one layer. And everything went well. As a gag gift to someone, it will do. Not everybody will be glad to receive such a present, but you know who will, don't you? 

    Mylar as an appliqué fabric

    By Irina, in Machine embroidery materials and technology, , 0 comments, 4,797 views
    Original text by Marina Belova 
    I've long set my sights on mylar (wrapping film used for presents) as a possible material for machine embroidery. The manufacturers in Europe and the USA have been producing the machine embroidery variety for ages, but where I live only the wrapping film can be found, or, as a last resort, you can turn to the old kids' balloons filled with helium. 
    The film, of course, is not a durable material, so you hardly can use it for clothes. But it will be good for the items that don't require washing and pressing with a hot iron, for instance, bags or embroidered postcards. It is said that you cannot have the film dry-cleaned, but it can endure 10–20 washing cycles. On the other hand, this film comes in all kinds of colors and ornaments, and it also has a shine, which is its undeniable advantage. 
    This is a spring tree with birds that I created today, but, unfortunately, it is hard to capture that shine with my camera: 

    The most important thing is, this film is very easy to use. It can be used as an appliqué, topped with low-density fills, through which the shine is visible. 
    The design digitizing is even more simple than for the traditional patched appliqué because you don't need to do any trimming; the films tear off easily along the line of needle penetrations: 
    First, create an outline where the film should be.  Then, create the rest of the design.  Settings recommendations are very similar to the ones for machine embroidery on paper: low density, the use of motifs, removing short stitches and so on. 
    I'll show you how to do it, using my own attempt as an example. 
    I hoop the fabric together with the stabilizer: 

    Stitch the outline: 

    Put the film on top of it. I have sprinkled mine slightly with a temporary spray adhesive to prevent it from slipping and creasing at the very beginning: 

    Then embroidered the entire design. The film, as I found out, can be torn off even along the running stitch line: 

    But it is better to tear it off along the satin stitch line. The rest can be removed with pincers, which is not difficult: 

    The most important thing is to keep an eye on the embroidery so that the folds on the film do not appear, otherwise, you'll get a ribbing under the fills. You cannot spot it in the photo, and that's why I don't show it, but in reality, it is very much visible. 
    Before my second attempt, I decided to iron my already wrinkled film to smooth it – mine is of a simple wrapping variety, remember? It turned out that you can smooth it a little. I set my iron at the most delicate regime and used a thin piece of cloth for protection. The result was splendid. 
    I used the most ordinary SES needle, but a thin one – #70. The threads were both rayon and polyester, the most standard #40. 
    Such are the secrets of working with this film. 

    Machine embroidery converters: comparison

    By Irina, in Machine embroidery materials and technology, , 3 comments, 4,066 views
    Converters is a small but pleasant bonus from the embroidery software manufacturers. A converter is a small app that allows users to watch, scale and save machine embroidery files in a variety of formats. Besides the aforementioned functions, some of them have additional options.
    For example, they allow you start/finish the embroidery designs, remove the short stitches and change colors. Some apps even have a simple in-built stitch editor.
    Judging from the information on the official websites, all converters also include a stitch generator that is a part of their "older brothers" – machine embroidery editors. This feature enables the apps to recognize not only the machine embroidery files but also the native ones. That is, the converter is able to open an object file that was created in the embroidery editor by the same manufacturer. An inbuilt stitch generator will recount the stitches every time you make some changes.
    Not all converters are alike. I use converters a lot because I often work with the ready files. Sometimes it is more convenient to use more than one. Looking back at my article on how to choose machine embroidery software I decided to write a review for every converter that can be downloaded and/or tried for free.
    To make everything I said more clear, I suggest you consult these:
    Download the trial version of the Wilcom TrueSizer converter here. Register and use the Ambassador on the official website.  Register and download My Editor on the official website or  Download a free trial version of MelcoSizer. Download TESViewer for free on the official website or  Register and download an old Coats EDV converter, My Editor analog with fewer possibilities. The last two are based on WingsXP.  In the table below you can see the parameters I used to compare converters. 

    The conclusion offers itself when you look at the software capabilities. No explanation needed. A lesser known free MyEditor converter outshines all the others. Bravo. However, MelcoSizer comes a close second. 

    Embroidering a postcard

    By Irina, in Machine embroidery materials and technology, , 0 comments, 3,294 views
    Original text by Marina Belova 
    I decided to embroider a postcard. I somehow don't have the mood for a Christmas postcard — perhaps, the reason is that I haven't found a proper design. But I stumbled upon a design for a Valentine's Day postcard instead. Here's a step-by-step report of me making it. 
    This is how the drawing looked like after some manipulations over the size (the original image came from an open source): 

    I settled upon 20.5x20.5 cm. 
    Here is the design preview: 

    It has altogether 7 colors: 6 for the hearts and the 7th for the stitch along the perimeter: I need this stitch because I'll trim to it. 
    I set a low density: 0.7–0.9 mm. I also removed the underlay. All connector stitches between the segments and the outlines were hidden on the edges of the objects and were made with running stitches. The stitch length was no less than 3 mm. I drew the tie-offs manually on hearts and inserted them automatically on letters. You can see the result in the photo below. 
    Naturally, I embroidered on paper. Read here on how to make a design for the embroidery on paper. 
    I chose the handmade paper, not a heavyweight variety but with long fibers that can be seen with the naked eye. 

    I chose the threads of the same thickness (#40) but of different structure: rayon, polyester, metallic. 
    The first thing I did was to frame a cut-away stabilizer. 

    Then I sprinkled it with temporary spray adhesive and stuck the paper to it: 

    I must point out that this adhesive is bad for securing the paper on the paper. They unstuck practically right away. I thought of that in advance, therefore, the first thing in my embroidery sequence was an outline that stitched the base of my postcard to the interfacing material.
    Having embroidered the squares, I trimmed the extra paper along the perimeter using scissors: 

    Now I could embroider safely – nothing would shift. 
    The design was embroidered rather quickly – hardly surprising as it only had 6105 stitches. The embroidery went well, the thread laid smooth, the paper didn't become perforated. 
    This is the embroidery still in the hoop but (almost) without the connector stitches: 

    After that I unhooped my semi-finished product and trimmed it along the outline: 

    This is how the wrong side looks like: 

    One should notice the tie-offs. If I wasn't lazy and drew them manually everywhere and not only on the hearts, the wrong side of my embroidery would be clean and I wouldn't need to cover it. But I decided to automatically insert tie-offs; the only thing I did was to increase the stitch length compared to the default one in my editor. 
    In the photo above you can see the ugly knots almost everywhere in the letters, and these are not easy to get rid of. 
    So the ready postcard looks like this: 

    The only thing left is to glue some interesting-looking paper to the inside, write something and give as a present. 

    Napkins embroidered in-the-hoop

    By Irina, in Machine embroidery materials and technology, , 0 comments, 5,659 views
    Original text by Yelena Kraftwork 
    The history of napkins goes back for centuries. People used them to clean their hands in the times when forks and spoons hadn't yet been invented. Napkins come in various shapes and sizes: rectangular, square, even round. Even the simplest napkin may become a nice decoration for your dinner table if you machine embroider it. This master-class will tell you how to embroider 4 napkins in one go. 

    Embroidery on napkins Materials: 
    Tearaway adhesive stabilizer  Embroidery threads  Machine embroidery design  Embroidery or sewing and embroidery machine  200*200 mm frame (or larger)  Four 300*300 mm napkins or pieces of fabric 
    In this masterclass, I used a custom design from Brother Innov-is 1E sewing and embroidery machine's memory. You are welcome to choose any of embroidery designs from our shop. 
    Embroidery on napkins The making process: 
    Cut a piece of stabilizer slightly bigger than your hoop. On the adhesive side draw the central lines with a fabric marker. Put your napkins onto the stabilizer in accordance with the lines. 


    Provided that you have a frame over 200*200 size, you can embroider all 4 of them in one go. 
    Place the napkins onto the stabilizer and press them together with an iron. The temperature depends on your type of fabric. Hoop the stabilizer together with the napkins so that the center lines register perfectly. 


    Choose your design and place it at the angle of 45° on all napkins. 


    Embroider the designs. Finish the borders with rolled hems on your overlocker or in some other way. Now you have a set of embroidered napkins that can make your friends envy when you invite them for tea. 


  • Top Downloads

  • Recently Browsing   0 members

    • No registered users viewing this page.
×
×
  • Create New...