Jump to content
  • Articles

    Our website articles

    How to increase the size of a design and adjust the stitch count in My Editor?

    By Irina, in Machine embroidery materials and technology, , 4 comments, 9,743 views
    How open file you can read here 
    For example, used he design of Fashion teddy bear design from our embroidery library. The format is chosen arbitrarily.
    Open the design you want to resize. Click on Upscale design. 

    Increase the size of your design either by percent or by a certain number of cm. (I added 10%). Press OK.

    As you can see in the lower left corner of the window, your design is now bigger than it was, but the number of stitches remains the same. This means that the embroidery may look a bit bald when finished. And we don’t know that, do we?

    Press Ctrl + A to select the entire design. Ultimately, left-click on any part of the background and drag to enclose the entire design. You’ll see a rectangular frame around it.

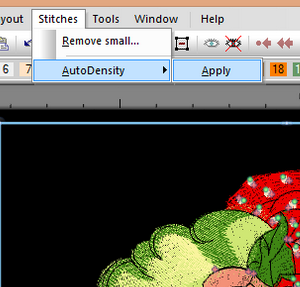
    Now, go to Stitches > Auto Density > Apply.

    My Editor has automatically added the stitches in the required places. You can see that your stitch count went up. 

    All that is left is to store your design where you want it on your computer.

    Appliqué with ragged edges

    By Irina, in Machine embroidery materials and technology, , 0 comments, 4,991 views
    Original text by Marina Belova 
    Appliqué with ragged edges is, perhaps, the easiest type of all in the machine embroidery. Easy both in digitizing and in making. This appliqué contains a very moderate amount of stitches. 
    I will consider the method of manually trimming the extra appliqué fabric right in the hoop. 
    The technology of creating appliqué is simple and includes 2 steps: 
    Embroidering an outline that will show where to place the appliqué fabric. Then the machine makes a stop and the hoop comes out for positioning of appliqué fabric sprayed with temporary spray adhesive.  Appliqué fabric is usually stitched with running stitches or zigzags to hold it in place. After that, the machine makes another stop and the hoop comes out for cutting the fabric directly in it.  The fabric is cut in a free-hand, you may even say artistic, way, 3-5 mm from the edges. You can fray the edges afterward. In this way, for example: 

    Edging 
    A several-fold running stitch is habitually used for an appliqué with ragged edges. Satins with ragged edges, small zigzags, motifs and whatever else your imagination can conjure, can be used as well. 
    Digitizing by hand 
    Creation of an outline that will show where to place the fabric.  Insert a stop so that the hoop will come out for positioning of the appliqué fabric. Every type of machine has its own way of adding commands.  Creation of an outline that stitches the appliqué fabric to the base one. Usually, several running stitches are used with 2 mm stitch length. Don't forget the tie-offs!  Insert a stop so that the hoop will come out for trimming. Every type of machine has its own way of adding commands. If there will be no embroidery after the creation of the appliqué, you can trim the extra fabric after unhooping.  General recommendations on creating the appliqué with ragged edges 
    In order to achieve a worn vintage look, better choose 100% cotton twill as your appliqué fabric and wash it prior to the embroidery. The appliqué fabric needs no stabilizing, otherwise, the desired ragged edge effect will not be achieved – the stabilizer will not allow the edges to fray.  Better stitch with the threads matching your base, not your appliqué fabric, in color. After washing, the edges of your appliqué will become even more frayed and the stitches will not be visible anymore.  To achieve even a more ragged edge, you can add notches and dents to the lines. 


    Thread Velvet technique variations

    By Irina, in Machine embroidery materials and technology, , 1 comment, 4,423 views
    Original text by Marina Belova 
    In anticipation of the New Year, I decided to make a small bag for a present. The design was chosen specifically for testing the Thread Velvet technique. With it, I wanted to kill two birds with one stone: to make a bag and do some experimenting. 
    An image, as usual, was taken from an open source on the Internet and slightly altered according to my purpose: 

    The already modified image for my New Year bag embroidery
    And this is how it looks on the screen: 

    The overall view of the embroidery after digitizing
    For some unknown reason, I decided to save up on stitch count and add just 2 outlines for the thread velvet instead of 3. I thought it would be enough. Each layer consisted of 2 colors. 
    I secured layer perimeter-wise by partly running stitches and partly zigzags. Want to see which one will hold the fabric better. 

    Various stitch lines along the perimeter to prevent the unstitching of satins
    Besides embroidering of the stylized Christmas-tree decorations and letters, I decided to add a serrated e-Stitch line where the strings will be.
    And also to outline my future item with a running stitch so that it would be easier to cut it out. I have a big border frame, therefore, I can embroider big designs. Why not put it to use, indeed? As the result, I got a 19.2 x 51.5 cm embroidery area. 
    I chose corn-colored silk for my bag. The threads were golden and lilac. 
    The embroidery went without effort. Already during the embroidery, I liked the volume on the right side created by several layers of threads superimposed on one another right where I was going to cut. Even with 2 outlines and 3 layers of threads are sufficient to create an impressive outer look. But the fabric is significantly puckered. 

    2 layers of threads create enough volume for the embroidery to rise above the surface of the fabric 
    This is how the embroidery looked still in the frame: 

    The ready embroidery 
    After that, I took everything out and decided to cut right away. The star was the first thing on the list. I planned to turn it into the ordinary fringe, so I cut the lower thread on the wrong side: 

    Cutting the lower thread on the wrong side of the embroidery
    Then gave the threads on the right side a little fluff and got this star: 

    A Thread Velvet star 
    Then I proceeded to slash the satins on the right side, where I wanted the velvety effect: 

    Slashing satins for the velvety effect 
    This is where the consequences of the mistake of economizing hit me. 2 outlines with 3 layers in each of them turned out far from enough. While cutting all layers of satins the fabric immediately showed through. And the outer look of the embroidery was far from what I imagined. But what is embroidered, is embroidered. 
    So I slashed the rest of the satins. This is what I got: 

    The embroidery final appearance after all the cutting 
    The slashed threads do not come out under the securing stitch lines and zigzags. Therefore, you can spare zigzags without hesitation if they are not here for decoration. 
    Sure, it adds a certain flare, but I myself arrived at the following conclusions: 
    You need to have much more outlines than 2 or even 3, superimposed. Each of the outlines should contain 3 layers of satins due to the understitching and the outer layer.  The number of layers should be determined separately for each embroidery design. But, the thicker are the satins, the more layers should they consist of. My thickest satin (8–9 mm wide) was inside the ball on the right. In the end, this ball looks the most naked.  In order to see the other color among the layers, you need to embroider at least 2 outlines with 3 layers of satins in them.  The outlines of different layers should be separated by at least 1–1.5 mm.  Don't be afraid to increase the density of double zigzag. I used 0.8 mm density, and it turned out to be not enough.  I would additionally place a low-dense flat fill under the satin layers so that the fabric would be less visible in case there wouldn't be enough density in the velvety parts.  Securing stitch lines for the satins should be placed off the edges and closer to the center. 

    An alternative way of embroidery on piled fabrics

    By Irina, in Machine embroidery materials and technology, , 1 comment, 4,040 views
    Original text by Marina Belova 
    I really cannot say where would we be without the Internet. The Internet is an enormous free encyclopedia where one can find tons of information even on such narrow a topic as machine embroidery. 
    While surfing the machine embroidery websites, I, for example, have long set my eyes on this embroidery technique for the piled fabrics (fleece, terry cloth and so on). The technique is often called embossing or trapunto. I guess, "чеканка" or "тиснение" would be the most appropriate words for it in Russian. But you can also call it mock trapunto. The embroidery that employs this technique is very original and good-looking even when the simplest designs are used. This is the alternative method of embroidering logos and very simple designs, which would fail to kindle anybody's interest when embroidered on smooth-surfaced fabrics. 
    This is one of my recent embroideries on fleece. It's very simple, but the outer look, the clarity and readability of the letters and the softness of the embroidery don't cease to make me happy. 

    The particular feature of these designs is their size – all of them are rather big and contain open areas (or, more often, holes), through which the pile shows. These open areas are surrounded with ordinary fills of a very low density, which trample the pile. As a rule, the fills have thinnish satin borders. 
    The embroidery technique is very simple: hoop it and embroider, as you do with piled fabrics with water soluble film on top and the backing that corresponds to that particular fabric type. Usually, the thread matches the fabric in color. 
    Digitizing is easy to and everybody can do it, even the least experienced user. 
    You create a simple fill of a very low density with openings. The usual density value is 1–2 mm. No understitching. All connector stitches joining different segments run along the edges. The stitch length in fills is reduced to about 2.5 mm.  For the towels a 2-layer fill is often used, the layers being perpendicular to each other. For fabrics with a smooth surface with a polyester padding one filling layer is enough. The untrampled padding rises above the surface of the embroidery in the open areas, which contributes to the original look.  Satin stitch border, no less than 1 mm wide and of a standard density, usually runs along the edges.  All of the above is rather easy to achieve, provided that the designs are simple, and can be done in any machine embroidery editor. Especially when you take into account that a satin stitch border can be created automatically in virtually every contemporary embroidery editor of any level. 

    Big designs alignment in machine embroidery A simple design

    By Irina, in Machine embroidery materials and technology, , 0 comments, 3,354 views
    Original text by Marina Belova 
    I've already written how to align parts of a design that don't fit into the hoop or a frame. Today I'll show how the most simple alignment goes. 
    I call alignment simple if it meets the following conditions: 
    The objects in a design are separate (apart from each other).  The design file is created by you, not taken from someone else.  You use a single-head embroidery machine.  So, today I'll replicate this decorative pillow with poppies that I had seen in the old Creative Embroidery and Cross Stitch magazine a long time ago: 

    I won't get exactly the same pillow, of course, but I'll try to make it as similar as possible. The intended size of the ready pillow is about 40x40 cm.
    The embroidery itself, consequently, a little smaller. But in any case, it won't fit even into my largest, 30x120 cm, frame. So I'll need to frame the design twice and align its parts. 
    I used a photo of this pillow as a background and created this design, using it as a base: 

    The ready design is 37.5 cm high and 34.6 cm wide. That is, I won't be able to embroider it in one go by any means. For this reason, I draw a 120x30 rectangle right in my embroidery editor. 
    I need it to see the borders of the frame and to determine the cutting line along which I'll split the design into parts. That is, to see with my own eyes, how big a part will be hooped the first time and which – the second. 
    As I have already had some experience in dividing designs for future alignment, I instantly decided to cut in this way: 

    In this picture, big long rectangulars are the borders of my frame: The drawing is very simple because all of its components are located at a distance from each other. I won't cut through the elements, like flowers or ribbons, so that not to create unnecessary troubles. I will cut between the objects. 
    Everything that fits into the orange rectangle without cutting through the flowers or ribbons will be framed first. All the elements enclosed by a black rectangle will be framed second. In other words, I cut my design along the curved green line. All the objects below this line will be embroidered first, and all that are located above – second. 
    I almost never print the design on paper in full scale so that to pin it down onto the fabric and use it as a pattern. I always do the marking instead – simple straight lines, which will serve as a guide for framing and also help me to know where to put a start point for the alignment. 
    So, I draw the marking lines. And also the alignment lines (marks), which will help me know whether all the elements align in a correct way and fall into intended places. 

    In this picture I painted the alignment lines, which I will need to trace onto the fabric, yellow. The first time I'll frame the fabric in accordance with the 2 horizontal and a vertical line. And second framing will be in accordance with a vertical line and also the middle and the upper horizontal lines. 
    In a picture below reference lines, in accordance with which I'll check if the elements register, are marked green: 

    Based on all of these simple geometrical constructions, I divide my design into 2 files. 
    Here's the first one, with the green reference lines: 

    And here's the second one, with the green reference lines just barely visible under the ribbons: 

    I'll show you details of this file. I put the alignment start point at the end of the green reference line. The crossing in the picture below: 

    Now I need to mark the fabric. I do it in a simple way, by copying the dashed lines from the screen right onto the fabric with a marker that will disappear afterward. My fabric is a synthetic one so I can take the liberty to do so. If you look closely, you can see scarcely distinguishable purple markings in a photo below: 

    I won't use the stabilizer for the embroidery because I don't have a thin tear-away one. The design is not "heavy", just 17000 stitches, so I'll embroider it as it is. 
    I frame the fabric as planned, in accordance with the lower and the middle horizontal line and a vertical one. I try to parallel my alignment line to the border: 

    Then I shift the frame toward the start point in the first file: the crossing between the lower horizontal and the vertical lines. 

    I load the first part of my design and embroider it. Here is what I got: 

    Above the upper flower on the right are the 2 red reference lines, which will play a very important part in the alignment. 
    I take the fabric out and frame it one again. This time I use a vertical and 2 horizontal lines, middle and lower ones, for guidance: 

    I load the last file. Shift the frame toward the start point: 

    Start the machine. The first thing embroidered are the reference lines, which will theoretically completely coincide with the ones in the first file. This doesn't happen often. I got this: 

    Not bad. I only need to shift it vertically – the exact matching of the upper parts of this design is not necessary. 
    After that, I rip all the reference lines out because it will not look good if they show through the lace ribbons. 

    Then I start the machine and embroider the rest of the file: 

    Take it off the machine. The fabric almost didn't pucker. And where it did, it could be removed by washing and pressing: 

    The wrong side is neat: 

    Here, I have ironed it a bit – the embroidery is smooth, no wrinkles: 

    This is all that concerns the embroidery. Nothing too hard. The only thing left is to remove jump stitches and sew up the pillow. 
    In order to understand the difference in alignment on home and industrial embroidery machines, read this article. 

    Embroidering with thin #60 threads

    By Irina, in Machine embroidery materials and technology, , 0 comments, 3,214 views
    Original text by Marina Belova 
    Today I'll tell you the main aspects of working with thin machine embroidery threads. 
    As I don't have much experience in using such threads, I don't know all brands that can be currently bought in Moscow. I've encountered the following ones: Amann (Sarafil 120/2, which is the same as the more familiar #60), Madeira (Classic Rayon 60, Polyneon 60), Durak (Visco 60).

    In my opinion, Amann threads are the most available of all. Their only disadvantage is their high price and also the fact that they are sold in 5000 m rolls. The rest of the threads are not easy to find. By the way, there are even thinner Serafil 200/2 threads (same as #75 ones), which are meant for even more delicate embroidery. 
    Such threads are made for small (2–3 mm) lettering and very small details – they are ~50–60% thinner than standard #40 ones. But this does not mean that with them you can embroider anything. For example, 2–3 mm letters with serifs will hardly be neat and readable even when embroidered with these threads. 
    One more important aspect – the color palette for #60 threads is much reduced compared to the standard #40s. 
    Embroidery technicalities 
    #60/8-65/9 needles are recommended. But, in my opinion, #60/8 needles are too thin for such threads.  Tighten the upper thread tension.  A thinner than usual lower thread should be winded up on a spool, like Amann Isa 180.  Reduce the machine embroidery speed a bit.  Use the ordinary stabilizer that corresponds to the type of fabric.  Design creation: special features 
    The density should be increased by ~25%. 0.35 mm is the density value for this type of threads Madeira recommends. But, as usual, you need to find the optimal density value by trial and error.  You should avoid using these threads for the fills. It's better to embroider fills with an ordinary thread and all the small details – with the thin thread. Even if it leads to extra thread change and trims.  Use only connector stitches between the letters; no tie-offs or trims. 

    Gift bag for a bottle

    By Irina, in Machine embroidery materials and technology, , 0 comments, 2,236 views
    Original text by Marina Belova 
    Several days ago I decided to do another In-The-Hoop project – a gift bag for a bottle of wine. February 23rd is not far away, there's the occasion for such a gift. Unfortunately, it was not done entirely on embroidery machine because I didn't much like the result. So I had to use a sewing machine, after all, to give the item a proper finish. 
    Here's what I got: a gift bag for a bottle with traditional February 23rd symbols: 

    I chose the simplest design possible: a star with ribbons and laurels. I sneaked the shape of a bag from one of machine embroidery websites. (You can choose from the designs in our shop instead). 
    Liked it very much – such a wide neck will arrange in beautiful folds. So I created this pattern: 

    According to it, I drew 2 embroidery designs, which were meant to be sufficient for the creation of this item. Below are the previews of the design: 


    Before starting the embroidery, I printed the pattern and stuck the parts together with adhesive tape. 

    With its help, I cut out two parts of the future bag: 

    I smoothed down the fold on the upper edge (the neck of the bag): 

    And began embroidering. I framed a stabilizer: 

    Loaded the design and stitched the outline: 

    I picked up the first part of my design and secured it face up with adhesive according to the outline: 

    Then I stitched the eyelets, sew the ironed out neck and stitched one more outline along the perimeter to show the real size of the embroidery area and not just the parts I had cut out. I took out the ready detail, trimmed it along the outline and tore away the stabilizer: 

    After that, I repeated the same steps with the second detail: framed the stabilizer, loaded the 2nd part of the design, stitched the outline and secured the still embroidery-free second cutout face up: 

    Because there is much to embroider here, the first thing I did was to stitch the detail to the stabilizer along the edges and sew up the neck: Only after that I embroidered the star and the rest of the design: 

    Now it's time to sew the 2 parts together. To do this, I secure the back side of my bag face up. You need to be very careful here so that to align the two halves of the neck: 

    I start the machine and sew both of the details together with a running stitch perimeter-wise, about 7 mm from the edge: 

    Take out the almost ready bag and trim the extra fabric to the guideline, which is distinctly visible on the wrong side of the stabilizer: 

    Tear away as much stabilizer as possible: 

    Slash the holes: 

    Turn the bag the right side out, run the string through the holes, put the bottle inside, tie the ends of the string together. Everything seems to be ready now: 

    But I don't like the result. Because of this mess, which is clearly visible: 

    The neck is too wide, the seams stick out, they would better be hidden because they are impossible to drape. For this reason, I need to add a backing. No matter how strong is my dislike of sewing, I need to do it. 

    My summary of this project is this: not everything can be made on the embroidery machine. 

    Thread Velvet

    By Irina, in Machine embroidery materials and technology, , 1 comment, 6,615 views
    Original text by Marina Belova 
    Thread Velvet is a variation of the fringe technique. Judging by those who produce the embroidered fabrics, this is a rather popular way of decorating a simple embroidery, which helps to enrich the look of the embroidery and make it original. 

    As the result, the embroidery resembles high-pile velvet and just as nice to the touch. The big advantage of such embroidery and its main difference from velvet is that it's washable. 
    This technique is very similar to the well-known sewing technique named chenille, where you slash several layers of fabric, matched in color and stitched together. Then these layers are fluffed so that you get a soft texture like velvety petals of the flowers. 
    Technically the process of creating the Thread Velvet is simple and includes 4 steps: 
    Hoop the fabric together with the stabilizer. The stabilizer is sorely needed here because the number of stitches in the design is large.  The embroidery process is not diverse from a usual one.  Unhoop the item and carefully slash the satin column in the middle on the right side where you plan to create the "velvet".  Fluff the threads up.  Digitizing recommendations 
    Create several layers of ordinary satins for one object. Satins should be no less than 6 mm wide. Each layer should be placed at a distance from the previous one. It's very similar to how you create volume with the help of understitching. The offset is necessary for the fabric not to be perforated along the outline. 
    Each layer if filled with 3 layers of stitches. A main layer and 2 underlays. Stitches in the main layer should be parallel to those in the underlay. The density of the main layer is set at a standard value; the density of the underlays is determined in each individual case, depending on how fluffy we want the embroidery to be.  We secure every outline from unraveling along the perimeter in the same way as in fringe:  with thin satins. Set the stitch length in the securing column at about 1–1.5 mm.  Running stitch with ~1-1.5 mm stitch length.  It is believed that:
    rayon #40 threads work best. But you can also use the threads of different composition and thickness, only don't forget to set the correct parameters while digitizing.  You can use color blends here, where every new layer is embroidered with a thread of a different color.  Sure, the multi-layered embroidery contains a large number of stitches and, consequently, requires a lot of effort while embroidery and later treatment as well as digitizing. But the outer look of the embroidery is worth it. 
    P.S. An interesting rendering of Thread Velvet. 

    Reverse appliqué in machine embroidery

    By Irina, in Machine embroidery materials and technology, , 0 comments, 4,081 views
    Original text by Marina Belova 
    Reverse, or inverted, appliqué in machine embroidery is a result of putting one or several layers of an appliqué fabric underneath the base fabric that works as a background. A design is embroidered and the base (background) fabric is removed layer by layer in specified places. Reverse appliqué creates an illusion of a distance. 

    Like an ordinary appliqué, the reverse appliqué is used for saving up on stitch count in large objects. 
    I'll examine the process of cutting the fabric by hand right in the hoop and also after unhooping. 
    The process of creating an appliqué is very simple to the one for the traditional patched appliqué:  The appliqué fabric is placed underneath the base fabric and is hooped together with it. This whole "sandwich" can be sprinkled with temporary spray adhesive if you want.  I've seen 2 types of recommendations on where to put a stabilizer. Some experts say that the stabilizer should be placed between the base and the appliqué fabric. And some advocate for the standard way – the stabilizer backing. 
    I think that in case the stabilizer is put between the fabrics, you'll need a water-soluble or a fusible stabilizer. This method is suitable for the clothes so that the item is soft and pleasant to wear.  One way or another, you need to choose the stabilizer in each individual case. And your decision will be governed mainly by the design.  The layers of fabric are joined together with a decorative stitch. The machine should stop so that the base fabric could be trimmed right in the hoop, in order to expose the appliqué fabric underneath.  After unhooping, the item is taken out and the extra fabric on the wrong side is trimmed as well.  If the design contains a large number of stitches on top of the appliqué, the appliqué fabric is better to be trimmed before the base one to avoid lumps. In that case, the hoop is taken off the machine, turned the wrong side up and the appliqué fabric is trimmed along run/zigzag/satin stitch on the right side, at a distance of several mm. The hoop is placed back into the machine, and the embroidery is finished.  In the end, trimming takes two times as much as in traditional appliqué. But it contains much fewer stitches.  Choosing the image and preparation 
    Designs that are good for traditional patched appliqué, are suitable for reverse appliqué as well. 
    Digitizing of a reverse appliqué 
    Dense fabrics not prone to fray  Create an outline for sewing up our "sandwich": the main fabric + appliqué fabric + stabilizer. Several running stitches or a bean stitch with a low stitch length are used for the outline.  But you can use a motif stitch, too.  Insert a stop so that the hoop will come out for trimming. Every type of machine has its own way of adding commands.  If you only have 1 layer of the appliqué fabric, you can trim the base fabric after unhooping. If there are several, you'll need to trim right in the hoop.  Fraying fabrics 
    Create an outline for sewing up our "sandwich": the main fabric + appliqué fabric + stabilizer. Several running stitches or a bean stitch with a low stitch length are used for the outline.  On top of this stitch place a low-dense zigzag, satin or motif stitch. This is necessary to prevent fraying.  Insert a stop so that the hoop will come out for trimming. The method depends on the machine type. If you only have 1 layer of the appliqué fabric, you can trim the base fabric after unhooping. If there are several, you'll need to trim right in the hoop. 

    Using metallic threads in machine embroidery

    By Irina, in Machine embroidery materials and technology, , 0 comments, 2,959 views
    Original text by Marina Belova 
    I really don't know why people think that metallic threads are trickier than rayon or polyester ones. In my opinion, they hold no secrets. 
    Traditionally, a metallic thread is a nylon or a polyester thread wrapped in a metal foil, which makes the embroidery shiny. 
    To me, it is much easier to use than ordinary threads. Besides, a metallic thread of a high-quality is more durable and breaks less than, for example, a rayon one. It's only considerable disadvantage is that it is more expensive compared to the ordinary threads. 
    But the outer look is excellent. 
    There are several recommendations on working with these threads and creating machine embroidery designs for them. 
    To embroider with metallic threads you need to use longer stitches everywhere in the design: in fills, running stitches and underlays. The stitch length should be no less than 3 mm.  Perhaps, you should also reduce the density of thedesign by 5–15% compared to the default one for #40 threads.  You can use up to 3 layers in your design.  #75/11-80/12 needles with large needle's eye are preferable for #40 metallic threads. I don't know ho w such needles on home embroidery machines are called, but there on the industrial machines there fall in a separate category. Schmetz has DBx7ST, for example.  I've often seen a recommendation to reduce the machine embroidery speed to 700-750 rpm. But if you use a high-quality thread, it works perfectly at 800-900 rpm.  A metallic thread is prone to twisting, therefore, it would be better to cover a spool with a special net before embroidery. My American colleagues even advise using an ordinary stocking with the toe cut off if you don't have a net. For this purpose, you may also try to tighten the tension.
    Curiously enough, it contradicts the recommendations to loosen up the tension in general. Therefore, you need to do a test piece every time you use metallic threads of a brand you haven't encountered before.  Also, to prevent twisting, you can run the thread through a piece of foam plastic.  You need to use a thinner lower thread to match the metallic thread on a spool. For example, Amann Isa 180.  To avoid excessive thread breakage, use a stabilizer made of natural (cotton) and synthetic (rayon) fibers, like Madeira E-Zee. This will help to reduce friction so that the needle didn't heat up so much.  You can also use the ordinary wax paper in the hoop together with the stabilizer.  Not very long ago I came across a hilarious recommendation: deep-freeze your metallic threads several minutes immediately prior to the embroidery. I'll try that one, see if it works in any way. I'm curious.  Anybody who wants to know what effects can be achieved with thick metallic threads, welcome here. 

  • Top Downloads

  • Recently Browsing   0 members

    • No registered users viewing this page.
×
×
  • Create New...